|
KIT: |
Tamiya 1/48 FM-2 Wildcat |
|
KIT # |
61034 |
|
PRICE: |
$26.00 |
|
DECALS: |
See review |
|
REVIEW & |
|
|
NOTES: |
Conversion |
|
HISTORY |
It had been apparent from the outbreak of the Pacific War that the Navy's standard fleet defense fighter, the F4F Wildcat, was outperformed by almost all its prospective opponents. Indeed, it was only superior US tactics and the loss of the majority of the IJN's prewar-trained aviators at the Battle of Midway that allowed the Wildcat to hold its own as it did. The A6M2 Model 21 was shown to be faster, out-climbing and out-maneuvering the Wildcat when it was flown against the captured Aleutian Zero, and the Zero could hold its own with the Wildcat in a dive. All this resulted in the Navy putting even more emphasis on replacing the Wildcat with the F6F-3 Hellcat as soon as possible.
By the fall of 1942,
production of the Wildcat - which was seen as a useful aircraft for the
composite squadrons operating from escort carriers that were to provide
anti-submarine cover and close air support for coming invasions - was
transferred to General Motors Eastern Aircraft Division, as the FM-1; this
airplane differed from the standard F4F-4 Wildcat in reverting to the 4-gun
armament of the F4F-3, which Navy pilots had preferred since it gave a longer
burst of fire with the same amount of ammo. 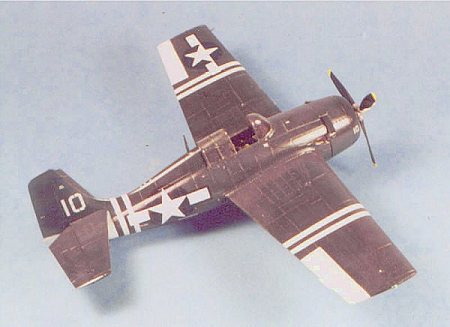
Grumman was not completely through with the Wildcat, however. The possibility of developing a lighter version intended specifically for operation from the short decks of the escort carriers had been under consideration since before production was taken over by General Motors. The main difference would be substitution of the 1,200 h.p. Pratt and Whitney R-1830-86 that powered the F4F-4 with a Wright R-1820-56 Cyclone equipped with a single-stage two-speed supercharger and new forged cylinder heads. This version of the Cyclone provided 1,350 h.p., an increase of 150 h.p., and was 230 lbs. lighter than the R-1820. The XF4F-8 as it was called had 4 guns like the FM-1, and was visually distinguished after the second prototype by an enlarged rudder and vertical stabilizer to counteract the increased torque of the more powerful engine. Other weight reduction efforts were made in the detail design, and the airplane was a total 530 lbs. lighter than the F4F-4. Initial climb rate was nearly doubled, service ceiling was boosted from 34,000 to 36,400 ft., and the airplane was some 10 m.p.h. faster than its predecessor. All in all, this was a "wilder" Wildcat. It went into production as the FM-2 at General Motors Eastern Aircraft plant in early 1943; between then and August 1945 when the production line shut down, 4,437 FM-2s were delivered, making it the most numerous Wildcat of all.
Combat:
In the Pacific, the FM-2
started showing up on escort carrier decks in the fall of 1943 as the Central
Pacific offensive began heading toward its final destination of the Japanese
Home Islands. During the invasions of the Marshall and Caroline Islands, and
finally the Marianas, ten more Wildcat pilots would become aces. The FM-2
provided sterling service in the Second Battle of the Philippine Sea on October
24, 1944, when FM-s from task forces Taffy Two and Taffy Three, under attack by
the Japanese surface forces that broke through the San Bernardino Strait, flew
so hard against the enemy that the Japanese Admiral concluded he was up against
the fast carriers of the Third Fleet and turned tail just as he was about to be
turned loose among the invasion forces. FM-2s flew and fought at Iwo Jima and
later Okinawa where they scored their final aerial victories of the war.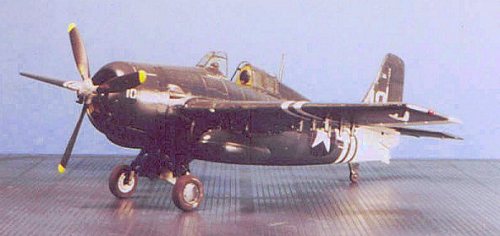
In the Atlantic, the 340 of the wilder Wildats served with the Fleet Air Arm as the Wildcat VI, with their first action being support of the invasion of Southern France in August 1944. In April 1945, four Wildcat VIs were intercepted off the Norwegian coast by four Messerschmitt Bf-109G-10s of JG5 - the "outperformed" Wildcats promptly shot down all four Germans, the final victories scored by the Wildcat in British service. FM-2s served in the anti-submarine role aboard escort carriers of both the US Navy and Royal Navy.
Today, the most-common surviving Wildcats are FM-2s, and I consider myself fortunate to have made friends with two of them out at the Planes of Fame Museum in Chino.
|
THE KIT |
Tamiya's F4F-4 Wildcat is one of the very best kits from that company, with the best and most accurate surface detail of any 1/48 plastic model airplane I have run across. Out of the box, a novice modeler can create a very good-looking model. While there are aftermarket sets for the cockpit, it's not something one has to have in order to get an accurate-looking cockpit. I do however strongly recommend obtaining the Squadron (Falcon) vacuformed canopy for the Tamiya kit, as this allows you to pose the canopy in the open position, which is not really possible with the kit canopy due to its thickness.
|
CONSTRUCTION |
The Conversion:
No one has made a good resin conversion for the FM-2, so if a modeler wants to turn the F4F-4 into an FM-2, they are going to have to break out the "modeling skills" from the tool box. This conversion is not as difficult as it seems.
The Wing:
The big difference is in the wing. The under wing oil coolers are gone, and the outer machine gun, with its gun bay cover, shell ejection chute, and other associated bits. Doing all this will entail sanding off some of that beautiful surface detail and then rescribing it, which is off-putting to some modelers who doubt their skill at this.
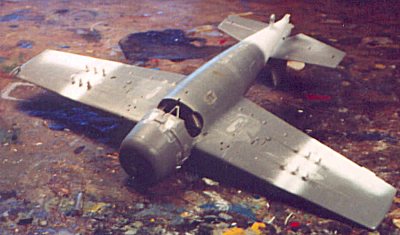 The first thing to do is
sand off the gun bay cover on the upper wing surface. I used a small sanding
stick, and kept it as tight to the area as possible, so that I didn't sand off
more detail than was absolutely necessary. The next area to sand is the
underwing, to take off the ammo loading door for the outboard weapon, and take
off the bulged fairings aft of the shell ejection chute. Then you must sand
down the area of the oil cooler so it is smooth. I filled in the shell ejection
chute and the area inside the oil cooler with cyanoacrylate that I hit with
accelerator; I then sanded smooth again. When all this was done, I covered all
these areas with Mr. Surfacer 500 and let it set overnight to get hard.
The first thing to do is
sand off the gun bay cover on the upper wing surface. I used a small sanding
stick, and kept it as tight to the area as possible, so that I didn't sand off
more detail than was absolutely necessary. The next area to sand is the
underwing, to take off the ammo loading door for the outboard weapon, and take
off the bulged fairings aft of the shell ejection chute. Then you must sand
down the area of the oil cooler so it is smooth. I filled in the shell ejection
chute and the area inside the oil cooler with cyanoacrylate that I hit with
accelerator; I then sanded smooth again. When all this was done, I covered all
these areas with Mr. Surfacer 500 and let it set overnight to get hard.
I sanded the Mr. Surfacer smooth and followed up with some Mr. Surfacer 1000 to get as smooth a finish as possible. When this was done, I then took a ruler and drew the rivet lines across the sanded areas. I measured the distance between rivets in the original surface detail and marked that off. I then tapped each spot with the tip of a new #11 Xacto blade, to recreate the rivet detail. I then rescribed the panel lines where necessary, and assembled the wing. Don't worry if your new "engraved rivets" don't look quite like the originals - we're going to deal with that problem later, and it's an easy solution.
Since I already knew I was going to do a late-production FM-2 with rocket rails, I lined out the attachment points, drilled holes, and glued in the leftover rocket rails from a Hasegawa Hellcat kit.
The next thing to deal with is the engine cowl. I filled in all the flap lines with cyanoacrylate, sanded them smooth, then covered them with Mr. Surfacer 500. I also cut out the area around where the exhausts were in the lower hemisphere so they were square, and glued Evergreen sheet in position, which was also then covered with Mr. Surfacer. I sanded off the lip intake atop the cowl. After the Mr. Surfacer was hard and I sanded it smooth, I then cut out the two cowl flaps for the FM-2. I used Evergreen sheet for the replacements, and posed them in a slightly-opened position.
I then cut out the four areas of the ejection exhausts on the upper and lower fuselage parts, and used Evergreen sheet to create those exhaust areas.
 While all that was
setting up I assembled the cockpit. For the FM-2, the full-floor Tamiya cockpit
is correct, so all one needs to do is assemble it. Remember that, unlike
Grumman-built Wildcats that had Bronze-Green cockpits, the General Motors
airplanes had the cockpit painted Interior Green. I added Eduard seatbelts and
assembled the cockpit into the fuselage sub-assembly.
While all that was
setting up I assembled the cockpit. For the FM-2, the full-floor Tamiya cockpit
is correct, so all one needs to do is assemble it. Remember that, unlike
Grumman-built Wildcats that had Bronze-Green cockpits, the General Motors
airplanes had the cockpit painted Interior Green. I added Eduard seatbelts and
assembled the cockpit into the fuselage sub-assembly.
The next conversion is the vertical fin and rudder, which needs to be extended 5/32". I used some thicker Evergreen sheet, sanded to fit the kit parts, glued them in position, covered them with Mr. Surfacer, and when it was hard I used a rat-tail file to get a surface for the fabric-covered rudder that looked like the surrounding areas.
For the Cyclone engine, I used an R-985 from an old Monogram T-6. It's not completely right, but once in position inside the cowl it looks just fine. Those who are anal about such things can get a Cyclone from a Monogram B-17 kit or buy an aftermarket resin engine. You also need to cut out the cooler ducts from the inner cowling.
The final modification is the propeller. the FM-2 used uncuffed propeller blades. I used the prop blades from an Accurate Miniatures Allison P-51, since they are incorrect for any Allison P-51 other than the P-51A. You keep the original Tamiya hub, which can be modified with a longer and more pointed hub cap that you can make from the rocket head out of the Hasegawa Hellcat kit - or you can elect to leave it alone, which is what I did. Check the airplane you are modeling to determine the proper hub cap.
I used Evergreen tubing for the exhausts, glued them in position, then glued the wing sub assembly to the fuselage sub-assembly, and attached the engine and cowling. We were ready for the paint shop.
|
PAINT & DECALS |
Painting:
All Wildcats, regardless of their camouflage finish, have a wheel well that is light grey. I used Gunze-Sanyo Light Gull Grey for that, painting the lower parts of the landing gear and the inner surfaces of the gear doors flat black. The landing gear was set aside for assembly in the model later.
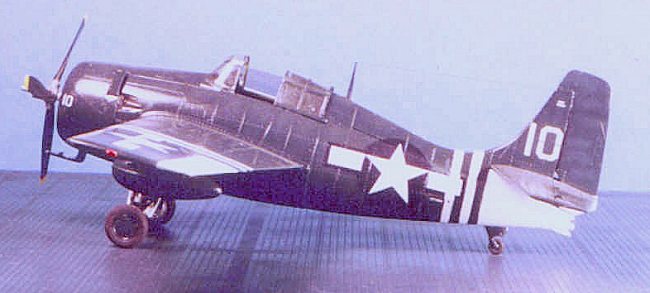
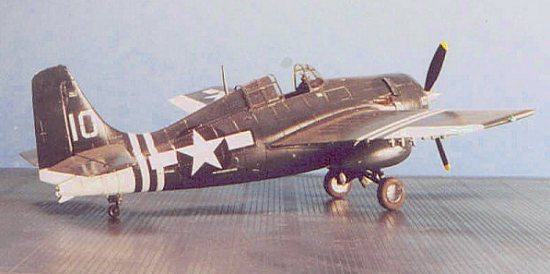
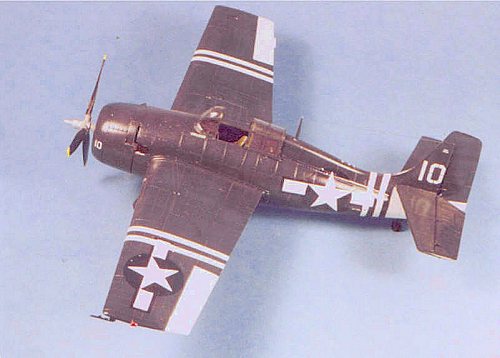 I had decided to do an
airplane from VC-88 aboard the USS "Hoggat Bay" in the Pacific around the time
of the Okinawa campaign. I chose this scheme because while it is overall Glossy
Sea Blue, a nice dark color that will keep the eye from completely seeing all
the rescribed wing detail, it also has white stripes around the wings and
fuselage, as well as white ailerons and a white rear fuselage; this different
color also helps trick the eye - particularly since the white wing stripes go
over the area of the outer wing gun that was rescribed - so that the original
detail and replacement detail look fine. Unless you are really good at such
rescribing, I strongly suggest you do a GSB Navy Wildcat or a camouflaged
British Wildcat - do not do the grey/white Atlantic scheme, as those colors are
light enough and monochromatic enough to let the viewer study the rescribed
detail.
I had decided to do an
airplane from VC-88 aboard the USS "Hoggat Bay" in the Pacific around the time
of the Okinawa campaign. I chose this scheme because while it is overall Glossy
Sea Blue, a nice dark color that will keep the eye from completely seeing all
the rescribed wing detail, it also has white stripes around the wings and
fuselage, as well as white ailerons and a white rear fuselage; this different
color also helps trick the eye - particularly since the white wing stripes go
over the area of the outer wing gun that was rescribed - so that the original
detail and replacement detail look fine. Unless you are really good at such
rescribing, I strongly suggest you do a GSB Navy Wildcat or a camouflaged
British Wildcat - do not do the grey/white Atlantic scheme, as those colors are
light enough and monochromatic enough to let the viewer study the rescribed
detail.
Decals:
The U.S. National Insignia and the aircraft numbers came from the decal dungeon, as did the white stenciling.
Final Assembly:
I attached the landing gear in position, which takes a bit of fiddling but is not difficult, then attached the prop and glued the vacuformed canopy in position with white glue. I weathered the airplane with some greyed-out exhaust stains. At the moment I haven't attached any rockets underwing, though I probably will sometime soon.
|
CONCLUSIONS |
I now have every version of the Wildcat used other than the F4F-7 and the French G-36. The F4F may have been outperformed technically by its opponents, but few aircraft of the Second World War were better-flown by their pilots, and so far as the U.S. Navy is concerned, no other fighter made as significant a contribution to victory in the Pacific than the little Wildcat. It's my favorite Navy fighter.
If you would like your product reviewed fairly and quickly by a site that has thousands of visits a day, please contact me or see other details in the Note to Contributors.