|
KIT: |
Eduard P-39Q Airacobra |
|
KIT # |
|
|
PRICE: |
$24.95 |
|
DECALS: |
See Review |
|
REVIEWER: |
|
|
NOTES: |
Cutting Edge P-39
cockpit set (# unk) |
|
HISTORY |
The P-39 came early to the New Guinea campaign, with the first aircraft arriving at Port Moresby's Five Mile Drome with the 35th Pursuit Group in April 1942. While the P-39 - flown by inexperienced pilots and crippled by the lack of supercharging - was unable to compete successfully against the well-trained IJN veterans of the Tainan Air Group based across the island at Lae, they managed to contribute enough to the defense of Port Moresby to keep it in Allied hands during the desperate summer of 1942, and allow it to become the base for reconquest of New Guinea.
 As soon as he could
get other, more capable fighters, General George Kenney took the P-39s off
first-line air defense operations. The airplane had excellent performance at
low altitude, and had made a name for itself in ground support for troops in the
retaking of Buna. When the 82nd Tactical Reconnaissance Group arrived in the
theater in the summer of 1943, equipped with the P-39Q-6, they were immediately
put to work in the "leapfrog" campaign up the back of New Guinea that would
result in the complete expulsion of the Japanese from the island by the summer
of 1944.
As soon as he could
get other, more capable fighters, General George Kenney took the P-39s off
first-line air defense operations. The airplane had excellent performance at
low altitude, and had made a name for itself in ground support for troops in the
retaking of Buna. When the 82nd Tactical Reconnaissance Group arrived in the
theater in the summer of 1943, equipped with the P-39Q-6, they were immediately
put to work in the "leapfrog" campaign up the back of New Guinea that would
result in the complete expulsion of the Japanese from the island by the summer
of 1944.
The P-39Q-6 was a SWPA field modification of the standard P-39Q-5, with a camera mounted in the radio compartment for oblique photo coverage at low altitude. The tactics of the unit were based on those of the Mustang-equipped RAF squadrons in Europe, flying missions at extreme low altitude, where the performance of the P-39 was sufficient to meet the needs of the mission.
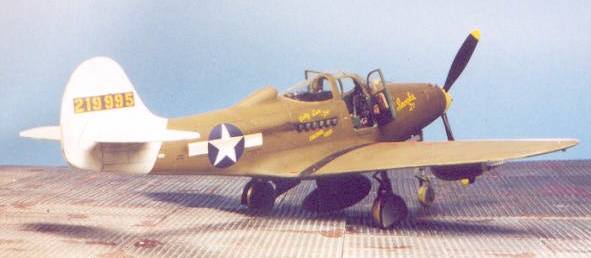
Among the pilots in the unit was 1st Lt. William A. Shomo, of Fresno, California. Naming his airplanes "Snooks," his nickname for his wife, Shomo was an accomplished tactical reconnaissance pilot. Tac-R meant staying well away from enemy aircraft, which were met with increasing lack of frequency during 1943-44, so he never had the chance in New Guinea to establish a record as a fighter pilot. That would take place later, in the Philippines, when Captain Shomo - flying an F-6D Mustang instead of a P-39 - would shoot down a Betty and six escorting fighters in one engagement, earning the Medal of Honor as a result.
|
THE KIT |
 The arrival of
Eduard's P-39 Airacobra series last year signaled that this company is now able
to compete in terms of kit quality with anything released by Tamiya or
Hasegawa. Here is a preview of the kit done
here at Modeling Madness. Check the
Kit Review section for other reviews.
The arrival of
Eduard's P-39 Airacobra series last year signaled that this company is now able
to compete in terms of kit quality with anything released by Tamiya or
Hasegawa. Here is a preview of the kit done
here at Modeling Madness. Check the
Kit Review section for other reviews.
The Aftermarket Sets:
Cutting Edge has recently released a resin cockpit designed by Scott Battistoni for the Eduard P-39. While the standard cockpit offered by Eduard is certainly acceptable, and in the profipack version includes photo-etch detail including seat belts, this resin cockpit is fully up to the standards of other cockpits Scott has created, such as the excellent True Details P-51D cockpit or the Cutting Edge F-84 cockpit.
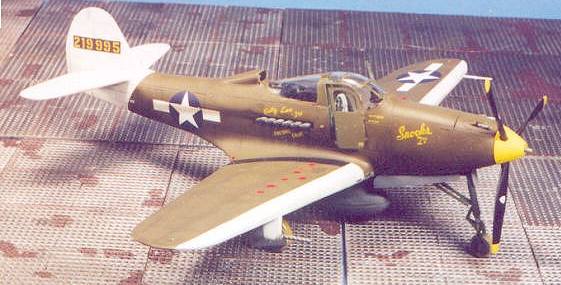
Cutting Edge has also released four new sheets of decals for the P-39 in all its various guises and in the markings of all the air forces with which it flew during World War II. As is usual with their sheets, the decals are thin and well-printed. I did use the tail serial number from the ProModeler P-39Q sheet for Shomo's airplane, because it uses the correct "Bell font" for the numbers; the rest of the Cutting Edge sheet for Shomo's airplane is very accurate.
|
CONSTRUCTION |
My only complaint about the P-39 kit as it comes out of the box is that Eduard molded the trailing edge of the wing a bit thick. Therefore, the first thing I do with one of these kits is sand the upper and lower wing parts to thin down the trailing edge when they are glued together.
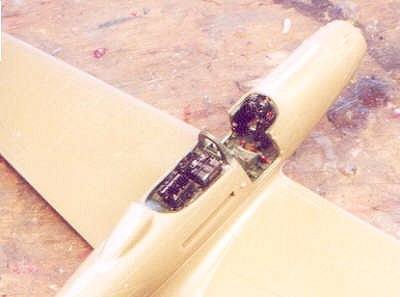 Because I was using
the Cutting Edge resin cockpit, I also sanded the inside of the fuselage in the
cockpit area so it was a bit thinner. I have found frequently that when you are
using a resin cockpit, it is easy to end up with the fuselage being too wide as
it is squeezed around the cockpit; the result - when building a model like this
with a one-piece lower wing, will be loss of dihedral as you squeeze the wing
into position with the fuselage. To me, there is nothing more
ridiculous-looking than a Mustang, a Spitfire or a Bf-109 with no dihedral; it's
the mark of a modeler who isn't paying attention to detail.
Because I was using
the Cutting Edge resin cockpit, I also sanded the inside of the fuselage in the
cockpit area so it was a bit thinner. I have found frequently that when you are
using a resin cockpit, it is easy to end up with the fuselage being too wide as
it is squeezed around the cockpit; the result - when building a model like this
with a one-piece lower wing, will be loss of dihedral as you squeeze the wing
into position with the fuselage. To me, there is nothing more
ridiculous-looking than a Mustang, a Spitfire or a Bf-109 with no dihedral; it's
the mark of a modeler who isn't paying attention to detail.
I painted the cockpit parts Bell Green before assembling them. "Bell Green" is a medium green with a distinct blue tone, very similar to the contemporary Euro-1 Green, which was used for the cockpit, wheel wells, landing gear and gear door interiors on the P-39. I confirmed this color when I saw the P-39N recently restored by Yanks Air Museum out at Chino airport; they have a reputation for "getting it right" when it comes to restoring an airplane to original-factory condition. When that was dry, I painted the seat belts white and detailed them with Testors ModelMaster Aluminum. I finished off by highlighting the cockpit with thinned Tamiya "Smoke" brushed over various areas. When that was dry, I gave the cockpit a coat of Dullcote and installed it.
Other than this, assembly of the kit was straightforward as described in other reviews.
|
PAINT & DECALS |
Painting:
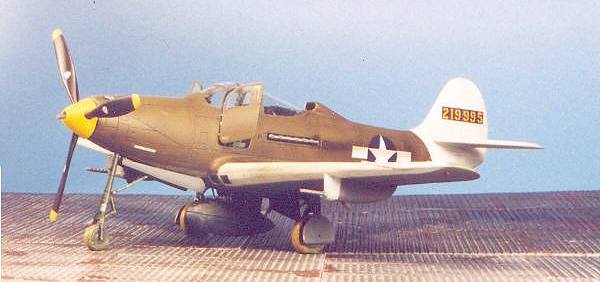
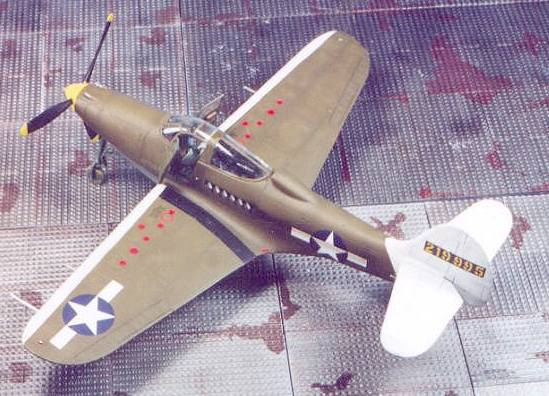
After first "pre-shading" the model with flat black over the panel lines, I applied a thin coat of flat white to the tail surfaces and leading edges of the wings for the SWPA ID markings. Since this was roughly applied in the field over standard camouflage, I did not want a smooth finish here. When this had dried, I masked off these areas and painted the rest of the model with Gunze-Sanyo "Olive Drab I" on the upper surfaces and Tamiya "Neutral Grey" for the lower, with each suitably "faded". I gave the model a coat of Future and was ready for decals.
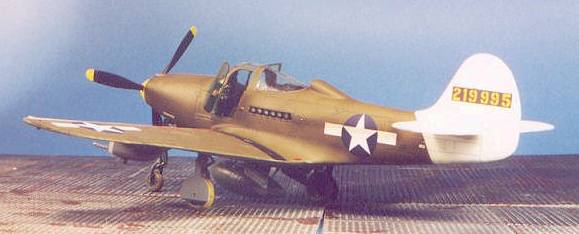 Decals:
The Cutting Edge decals went down under a coat of Micro-Sol and dissolved into the painted surface. I used the kit stenciling decals for other markings.
Final Finish:
After washing off dried decal solvent and applying another coat of Future, I first picked out some "chipping" in various areas of the airplane for weathering and made exhaust staining by airbrushing Tamiya "Smoke." When that was dry, I applied several light coats of thinned Testors Dullcote. I then attached the landing gear and prop/spinner, and attached the cockpit doors in the open position to give maximum display to the Cutting Edge cockpit.
|
CONCLUSIONS |
The Eduard P-39 is one of the best kits released recently, and looks good in just about any set of markings or camouflage you can apply. The resin cockpit gives a level of "realism" to the overall final effect that none of the other three in my collection have.
If you would like your product reviewed fairly and quickly by a site that has well over 100,000 visitors a month, please contact me or see other details in the Note to Contributors.