|
KIT # |
8086 |
|
PRICE: |
$34.95 |
|
DECALS: |
five aircraft |
|
REVIEWER: |
|
|
NOTES: |
Profipack |
|
HISTORY |
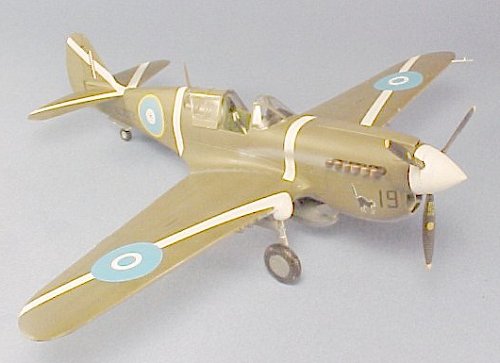
The P-40M was similar to the preceding P-40K series, with the primary visual difference being a cooling inlet on each side of the nose ahead of the exhaust stacks, and a radio antenna mast. Like the late-series P-40K, it was powered by an Allison V-1710-81 engine. The 600 P-40Ms produced were almost all destined for Lend-Lease, and the airplane was known in the RAF and the Commonwealth Air Forces with whom it served as the Kittyhawk III.
The RNZAF and the Kittyhawk III.
The RNZAF had its first contact with the Curtiss P-40 when 80 P-40E-1 "Kittyhawk Is" were delivered in April and May 1942. 14, 15, and 16 Squadrons were formed on the Kittyhawks and undertook training through the rest of the year.
 15 Squadron was the
first to enter combat on Guadalcanal, arriving at Henderson field on April 8,
1943, the day after the last great Japanese raid on the island, in which over 40
Japanese aircraft had been shot down by the Navy and Marine defenders. 15
Squadron undertook escorts of RNZAF Hudson reconnaissance flights in the
Solomons, and scored their first success on May 6, when the squadron commander
shot down an A6M-2N during a rainstorm.
15 Squadron was the
first to enter combat on Guadalcanal, arriving at Henderson field on April 8,
1943, the day after the last great Japanese raid on the island, in which over 40
Japanese aircraft had been shot down by the Navy and Marine defenders. 15
Squadron undertook escorts of RNZAF Hudson reconnaissance flights in the
Solomons, and scored their first success on May 6, when the squadron commander
shot down an A6M-2N during a rainstorm.
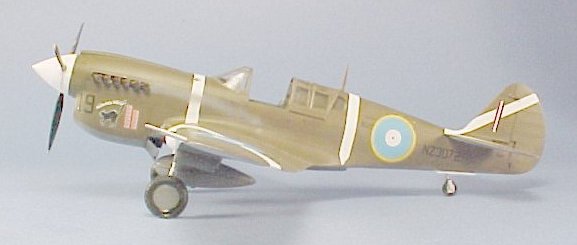
The tour of duty for a fighter squadron in the Solomons was six weeks at a time, and 15 Squadron was relieved by 14 Squadron in early June. 15 Squadron had taken part in the great fighter air battle of June 7, when the Kiwis claimed four of the 23 Zero-sens shot down that day. 14 Squadron began its score on June 11, when 25 Zeros were shot down. Of the six claims by 14 Squadron, two were by Flt. Lt. Geoff B. Fisken flying NZ3072 "Wairapa Wildcat," who was already an ace - having been credited with six Japanese aircraft over Singapore in January and February 1942, while flying the Brewster Buffalo. Five days later, the largest of the three raids - 100 Zeros and Vals from the "Junyo" air group - were intercepted by 74 Allied fighters; the Kiwis scored five when they dove into a big dogfight over Savo Island involving 33 Zeros.
With the invasion of New Georgia the following month, the New Zealanders had the opportunity to meet the Japanese on several occasions. On July 4, Flt. Lt. Fisken claimed two Zeros and a Mitsubishi G4M-2 "Betty," the only multi-engine Japanese aircraft claimed by a New Zealand pilot in the Solomons. This brought Fisken's Solomons score to 5, and with his 6 previous kills over Singapore, he became the top-scoring Commonwealth fighter pilot in the Pacific War, with a total of 11.
 As the Allied air
forces moved into New Georgia and began the campaign that would end with the
invasion of Bougainville in October, the RNZAF Kittyhawks became the favorites
of the Dauntless and Avenger crews to whom they provided close escort on the
Bougainville raids, and later on the missions against Rabaul once airfields were
established on Bougainville in November. Unfortunately, this role as close
escort did not allow the Kiwi pilots much opportunity to score against the
Japanese, who opposed nearly every mission. When the Kiwis were released for
fighter sweeps on two occasions during the Rabaul campaign they demonstrated
their reputation for toughness, scoring strongly against the Japanese fighters
despite the fact they were mounted in the "inferior" P-40. Following the
withdrawal of the IJN fighter units from Rabaul on February 28, 1944, the first
Kittyhawk fighter-bomber mission was flown with 500-lb bombs on March 10, 1944.
On March 21, 1944, the RNZAF Kittyhawk Wing began carrying 1,000-lb bombs on
missions to Rabaul.
As the Allied air
forces moved into New Georgia and began the campaign that would end with the
invasion of Bougainville in October, the RNZAF Kittyhawks became the favorites
of the Dauntless and Avenger crews to whom they provided close escort on the
Bougainville raids, and later on the missions against Rabaul once airfields were
established on Bougainville in November. Unfortunately, this role as close
escort did not allow the Kiwi pilots much opportunity to score against the
Japanese, who opposed nearly every mission. When the Kiwis were released for
fighter sweeps on two occasions during the Rabaul campaign they demonstrated
their reputation for toughness, scoring strongly against the Japanese fighters
despite the fact they were mounted in the "inferior" P-40. Following the
withdrawal of the IJN fighter units from Rabaul on February 28, 1944, the first
Kittyhawk fighter-bomber mission was flown with 500-lb bombs on March 10, 1944.
On March 21, 1944, the RNZAF Kittyhawk Wing began carrying 1,000-lb bombs on
missions to Rabaul.
The last RNZAF aerial claim of the war was in February 1944 over Rabaul, and the total score of the Kittyhawk Wing stood at 99. That May, the first RNZAF squadron exchanged their Kittyhawks for F4U-1A Corsairs, and the Kittyhawk left New Zealand service.
|
THE KIT |
This P-40M kit was originally released by Mauve in 1995, shortly after the release of their P-40N. The kits heralded another Japanese model company's entry into world-wide plastic model production, but unfortunately for Mauve their production facility was destroyed in the Kobe-Osaka earthquake of that year.
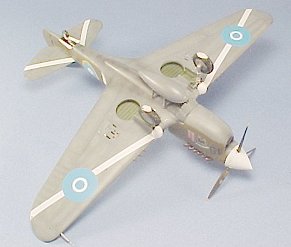
Three years ago, Eduard obtained the molds of the Mauve kits and released the P-40N as a "Profipack" kit with a resin cockpit and radiator section, and photo-etch details. The P-40M is the second release and features the same items as the P-40N, though with the different, early pilot's seat in the resin cockpit. The kit also provides decals for five aircraft: RAAF and SAAF Kittyhawk IIIs in desert camouflage, G.B. Fisken's "Wairapa Wildcat" Kittyhawk III (the coverart airplane), a Red Air Force P-40M, and a P-40M of the Brazilian air force. The decals sheet is in two sections, one with the RAAF and SAAF aircraft, and a larger sheet with the other three. I have heard several complaints that the kits only have the smaller sheet for the desert-camouflaged airplanes. My review kit had all the decals. In my experience, Eduard is good about providing replacement parts quickly, so if your kit does not have all the decals, you should contact them at their website and request they provide the missing sheet.
|
CONSTRUCTION |
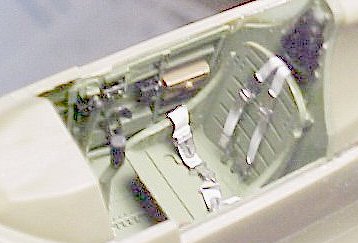 Construction starts
with the cockpit and the radiator parts. There is very good photo-etch detail
for the radiators, as well as for various bits in the cockpit. Unfortunately,
the resin radiator does not fit into the fuselage right when assembled without a
lot of difficulty; once in and with the fuselage assembled, none of the
beautiful detail can be seen. My advice is to use the plastic parts for this,
since they do fit right and you will not see that they are not totally accurate
once the model is built. The cockpit goes together easily and looks good.
However, before assembling it, cut off the sides of the thick resin floor
outboard of where the cockpit walls are attached, or you will have great
difficulty fitting the wing with its resin wheel wells to the assembled
fuselage. I used the photo-etch instrument panel, and the photoetch seatbelts.
Otherwise I left the other bits on the fret; they don't improve things that
much and my experience is they will be knocked off within months as it is - and
will not be found to repair. The cockpit looks as good as anything from True
Details if you do this.
Construction starts
with the cockpit and the radiator parts. There is very good photo-etch detail
for the radiators, as well as for various bits in the cockpit. Unfortunately,
the resin radiator does not fit into the fuselage right when assembled without a
lot of difficulty; once in and with the fuselage assembled, none of the
beautiful detail can be seen. My advice is to use the plastic parts for this,
since they do fit right and you will not see that they are not totally accurate
once the model is built. The cockpit goes together easily and looks good.
However, before assembling it, cut off the sides of the thick resin floor
outboard of where the cockpit walls are attached, or you will have great
difficulty fitting the wing with its resin wheel wells to the assembled
fuselage. I used the photo-etch instrument panel, and the photoetch seatbelts.
Otherwise I left the other bits on the fret; they don't improve things that
much and my experience is they will be knocked off within months as it is - and
will not be found to repair. The cockpit looks as good as anything from True
Details if you do this.
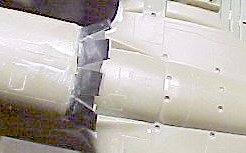
 You must put in a
spreader bar fore and aft of the cockpit after you have assembled the fuselage
halves, or you will turn the air over your workbench a deep and impressive shade
of dark purple when you go to fit the wing sub-assembly to the fuselage
sub-assembly. I cut pieces of sprue 3/4" long and mounted them as you see in the
accompanying photograph.
You must put in a
spreader bar fore and aft of the cockpit after you have assembled the fuselage
halves, or you will turn the air over your workbench a deep and impressive shade
of dark purple when you go to fit the wing sub-assembly to the fuselage
sub-assembly. I cut pieces of sprue 3/4" long and mounted them as you see in the
accompanying photograph.
As to the wings: you
get two resin wheel wells which don't really improve things since the P-40M did
not use the canvas boot and instead had the open wheel well. I found I had two
wheel wells for the same side (they're tapered to fit in the wing). At that
point I used the plastic parts since you can't see the wheel well walls anyway
once the wing is assembled. (Are you starting to see why I have this policy of
"if you 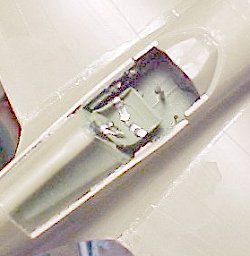 can't see it, I
didn't do it"?? These resin parts are not that useful in the first place.)
can't see it, I
didn't do it"?? These resin parts are not that useful in the first place.)
I then assembled the wing to the fuselage. The fit is not great, but if you have put in the spreaders as I advise, it goes in and you will get the wing at the right dihedral. Check the dihedral against drawings like those in the Squadron-Signal "P-40 In Action" since it is very easy to apply too much dihedral here. If you did as I suggested with the spreader bars, you will only need a thick application of Mr. Surfacer to take care of the upper wing/fuselage joint and smooth it properly. I also attached the horizontal stabilizers at this time.
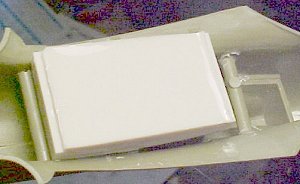
The rear canopy is a particular pain in the patootie on this kit. You need to assemble the interior with the "scallops," then glue the clear part on. Use the Eduard express masks before you glue this in position. Unfortunately, this part does not fit on any panel line; you need to apply Mr. Surfacer and very carefully sand down so there is no seam left here or the model will look completely wrong. I then applied Mr. Surfacer to all the rest of the joint seams, and sanded smooth when it was dry.
 I then attached the photo-etch cowl flaps. These are actually too small, don't
fit right, and the detail they provide is - once again! - nothing you will see
once the model is assembled. I went ahead and used these, but about a week
after I took these photos of it, I came to the conclusion they looked terrible,
and replaced them with scratchbuilt cowl flaps made from .010 Evergreen sheet,
which had been my solution to the Mauve kits I had made when this kit was first
released. I suggest you do the same - cutting them out and gluing them on will
take far less time than all the bending and fitting and re-fitting and further
fitting all to no final good purpose with the photoetch flaps. The model
was now ready for paint.
I then attached the photo-etch cowl flaps. These are actually too small, don't
fit right, and the detail they provide is - once again! - nothing you will see
once the model is assembled. I went ahead and used these, but about a week
after I took these photos of it, I came to the conclusion they looked terrible,
and replaced them with scratchbuilt cowl flaps made from .010 Evergreen sheet,
which had been my solution to the Mauve kits I had made when this kit was first
released. I suggest you do the same - cutting them out and gluing them on will
take far less time than all the bending and fitting and re-fitting and further
fitting all to no final good purpose with the photoetch flaps. The model
was now ready for paint.
|
PAINT & DECALS |
 Painting:
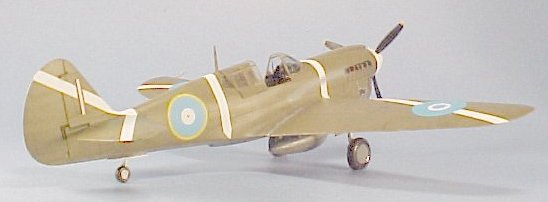
I had decided to do Fisken's airplane, so I pre-shaded it, then painted the upper surfaces with Gunze-Sanyo "Olive Drab I", fading the paint after initial application by adding in various drops of white and yellow and repainting various areas. The lower surfaces were painted with Tamiya "Neutral Gray." The spinner was painted white. The cockpit had previously been painted Interior Green.
Decals:
Eduard provides the white identification stripes used by the RNZAF. These have been mistakenly shown by the "drips under pressure" to have had red borders, due to incorrect analysis of photos that show the stripes were masked off and had overspray past the tape, giving a "dark stripe" on the edge. Fortunately, Eduard provides the red "edge stripes" separately. Toss them in the decal dungeon - you'll find a use for them someday.
Unfortunately, the national insignia decals are not thoroughly opaque. I cut some circles from white decal sheet, applied them on the wings over the white stripes, then applied the decals over that; otherwise, you will have "light-dark color bleed" in the white portions of the insignia. Other than that, the decals went on easily, snugged down under a coat of Micro-Sol, and provided no technical difficulties.
Final Assembly and Finish:
Fortunately, I had a Squadron P-40M vacuform canopy left over from previous Mauve kits, and used that. I suggest you get one, too. The kit-glass is too thick to pose open, which is a shame, since you have that nice resin cockpit. The vac canopy can be cut and displayed open with no trouble.
 I applied exhaust and oil stains with Tamiya "Smoke", dinged it in various
places with Testors Metalizer "Aluminum non-buffing," then gave the model
several coats of thinned Dullcote to get it to the dead flat that a sunbleached
airplane would have in the Pacific.
I applied exhaust and oil stains with Tamiya "Smoke", dinged it in various
places with Testors Metalizer "Aluminum non-buffing," then gave the model
several coats of thinned Dullcote to get it to the dead flat that a sunbleached
airplane would have in the Pacific.
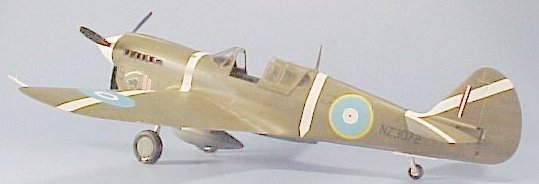
I attached the landing gear; the resin main wheels are very nice. I added 1/16" to the tailwheel leg, so it would be long enough to provide the right "sit." I replaced the rail wheel doors with doors made of .010 Evergreen Sheet.
The exhausts are individually attached. Be careful here, otherwise you are bound to drop one and the carpet monster will consider it a tasty treat.
I had previously cut 1/8" off the propeller blades at the tips; the blades are too long. Sand them round and you will have the "paddle props" used in the P-40M and P-40N.
|
CONCLUSIONS |
 This kit makes up into
a nice model, but I had forgotten what a pain-in-the-patootie these Mauve kits
were. They do, however, make up into the best-looking completed P-40 model
available. You can turn this kit into an early P-40N-1 if you cut off the inner
wing gun on each side. There are some nice decals available from Cutting Edge
to do early P-40Ns. Otherwise, the Fisken markings are the most interesting in
the kit.
This kit makes up into
a nice model, but I had forgotten what a pain-in-the-patootie these Mauve kits
were. They do, however, make up into the best-looking completed P-40 model
available. You can turn this kit into an early P-40N-1 if you cut off the inner
wing gun on each side. There are some nice decals available from Cutting Edge
to do early P-40Ns. Otherwise, the Fisken markings are the most interesting in
the kit.
Thanks to Eduard for providing the Review Kit.
If you would like your product reviewed fairly and fairly quickly, please contact the editor or see other details in the Note to Contributors.