Accurate Miniatures 1/48 P-51A
|
KIT # |
3402 |
|
PRICE: |
$20.00 |
|
DECALS: |
One version |
|
REVIEW: |
|
|
NOTES: |
|
HISTORY |
ALLISON PONIES: Modeling the Early Mustang
Myths and Truths of the Allison Mustang:
Everyone "knows" that the Mustang was the airplane designed and built in 120 days for the British because North American's Dutch Kindelberger didn't want to build Curtiss P-40s under license. Also that the first Mustangs were a disappointment because they were hobbled by the god-awful Allison engine, and that the airplane only became "good" when it was powered by the mighty Merlin. Right? That's the stuff in all the Mustang books, isn't it?
Well, yes, all that is in the "history books," most of which are written by people who prove the old saw that if you copy from one it's plagiarism, while if you copy from many it's research. Also, if the many have copied from each other, mistakes can indeed become "facts." We are only now, sixty years after the events, starting to discover that a lot of what was written as history at the outset was "uninformed" to be generous. It was then was copied by those who followed, to the point that it became "the truth" because it had been repeated so many times.
Here's a truth from the horse's mouth about the origins of the Mustang: in 1981, Edgar Schmued, designer of the Mustang, came out to Chino for a 40th Anniversary celebration of his most famous work at The Air Museum, "Planes of Fame." Mr. Schmued began his career at the Bayerische Flugzeug Werke in Munich in 1934, and left in late 1937 when certain political idiots started investigating aspects of his family history. (Thank God, if World War II had to be fought, we got to fight the morons of the Nazi Party.) As a young engineer, Schmued had been involved in most of the detail design work that went into the creation of the Bf-109. "I was working on a fighter design of my own all that time, refining it with new information, waiting for an opportunity," he said. "Yes, the Mustang was built in 120 days, but I had been designing it for five years."
Furthermore, Dutch Kindelberger knew about Schmued's filing cabinet full of drawings, and had a strong hunch it was a pretty good design, at the time he turned down the British offer to fund North American's license production of the P-40; an airplane Kindelberger correctly saw as being at the end of its development cycle. It might be a fight to turn the drawings into blueprints inside 120 days, but they were not starting with "clean paper" as everyone has believed all these years since.
So far as the Allison-powered Mustang being a "disappointment" is concerned, Southern California aviation legend the Rev. B.C. Reid - who flew every kind of Mustang there was with the 107th Tac Recon Squadron of the 67th Tac Recon Group during 1943-45 - says that the P-51A Mustang was to the Mustang series what the Bf-109F was to Messerschmitt's fighter: the best combination of engine and airframe for flight harmony. "After the A-model, they kept adding weight more than they added power," he once told me, "and the D-model was an underpowered truck in comparison with the A-model. Its only grace was it could fly high." The 107th TRS kept F-6As (the photo-recon P-51A) to the end of the war, and pilots like Reid chose to fly them over the F6C (P-51C) or F6D (P-51D) whenever possible, "because you could outperform anything under ten thousand feet in that baby."
The first Mustang Ace wasn't even flying a Mustang! 1LT Michael T. Russo of the 522nd FBS shot down five German aircraft between September 13 and December 30, 1943, while flying something its pilots called an "Invader." The A-36A never had an "official name," though Lt. Robert B. Walsh of the 27th Fighter-Bomber Group is generally credited with suggesting "Why don't we call them 'Invaders' since we're always invading places?" For an airplane that wasn't even a fighter, the A-36s of the 27th FBG managed to shoot down 53 German and Italian aircraft between their introduction to combat in June 1943 and the group's transfer to P-47s in April 1944.
` The first long-range escort missions by Mustangs weren't flown out of England into Germany, they were flown from India across the Indian Ocean to Burma, a further distance than East Anglia to Berlin, and the airplanes involved were P-51As and A-36s of the 311th Fighter Group. By the end of their fights over Rangoon in November 1943 - a full month before the 354th FG flew the first Mustang escort in the ETO - CAPT J.J. England of the 311th's 530th FS had 8 victories.
All of this is to say that there was "plenty of fight" in the first Mustangs. This takes away nothing from the outstanding achievements of the P-51B and P-51D, which literally won the war in the air over Europe and broke the back of the Luftwaffe. This in turn, enabled the Normandy Invasion and the liberation of Western Europe to take place; no small achievement.
|
THE KIT |
Until 1994, the Allison Mustang was ill-served by the kit makers. In 1/72, Frog made an indifferent kit with a wing more appropriate for a P-51D. To date, modelers in 1/72 are still ill-served by the Allison Mustang offerings, which seem unable to determine such basic items as airframe shape, what wing to use, landing gear, etc. Without major scratchbuilding, the 1/72 modeler is out of luck.
No such problem exists in 1/48, where Accurate Minatures released the P-51, A-36A and P-51A as the first products of this company. Additionally, the P-51 was re-released as an RAF Mustang Mk.Ia, with different decals and the camera provided on a separate tree. The only complaints one can have with these kits is that the propeller is incorrect for any version other than the P-51A, and is too thick as it appears on the parts tree. In addition, the instructions are difficult to follow, and some modelers report difficulty assembling the cockpit into the fuselage due to the engineering of the kit to be different versions.
The kit comes with differently-molded engine cowlings to cater to the different-shaped carburetor intakes and the weapons carried (or not) in the nose. The wings are different for each, with the P-51 equipped with 4 20mm cannon that extend in front of the wing, the A-36 having four machine guns and dive brakes, and the P-51A having a wing similar to the A-36 minus the dive brakes. There are also different looks in the shape of the radiator scoops between versions. All of these differences are well met by these kits.
The cockpit provided by the kits is more than acceptable, and set a new standard for the amount and quality of detail expected "in the box" when first released five years ago. True Details has recently released a resin cockpit for the P-51A, which has more small detail, without making the original cockpit obsolete in any fashion. The canopy provided, while clear, is quite thick and does not look right at all if it is cut open. Fortunately, Squadron has released vacform canopies of both the "coffin lid" and Malcolm hood which are so beautifully clear that a modeler can leave the Malcolm hood closed without spoiling any view of the cockpit within.
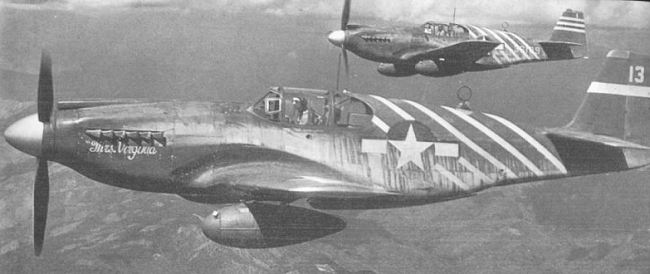
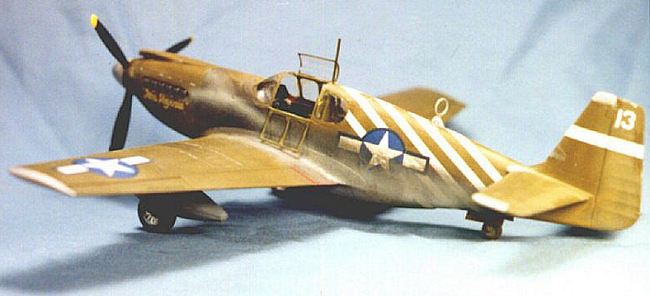
One of the most well-known early Mustangs is a P-51A, "Mrs. Virginia," flown by an unknown pilot of the First Air Commando Group. The airplane is famous primarily due to the existence of a very good air-to-air photograph of "Mrs. Virginia" flying over the Assam hills that has been often published in books on the Mustang. The 1st ACG was founded and led by Colonel Phil Cochrane in the China-Burma-India Theatre. It helps that there is an aura of adventure around Cochrane and his unit: they were founded to support Orde Wingate's "Chindits" on operations behind enemy lines in Burma. Cochrane and his crew of "daredevils" were immortalized by Milton Caniff when he created the comic strip "Terry and the Pirates," which boys of a certain age who loved airplanes and adventure couldn't wait to get hold of in the Sunday papers as they grew up.
"Flightline" is a line of decals created in the past year, mostly involving Thompson Trophy Racers of the post-war period. Those of you who can't stop making P-51Bs and P-51Ds but are running out of new markings are strongly urged to contact them and get hold of some very interesting decals for the "stockers" that wowed post-war audiences at the Cleveland Air Races. The first sheet released had four interesting Mustangs: Paul Mantz's 1946 Bendix and Thompson Trophy winner, #46; Mantz's airplane as it appeared later, when it flew nonstop over the North Pole in 1951 as "Excalibur;" the famous P-51 with the black-and-white "razzle-dazzle" camouflage (those of you who went to the 1999 IPMS-USA National Convention had the opportunity to see a very good model made with this set); and "Mrs. Virginia."
With these decals, an example of the new True Details P-51A cockpit provided by Squadron, and a P-51A kindly sent out by Bill Bosworth, what else could a boy do but sit down and re-create "Mrs. Virginia"?
|
CONSTRUCTION |
The first thing I did was glue the cowlings to their individual fuselage halves, after cutting away the structure around the cockpit that would be replaced with the vacuform canopy, and set all this aside to dry. I also at this time masked and painted the vacuform canopy with Interior Green. I would be puttying around the join area to get proper fit, and having this pre-painted guaranteed I could keep the putty from being seen from the inside of the cockpit. With the cockpit ready, I separated all the resin parts from their backing and assembled the cockpit sides into the proper fuselage half.
I then painted the True Details cockpit, using Gunze Sanyo H-58 Interior Green. There is now information that North American may have used Dull Dark Green in Mustang cockpits; I have yet to hear anything definitive about early Mustangs, though I would probably now paint the cockpit Dull Dark Green when I do another one. To continue, once that was dry, I painted the "black boxes" with Tamiya semi-gloss black, then drybrushed things with Model Master (non-buffing)Aluminum, paying particular attention to the seat and floor, since this was going to be a Mustang that was "ridden hard and hung up wet." I then shot a thin black wash over everything to bring up more detail.
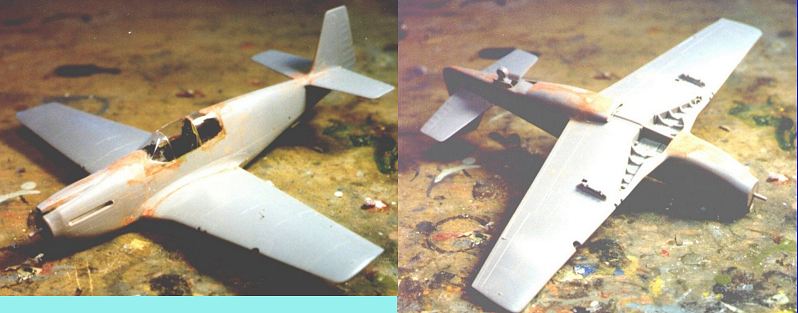
I then assembled the fuselage halves per kit instructions, and attached the wing and horizontal stabilizers. There is a point to notice here about the wing: Accurate Minatures provides the wing with the flaps up. Most Merlin Mustangs sit on the ground with their flaps down to avoid keeping the hydraulic system pressurized. The Allison Mustang, which was lighter in structure overall, is mostly seen with the flaps up. This also means that the center wheel well doors are up. These doors are only down when cycling to retract the gear, or when the hydraulic system is de-pressurized. Otherwise, they would block the radiator cooling intake and an overheated engine due to that was considered an offense worthy of a $50 fine for the pilot so stupid as to do so - and that was in the days when $50 was a substantial sum! So, when assembling your wing, if you are keeping the flaps up, cut off the mounting tabs of the wheel well doors and glue them in the "up" position.
You must "Future" the vacuform canopy before using it, since you are going to use cyanoacrylate around it, and "Futuring" is the only way to guard against fogging the canopy. (You may want to try any of several brands of non-fogging superglues. They work quite well - Ed)
Carefully cut away the canopy from its base with a brand-new sharp #11 blade. You will also want to cut away the side panel and upper "coffin lid" at this time if you plan to have the canopy open. Test-fit the canopy and trim as necessary to get a good fit.
The canopy is then glued to the airframe; do this a bit at a time, applying the C-A with a blade tip, so that you can get everything to fit as closely as possible. If you are lucky and it fits close, then use Gunze "Mr. Surfacer" to fill any gaps. If you weren't that good in your installation, you will need to apply putty as sparingly as possible along the join line. Then very carefully sand it away when thoroughly dry; your goal here is to scratch the window panels as little as possible, though if you are unsuccessful you can paint another coat of Future over the scratches to remove them.
|
PAINT & DECALS |
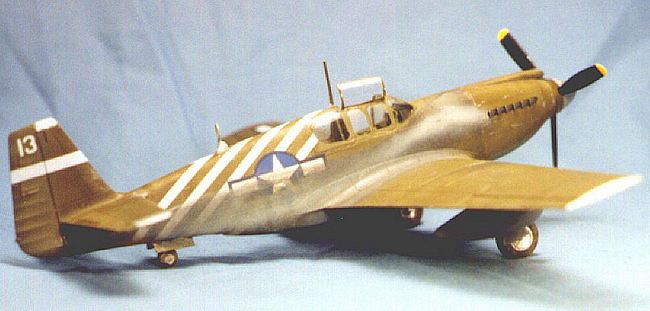
"Mrs. Virginia" is a well-used airplane, to say the least. The airplane was flown in the tropics and is badly sun-faded. I first painted the lower surfaces Tamiya XF-52 "Neutral Grey." I then painted the upper surfaces with Gunze Sanyo H-52 Olive Drab. Once the original "base color" was dry, it was time to "fade" the paint.
Looking at color photographs of USAAF aircraft of the period, one sees that the sun fading effect is most prominent on the upper surfaces of the wings and horizontal stabilizer, and the upper part of the fuselage. It also seems that the paint fades differently on different panels (without the "shadow effect" modelers so love nowadays), which may be due to different kinds of metal creating different conditions under the hot tropic sun. Also, fabric fades differently than metal.
I started with a cupful of standard H-52 Olive drab, and an open bottle of Gunze Sanyo H-85 "Sail Color," a very light tan. I put in a brushful of "Sail Color" and started around the lower sides of the fuselage,spraying lightly. Some panels got a bit more than others, but one could still see the underlying color. I left the area underneath the horizontal stabilizer alone, since this would have been protected from the sun.
Another brushful of Sail Color into the mix, and I moved up the sides of the fuselage airbrushing lightly as I had, and "blotching" here and there, creating larger and more prominent areas of this shade. I also began "blotching" on the wing and horizontal stabilizer upper surfaces, and the vertical fin. With the paint at this intensity, I painted the whole fabric-covered rudder, which would have faded differently from the metal surfaces.
Another brushful of Sail Color with a bit of flat yellow in the mix and I was ready for the upper surfaces. I did leave a bit of the "darker" blotchiness around panel lines, and faded things differently from panel to panel, getting the flaps and ailerons differently also. I shot the fabric-covered elevators to maximize the fading effect. Maximum effect was also applied to the spine of the fuselage and the nose area around the carb intake. Satisfied with the "fade," I let everything dry. I painted the rudder, horizontal stabilizer tips and the prop spinner with Model Master Aluminum (non-buffing), then shot the model with Testor's Glosscote.
It's hard to tell, looking at the photograph of "Mrs. Virginia" whether or not the serial number is visible on the fuselage under the stripes and exhaust grime. I decided it was, but not completely; I applied the serial number decal, let it dry, then over painted it with Olive Drab that was darker than the surrounding area, while still letting bits of the underlying numbers show through. Once dry, I shot this with Glosscote. I then applied the fuselage stripes; these come as a large decal for either side, and go on easily with water on the surface to allow them to be moved around to final position. I mopped up the excess water with tissue, then applied a good coat of Micro-Sol, and set things aside to dry.
Once this was done, I used the Aeromaster national insignia, since these are already nicely faded, with a dark blue surround where the red was over-painted. I then applied the rest of the insignias, using only the "Mrs. Virginia" for the left side (though Flightline provides them for both sides).
Once everything was dry, I recovered the model with Glosscote, then with Dullcote brought down as flat as possible with three thin coats of my special mix.
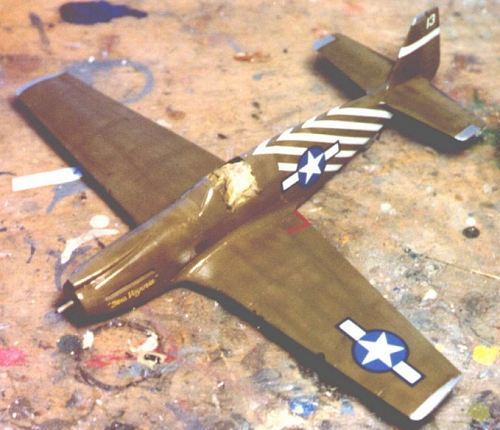
The one thing one notices about "Mrs. Virginia" is that this just might be the dirtiest Mustang ever photographed! The airplane has heavy exhaust staining, and lots of dings and chips.
I started with Model Master Aluminum (non-buffing) dry brushing the areas along the wing root and around the gun bays where scuffing would happen. I picked out the dzus fasterners and screws that held the cowling panels on, and "rubbed" the edges of various panels. I scoured the intake openings, and other areas, and also did paint chipping on the leading edge of all flying surfaces and "dinged" the leading edges of the propeller blades.
It was now time for oil-streaking and exhaust staining. I use a wash that is 50-50 Gunze "Mahogany" and Tamiya semi-gloss black, mixed with 90 percent rubbing alcohol, for the wash. I first sit the airplane in the parked position and then run wash along the panel lines around the cowling, letting it drip by gravity, I then brush on oil from the rear lanel lines of the cowling, back over the fuselage ond over the inner sections of the wing upper surfaces, to simulate oil stains created by flight conditions. In the case of this airplane, the photograph said it would be hard to do "too much."
I then put in a bit more black, and brushed exhaust staining the entire length of the fuselage, again letting it sit and drip with gravity for some of the effect. Doing it this way, after the Dullcote has been applied, will leave a different surface texture, so that the stains "stand out" as they should. I then put in a couple brushfulls of Sea Grey Medium, and airbrushed the exhaust stains. These were grey due to the fact that the engine was set on as lean a setting as possible to maximize range, which led to heavy oxidization in the exhaust.
Since the airplane operated from jungle airstrips, I muddied up the wheels a lot, and drybrushed "mud spray" on the lower surfaces of the wings and the rear fuselage. Then thinned some "mud" and brushed it onto the wings where the pilot and crew would have stood while entering the cockpit. It took awhile, but soon the airplane looked like the photograph: good and dirty. I attached the open canopy parts, attached the fishtail exhausts, and made antenna wire with "invisible repair thread."
|
CONCLUSIONS |
This was an easy project, with the most difficult parts being in the painting and weathering, and those were actually quite easy with the photograph at my side to guide my efforts. The Accurate Minatures kits are one of the best series of models of Mustang variants available. They require a modicum of skill and are not as "shake 'n' bake" as their Tamiya equivalents. But then, those aren't Allison Ponies, are they?
Copyright ModelingMadness.com. All rights reserved. No reproduction in part or in whole without express permission from the editor.
Back to Reviews Page 2016