| KIT #: | 051 |
| PRICE: | $Currently (June 2005) out of production |
| DECALS: | Two options |
| REVIEWER: | Les Dorr Jr |
| NOTES: | Largely scratch built interior; Superscale decals |
| HISTORY |
For basic information on the SOC Seagull and what’s in the box, I suggest Da Boss’ most excellent preview.
| THE KIT |
 Scott’s preview
covers the basic kit parts very well. My Minicraft-Hasegawa boxing – from
the days when those two companies had a working relationship – is the
floatplane version, so it includes parts for the main and wing floats as
well as wheels and gear struts. The float struts follow the same design
Scott describes: They are molded to pieces that fit into slots, producing
seams that would be difficult to fill if assembled as is. I’ll explain my
workaround below.
Scott’s preview
covers the basic kit parts very well. My Minicraft-Hasegawa boxing – from
the days when those two companies had a working relationship – is the
floatplane version, so it includes parts for the main and wing floats as
well as wheels and gear struts. The float struts follow the same design
Scott describes: They are molded to pieces that fit into slots, producing
seams that would be difficult to fill if assembled as is. I’ll explain my
workaround below.
The kit’s rigging instructions, essential for any biplane model, are pretty useless. They probably are an artifact of the time the kit was manufactured, but the only diagram is a small front view. The main inter-wing wires aren’t hard to figure out from photos, but it took a lot of close-up examination of a lot of grainy black-and-white photos online to come up with the correct (I think) rigging between the cabane struts on the forward fuselage.
The decals included with this boxing are for 1-O-9 flying off USS Pennsylvania before WWII and the well-known V173 Coast Guard aircraft. Out of the box, the kit is advertised as an SOC-3...but honestly, I couldn’t find any external differences between it and the SOC-1 I modeled.
| CONSTRUCTION |
I tackled the wing and cabane struts first. Hasegawa apparently designed the strut arrangement with easy alignment in mind, but I suspect many intermediate and advanced modelers will want a cleaner, more accurate look to the finished model.
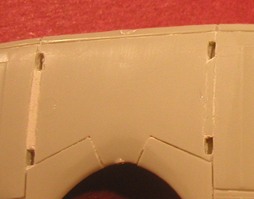 My solution was
relatively simple. I cut the struts from their large mounting pieces,
leaving a small part of the mount at the end of the strut. I then glued
only the remaining mounting pieces into the slots while leaving enough
space at each end to reinsert the struts after puttying. (Since I was
building my Seagull with wheels to match a particular photo, I didn’t mess
with the float struts. They have the same problem, and you can use the
technique I’ve outlined on them as well.) Filling and sanding obliterated a
couple of the ribs around each slot; I simulated replacements by scribing a
raised line with an X-Acto knife.
My solution was
relatively simple. I cut the struts from their large mounting pieces,
leaving a small part of the mount at the end of the strut. I then glued
only the remaining mounting pieces into the slots while leaving enough
space at each end to reinsert the struts after puttying. (Since I was
building my Seagull with wheels to match a particular photo, I didn’t mess
with the float struts. They have the same problem, and you can use the
technique I’ve outlined on them as well.) Filling and sanding obliterated a
couple of the ribs around each slot; I simulated replacements by scribing a
raised line with an X-Acto knife.
Next, I turned to the interior. The kit provides only a floor, a pair of clunky seats, a headrest for the pilot and a reasonably accurate (for 1/72) radioman’s console. Since I planned to pose my model with a Falcon vacuform canopy in the open position, I did a significant amount of scratchbuilding.
My philosophy for
detailing 1/72 interiors is to create the impression of a proper cockpit,
not to reproduce every tiny lever
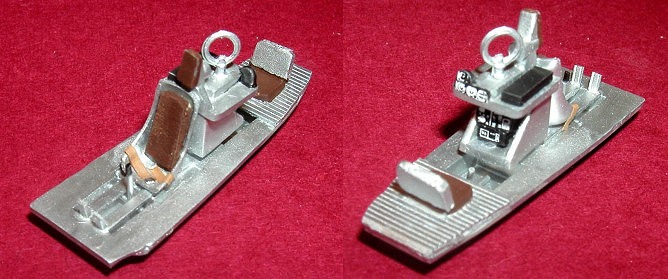 and wheel. I created ribs and stringers
from thin strips of black electrical tape, and the prominent framing from
.025 plastic rod. The panels, quadrants, radioman’s seat cushions, radios
and gun mount were made from plastic sheet and square rod. I found a nice
radio DF loop in my spares box, and robbed an old vac kit for the pilot’s
seat. (Interestingly, pre-WWII Seagull pilots apparently had only lap
belts; full harnesses weren’t standard until after the war started.) The
pilot’s back cushion was carved from a blob of Squadron white putty. I
scrounged a nicely detailed.30 caliber rear machine gun from an Airfix OS2U
Kingfisher, but it’s almost invisible under the Seagull’s closed “turtledeck.”
and wheel. I created ribs and stringers
from thin strips of black electrical tape, and the prominent framing from
.025 plastic rod. The panels, quadrants, radioman’s seat cushions, radios
and gun mount were made from plastic sheet and square rod. I found a nice
radio DF loop in my spares box, and robbed an old vac kit for the pilot’s
seat. (Interestingly, pre-WWII Seagull pilots apparently had only lap
belts; full harnesses weren’t standard until after the war started.) The
pilot’s back cushion was carved from a blob of Squadron white putty. I
scrounged a nicely detailed.30 caliber rear machine gun from an Airfix OS2U
Kingfisher, but it’s almost invisible under the Seagull’s closed “turtledeck.”
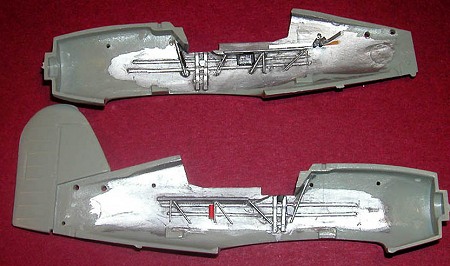 I hand-brushed
Testors Metallic Silver (from the spray can) as the overall interior color
to simulate the then-standard aluminum lacquer, then applied a “sludge
wash” to the ribs and stringers to bring out the detail. I painted the
pilot’s and radioman’s seat cushions and headrest with a craft store
acrylic brown to resemble leather. The rear MG was painted Testors Model
Master (MM) Interior Black, then rubbed with black eye shadow to make it
look more like gunmetal. I cut the “faces” for the radio equipment from an
old T-33 instrument panel decal.
I hand-brushed
Testors Metallic Silver (from the spray can) as the overall interior color
to simulate the then-standard aluminum lacquer, then applied a “sludge
wash” to the ribs and stringers to bring out the detail. I painted the
pilot’s and radioman’s seat cushions and headrest with a craft store
acrylic brown to resemble leather. The rear MG was painted Testors Model
Master (MM) Interior Black, then rubbed with black eye shadow to make it
look more like gunmetal. I cut the “faces” for the radio equipment from an
old T-33 instrument panel decal.
(NOTE: I had only two photos of an SOC interior when I started this project. Thanks to Charles Landrum and Bill Larkins, there is now a plethora of front and rear cockpit shots in the Files section of the SOC Seagull Yahoo group shown in the references. Thanks, guys!)
I tested the
alignment of the floor/seat assembly and the fuselage halves many times to
make sure everything fit and that the fuselage would close. Amazingly
(considering some of my past modeling efforts), they went together
perfectly! I attached the floor and seats to one side with CA glue, and
mated the fuselage halves with liquid cement. I then glued the lower wing,
horizontal stabilizers and landing gear struts t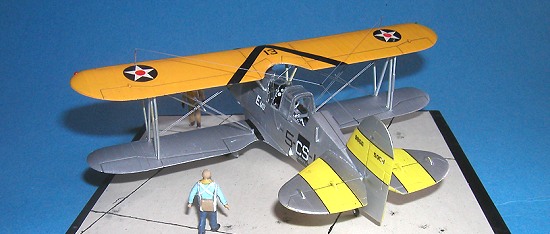 o
the fuselage with zero fit problems.
o
the fuselage with zero fit problems.
The kit engine bears only a passing resemblance to the real Pratt & Whitney R-1340. I painted the cylinders MM Steel, the pushrod ring Interior Black, and the engine case MM Aircraft Gray. I brush-painted the outside of the cowling with a flat black acrylic paint, then polished it to a partial gloss with an old t-shirt. I painted the cowling interior metallic silver, inserted the engine, and super-glued the assembly to the fuselage.
Before sending my Seagull to the paint shop, I glued the main and cabane struts to the upper wing. This was a trial-and-error process; I cemented each strut into its holes, then quickly adjusted its angle to match the front view in the instructions. When I checked the alignment of all four struts by dry-fitting – I left off the aileron struts until final assembly – the cabane struts were slightly off from the holes in the fuselage, but I foresaw no problem bending them into position. I finished by putting the kit canopy on with white glue to mask the interior. I left off the wheels for later painting and assembly.
| COLORS & MARKINGS |
 Although the kit
decals for the USS Pennsylvania aircraft are attractive and accurate, I
wanted to build a cruiser-based Seagull. SuperScale sheet 72-062 supplies
letters, numbers, squadron insignia and ship names for a variety of SOCs,
including cruiser and battleship aircraft, a VIP plane and a shore-based
Marine Seagull.
Although the kit
decals for the USS Pennsylvania aircraft are attractive and accurate, I
wanted to build a cruiser-based Seagull. SuperScale sheet 72-062 supplies
letters, numbers, squadron insignia and ship names for a variety of SOCs,
including cruiser and battleship aircraft, a VIP plane and a shore-based
Marine Seagull.
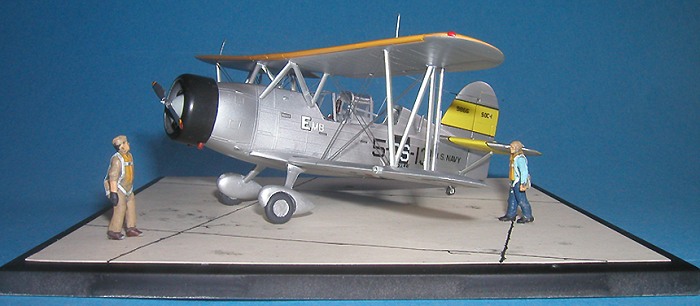
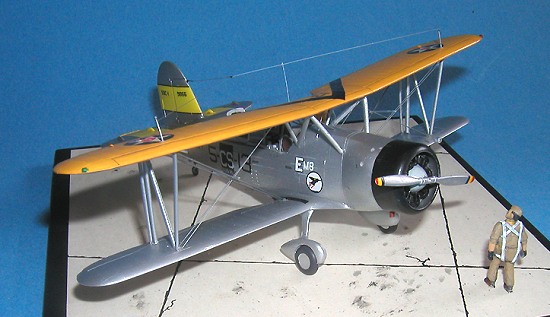
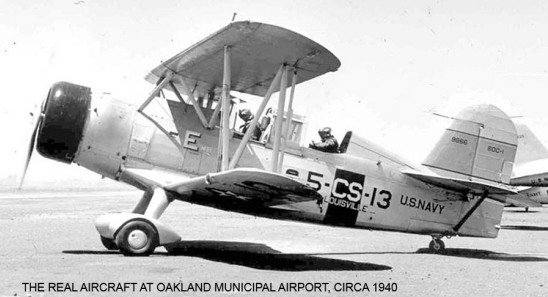
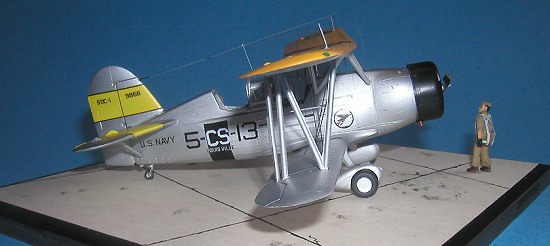
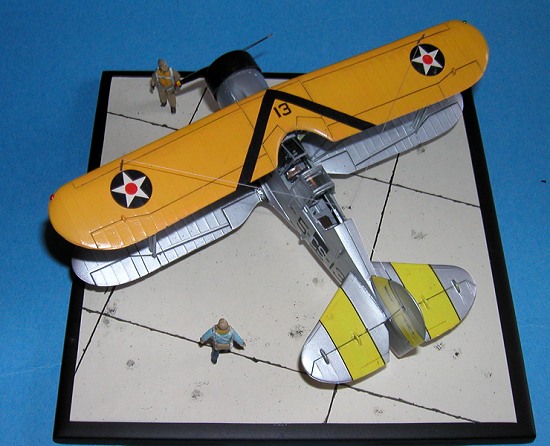
After looking at dozens of photos, I decided to model SOC-1 Bu.No. 9866 from Cruiser Scounting Squadron 5 (VCS-5) with 5-CS-13 squadron/section markings. This particular aircraft was stationed aboard the heavy cruiser USS Louisville from late 1939 through 1941. I had an excellent reference photo, taken by Bill Larkins in 1940, showing the aircraft about to taxi onto the runway at Oakland Municipal Airport.
Painting “Golden Wings” U.S. Navy aircraft demands creative planning because the plane often has three or four separate colors. My SOC was no exception: Orange-Yellow on the top of the upper wing, large black-bordered Lemon Yellow bands on the vertical tail and horizontal stabilizers, black fuselage band and cowling, and an aluminum lacquer finish on everything else.
I decided to go with overall aluminum after scrutinizing the black-and-white photo of 5-CS-13 and considering the time it was assigned to USS Louisville. I’m aware that standard Navy practice early in the SOC’s service lifetime was to paint them aluminum lacquer only on fabric surfaces; the metal surfaces were light gray. However, the Navy began switching to aluminum lacquer overall for its aircraft in the mid-to-late 1930s. I couldn’t see a difference in surface reflectivity or “color” on the 5-CS-13 photo, and I reasoned that the plane – by its tail number, the 11th SOC-1 built -- likely would have been repainted with aluminum lacquer by 1940.
 I started by
masking off the cowling, then shooting a base coat of hardware store flat
white over the entire airframe to check for flaws and to serve as a base
for the yellow colors. Next, I brush-painted the top of the upper wing with
a custom mix of yellow and red craft store acrylic paints. The color should
curl under the leading edge to cover the deployable slat.
I started by
masking off the cowling, then shooting a base coat of hardware store flat
white over the entire airframe to check for flaws and to serve as a base
for the yellow colors. Next, I brush-painted the top of the upper wing with
a custom mix of yellow and red craft store acrylic paints. The color should
curl under the leading edge to cover the deployable slat.
I brushed the entire vertical tail and stabilizers with an acrylic color called “Buttercup,” which duplicates Lemon Yellow very well. I subsequently masked the location of the bands with tape, then airbrushed several coats of metallic silver over the entire aircraft. When I pulled off the tape, I had perfect tail bands!
I applied the decals next. I overcoated the old SuperScale Seagull sheet with Superfilm after the first number broke apart. The black fuselage band fits only one way, but you can’t tell by looking at it. I used the kit’s national insignia and V-shaped black wing band. The “E” (for excellence) markings came from an old Superscale Navy sheet. I raided my spares box for the small white “M” and “B” (maintenance and bombing excellence), the “13s” on the top and bottom wings and the black outlines for the tail bands. I printed the “9866” tail number and “SOC-1” designation on clear decal sheet using the Long Beach font.
I applied a “sludge wash” to bring out the control surface breaks on the wings, rudder and elevators. To finish up, I airbrushed several coats of MM Semi-Gloss Lacquer over the entire airplane to seal the decals and produce a more realistic scale finish.
| FINAL CONSTRUCTION |
When the overcoat was dry, I popped off the canopy and applied the instrument panel decal. I cut out the sections of the Falcon canopy, trimmed each to fit, and framed them with strips of double-sided Scotch tape painted metallic silver. Too late -- after I’d drilled a hole through the windshield -- I noticed that the Seagull I modeled apparently didn’t carry the usual telescopic sight on the forward fuselage. I scratchbuilt a new windshield from clear plastic and nestled the remaining canopy sections beneath one another, securing everything to the cockpit with white glue.
The kit wheels don’t look like those on the actual aircraft, so I substituted modified parts from the Airfix Kingfisher. I filled the spokes on one side and the small hole on the other with putty and sanded them flat. I painted the tires grimy black, cut small circles from a silver decal for the hubs, then mounted the wheels to the gear struts. I had to enlarge the openings very slightly to get the new wheels to fit.
 I painted the
propeller hub and blade fronts metallic silver, and the blade rear surfaces
interior black. I applied red/yellow/blue prop tip decals from a SuperScale
sheet for the J2F Duck. I had to bore out the hole in the engine front to
make the prop shaft fit.
I painted the
propeller hub and blade fronts metallic silver, and the blade rear surfaces
interior black. I applied red/yellow/blue prop tip decals from a SuperScale
sheet for the J2F Duck. I had to bore out the hole in the engine front to
make the prop shaft fit.
Next up was installing the rigging. After scrutinizing photos of many Seagulls, I believe the correct (for 5-CS-13, at least) rigging arrangement between the cabane struts is a set of wires in a “V” connected to each pair of vertical struts, plus a pair of wires in an inverted “V” between those two sets. I used short lengths of very small-diameter fishing line for the wires.
The main rigging was more of a chore than I expected. After a lot of frustration trying to use stretched sprue or fishing line, I turned to some .010 metal rod from the local Hobby Town. The stuff is gold-colored, so I had to paint it steel…but otherwise, it worked great! I added a pair of rigging spacer bars from stretched sprue. I added two antenna posts on the top wing, then strung very fine stretched sprue for the antenna wires themselves. I finished the model itself by filling the holes for the float struts with white glue and putting a drop of metallic silver on each with a toothpick.
The base is a ceramic tile painted flat black. The “concrete” is a piece of card stock with black ink “tar lines.” I weathered the surface by drybrushing spots of acrylic dark gray paint and applying a few dabs of goop from the bottom of my thinner jar. The pilot and radioman figures are from my spares box; I made their parachute packs from Squadron white putty and their parachute straps from strips of masking tape.
| CONCLUSIONS |
The Hasegawa kit is the only Seagull I know of in 1/72 scale, so it’s your choice what you make of it. Straight out of the box, you can build an attractive model, but it will be very basic by today’s standards for the scale. You can get around the lack of cockpit detail by installing a couple crew figures and using the kit canopy in the closed position. (I’ve always thought it odd that the aftermarket folks have never produced a photoetched detail set for this kit, as well as for other Airfix “classics” like the Duck and Kingfisher).
If you choose to build the float version of the Seagull, be aware that you’ll have to either mount the model on the stand that’s included, or fashion some kind of water diorama.
June 2005
| REFERENCES |
Larkins, William T., The SOC Seagull (online version) http://www2.thecia.net/users/jrd/profile-1.html
SOC Seagull Yahoo group http://groups.yahoo.com/group/CurtissSOC/?yguid=75673368
U.S. Navy Historical Center online library of SOC images http://www.history.navy.mil/photos/ac-usn22/s-types/soc.htm
Copyright ModelingMadness.com. All rights reserved. No reproduction in any form without express permission from the editor.
If you would like your product reviewed fairly and quickly, please contact the editor or see other details in the Note to Contributors.