| KIT #: | 02098 |
| PRICE: | $5.98 MSRP |
| DECALS: | Two options |
| REVIEWER: | Greg Ewald |
| NOTES: |
| HISTORY |
There is no
need to drone on about the P-51D…it certainly was one of the best fighters
ever produced, and other countries knew it! The leftover planes from WW2
were used by a myriad of countries as acceptable pursuit aircraft, until
they were able to receive the newer jets, and fought in almost every livery
imaginable, from South Africa to Scandinavia !
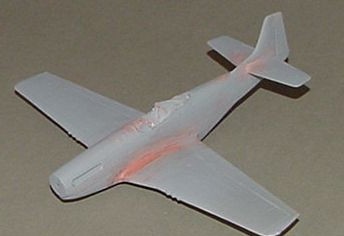
| THE KIT |
Molded in medium gray, the sprues are relatively flash free, and have few, if any, sinkholes. The styrene is not brittle at all, and is easy to cut, sand, and glue without breaking a sweat. Assembly instructions are printed on one page of a 4 page pullout, only compromising 7 steps, making this one hell of a good kit for a make-n-take, or a weekend project with the kids.
Fairly well recessed panel lines abound on the kit, and the riveting is kept to a minimum, easing the time spent sanding and polishing.
A one piece canopy is included, and is extremely brittle…if you want to display an open cockpit, vac one or buy an aftermarket item and customize.
| CONSTRUCTION |
 Right off the
bat, in step 1, you have to decide which version you are going to build, D
or K. Since I was going to be building the Norski bird, I went with the
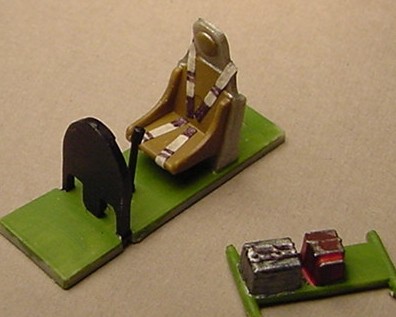
chunky prop blades ( part 1 ). The cockpit assembly in step 2 is basic,
but well done for 1/72nd scale, with a nice seat, joystick,
control panel, and optional pilot figure. All of the cockpit items were
painted prior to assembly, as were the interior surfaces of the fuselage,
using ZC green as a base, and other mixed colours for detailed odds and
ends. A silver pencil (thanks for that tip) brings out the dials and
switches just fine. Masking tape was used to replicate the
Right off the
bat, in step 1, you have to decide which version you are going to build, D
or K. Since I was going to be building the Norski bird, I went with the
chunky prop blades ( part 1 ). The cockpit assembly in step 2 is basic,
but well done for 1/72nd scale, with a nice seat, joystick,
control panel, and optional pilot figure. All of the cockpit items were
painted prior to assembly, as were the interior surfaces of the fuselage,
using ZC green as a base, and other mixed colours for detailed odds and
ends. A silver pencil (thanks for that tip) brings out the dials and
switches just fine. Masking tape was used to replicate the
 seat harness.
Gluing together the fuselage halves is really the only tricky thing about this model…you have to align the cockpit floor as well as the four pins of the cockpit rear at the same time, all the while trying to get the glue in place. I finally settled on dry-fitting the whole thing, and using a small tip applicator on my C/A glue to work in the capillary fashion, while the major pieces were held in place with tape.
 In step 4, the
lower wing is attached to the fuselage quite ingeniously, with nary a seam
to be filled, but the upper wings are going to need some care at the root.
The seam was so small, though, that regular putty would have been overkill,
so I soaked some bondo in laquer thinner (good thing I quit smoking ) and
painted it into the small gaps with a brush. Gap filling C/A would have
worked also, but is harder to sand into shape, and I did not want to ruin
those beautiful lines! (note: be sure not to fill in the gun camera hole on
the port wing while you are patching) I left off adhering the exhaust
pipes and the canopy until after the main assembly was finished.
In step 4, the
lower wing is attached to the fuselage quite ingeniously, with nary a seam
to be filled, but the upper wings are going to need some care at the root.
The seam was so small, though, that regular putty would have been overkill,
so I soaked some bondo in laquer thinner (good thing I quit smoking ) and
painted it into the small gaps with a brush. Gap filling C/A would have
worked also, but is harder to sand into shape, and I did not want to ruin
those beautiful lines! (note: be sure not to fill in the gun camera hole on
the port wing while you are patching) I left off adhering the exhaust
pipes and the canopy until after the main assembly was finished.
Step 5 and 6 lead us to the landing gear, which is somewhat un-sturdy but accurate…one of the greatest complaints about the 51 was about the spindly gear. It is, however, quite strong enough to hold up this plane and went into place without a whisper of complaint. Once again, we have the two wheel sides to glue together, sand down, and paint prior to adding on, those of you with Airfix experience will breeze right through this bit. I did need to do a little filling on the scoop (part 22), but nothing very major. The tail assembly went together like a dream.
In the final step, 7, you can either add drop tanks or bombs (250’s) to the underwing pylons.
Piece of cake, this one.
| COLORS & MARKINGS |
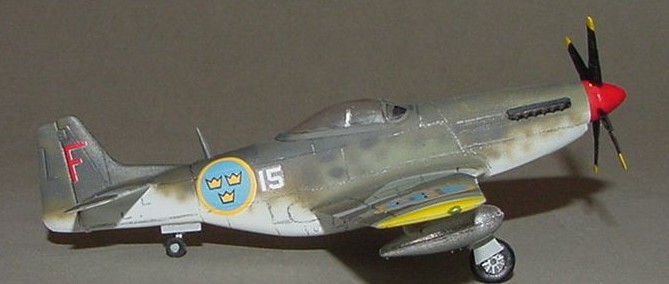
The markings
supplied with the kit show a bare metal finish J26 from Uppsala and a RAF
camouflaged K model from Italy, both 1945. I wanted to do something from
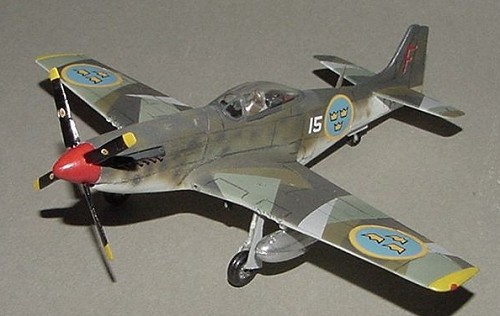
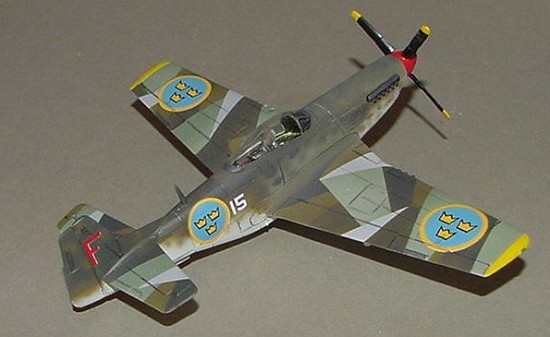
’47 or ’48, so went with a splinter
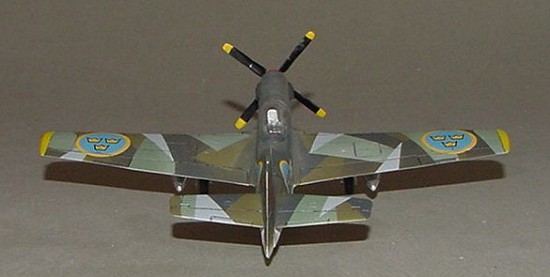 camo’d Swedish D. I could not
find any colour records of such a plane, but found quite a lot of info on
camouflage research, and put two and two together to create a “fictional”
P-51D in a mid-year pattern. Using a series of mixed Model Master
acrylics, I sprayed on the colours from lightest to darkest, using blue
tape to mask off the canopy and the splinter pattern from one to the
next…it actually went quite fast using a high setting on my compressor (50
psi) and un-thinned paint. Only three hours were spent on painting, and
that includes several breaks to check what’s happening on MM.
camo’d Swedish D. I could not
find any colour records of such a plane, but found quite a lot of info on
camouflage research, and put two and two together to create a “fictional”
P-51D in a mid-year pattern. Using a series of mixed Model Master
acrylics, I sprayed on the colours from lightest to darkest, using blue
tape to mask off the canopy and the splinter pattern from one to the
next…it actually went quite fast using a high setting on my compressor (50
psi) and un-thinned paint. Only three hours were spent on painting, and
that includes several breaks to check what’s happening on MM.
I used a mixture of duck egg blue and light gray for the underside.
After the paint was dry enough, I went over the panel lines with a highly sharpened number 2b pencil, and drybrushed on some vine charcoal and pastels for a subdued weathering job (those guys keep their planes CLEAN ) .
I used the kit decals, as well as some spares from a superscale sheet (modeling rule number one: never throw anything away), and they went on without a hitch over a lightly future sprayed model. A coat of satin sealer topped everything off.
| FINAL CONSTRUCTION |
 Pay attention to
how you put on the exhaust pipes…they have a definite angle to them. The
canopy is a real disappointment, fitting poorly and needed quite a lot of
care to get into place. Even after the camo job, it still required some
filling and repainting by brush to settle down.
Pay attention to
how you put on the exhaust pipes…they have a definite angle to them. The
canopy is a real disappointment, fitting poorly and needed quite a lot of
care to get into place. Even after the camo job, it still required some
filling and repainting by brush to settle down.
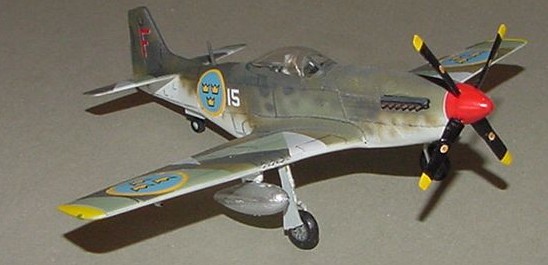
On go the chromed drop tanks, the wheels, and the prop from step 1 !!! All told, less than ten hours went into this little gem, and quite a lot of that was in the finishing process.
| CONCLUSIONS |
Builds into a neat little 1/72nd ‘Stang, not much detail, but very clean looking, and fun as can be !
July 2005
Copyright ModelingMadness.com.
Review kit courtesy of: My cash
If you would like your product reviewed fairly and fairly quickly, please contact the editor or see other details in the Note to Contributors.