MPC/Airfix 1/72 OS2U Kingfisher
| KIT #: | 1106 |
| PRICE: | $2-6 on the 'used kit' market |
| DECALS: | one option |
| REVIEWER: | Greg Ewald |
| NOTES: | Superdetailer's dream. Needs a vac canopy. |
| HISTORY |
Considered by many to be obsolete before the actual combat of WW2, the “bug” fulfilled it’s roll as the eyes of the fleet quite well, and ended up becoming well known for the rescue of many a waterlogged pilot, including the famous Eddie Rickenbacker.
The blue and yellow plane was also a capable anti-ship and anti-sub platform, but only able to carry a limited amount of armament from two hard points under the wings.
| THE KIT |
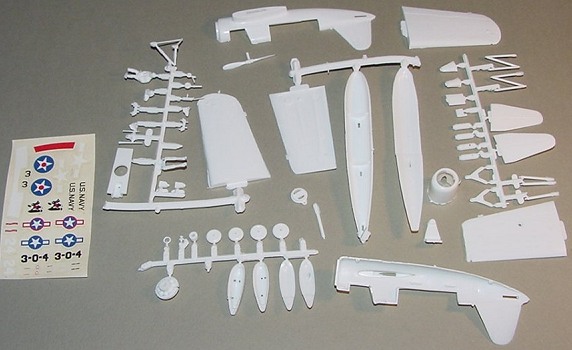 The white
sprues of this cast have quite a lot of flashing, and the brittle plastic
needs to be gently separated from the trees to avoid breaking…a pair of
Xurons or the like is a good idea! 63 parts make up the kit, which if
OOB builds into more of a “toy” than a dedicated replica, but there is
quite a lot of room for the scratch-builder in the roomy cockpits. I
discarded the kit canopy glass immediately due to way-out-of-scale
thickness, and thermoformed new pieces all the way around. While detailing
and accurizing the cockpit sounded like an interesting project, I opted for
spending time on the diorama to avoid a time crunch with other projects…
The white
sprues of this cast have quite a lot of flashing, and the brittle plastic
needs to be gently separated from the trees to avoid breaking…a pair of
Xurons or the like is a good idea! 63 parts make up the kit, which if
OOB builds into more of a “toy” than a dedicated replica, but there is
quite a lot of room for the scratch-builder in the roomy cockpits. I
discarded the kit canopy glass immediately due to way-out-of-scale
thickness, and thermoformed new pieces all the way around. While detailing
and accurizing the cockpit sounded like an interesting project, I opted for
spending time on the diorama to avoid a time crunch with other projects…
The fit of the separate pieces is surprisingly nice, very little gaps or spaces can be noticed during the dry fit.
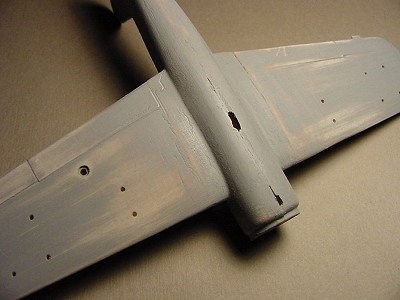
| CONSTRUCTION |
 Some of the
MPC kits need to be treated as if they were limited run jobs, and the
assembly is correspondingly tricky. I used both regular and gap filling
super glue, as well as a fair amount of bondo to get this little gem to
work.
Some of the
MPC kits need to be treated as if they were limited run jobs, and the
assembly is correspondingly tricky. I used both regular and gap filling
super glue, as well as a fair amount of bondo to get this little gem to
work.
In step 1, do not cut out the access holes for the central pontoon. If you wait until you have the fuselage assembled, you can get it centered and perpendicular easily. The cowling and motor assembly (steps 2/3) are simplified, the only thing to worry about is how the cowling (#2) fits over the forward part of the fuselage…I had to trim mine out quite a lot to get a good, snug fit.
The wing roots on the top were nice and tight, but the bottom took quite a bit of filler to get right…several thin coats with sanding in between works out well.
 This kit does
have the option of building a Kingfisher with landing gear instead of
floats (yawn), and in step 5 you have to make up your mind…the attachment
points of the outriggers and the central pontoon are a bit tricky, and
very, very weak…gap filling glue did the trick here, with accelerator to
make things speed along. An alternative would be to build a simple jig to
hold the pieces in place while your glue sets up.
This kit does
have the option of building a Kingfisher with landing gear instead of
floats (yawn), and in step 5 you have to make up your mind…the attachment
points of the outriggers and the central pontoon are a bit tricky, and
very, very weak…gap filling glue did the trick here, with accelerator to
make things speed along. An alternative would be to build a simple jig to
hold the pieces in place while your glue sets up.
I glued the upright supports to the pontoon prior to attaching the whole thing to the fuselage(this is why you did not cut the access holes in step 1 ), and used a right angle square to make sure the pontoon was plumb to the assembly.
The bomb pylons were added, but not the bombs, since the castings were so bad. If you really wanted to add them, pick up some aftermarket bombs or steal some from another kit. I also left off the wheel pontoon assembly, why? We shall see…
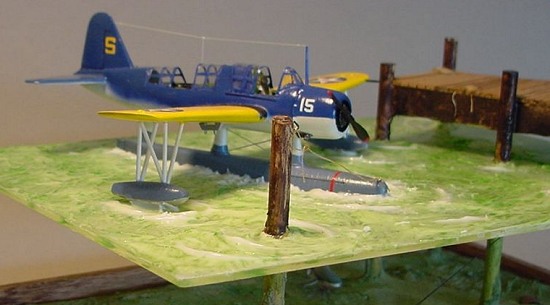
| COLORS & MARKINGS |
 Kingfishers were
painted in a variety of colours (making them a perennial favorite of
modelers), I chose an early war scheme of two-tone blue with insignia
yellow wings. In one of the reference photos from the site below, you can
see different schemes on the same tarmac! Priming the main fuselage with
grey, and the wings with white added a bit of punch to the kit after the
colours were applied. I don’t like to spray gloss colours, but instead
use Testor’s Model Master acrylic flats, and then apply several thin coats
of gloss after the paint has dried well, buffing with a 3M green pad in
between coats.
Kingfishers were
painted in a variety of colours (making them a perennial favorite of
modelers), I chose an early war scheme of two-tone blue with insignia
yellow wings. In one of the reference photos from the site below, you can
see different schemes on the same tarmac! Priming the main fuselage with
grey, and the wings with white added a bit of punch to the kit after the
colours were applied. I don’t like to spray gloss colours, but instead
use Testor’s Model Master acrylic flats, and then apply several thin coats
of gloss after the paint has dried well, buffing with a 3M green pad in
between coats.
The ribbed non-slip wing walks were painted flat black and lightly dry-brushed after the gloss had set up well, the dark black really sets off the bright yellow and cobalt blue!
Since the craft was dry enough (3 days of curing for the gloss), it was time to apply the decals. The kit decals were printed well, but were yellowed and brittle, and so discarded in favour of Superscale Pacific theater markings, which went on with no muss or fuss easily, and look fantastic.
| FINAL CONSTRUCTION |
 The kit canopies
provided are a nightmare of crazed plastic and about a scale foot in
thickness…I didn’t even want to use them as masters. The front canopy was
vacuformed , and the rest thermoformed, as they were simple curves. Keep
all of those blister packages you get when you buy new items at the
hardware store, that is where all of my clear plastic came from! I cut out
any flat bits and put them in a bin near my table instead of tossing the
package into the recycle bin, and it has saved me quite a lot of $$$$.
The kit canopies
provided are a nightmare of crazed plastic and about a scale foot in
thickness…I didn’t even want to use them as masters. The front canopy was
vacuformed , and the rest thermoformed, as they were simple curves. Keep
all of those blister packages you get when you buy new items at the
hardware store, that is where all of my clear plastic came from! I cut out
any flat bits and put them in a bin near my table instead of tossing the
package into the recycle bin, and it has saved me quite a lot of $$$$.
The front antenna mount was glued in place, and the stretched sprue lines were installed. I used a pin drill to open a hole in the center cockpit glass, glued that bit of line on, and then attached another piece to the tail…carefully pulling the line to give it the distinctive “bend” in the middle of the plane.
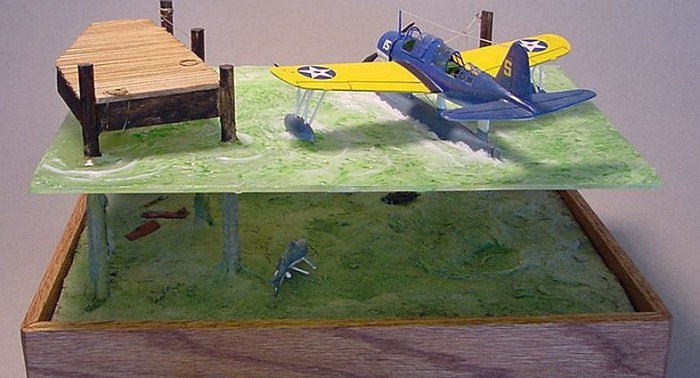
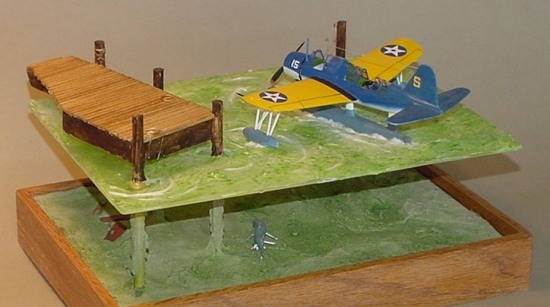
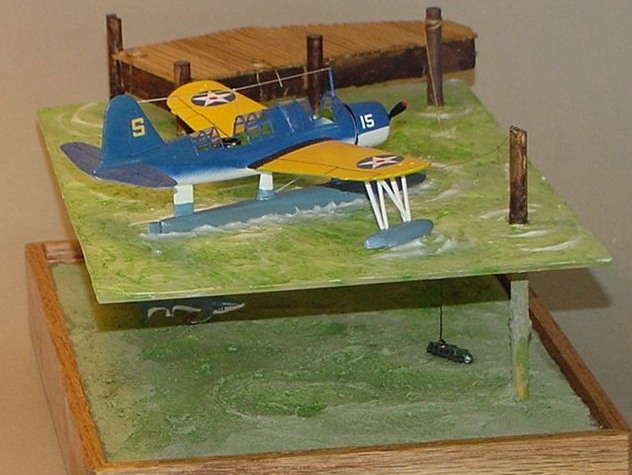
| DIORAMA |
 At
first, I wanted to display this little plane on the tarmac, but after
seeing some pretty nice shots of them on the beach sand, thought that
perhaps that would be the way to go…until a friend suggested elevating the
plane in a more 3D environment…that got the wheels turning, and after some
days of making mistakes, I had worked out a fairly good composition using
Lexan and wood.
At
first, I wanted to display this little plane on the tarmac, but after
seeing some pretty nice shots of them on the beach sand, thought that
perhaps that would be the way to go…until a friend suggested elevating the
plane in a more 3D environment…that got the wheels turning, and after some
days of making mistakes, I had worked out a fairly good composition using
Lexan and wood.
I started the
diorama when the plane was about ½ completed, so I could fix any mistakes
made to the model during the initial cutting, etc. Using an abrasive wheel
on my Dremel, I opened the main hole for the pontoon in a 1/8th
thick piece of Lexan, and drilled holes for the upright pilings of the
dock. The Kingfisher was seated as b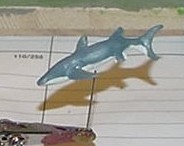 eing dry, no bombs, waiting for a
refueling, near a extension dock in the Pacific…using a spare engine for a
dock weight and fabricating a shark out of Sculpey helped to set off the
whole feeling of the diorama. The dock is made from basswood and balsa,
with ropes from my 1/96 ship spare parts box.
eing dry, no bombs, waiting for a
refueling, near a extension dock in the Pacific…using a spare engine for a
dock weight and fabricating a shark out of Sculpey helped to set off the
whole feeling of the diorama. The dock is made from basswood and balsa,
with ropes from my 1/96 ship spare parts box.
Using a green tinted acrylic gel compound, the waves were created using a small palette knife in three layers…I used the extra heavy gel, but in hindsight, would have been better of using the regular stuff…the extra heavy seizes up way too fast to work with.
| CONCLUSIONS |
 There are
only a few 1/72nd Kingfisher kits out there, and this one is
certainly a diamond in the rough…if you feel like spending some time with
styrene, you couldn’t do a better project than detailing the interior of
one of these little guys!
There are
only a few 1/72nd Kingfisher kits out there, and this one is
certainly a diamond in the rough…if you feel like spending some time with
styrene, you couldn’t do a better project than detailing the interior of
one of these little guys!
| REFERENCES |
http://aeroweb.brooklyn.cuny.edu/specs/vought/os2u-3.htm
Greg Ewald
June 2005
Copyright ModelingMadness.com. All rights reserved. No reproduction in part or in whole without express permission from the editor.
If you would like your product reviewed fairly and quickly, please contact the editor or see other details in the Note to Contributors.