|
KIT: |
Tamiya 1/48 F4U-1A Corsair |
|
KIT # |
61502 |
|
PRICE: |
$43.00 |
|
DECALS: |
See Review |
|
REVIEW & |
Parker Ewing |
|
NOTES: |
Kit has 'spinning prop and motor. |
|
HISTORY |
When I first got into modeling about a year ago, I had a solid vision in my head on what I wanted my first diorama to look like. I've always enjoyed the Corsair and the South Pacific theater, so I set out to create them. It worked out fairly well, but as I improved my skills and eye for detail, glaring problems would emerge and bug me. Unwilling to construct another one, I opted to re-work this diorama three times with various improvements. When I finally replaced the Corsair, I felt it was finally complete.
|
THE KIT |
This is Tamiya's prop-spinning Corsair version. It's the exact model except
for the motor included. To mark my one year anniversary in modeling, I decided
to try my first kit surgery and ordered the Aires gun bay set, and an Eduard
detail set which covered additions to the landing gear and cockpit. It was time
to step into the big leagues, or so I thought. While waiting for them to arrive,
I took a deep breath and cut out the vertical tail control surfaces. Using a
razor blade and a scribing tool, it wasn't as hard as I thought, and I was off
and running. Shep Paine had nothing on me.
|
CONSTRUCTION |
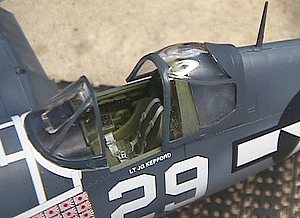 Starting with the cockpit, I sprayed everything Polly Scale US interior
green. I painted certain consoles and the instrument panel black, and then began
to pick out details with dry brushing and a toothpick. The dials were brushed in
aluminum. While waiting for that to dry, I decided to try another first and
undercoated every exterior piece in Alclad aluminum b/c I really wanted to try
and chip the paint later. It smells awful, but man, what a nice finish it gives
you. Once dry, I weathered the interior parts with a burnt umber wash and
drybrushed a chipped paint look on everything applicable. I flat coated all the
pieces and put some gloss drops into the dials. Once done, I finally started
putting them all together. The cockpit looked great and I was rolling.
Starting with the cockpit, I sprayed everything Polly Scale US interior
green. I painted certain consoles and the instrument panel black, and then began
to pick out details with dry brushing and a toothpick. The dials were brushed in
aluminum. While waiting for that to dry, I decided to try another first and
undercoated every exterior piece in Alclad aluminum b/c I really wanted to try
and chip the paint later. It smells awful, but man, what a nice finish it gives
you. Once dry, I weathered the interior parts with a burnt umber wash and
drybrushed a chipped paint look on everything applicable. I flat coated all the
pieces and put some gloss drops into the dials. Once done, I finally started
putting them all together. The cockpit looked great and I was rolling.
However, my run at the pro's was about to come to a crashing halt. The motor
fit in fine, but when I dry fit the cockpit, the fuselage wouldn't fit right.
Something about the cockpit fit was wrong. I spent an hour filing edges,
checking, and rechecking to no avail. Although it was close, I simply could not
figure why it wouldn't fit. Frustrated, I finally committed an MCS (modelers
cardinal sin) by going the I'm-going-to-make-it-fit route. It worked, and there
were no gaps! But to my horror, there suddenly appeared a small crack in the
side fuselage. After staring in disbelief for a minute, I rallied by figuring I
could repair it and then cover with the large national insignia.
 With confidence somewhat shaken, I focused on the Aires gun set. My first
opened gun bay.....it was going to be cool. I busted out the razors, Dremel, and
sanding pads, and went to town. But as I started cutting, I noticed the
instructions were very vague. The drawing they gave showing what to cut out
didn't completely match the kit and installation procedures were virtually
non-existent. I had done a good job of cutting the wing out, but the gun bays
were way too thick to make the wing fit. Since the damn instructions were
useless, I set out on my own with my trusty Dremel to try and figure it out. The
short version is that I got it almost workable, but I was losing confidence and
patience in the gun bay set rapidly. My gut said it wasn't going to work and/or
look good. I sat back and took it all in.......I had a cracked fuselage, and a
cut up wing I didn't like. I began to realize that Shep Paine didn't sweat me.
A peace overcame me.
With confidence somewhat shaken, I focused on the Aires gun set. My first
opened gun bay.....it was going to be cool. I busted out the razors, Dremel, and
sanding pads, and went to town. But as I started cutting, I noticed the
instructions were very vague. The drawing they gave showing what to cut out
didn't completely match the kit and installation procedures were virtually
non-existent. I had done a good job of cutting the wing out, but the gun bays
were way too thick to make the wing fit. Since the damn instructions were
useless, I set out on my own with my trusty Dremel to try and figure it out. The
short version is that I got it almost workable, but I was losing confidence and
patience in the gun bay set rapidly. My gut said it wasn't going to work and/or
look good. I sat back and took it all in.......I had a cracked fuselage, and a
cut up wing I didn't like. I began to realize that Shep Paine didn't sweat me.
A peace overcame me.
I knew what needed to be done. The clock said 6:30 pm. I somberly drove to the
hobby store down the street, purchased another Corsair kit at full price and
walked out before I got emotional. I was home 20 minutes later.......Sometimes
you just have to cut your losses. I removed the engine and cockpit from the
original fuselage and put it into the new set. Another thing I had done while
waiting for my goodies to arrive was to put together, paint, and weather every
part I could. Therefore, construction went forth fairly quickly and easily with
no problems.
|
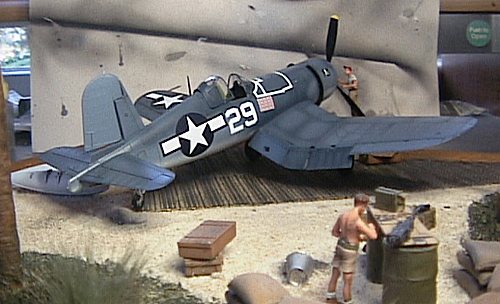
PAINT & DECALS |
Now for my favorite part of modeling. I've always been fascinated by South
Pacific Corsairs as their paint jobs faded so badly in some cases that they took
on a washed out/ bleached look. I've yet to see Corsairs done quite the way many
of the reference pictures show and I wasn't about to experiment, but a heavy
weathering job I could do. The Alclad aluminum was covered with Gunze 54 (Navy
Blue) as the base color. Gunze 56 (Intermediate Blue) was free handed as the
medium blue. I've think free handing in this case gives the more softer look
that's needed. A word of warning though.....You'll need to lighten this color
significantly to achieve the proper contrast. The bottom was Tamiya flat white.
 Then I got to my favorite part....panel fading. No other step brings the model
to life like this one. Lightening up the base color about 50%, I sprayed lightly
in a circular motion inside panels. I also hit the middle of all the flap
recesses. Since the top of the aircraft would be exposed heavily, I hit that as
well. I finished this step by misting a quick coat over the entire model. The
last thing was to run a quick mist of the original base color in order to smooth
it all out. The final effect is wonderful. It gives the model a used and
textured look. More importantly, no part of the surface looks monolithic. Things
were coming together......my confidence was soaring. After the Gunze gloss coat
was applied, I applied a burnt umber wash that brought out the panel lines on
the top and bottom. Using Q-tips, I wiped away the excess in the airflow
direction. The bottom of the model received an especially liberal dose of wash
as I wanted it to be really dirty.
Then I got to my favorite part....panel fading. No other step brings the model
to life like this one. Lightening up the base color about 50%, I sprayed lightly
in a circular motion inside panels. I also hit the middle of all the flap
recesses. Since the top of the aircraft would be exposed heavily, I hit that as
well. I finished this step by misting a quick coat over the entire model. The
last thing was to run a quick mist of the original base color in order to smooth
it all out. The final effect is wonderful. It gives the model a used and
textured look. More importantly, no part of the surface looks monolithic. Things
were coming together......my confidence was soaring. After the Gunze gloss coat
was applied, I applied a burnt umber wash that brought out the panel lines on
the top and bottom. Using Q-tips, I wiped away the excess in the airflow
direction. The bottom of the model received an especially liberal dose of wash
as I wanted it to be really dirty.
The
chipping had mixed results. Pulling tape didn't work at all, and chipping with a
razor and/or toothpick didn't look right so I ended up using light sandpaper and
lightly scrubbing areas. Some areas it worked, others it rubbed off the
undercoat. I'd love for someone to tell me how best to do this. I had ordered
Aeromaster's ‘Island Hopping Corsairs' and ended up using a mix of the it and
the kit decals to re-create Ira Kepford's rig. Micro-Sol snuggled them right
down. Weathered a few more areas like gun and engine residue with Tamiya Smoke
and Gunze Soot and finished everything with the best flat coat in the
world......PollyScale. Lastly, the wingtip lights were painted silver, then
coated with clear gloss colors. The only thing left was my traditional playing
of the ‘Hallelujah Chorus' and parading the finished model in front of my
unamused wife.
Now for the cool part....firing up the engine. I checked all my wiring and
broke out a brand new AA battery. Everything was ready and I brought in my
lovely wife to flick the propeller for good luck. She would be impressed. She
flicked it.........Nothing. Again.......nothing. I was in shock. That turned to
anger as she exited the room with that smirk on her face. After breaking down
the battery assembly numerous times, consulting an electrician that works for
me, and even a trip to Radio Shack, I couldn't get it to work. Something was
wrong with the motor itself which of course was buried deep into my beautifully
finished plane. In a sober and humbling moment, I finally cut the wires out of
the Corsair. Lesson learned: test the motor before installing. When Tamiya
issues that $250 Zero of theirs with motor and lights........I'll be wiser and
ready.
|
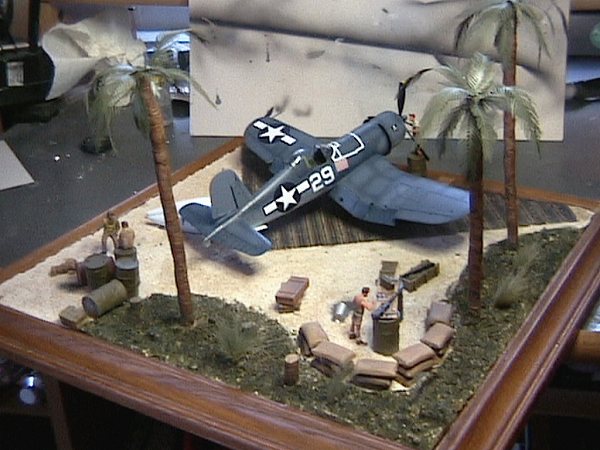
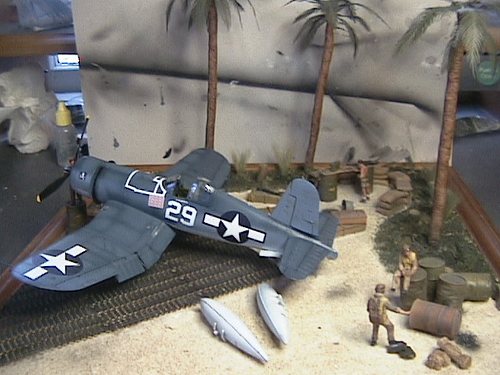
THE DIORAMA |
The palm trees were the resin/PE combo from Verlinden, and although they
were about $14 a piece, they were worth it. They're what draws the eye first and
they have a perfect lean to them. I had to cut them down to scale a little bit,
so I 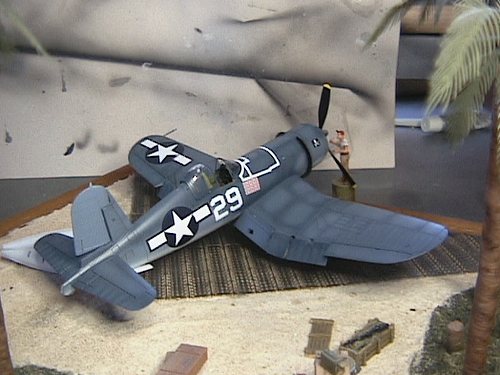 took the extra pieces and created stumps so as not to waste them. The
ground work is Celluclay with a combination of sand and RR ballast mixed in for
texture. I sprayed white glue over the top to seal everything and prevent the
sand from falling away. This had to be done a few times and was a really messy
procedure, but was accelerated by using little pressurized air cans from office
supply stores. The foliage is plain old sawdust sprayed varying shades of green.
took the extra pieces and created stumps so as not to waste them. The
ground work is Celluclay with a combination of sand and RR ballast mixed in for
texture. I sprayed white glue over the top to seal everything and prevent the
sand from falling away. This had to be done a few times and was a really messy
procedure, but was accelerated by using little pressurized air cans from office
supply stores. The foliage is plain old sawdust sprayed varying shades of green.
My first surgery was relatively minor and involved improving the groundwork
But my second was a dozy. I've seen a few pictures of the PSP plating and always
thought they brought so much life to a scene. Verlinden's set was unbelievably
expensive, so I started looking around. DJ Parkins out of England makes a
wonderful line of accessories in 48th scale and they carried the PSP. I got two
large sheets covering over a square foot of photo etched PSP for like 20 bucks.
The Verlinden set would've cost over $100 in the same size. DJ Parkins rules. I
had to cut and sand half my groundwork out in order to set this stuff properly,
but once it was painted in burnt iron and weathered, it looked the part and I
was beside myself with modeler's joy. The pilot figures are from the kit and the
crew is actually Verlinden's Luftwaffe summer crew. The rest of the stuff are
random accessories from Academy and Tarmac.
|
CONCLUSIONS |
A lot of fun to build. All mistakes were mine. Tamiya's Corsair is a jewel
and deserves all it's accolades. After one year in modeling, I've learned one
unassailable rule. Every mistake I've ever made, without exception, has occurred
though impatience. But I am learning. I appreciate all the stuff you guys put on
the web, and everyone I write to with questions has been just super. If I can
ever return the favor, please feel free to write.....just don't mention the
motor.
If you would like your product reviewed fairly and quickly by a site that has thousands of visits a day, please contact me or see other details in the Note to Contributors.