
Flying Kiwis 1/72 F4U-1A Corsair
|
KIT # |
KC 40 |
|
PRICE: |
$10.95 NZD |
|
DECALS: |
One Aircraft |
|
REVIEW : |
Mark Fordham |
|
NOTES: |
Hasegawa kit with locally produced decal.` |
|
HISTORY |
History copied from instruction sheet and originally written by Warren P Russell.
Flt/Lt Peter Gifford OC "A" Flight No 19 Squadron, Torokina Bougainville, 1944 had this to say about the Corsair:
"In the F4U the United States has an outstanding aircraft, it never quite caught the worlds admiration as did the Spitfire, Hurricane or ME-109, but there is no doubt it played a major role in destroying the Japanese forces in the Pacific.
Unfortunately the F4U came to us only in March 1944 and RNZAF pilots had no occasion to test its combat manoeuvrability. But it was obvious that it could so outpace and out climb all Japanese opposition that manoeuvrability would not have been a major issue.
 While an ugly duckling on land, once airborne the F4U was in its element.
With its two-stage, supercharged 2,000 hp radial engine, it was a very fast
fighter being rated at 417 mph at 20,000 ft – we found it would do that. The air
cooled radial was far less vulnerable to small arms ground fire and it had an
excellent service ceiling.
While an ugly duckling on land, once airborne the F4U was in its element.
With its two-stage, supercharged 2,000 hp radial engine, it was a very fast
fighter being rated at 417 mph at 20,000 ft – we found it would do that. The air
cooled radial was far less vulnerable to small arms ground fire and it had an
excellent service ceiling.
For a fighter it was a big aircraft, almost twice the weight of a Spitfire or Hurricane and two and a half times that of a Zero. The pilots sitting position was fairly upright and located further back than the trailing edge of a rather large mainplane. This made forward visibilty on the ground very poor, taxiing was a continual zigzag. Prior to touchdown there was a period of hopeful uncertainty as the runway seemed to disappear from view. This was especially so in night landings on some of the Pacific’s narrower jungle-lined airstrips.
|
THE KIT |
The Corsair is another one of Flying Kiwis’ "bagged" Kitset similar to their RNZAF P51D Mustang. This time using the Hasegawa F4U-1 Corsair mouldings.
The Corsair is moulded on three sprues in light grey plastic with a thin clear canopy.
 The instructions are printed on a wonderful shade of slime green A4 paper and
includes a photo of a corsair "somewhere in the Pacific" Assembly and painting
instructions, and a nice little decal sheet with marking for one plane.
The instructions are printed on a wonderful shade of slime green A4 paper and
includes a photo of a corsair "somewhere in the Pacific" Assembly and painting
instructions, and a nice little decal sheet with marking for one plane.
Turning to the moulding we can see that they are typical Hasegawa, no flash, well moulded with fine raised panel lines, some detail in the wheel-wells and cockpit but the purist will want to at some extra detailing.
There is however some Ejector pin marks on the inside of the wheels that are going to be hard to remove.
|
CONSTRUCTION |
 This is one of those no-brainer kitset that you sometimes wish for after
completing that 6 month Resin or vaccuform project, In other words it Dam near
makes it’s self.
This is one of those no-brainer kitset that you sometimes wish for after
completing that 6 month Resin or vaccuform project, In other words it Dam near
makes it’s self.
After assembling the cockpit, which needed a little extra detail added to along the sides of the fuselage to fill up the interior was painted US Interior Green. Once dry the kit decals were added to the instrument panel and consoles, not as flash as the Tamiya F4 kit but at this scale the decals do the job. Scott Van Aken's wonderful Minicraft/Hasegawa F4U-1 Review (may not currently be available) shows how to add the extra details to the interior
Assembling the fuselage presented no problems and no filler was needed at all. In fact I barely had to do any sanding on the joint. Wings were assembled next and again no problems were encountered, apart from having to prise the front joints apart to add the separate oil cooler fins that I had forgotten to glue in before. Doh!
Wing assembly was then glued to the fuselage and because of the way that Hasegawa have approached this means that there is almost no need for filler, a tiny dribble of superglue was needed on the underside joint and that was it.
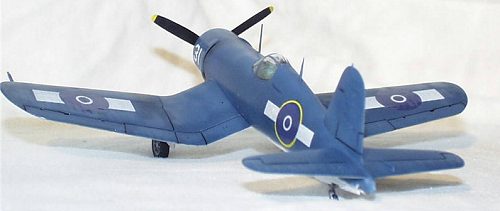
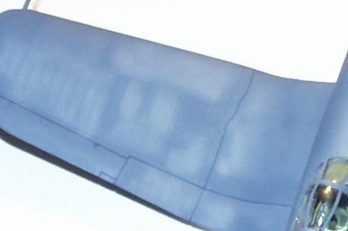
Tailplanes were added and this is getting boring but again no filler was needed. In fact the only time I had to break out the filler was to fill the flap step in (see photo)
Total assembly time for the major airframe was less than 1 hour. Remember the days when you could build up that Airfix or Matchbox Bf-109, paint it, slap the decals on it and have it flying around the living room terrorizing the cat in less than ½ hour? Wheels were cleaned up, flats filed on the bottoms and ejector pin marks disguised as much as possible by re-scribing the tread pattern using a razor saw. While on the subject of undercarriage remember that when fitting the tailwheel to remove the arrester hook as RNZAF Corsairs did not have them fitted.
|
PAINT & MARKINGS |
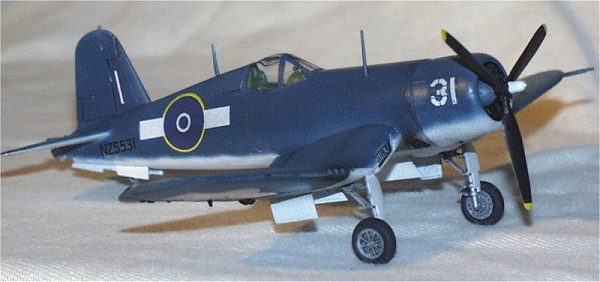
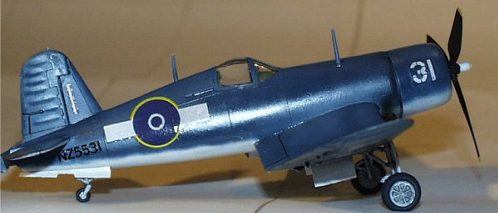
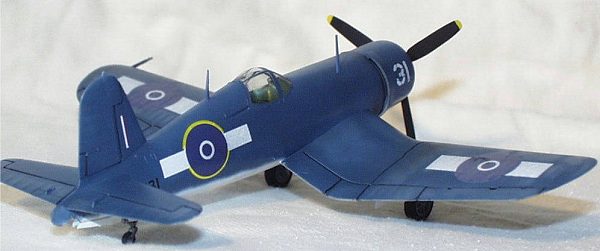
RNZAF Corsairs saw active service in Bougainville and although never scored a kill over Japanese aircraft were used extensively for ground attack duties in conjunction with CAC Boomerangs of the RAAF, Most of the time the Corsairs were operating in hot dry dusty conditions with very little maintenance to unimportant details like paint.
Most NZ Corsairs were painted Matt White undersides with NZ Ocean Blue uppers which due to the climate didn’t stay pristine for long, the blue in particular fading and weathering badly.
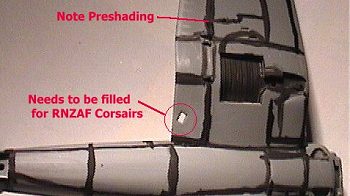 First step was to pre-shade all panel lines (see photo) then Tamiya XF-2 Flat
White was carefully sprayed over the bottom of the aircraft, with the airbrush
set to about 3 mm spray width the squares between the black pre-shaded panels
were painted in.
First step was to pre-shade all panel lines (see photo) then Tamiya XF-2 Flat
White was carefully sprayed over the bottom of the aircraft, with the airbrush
set to about 3 mm spray width the squares between the black pre-shaded panels
were painted in.
Then with the airbrush adjusted out to its maximum setting light coats were misted over the entire bottom until the required results were achieved.
Once I was happy with the results the underside was masked off and the NZ
Ocean blue (Tamiya XF-18 Medium Blue with a drop or two of white added) was
sprayed over the rest of the aircraft using the same technique as the
 underside.
To weather the upper wings and fuselage even more I added about 5 drops of light
grey to the remainder of the paint left in the airbrush and lightly dusted the
very top of the fuselage to give the paint that UV faded look. Random panels
were carefully painted in on the wings and tailplanes to give it a patchy look.
underside.
To weather the upper wings and fuselage even more I added about 5 drops of light
grey to the remainder of the paint left in the airbrush and lightly dusted the
very top of the fuselage to give the paint that UV faded look. Random panels
were carefully painted in on the wings and tailplanes to give it a patchy look.
After a quick coat of future and leaving for 24 hours it was time to apply the decals, only one aircraft is shown in the instructions No 31 NZ 5531 stationed at Ardmore part of No 3 Service Unit a backup to the units fighting in the Pacific.
Like all Flying Kiwis’ decals to-date they went on with no fuss or problems. Once dry and light exhaust and gun smudging added the Corsair was given a final coat of future and left to dry overnight
Small sundry items were added and finally you have a RNZAF Corsair to add to the collection of Mustangs and P-40s.
I usually don’t add the aerial wires to my aircraft as they have to be
displayed on open selves and leaving the rigging off makes it a lot easier to
dust them.
|
CONCLUSIONS |
The Flying Kiwis’ Corsair went together in about four evening of work with no problems whatsoever, It’s one of those models that you can do if your feeling a little jaded about the hobby or have just started into the hobby as an absolute beginner. It makes into a very nice little model and is about 1/3 rd the price of the Hasegawa offering.
|
REFERENCES |
Wanaka Warbirds – G S Morris and W P Russell
http://www.kiwiaircraftimages.com/corsair.htmlNZPAF-RNZAF Aircraft Colour Schemes – W P Russell.
If you would like your product reviewed fairly and fairly quickly, please contact the editor or see other details in the Note to Contributors.
Back to Reviews Page 2015