
Revell 1/72 P-39 Airacobra
| KIT #: | ? |
| PRICE: | $? |
| DECALS: | I'm sure the kit came with them |
| REVIEWER: | Mark Fordham |
| NOTES: | Oldie but a goodie |
| HISTORY |
The P-39 Airacobra was the first US Army fighter with tricycle landing
gear, and was also unique for having its engine placed behind the pilot in
the middle of the aircraft. Other interesting features included a 37mm
cannon firing through the propeller hub, a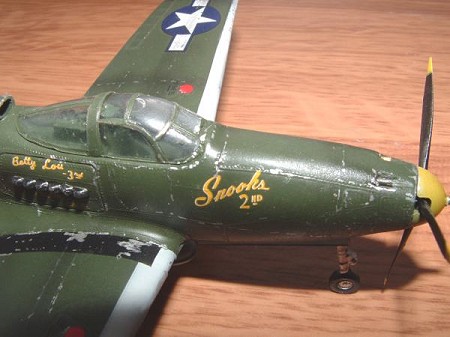 nd access to the cockpit via a
door in the fuselage (as opposed to a moveable canopy). While not noteable
as an air-to-air fighter (in American hands), the P-39 performed well as a
ground attack aircraft. However, the Russians received nearly 5000 P-39s
through the lend-lease program, and they used them successfully as air
defense fighters on the Eastern Front. About 200 P-39s originally
designated for export to the British were repossessed by the USAAF, and
were known as P-400s; these were used in the early Southwest Pacific
campaigns such as at Guadalcanal.
nd access to the cockpit via a
door in the fuselage (as opposed to a moveable canopy). While not noteable
as an air-to-air fighter (in American hands), the P-39 performed well as a
ground attack aircraft. However, the Russians received nearly 5000 P-39s
through the lend-lease program, and they used them successfully as air
defense fighters on the Eastern Front. About 200 P-39s originally
designated for export to the British were repossessed by the USAAF, and
were known as P-400s; these were used in the early Southwest Pacific
campaigns such as at Guadalcanal.
Due to general laziness the history is from Daveswarbirds.com.
| THE KIT |
Now first off this is not one of the Revel Wunder kits that have been released in the last few years, sure the boxing is new but the model is still the original 60’s fair that I remember building as a kid, hell it still has the optional side cover so you can display the motor, the funky do-nut tyres and the masses of raised rivet and panel lines.
A new boxing, updated instructions and a new set of decals is all you get for your money in this re-issue, however the Revell P39 still can be made up into a nice little model, not as accurate and detailed as the Academy offering for sure but still a favourite of many (Including your editor who has to have built at least a half dozen of these neat Revell kits.Ed).
| CONSTRUCTION |
You know considering how old the moulds are for this model the general fit is pretty good, like most 60’s models cockpit detail wasn’t an option and you get the generic seat and generic Mr pilot, you do get a nicely detailed radio to fill out the back of the canopy, once the seat and radio was fitted and the front wheel well was blocked off the fuselage was closed up and care was taken to hide the join lines without wiping out too much rivet detail.
 I decided to not display the detailed engine this time as I had done that
so very many times as a kid, so the engine cover was glued into place and
the one sided engine consigned to the spares bin
I decided to not display the detailed engine this time as I had done that
so very many times as a kid, so the engine cover was glued into place and
the one sided engine consigned to the spares bin
The one piece lower wing was glued next and once dry the upper parts of the wings were glued on, with a little bit of care and some deft trimming I was able to fit the upper parts without having to use any filler on the wing roots. I did however re-scribe the wing details after sanding all those golf ball rivets off.
The wheel wells are completely bare of detail and okay I could have spent hours and hour scratch building the wheel wells I decided I just couldn’t be bothered, hell it’s going to sit at the back of a display cabinet for the rest of it’s life.
With the main construction done it was time to fit the spinner to the props, now when compared to the Academy model the Revell nose is just wrong, the spinner is way to short and round, the nose is too skinny and long and the prop blades, again to skinny, all in all the Revell P39 could stand to put a little weight on.
The front undercarriage in my kit had been damaged beyond repair so a new one was scratched from sprue, I also replaced the original do-nut wheels with a set the same diameter from the spares box, I also made new door covers out of 5 tho plastic card as the originals were about 4 feet thick.
| COLORS & MARKINGS |
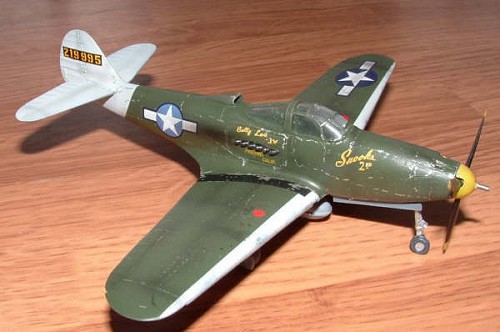
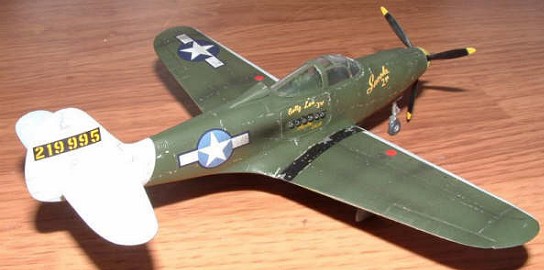 Like most P39’s this one's Olive Drab over Neutral Gray, first off the Gray
was sprayed on and then masked off, the Olive Drab was then gunned on and
left to harden for a day or two, now the chap that had sent me this model
had also included a spare set of Heller decals for Snooks 2nd so
the tail had to be masked off and sprayed white.
Like most P39’s this one's Olive Drab over Neutral Gray, first off the Gray
was sprayed on and then masked off, the Olive Drab was then gunned on and
left to harden for a day or two, now the chap that had sent me this model
had also included a spare set of Heller decals for Snooks 2nd so
the tail had to be masked off and sprayed white.
The wing edges were also masked of and sprayed white as well, with the major painting done the Heller decals were then added with no problems, these settled down well with my home made decal softener (85% Boiled water, 15% Acetic Acid and a drop of dishwashing liquid).
Once the decals had dried off it was time to make the plane look a like “dinged” … well lets be honest here, it looks like the entire German Army has walked over it on the way back to Berlin. Here is a case in point of a man given a Sliver pen and not knowing when to stop! I doubt if Snooks 2 ever looked this beat up but I did it to hide the fact that the Revell kit is really basic and toy like.
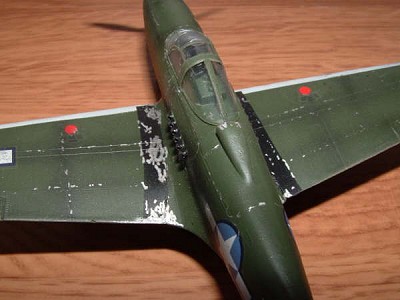 With over the top weathering the eye is distracted from the fact that
there is very little detail, the nose profile is all wrong, the front
undercarriage is wrong and that I'm a klutz with painting and decaling.
With over the top weathering the eye is distracted from the fact that
there is very little detail, the nose profile is all wrong, the front
undercarriage is wrong and that I'm a klutz with painting and decaling.
| CONCLUSIONS |
Want a well detailed P39? – buy the Academy one, Want a more accurate P39? – Buy the Academy one, Want a slap together weekend project with the kids for mock dogfights?- Buy the Revell one, Since the late 90’s when Academy released there P39 the Airfix/Heller and Revell P39’s have basically become BB gun targets or wet weekend slap togethers for the kids, A nice model can be made out of it but it’s easier to buy the Academy one.
| REFERENCES |
Microsoft Combat flight Sims (the P39’s in the PC game look a lot like the Revell one)
August 2005
Copyright ModelingMadness.com
If you would like your product reviewed fairly and fairly quickly, please contact the editor or see other details in the Note to Contributors.