PM 1/72 C-45 Expeditor
| KIT #: | PM 0304 |
| PRICE: | $6.98 MSRP |
| DECALS: | Two options |
| REVIEWER: | Joel Hamm |
| NOTES: |
| HISTORY |
Liaison and utility aircraft hold a certain fascination, perhaps because they, as this modeler once was, were civilians drafted into OD. Between Airfix and the Czech consortium, it’s possible to collect most of the US L and U Birds, but a biggie that’s been overlooked is the Beech 18. PM, Turkish Models, is the only company to kit this plane in 1/72 (Editor's Note: Hobbycraft also do the Beech 18 but it isn't much improvement); but it’s a poor production, requiring patience, skill, surgical techniques, and a very uncritical eye to emerge with a representation worthy of the plane’s service. Mind you, I’m not whining about the quality – just telling it like it is.
 With so much
aviation information available on the Web, some of it perhaps accurate,
there’s no sense saying much more than that the plane was a ’30’s design,
aimed at the perceived executive twin market, which subsequently went to
war as a transport, trainer, and all around hack, for every US service and
many allies. According to the FAA registry, gobs of them are still flying.
With so much
aviation information available on the Web, some of it perhaps accurate,
there’s no sense saying much more than that the plane was a ’30’s design,
aimed at the perceived executive twin market, which subsequently went to
war as a transport, trainer, and all around hack, for every US service and
many allies. According to the FAA registry, gobs of them are still flying.
| THE KIT |
PM offers a limited portfolio, with no particular theme. Those I’ve encountered combine the simplicity of Matchbox with the quality of early Airfix. If Matchbox’s engraved panel lines are jokingly called “trenches”, then PM’s must be “Grand Canyons”. The other main point of contention is their transparencies, which can hardly be so labeled. They are thick, rough, dimpled, cloudy, and – oh yes – they don’t fit worth a hoot. It’s a case of “no joy” in the spares box hunting up a new windshield; though for other Lindberg-like parts, such as engines, props, and wheels, replacements can be found.
| CONSTRUCTION |
First step with a kit such as this is to have a good sit-and-think about what stage of repair will be attempted, and how the mods will be carried out. Easiest task to tackle on the Beech was the boxed-in wheel wells. These were cut open, leaving only enough original boxing to hold the legs, and fitted with bulkheads and stringers according to a real 18 that happened to be sitting at my home airport.
 Transparencies posed the greatest
challenge. I’ve fiddled with several ways of making windows without pains
(ha ha) and none is completely satisfactory. For this project I decided to
back up the cabin window openings with clear sheet, fill the resulting
depressions with clear epoxy, then sand and polish the outer surface till
they’re flat, flush, and clear. Flushness would pose a ticklish masking
problem, for which I devised a personal computerized solution. I black
taped over the inside of the windows for contrast, then placed the
fuselage half on the scanner bed to create a full size image. I cropped
and cleaned up the window outlines with the photo editor, printed them on
peel&stick labels, then when ready to mask carefully cut them out with
surgical scissors. On a more delicately detailed kit all that sanding would
be destructive, but PM’s line scribing was so heavy that loss of detail was
no problem. 400 grit is coarse enough for starters, then 600, 800, 1000,
1500, and 2000; all available at the auto body section of Wal Mart. Another
handy item to purchase there is Johnson Wax’s Kit Scratch Out, for a final
polishing (also works wonders on car paint).
Transparencies posed the greatest
challenge. I’ve fiddled with several ways of making windows without pains
(ha ha) and none is completely satisfactory. For this project I decided to
back up the cabin window openings with clear sheet, fill the resulting
depressions with clear epoxy, then sand and polish the outer surface till
they’re flat, flush, and clear. Flushness would pose a ticklish masking
problem, for which I devised a personal computerized solution. I black
taped over the inside of the windows for contrast, then placed the
fuselage half on the scanner bed to create a full size image. I cropped
and cleaned up the window outlines with the photo editor, printed them on
peel&stick labels, then when ready to mask carefully cut them out with
surgical scissors. On a more delicately detailed kit all that sanding would
be destructive, but PM’s line scribing was so heavy that loss of detail was
no problem. 400 grit is coarse enough for starters, then 600, 800, 1000,
1500, and 2000; all available at the auto body section of Wal Mart. Another
handy item to purchase there is Johnson Wax’s Kit Scratch Out, for a final
polishing (also works wonders on car paint).
That took care of the cabin windows but
there were still two more problems. The overhead oval windows on the real
plane were omitted from the model, and had to be drilled and filled with
epoxy, then sanded and polished. The windshield is what threatened to
consign the project to the “Wait Until Someone Else Issues a Decent Version
of this Plane” pile. Aside from having the surface texture and clarity of
rock candy, it simply did not fit. Since nothing remotely suitable could be
found in the spares bin, the only solution was to reshape and polish both
sides, then glue it in place caulking the spaces sparingly with quick set
epoxy. Too much and the capillarity of the stuff will draw it into the
crack and down the inside of the glass.
 Once the seals were hard, the whole
windshield and roof got a liberal coat of more epoxy. After that set hard
enough to sand (several days – even for “quick set” glop) the whole
diminishing-grit smoothing and polishing process had to be repeated. After
the framing was painted on, several coats of Future produced a clear
windshield seamlessly joined to the fuselage.
Once the seals were hard, the whole
windshield and roof got a liberal coat of more epoxy. After that set hard
enough to sand (several days – even for “quick set” glop) the whole
diminishing-grit smoothing and polishing process had to be repeated. After
the framing was painted on, several coats of Future produced a clear
windshield seamlessly joined to the fuselage.
Forgot to mention – Even though nothing is visible, I fashioned an interior using seats from a crashed Arii Cessna Skymaster. The flight deck was similarly built up with bits and pieces. Engines were another point of contention. Those supplied with the kit were simplistic buttons. A search of the spares box produced a single Engines’n’Things resin replacement, so I duplicated this using my home brewed resin casting method. The details of this process have been sent to our editor for publication, but I haven’t seen them posted. Perhaps he, as other editors who have received it before, is scared of being sued to smithereens by kit and aftermarket part makers.
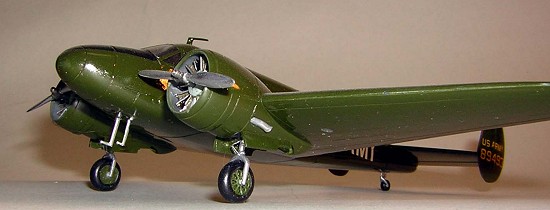
| COLORS & MARKINGS |
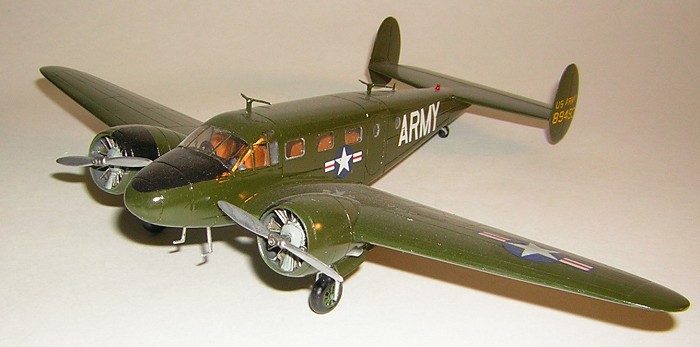
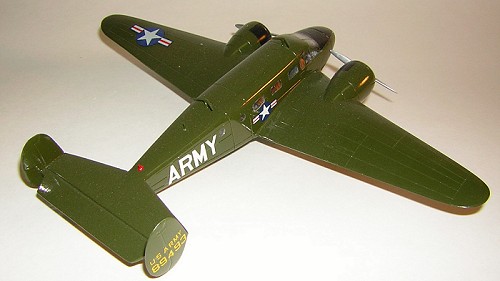
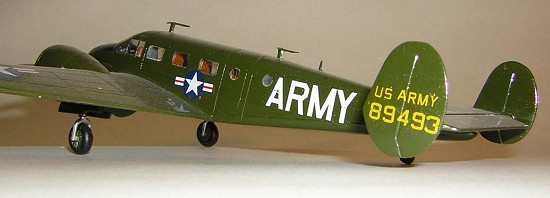
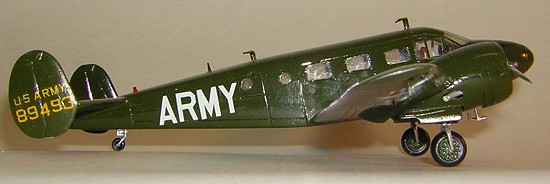
The kit provides decals for one Turkish and one US a/c, both in NMF. Even if the decals were useable – they were not, being reminiscent of early Airfix – a kit as seriously sand blasted and abraded as this was no candidate for aluminum paint. A search of my library turned up several views of a ‘50’s, or maybe ‘60’s, era Beech in overall glossy US Army Olive. Shiny OD is made by adding a few drops of orange to Testors bright green, throwing in a smidgen of white for scale effect.
 Markings all came
from the spares envelope, with codes having to be individually cut from
numbers and letters sheets. Not easy with presbyopic eyes.
Markings all came
from the spares envelope, with codes having to be individually cut from
numbers and letters sheets. Not easy with presbyopic eyes.
| FINAL CONSTRUCTION |
Stock wheels and landing gear legs were acceptable, but all other add-ons came from the parts bin or were scratch built (VOR antennae). The plane’s prominent exhaust stacks also escaped the kit designer’s notice, but they were easily fashioned form snippets of hollow core solder wire and drilled into the nacelles.
| CONCLUSIONS |
Some other company has just got to kit a decent version of the Beech 18. Stay tune to this space for “Son of a Beech” – a review of the companion AT-11 Kansan.
October 2005
Copyright ModelingMadness.com
If you would like your product reviewed fairly and fairly quickly, please contact the editor or see other details in the Note to Contributors.