| KIT: | Academy 1/72 P-40E Warhawk |
| KIT #: | 1671 |
| PRICE: | AUD$13.25 |
| DECALS: | Three options |
| REVIEWER: | Peter Hobbins |
| NOTES: | Model includes various aftermarket & home made bits. |
| HISTORY |
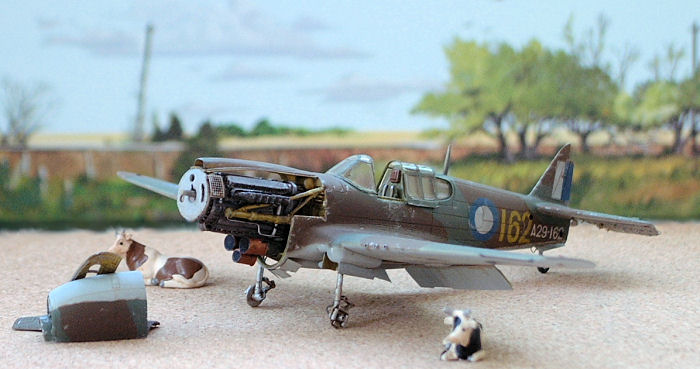
The P-40 is well known and well documented; even my 3-year-old son knows it as the “shark plane”, so clearly 112 Squadron RAF and the AVG ‘Flying Tigers’ have a lot to answer for! Of interest to Australians, the P-40 served in larger numbers with the RAAF than any other fighter – almost 1000 in total. They were a key component in foiling Japanese plans in New Guinea and later went on to perform sterling work in the ground-attack role through the island-hopping campaigns. However, by 1945 Kittyhawks were clearly obsolete and were rapidly demobilised and scrapped. The particular aircraft I chose to model here, A29-162, served from 1942–45 before being towed out to a bombing range in 1947 and presumably blown to bits!
| THE KIT |
Scott’s inbox review of the Academy P-40M/N gives a pretty close rundown on the contents and quality of this very similar kit. Academy’s P-40 kits were released in the mid 1990s and rapidly superseded the previous offerings in the field. They feature nice (perhaps slightly too deep) engraved panel line details, accurate shapes, no gimmicks like movable ailerons, and offer a good range of decals (I didn’t use the kit decals although they look a tad thick to me). The canopy is also fairly thick – no way can you cut it apart and pose it open. Otherwise, the plastic is nice to work with – thankfully, considering what I did to this kit – and most assemblies click into place as a testament to sound engineering. The instructions are clear and no doubt a very nice model can be built straight from the box.
| CONSTRUCTION |
Our model club (APMA) decided to have a group build contest for 2005, in which we all had to start with the Academy P-40E but could take it anywhere from there. I decided to go to town with this kit and have fun with lots of the aftermarket bits in my stash, in addition to trying out a few new techniques. In thinking about the best way to display the various ‘bits’ exposed, I came across some fantastic pictures of abandoned P-40s at the end of the war and a scenario came to mind. In particular, I wanted to show a derelict P-40 on or about the day before it received a 500 lb direct hit!
The aftermarket sets I used for this project were:
Clearly the original kit was about the cheapest part of this model!
 Anyways,
construction started by chopping up the fuselage – I removed the rudder,
the tailwheel bay infill and also the entire cowling area (carefully
retaining the lower cowl area which is not included in the Wurmcastings
set). I then also had to grind down the fuselage sides to accept the True
Details cockpit, which then fitted in very snugly. As this slots in from
underneath the fuselage, I painted it before installation, glued the
fuselage halves together, then just had to sand smooth and repaint the join
on the rear bulkhead once the resin section was installed. In removing the
True Details seat from the casting block, however, I ham-fistedly destroyed
it so I had to replace it with a photoetch one from Eduard (which is not
quite the correct version for this mark of Kittyhawk). In retrospect, while
I like the True Details instrument panel, I wish I had used the Eduard
photoetch one and left it full of gaping holes, as most Kittyhawks had
their instruments removed when the airframe was placed in storage. I also
had to grind down the forward fuselage a bit to fit in the firewall from
Wurmcastings; their set is designed to have only the upper cowls removed,
whereas I wanted the entire engine exposed, but it nevertheless fitted very
neatly.
Anyways,
construction started by chopping up the fuselage – I removed the rudder,
the tailwheel bay infill and also the entire cowling area (carefully
retaining the lower cowl area which is not included in the Wurmcastings
set). I then also had to grind down the fuselage sides to accept the True
Details cockpit, which then fitted in very snugly. As this slots in from
underneath the fuselage, I painted it before installation, glued the
fuselage halves together, then just had to sand smooth and repaint the join
on the rear bulkhead once the resin section was installed. In removing the
True Details seat from the casting block, however, I ham-fistedly destroyed
it so I had to replace it with a photoetch one from Eduard (which is not
quite the correct version for this mark of Kittyhawk). In retrospect, while
I like the True Details instrument panel, I wish I had used the Eduard
photoetch one and left it full of gaping holes, as most Kittyhawks had
their instruments removed when the airframe was placed in storage. I also
had to grind down the forward fuselage a bit to fit in the firewall from
Wurmcastings; their set is designed to have only the upper cowls removed,
whereas I wanted the entire engine exposed, but it nevertheless fitted very
neatly.
I like to fit the tailplanes before the mainplanes as I find they can help set everything square later on. In this case I carefully sliced away the elevators and glued the horizontal stabilisers to the fuselage. Then, using plans, I recreated the elevator structure from a solid piece of plastic carved to shape for the leading edge, and thin pieces of plastic card for the ribs. Once these were superglued in place, I painted them interior green and then covered the entire elevator with metal foil from an Easter egg, attaching it with superglue and joining the folded-over ends at the rear. Then it was simply a matter of cutting the overhanging foil to shape with scissors and re-attaching the elevators to the stabilisers. Why I did this will become apparent later; it sounds quite fiddly but was actually surprisingly easy and I now wish I had also done the same for the ailerons.
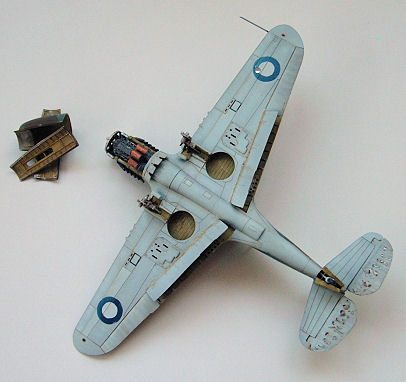
Moving to the wings, I drilled out the gun ports, removed the flaps and sliced off the moulded-in undercarriage bays. The latter are pretty nice in the kit, but don’t accurately represent the hollow underhang of a P-40’s wheel wells. Then I ground down and sanded the lips of the undercarriage bay to something more like scale thickness, and smoothed out the underside of the upper wing, ready for later placement of the Eduard flap ribs. The boxed-in wheel wells were made up from the Eduard set and superglued in place, then the wing tops were joined to the one-piece lower and the whole assembly was then glued to the fuselage. I had a little bit of a problem with the wing roots requiring a bit of filler and sanding. Technically I should have removed the gun blast tubes and recreated them lower down (they actually sit below the centreline of the leading edge), but instead I just drilled them out.
 A few other
detail pieces then followed. The Aires engine was attached to some scratchbuilt engine bearers (these do not form part of the Wurmcastings
kit) and the oil filters, ducting and wiring underneath were scratchbuilt
from plastic tubing, fuse wire and photoetched mesh. The undercarriage legs
had some detail added in the form of brakes on the hubs and some brake
lines, plus various photoetch pieces from Eduard. The flaps and ribs were a
bit fiddly but a sharp scalpel, thin superglue and gripping forceps
(tweezers) soon saw everything in place fairly soon. I then superglued the
flaps on to the underside of the wing; they had to be trimmed slightly as
they are not intended for this kit, but otherwise looked the part. In
retrospect I would have liked to have made some hinges or other attachment
points inside the flaps, as it is hard to get a strong join along that very
narrow edge, and in fact both flaps snapped off at various stages during
painting. Finally, I separated the Falcon vacform windshield from the
canopy and glued it to the coaming, blending it in with a little Gunze Mr
Surfacer. The kit rear windows were used but for some reason the framing
protrudes from the fuselage side, so I trimmed it off. Then the whole
airframe was polished using Micro-Mesh cloths and washed prior to painting.
A few other
detail pieces then followed. The Aires engine was attached to some scratchbuilt engine bearers (these do not form part of the Wurmcastings
kit) and the oil filters, ducting and wiring underneath were scratchbuilt
from plastic tubing, fuse wire and photoetched mesh. The undercarriage legs
had some detail added in the form of brakes on the hubs and some brake
lines, plus various photoetch pieces from Eduard. The flaps and ribs were a
bit fiddly but a sharp scalpel, thin superglue and gripping forceps
(tweezers) soon saw everything in place fairly soon. I then superglued the
flaps on to the underside of the wing; they had to be trimmed slightly as
they are not intended for this kit, but otherwise looked the part. In
retrospect I would have liked to have made some hinges or other attachment
points inside the flaps, as it is hard to get a strong join along that very
narrow edge, and in fact both flaps snapped off at various stages during
painting. Finally, I separated the Falcon vacform windshield from the
canopy and glued it to the coaming, blending it in with a little Gunze Mr
Surfacer. The kit rear windows were used but for some reason the framing
protrudes from the fuselage side, so I trimmed it off. Then the whole
airframe was polished using Micro-Mesh cloths and washed prior to painting.
| COLORS & MARKINGS |
While I had one photo of A29-162 from the front, showing a well-worn look, it didn’t tell me much about the camouflage or fuselage-side markings. I ended up going with a standard RAAF Kittyhawk pattern and deduced the yellow ‘162’ would have appeared behind the fuselage roundels, in common with many other aircraft from 2 Operational Training Unit (this machine’s last posting before retirement).
However,
because I wanted this aircraft to be really battered and neglected, I
actually underpainted the original USAAC colours of Olive Drab over Neutral
Grey. Over this I sprayed the RAAF colours of Sky Blue, Foliage Green and
Earth Brown, trying not to completely cover up the underlying shades
(although I pretty much did). I also used lots of post-it notes to create
panels of 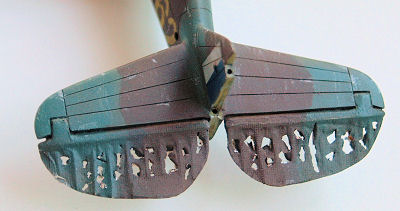 differing paint intensity to suggest irregular fading. The
markings were also a tricky point – it’s hard to successfully fade decals,
so in the end I masked and sprayed the roundels, fin flash and yellow ‘162’
numbers, again underdoing the intensity to leave a faded look. I also
oversprayed the hint of white stars on the relevant roundels to show
through the previous USAAC markings – these were obvious in some photos of
abandoned RAAF P-40s. The small serials under the tail were the only decals
used – these were placed on a small panel coated with Future and sealed in
with several more coats of the same.
differing paint intensity to suggest irregular fading. The
markings were also a tricky point – it’s hard to successfully fade decals,
so in the end I masked and sprayed the roundels, fin flash and yellow ‘162’
numbers, again underdoing the intensity to leave a faded look. I also
oversprayed the hint of white stars on the relevant roundels to show
through the previous USAAC markings – these were obvious in some photos of
abandoned RAAF P-40s. The small serials under the tail were the only decals
used – these were placed on a small panel coated with Future and sealed in
with several more coats of the same.
When the painting was finished, I rubbed the airframe over with Micro-Mesh to try to wear off some of the outer paint layer and reveal the USAAC colours, but I got a bit scared about rubbing all of the paint off so I was pretty cautious here. The model then had some thinned raw umber artist’s oil worked into the panel lines, using the same to make some oil/hydraulic dribbles down the flaps. I then took a sharp scalpel to the elevators and proceeded to rip irregular holes in them between the ribs to simulate torn fabric; the exposed metal pieces were then touched up with a linen colour. Finally, the model received several coats of Testors Dullcote, some paint chips were applied with silver paint and a silver pencil, and there we go. OK, the last step was actually cleaning up and painting a couple of railroad accessory cows, but as they (usually) don’t fly I won’t review them here!
| CONCLUSIONS |
The Academy P-40E is a very nice kit in itself, and can be built quite easily from the box. The canopy and decals are a bit thick, but certainly usable. In the end this model comprised about 50% kit and 50% aftermarket/scratchbuilt, and in so doing I learned a few new techniques like making fabric-covered control surfaces and painting on markings. If you want a kit to practice a few techniques on – battle damage, faded paintwork, dioramas – then Academy’s P-40s are cheap, go together easily and the plastic is quite amenable to whatever you throw at it. Go on, get that razor saw out now …
January 2006
| REFERENCES |
Ernie McDowell. Curtiss P-40 in Action. Squadron/Signal Publications, 1976.
Geoffrey Pentland. RAAF Camouflage & Markings 1939–45 Vol 2. Kookaburra Technical Publications, 1989.
Stewart Wilson. The Spitfire, Mustang and Kittyhawk in RAAF Service. Aerospace Publications, 1988.
If you would like your product reviewed fairly and quickly by a site that has over 300,000 visitors a month, please contact me or see other details in the Note to Contributors.