Minicraft 1/48 XF5F-1 'Skyrocket'
|
KIT # |
11626/11628 |
|
PRICE: |
$26.00 (approx) |
|
DECALS: |
One option |
|
REVIEWER: |
Chuck Horner |
|
NOTES: |
Eduard detail set (48-285) and Aeromaster decals used |
|
HISTORY |
The Naval BuAer came to realize by 1935
that the 12-minute climb to 20,000 feet of their current crop of fighters
was ineffectual in protecting their capital ships from bombers. By 1937
they had conceded that no single-engine aircraft in
 development could
achieve any better. As such, a twin-engine, single-seat interceptor
specification was issued. On 8 July 1938, Grumman's G-34 design was
awarded a BuAer contract, designated XF5F-1 and assigned BuAer No. 1442.
development could
achieve any better. As such, a twin-engine, single-seat interceptor
specification was issued. On 8 July 1938, Grumman's G-34 design was
awarded a BuAer contract, designated XF5F-1 and assigned BuAer No. 1442.
The XF5F, in its original configuration was a snub-nosed, twin-engine, twin-tail design. It was powered by two Wright R-1830’s of 1200 horsepower, rotating in opposite directions to eliminate torque. The design allowed for a central gun installation in the nose and five mini-bomb bays in each outer wing. These housed twenty 5.2 lb anti-aircraft bombs, to be dropped through bomber formations. The fuselage nose, ending nearly a foot behind the leading edge of the wing, allowed for unobstructed forward visibility by the pilot and also the placement of engines in close to the centerline of the aircraft.
So distinctive was the design that it became the "super weapon" of the 1940's comic book hero "Blackhawk". Readers of that time saw an entire squadron of Skyrockets fighting evil in each episode, when in reality, only one aircraft was ever built.
 The
XF5F-1 Skyrocket made its first flight on 1 April, 1940. The aircraft
soon achieved a top speed of 358 mph and could climb to 10,000 ft in 4
minutes. It also achieved 505 mph in a vertical dive. But testing found
design flaws.
The
XF5F-1 Skyrocket made its first flight on 1 April, 1940. The aircraft
soon achieved a top speed of 358 mph and could climb to 10,000 ft in 4
minutes. It also achieved 505 mph in a vertical dive. But testing found
design flaws.
From March to July 1941, Grumman made extensive modifications including extending the nose forward and the engine nacelles back. Further testing continued until the summer of 1942 when Grumman and the Navy concluded that the design was still flawed and would not go into production.
A year earlier, Grumman had constructed a second prototype for the Air Corps. This featured a very long nose with a tricycle gear configuration. It was designated XP-50. The project was canceled after the aircraft was lost over Long Island Sound in May 1941 from an in-flight explosion.
The XF5F soldered on as a flying test bed for the Navy. It was finally stricken in December 1944 after two landing gear failures. The airframe had made 211 flights and had 155 flying hours on it.
As the war progressed, Grumman took the knowledge learned on the XF5F and XP-50 and produced the F7F Tigercat.
|
THE KIT |
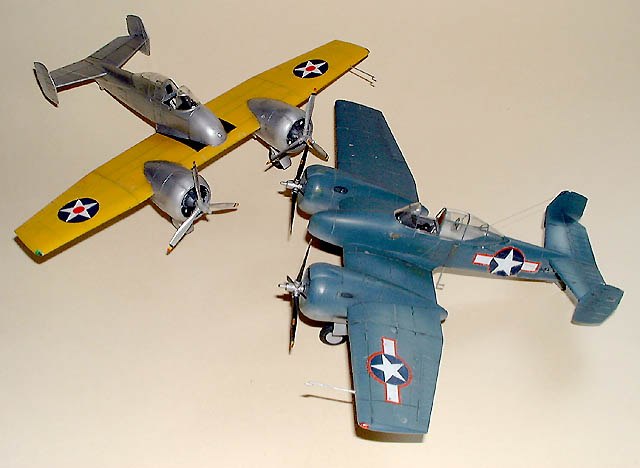
With the introduction of this kit, the Grumman fan can now build every Navy fighter from the F3F through the F9F (as well as the F-14) in 1/48 scale. Minicraft produces two kits of the Skyrocket: No. 11626 is the short-nose version and No.11628 is the long-nose. This represents the same (one and only) airplane, BuNo 1442 in an early and late stage of development. These kits are produced in Minicraft’s standard light gray, dense plastic. Surface details are finely recessed but simple. The clear pieces are ok but somewhat thick and slightly milky.
The Short-nose kit has 77 pieces on two sprue trees and the Long-nose has 92 parts on three trees. Except for a slightly different canopy, the long-nose has all of the pieces of the short-nose kit.
 Both
kits contains optional pieces as well. Two of the three vertical tail
configurations are included along with the added wing fillets.
Both
kits contains optional pieces as well. Two of the three vertical tail
configurations are included along with the added wing fillets.
My example of the Long-nose only had the earlier red-centered star insignia that comes with the short-nose. This does not allow you to build the later blue and gray variant that is shown in the directions.
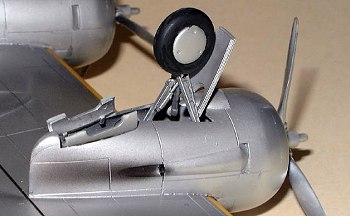
Minicraft includes a nose gun-bay with four 50 cal. guns in the short-nose version. The Skyrocket went through numerous armament proposals, finalizing on the four .50 cal. Machine guns. But I could find no evidence that the aircraft ever flew with these installed, so I did not use them. Besides, what Minicraft gives you looks like wood-block, mock-ups, in a featureless compartment.
The engines, on the other hand, are very nicely done. Each engine is six pieces plus the propeller. This includes separate push-rod assembly, exhaust and intake manifolds and nose case. I cannot say that they are completely accurate for the Wright R-1820, but after building up a set, I found it better detailed than the resin replacements that I purchased.
|
CONSTRUCTION |
I started my research with Steve Ginter's Naval
Fighters Series # 31 on the Skyrocket. It is recommend in the directions
and is about the only source of information on this somewhat obscure
airplane. The book is a reprint of articles by David Lucabaugh and Bob
Martin, that appeared in the American Aviation Historical Society Journal
in 1989. 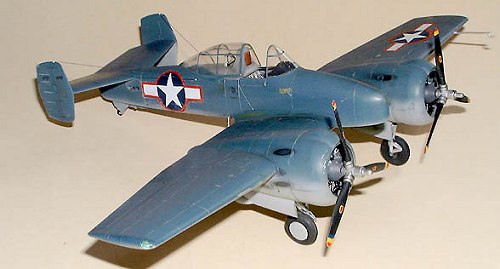
Experimental aircraft of that era progressed mostly by trial and error. This meant that there were lots of changes to a design. The Skyrocket was no different. Besides the major changes already noted, the aircraft went through different gear doors, vertical tails, wing fillets and prop spinners, some of which are offered in the kit.
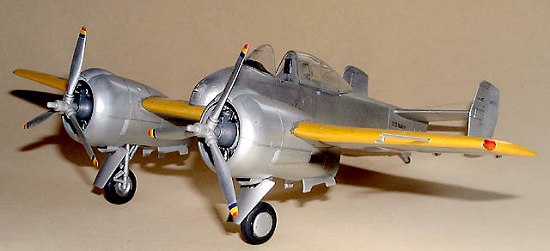
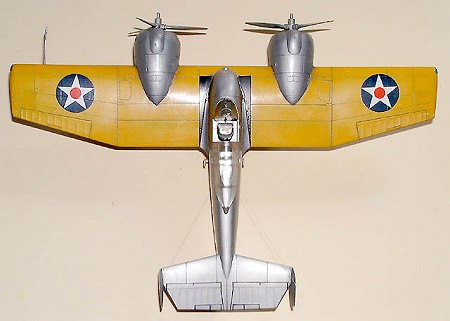
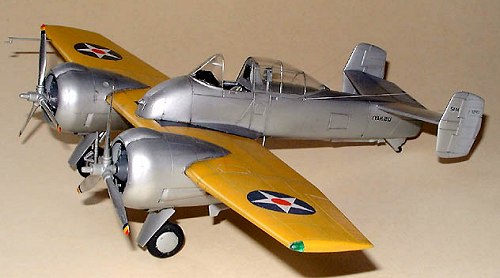
I had decided to build the short-nose version out-of-box and concentrate on the Chrome yellow and Aluminum exterior painting. It would be at the end of its Phase I period with the second tail configuration and wing fillets. I also planned to build the long-nose version in blue and gray, but with more details added.
Short-Nose Skyrocket
Most models start with the cockpit. This one is a little different -- it starts with the wing. The top and bottom halves of the wing are glued together, making a straight-through, single piece that the nacelles slipped over the front and the fuselage sits on top. The "cockpit" consists of an instrument panel, stick and seat, set on the top of the wing, near the trailing edge. The fuselage is later placed over this.
Normally, I don't do the external painting until after assembly. But in this case, it seemed natural to paint the wing yellow before adding the silver nacelles and fuselage.
 One
note, the directions call for the clear wing-tip lights to be added
here. I put this off to the very end, but then found that they didn't
fit well. It is much easier to sand, polish and mask them at this
earlier point, before painting the wing.
One
note, the directions call for the clear wing-tip lights to be added
here. I put this off to the very end, but then found that they didn't
fit well. It is much easier to sand, polish and mask them at this
earlier point, before painting the wing.
After masking off the cockpit floor area, I gave the top of the wing an under-coat of white, pre-shaded the seams with dark brown, and then several coats of chrome yellow. This color wraps around the leading edge and wing tips by 6 scale-inches. The underside is painted aluminum.
When everything was dry, I added the cockpit pieces. Except for the black instrument panels, the real cockpit was bare aluminum with a clear lacquer. I painted the model appropriately.
Next, I assembled the fuselage and tail. The fit was very good except for the nose. Minicraft's gun bay doors and nose cap took some sanding and filling to make a smooth contour. The entire assembly was glued to the top of the wing.
Then disaster! The nacelles are made up of four pieces: a nose ring, a single over-the-wing piece, and two under-wing pieces that form the wheel-well. These pieces are completely interchangeable and actually fit better wrong than they do right. Once off the trees, it's hard to tell left and right.
Being an "expert modeler", why would I need to study those "stinking" directions! I installed the under-wing parts backwards (right to left). They were a perfect fit. I remembered thinking that it was strange that the exhaust was on the inside of the nacelles, but it WAS an experimental design and who as I to second-guess Grumman. I didn't discover my error until I went to dry-fit the landing gear and found they pointed in.
 Trash
one model! In trying to remove my mistake, the brittleness of the
plastic became apparent, as pieces shattered when trying to pry them
loose. When I glued those suckers, they stayed glued.
Trash
one model! In trying to remove my mistake, the brittleness of the
plastic became apparent, as pieces shattered when trying to pry them
loose. When I glued those suckers, they stayed glued.
Oh well... that one was just for practice any ways!
I tore open the long-nose kit and started over. As I said earlier, all the parts are there to build the short-nose except for the early-style canopy. Since I had managed not to destroy this piece yet, I took it from my original kit.
After several days, I had duplicated my efforts (and purchased another long-nose kit).
The model is engineered to have the landing gear struts installed when you glue the lower nacelle halves together. It is a complicated, tri-pod structure that needs carefully attention to get it to line up correctly. I elected to install these after painting and had to modify them slightly to make them fit.
The Long-Nose Skyrocket
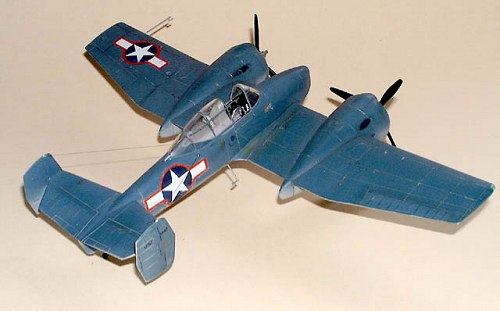
In the meantime, I was starting construction on the long-nose version, learning from my mistakes. I had decided to build the kit as it looked late in life, painted blue and gray. A black & white photo in Ginter's book showed it with a star & bar with a dark surround, indicating the 1943 red border or later over-printed blue border. The aircraft was well worn, being near the end of its career. In any case, I thought the red-border star & bar would look good.
I bought the Eduard Photo Etch set and resin replacement engines. I also scrounged a set of red-surround, star & bar decals from an AeroMaster F4F sheet.
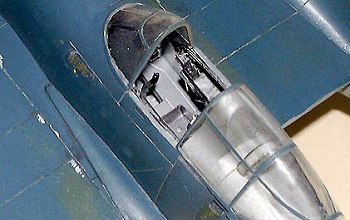 The
Eduard set is primarily a cockpit replacement. It includes two
instrument panels (early and late), a seat, belts, and assorted boxes and
panels that hung off the side braces.
The
Eduard set is primarily a cockpit replacement. It includes two
instrument panels (early and late), a seat, belts, and assorted boxes and
panels that hung off the side braces.
I shaved down the cockpit side-walls and glued .025 wire to the inside of the fuselage. This nicely simulated the fuselage tube structure that the instrument boxes hang off. The Eduard pieces fit very well, even those that have to be folded or layered. The cockpit was painted the same silver and black as the other kit.
After inspecting the resin replacement Wright R-1820's that I had purchased, I discarded them in favor of the kit engines. Except for having the rear accessory casing, the detail was much softer than the kit's pieces. I added the Eduard supplied wiring harness and painted them same as the first kit.
The rest of the construction was the same as the short-nose, except that I glued the nacelles on correctly the first time.
|
COLORS AND MARKINGS |
As I said earlier, I pre-painted the major components of the snub-nose model using Testors Chrome Yellow for the top of the wing and Testors Aluminum Metalizer for the rest of the model. After lightly buffing the Aluminum, I coated the silver with Metalizer Sealer. This not only protects the Metalizer, but evens out the tone to look more like the silver lacquer that was on the airplane.
 Markings
were very simple -- just the pre-war star and the four digit Bu.No. on
the tail. Once done, I sealed the model again and added some
"ware-and-tear". The airplane was flown in this configuration for about
one year before modified into the long-nose so I kept the "ware" light.
The gloss yellow wing needed something to brake up the sheen. A little
"dirt" in the seams and some minor paint chipping helped to do this.
Markings
were very simple -- just the pre-war star and the four digit Bu.No. on
the tail. Once done, I sealed the model again and added some
"ware-and-tear". The airplane was flown in this configuration for about
one year before modified into the long-nose so I kept the "ware" light.
The gloss yellow wing needed something to brake up the sheen. A little
"dirt" in the seams and some minor paint chipping helped to do this.
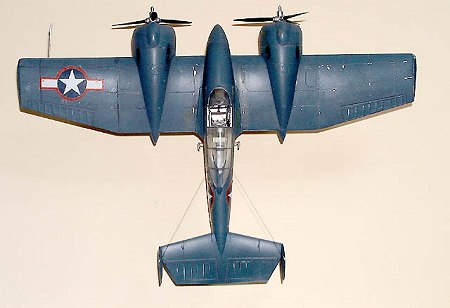
The Long-nose is depicted as it was in late 1943 at NAS Floyd Bennett. The plane has been a hack test aircraft for nearly a year and half. There was only one year of life left in her before being unceremoniously scrapped after two landing gear failures. In April 1943, the silver and yellow livery was replaced by the standard Navy blue and gray paint.
I use the Tamiya acrylic paints for this model. After it was dry, I applied the red-surround star-and-bar from the Aero Master F4F sheet and the BuNo on the tail. The model was then weathered more extensively than I did for the short-nose.
|
CONCLUSIONS |
The kits build up into a pair of nice, unique models. The fit is generally good and the detail, although sparse in some areas, is clean and crisp. If you’re a Grumman fan, these are a “must have.” My hat is off the Minicraft for picking a very different subject matter. It fits in well with my Hobbycraft P-35, and P-36 models.
|
REFERENCES |
Ginter’s Navel Fighters #31: Grumman XF5F-1
April 2004
Copyright ModelingMadness.com. All rights reserved. No reproduction in part or in whole without express permission.
If you would like your product reviewed fairly and quickly, please contact the editor or see other details in the Note to Contributors.