|
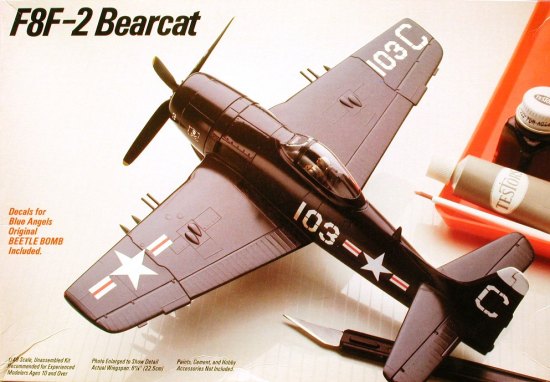
KIT: |
Testors 1/48 F8F-1/2 Bearcat |
|
KIT # |
589 |
|
PRICE: |
$7.00 (1990) |
|
DECALS: |
Two Aircraft |
|
REVIEWER: |
|
|
NOTES: |
Hawk Reissue |
|
HISTORY |
The F8F Bearcat was Grumman’s swan song to propeller-driven, carrier-based fighter plane development. Conceived as a short-range interceptor to counter kamikaze attacks during the US Navy’s campaign to wrest control of the Pacific islands from the Japanese in the final phases of WWII, the Bearcat arrived too late for combat service.
The design was inspired by the Focke-Wulf Fw-190 after captured examples were evaluated by Grumman test pilots sent to England for this very purpose. Their conclusions were transferred to paper in the form of a proposal to mate the most powerful version of Pratt & Whitney’s R-2800 Twin Wasp into an all-new Wildcat-sized airframe.
Translated into hardware, the new aircraft emerged as a lightweight dog-fighter with an unprecedented rate-of-climb and outstanding maneuverability. Sporting a blown plexiglas canopy for all-around visibility, the design featured the full complement of mandated ship-board naval equipment, armor protection for the pilot, and four wing-mounted .50 caliber machineguns.
A lengthy flight-test program followed which delayed full production of the new aircraft. As well, Pratt & Whitney was hard-pressed to fulfill demand for the engines since wartime exigencies had taxed their manufacturing capability beyond the requirements of both the Navy and the Army. Production of the newly named F8F-1 Bearcat did not commence until early 1945.
Deliveries to stateside training squadrons began in July of 1945 and regular fleet units started receiving the aircraft in November. Meanwhile, the Navy began testing the waters with a new jet-powered fighter, the McDonnell FH-1 Phantom. With the handwriting clearly on the wall, the Navy curtailed purchases of the F8F, amending production contracts to reflect its new infatuation with turbine power.
Though orphaned by emerging technology, further
refinements to the basic design produced the F8F-1C. This variant supplanted
the machinegun armament in favor of a like number of 20-millimeter cannon. A
redesign of the wing was required to accommodate the enlarged ammunition
magazines for these guns while a fairing was added over each weapon to allow
clearance for the larger breeches.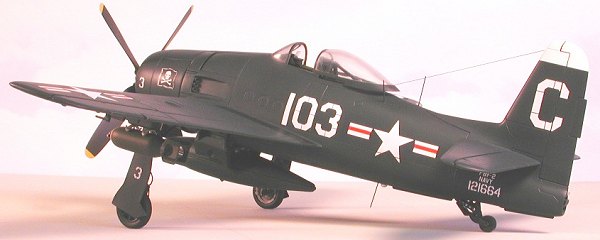
A dedicated night-fighter was likewise produced, with the necessary radar equipment carried asymmetrically on a wing pylon. Glare shields were mounted on the cowling to preserve the pilot’s night vision while the wing cannon were fitted with flash suppressors. The aircraft was designated the F8F-1N but it was not the success the Navy had hoped for due to the overtaxed pilot’s workload.
Midway through the Bearcat’s production run a more powerful R-2800 was mated to a modified F8F-1. Due to the increased torque of the new power plant the vertical fin was enlarged by twelve inches in height as a countermeasure. These changes were standardized and adopted on Grumman’s production line along with the improved cannon armament and the resultant aircraft were designated F8F-2.
Sub-types among the -2 Bearcats included both night-fighter and photo-reconnaissance versions, named respectively the F8F-2N and F8F-2P. As before, the F8F-2N suffered for want of a second crewman to operate the radar and in any event, radar performance was less-than-stellar due to vibrations with pod-mounting the set on a wing pylon. Conversely, the -2P was a respectable platform and was the last Bearcat variant to be withdrawn from active fleet squadron service.
As the early F8F-1s and -1Cs were retired, many found new homes with the French Air Force and were used in the light strike and close air support role during that country’s futile attempt to maintain its colonial hold over Indo-China after the Second World War. Subsequent users included the fledgling South Vietnamese Air Force (VNAF) and the Royal Thai Air Force. By 1960 these too had been retired as war-weary and obsolete.
Despite its limited range the Bearcat was generally well-regarded by its pilots who learned quickly to appreciate the fighter’s outstanding power-to-weight ratio and roll-rate. Shipboard take-offs at combat weight without catapult assistance were considered de rigueur and the F8F-1 was the last propeller-driven aircraft flown by the U.S. Navy’s Blue Angels. Restored examples of the Bearcat can still be seen in ‘warbird’ guise, working the air show circuits.
|
THE KIT |
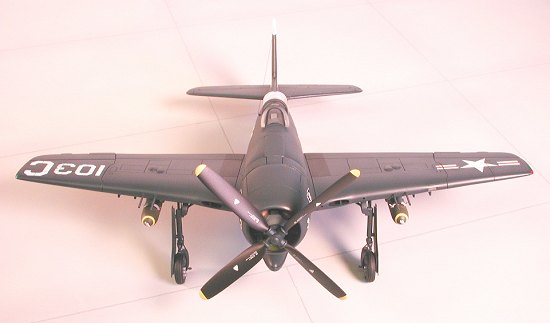
Testors’ F8F-1/2 Bearcat kit consists of 33 pieces molded in light gray, two clear parts, decals for two different aircraft, and an instruction booklet offering a recommended assembly sequence, color specifications, and a brief history of the aircraft. Notes are included to convert the model from an F8F-2 to the earlier F8F-1 version, as well as four-view drawings to assist in decal placement. This kit is a re-pop of the original Hawk Model Company release dating from 1967. In the earlier guise, the kits were molded in either white, dark blue, or clad with Hawk’s proprietary “Authenti-Plate” process, which featured multi-textured exterior panels over which chrome plating was applied. Markings for the Royal Thai Air Force were included with the plated edition.
 This kit is akin
to one of those crazy relatives we keep locked up down in our cellars…an
embarrassment to behold, time-consuming to work with, and difficult to
comprehend. The exterior detail consists of recessed panel lines on the
fuselage, with raised lines on the wings and stabilizer. The interior is
comprised of a rude-and-crude seat, an equally dismal pilot, and an ill-shaped
instrument panel to which a decal is affixed.
This kit is akin
to one of those crazy relatives we keep locked up down in our cellars…an
embarrassment to behold, time-consuming to work with, and difficult to
comprehend. The exterior detail consists of recessed panel lines on the
fuselage, with raised lines on the wings and stabilizer. The interior is
comprised of a rude-and-crude seat, an equally dismal pilot, and an ill-shaped
instrument panel to which a decal is affixed.
The propeller and power plant are this kit’s bright spots though the engine sports only nine of the required eighteen cylinders and the gear case is of the blunt-nosed variety more commonly found on the P-47 Thunderbolt. The Aeroproducts four-bladed prop is adequate for the task though the blades require a modest amount of thinning for a proper scale appearance.
The landing gear……well, it has some. The struts are usable though they lack the torsion rod and retraction jack necessary for strength and stability. The doors are too thick by half and the wells are naked save for some murky details on the underside of the wing tops and inside the fuselage. The wheels are too narrow and the hub detail is incorrect when compared to the prototype. The tail wheel, though a bit over-simplified, can be used.
The canopy transparencies are very poor due to errata on the inner surfaces caused by overuse of the molds and should be replaced by vacuform equivalents. External stores consist of a centerline fuel tank, two poorly-rendered 1000-lb bombs, and four 5-inch HVAR rockets. Antennas and cannon barrels are molded integral with the fuselage and wing halves making seam clean-up problematical.
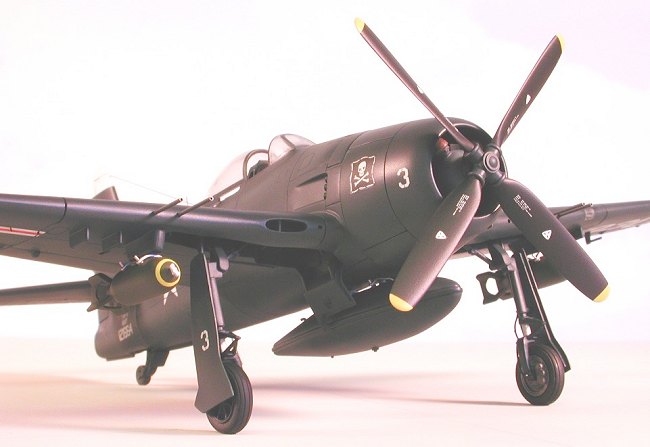
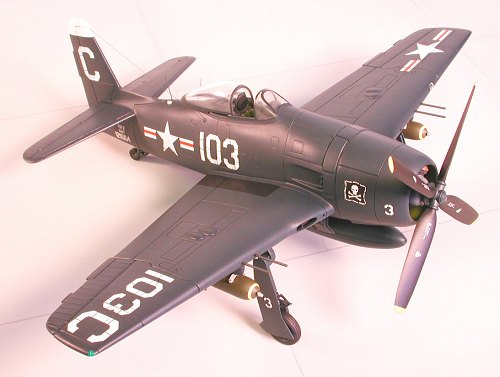
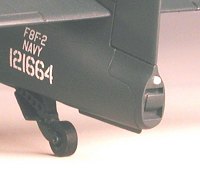
The Scalemaster-printed decal offers markings for BuAer No. 121664, an F8F-2 assigned to VF-17 aboard the USS Franklin D. Roosevelt circa 1949, and BuAer No. 95187, the all-yellow “Beetle Bomb” Bearcat assigned to the Blue Angels in 1949. (note: instructions are included to assist the modeler in converting this model to the earlier short-finned variant for Blue Angel use.)
|
CONSTRUCTION |
By now y’all are thinking “But Rog, but Rog—there’s
a newer state-of-the-art Bearcat kit from Hobbycraft…why flog this dog?” A-ha
my friends, there is logic behind my apparent lunacy. I had an opportunity to
examine an OOB build-up of the H/C model and the bottom line is, it has just as
many fleas as the Testors pooch. Same shape problems with the cowl lip, a poor
representation of the R-2800, totally fictitious gear wells, oversimplified
struts, totally incorrect wheel hubs (light-fingered directly from the H/C
T-33!), and similar problems with the shape of the vertical fin—both resemble a
frustrated modeler’s extended middle digit futilely pointing skyward. No me
buckos, I’m sorry…the Hobbycraft kit gets no cigar. Frugal iconoclast that I
am, I concluded that I could abuse myself for half the price, ergo it’s the
Mesozoic-era fossil from Testors for me. On to the build…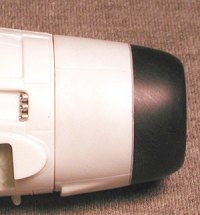
My first combat operation was a frontal assault
on the misshapen cowling. After removing the lip at the first panel line with a
razor saw, I sectioned in an equivalent piece removed from a Monogram P-61
cowling. Though slightly oversized, the Monogram part had enough ‘meat’ on it
to allow me to file and sand the new lip to conform to the Hawk, er…Testors
cowling. CA was used both to bond and fill, and when it was dry I rescribed the
access panels to conform to my reference drawings. The lower cooling outlet was
scored and back-cut with a #11 blade until daylight showed through from the
cowling’s front opening.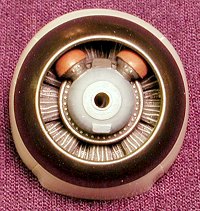
The as-issued
engine in this kit, though incorrect, offered a nicely detailed gearbox and nine
good cylinders. I decided to go with it though I reconfigured the powerplant to
reflect the correct eighteen-piston layout. I used a second engine pirated from
the Hawk/Testors P-47D kit as a donor for the additional cylinders. After
cutting away the molded firewall on the ‘front’ bank, I removed the gearbox from
the ‘rear’ bank then sistered the two parts together, in the proper alternated
cylinder alignment. Not perfect, and certainly not “Nats” material, but good
enough for the kid. A new engine mount inside the cowling was installed then
the engine was painted and glued solidly inside with Crazy Glue. Mission
accomplished!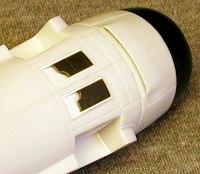
The next order of
battle was to add the complex variable oil cooler shutters below the fuselage
that the kit’s engineers completely neglected. After taping the fuselage halves
together I cut two longitudinal rectangles in the bottom, then built sloped
channels into the holes out of .020” Evergreen sheet. After sanding and shaping
the channels I fabricated a pair of doors and glued them to the fronts of the
channels with CA. After they’d dried I went back and scribed in the door
reveals and created the quarter-moon cut-outs at the rear (required for droptank
clearance).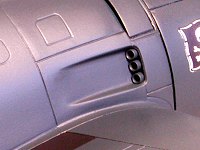
Next, I attacked
the molded-on exhaust manifolds. After a short barrage with a pin vise and a
#61 bit, the stacks were completely obliterated. A bayonet charge followed, as
I sliced away the odd few remnants with an X-acto knife then hollowed out the
recesses. New manifolds were constructed from 1/16” aluminum tubing and
attached from the inside of the fuselage. With friendly forces still at large
in the AO I back-cut the trailing edges of the cowl flap openings all the way
through to give them more definition. On to the interior.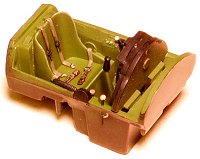
Reinforcements
from my reppo depot spares box answered the call-to-arms in the form of a
Monogram P-47 cockpit tub. After some minor fit issues were addressed it was a
near drop-in deployment. The mounting tabs even fit the pegs inside the
Bearcat’s fuselage. I added a throttle quadrant, oxygen hose, gun sight, and
photo-etched 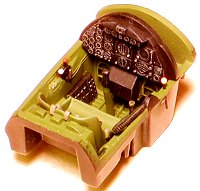 seatbelts plus a few odd knobs and handles to animate the pit then
painted and installed it in the left fuselage half. The instrument panel was a
kit-bash from various surplus bits, reconfigured to approximate the basic shape
and detailed with the usual doo-dads. The P-47’s armored headrest was modified
for its new Grumman mission, test-fit for clearance, then set aside for later
installation.
seatbelts plus a few odd knobs and handles to animate the pit then
painted and installed it in the left fuselage half. The instrument panel was a
kit-bash from various surplus bits, reconfigured to approximate the basic shape
and detailed with the usual doo-dads. The P-47’s armored headrest was modified
for its new Grumman mission, test-fit for clearance, then set aside for later
installation.
The kit’s
tailwheel mount was modified to allow the strut/door combination to be installed
at the correct angle and height. This was an easy operation that took all of
ten minutes to 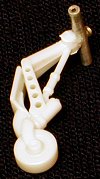 accomplish. A 15-millimeter piece of 1/16” aluminum tubing was
grafted to the hinge end of the strut after cutting away the protruding dowels
of the original mount. The additional length realized was the exact scale
distance required to produce the correct angle and height necessary for the
proper stance. I drilled out the lightening holes on the strut then installed
it in the left fuselage half. The fuselage was then glued together while I
planned my next offensive against the bogus vertical fin and rudder.
accomplish. A 15-millimeter piece of 1/16” aluminum tubing was
grafted to the hinge end of the strut after cutting away the protruding dowels
of the original mount. The additional length realized was the exact scale
distance required to produce the correct angle and height necessary for the
proper stance. I drilled out the lightening holes on the strut then installed
it in the left fuselage half. The fuselage was then glued together while I
planned my next offensive against the bogus vertical fin and rudder.
After a thorough
reconnaissance of that area I concluded that there were two extant problems; A)
the vertical fin is too shallow in chord, and B) the rudde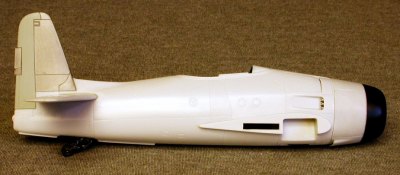 r has too extreme an
angle along the trailing edge. Compared to my available drawings the overall
height and the rudder hinge line seemed to be correct so I used those datum
points to effect a solution. I sawed the fin off just forward of where it joins
the fillet, leaving the original rudder intact for the time being, then
sectioned in a new piece fashioned from a surplus Monogram F-80 fin as a
substitute. After filing and sanding it to shape I recontoured the fillet to
jive with my references.
r has too extreme an
angle along the trailing edge. Compared to my available drawings the overall
height and the rudder hinge line seemed to be correct so I used those datum
points to effect a solution. I sawed the fin off just forward of where it joins
the fillet, leaving the original rudder intact for the time being, then
sectioned in a new piece fashioned from a surplus Monogram F-80 fin as a
substitute. After filing and sanding it to shape I recontoured the fillet to
jive with my references.
Next, I sawed the
kit rudder away and built a new one out of a piece taken from a Hasegawa P5M
flying boat stabilizer. After dry-fitting it to the rebuilt fin I did some
pre-shaping with file and sandpaper, then carefully glued it in place. I sanded
the entire assembly smooth then rescribed the rudder hinge line. It required
some trial-and-error to get the trailing edge angle correct and when I was
satisfied, I thinned the edge to scale thickness with a file and radiused the
rear with a few swipes of fine-grit sandpaper. Finally, I cut a notch into
the rudder and installed a new trim tab, made from another piece of the
 peripatetic Monogram F-80.
A minor mop-up operation removed the kit’s oversimplified representation of the arresting hook, created a recessed well, installed a modified ESCI F-4J tail hook, and added the rear navigation light made from clear sprue, heat-stretched into a rod then domed and polished at the end. After drilling an appropriately-sized hole above the hook well I inserted the clear rod and glued it with Testors liquid cement. Comparison with both my drawings and reference pics revealed that the forward keel plate was too long at the front so this was emended by cutting away about three millimeters and reshaping a new radiused leading edge.
Teardrop-shaped
position lights were fashioned from clear sprue and located top and bottom of
the fuselage (note: the upper beacon is offset to starboard), then I plotted the
position of the three dipole antennas and drilled holes there with a #80 bit.
The elements themselves are .013” guitar string, cut to length and glued into
the holes with CA. At this point I rescribed the horizontal stabilizer and
installed it then attached the modified armored headrest and crashbar to the
rear cockpit deck. Some additional detailing was accomplished with Evergreen
strip and sheet then a reflector was added to the gunsight via a rectangle of
clear acetate.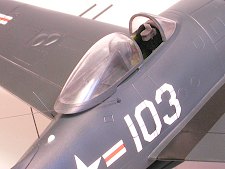
As previously
noted during the in-box “poop an’ snoop”, the Bearcat’s clear parts are very
poor. Excessively thick and marred on the insides by lumps, bumps, and tooling
marks, an attractive option would be to replace the two pieces with vacuform
substitutes. I’ve never had much luck with the acetate or butyrate used to
create these canopies so I decided to just ruck up and use the provided parts
after some hand-massaging to improve their appearance. I sanded and polished
both the interior and exterior surfaces, removing the offending lumps and
dimples and thinning them as well. The windscreen was attached with white glue,
and when it had set up I overcoated the seam with CA. Further sanding and
polishing created an acceptable joint then I dry-fitted the canopy and set it
aside for installation after the model was painted.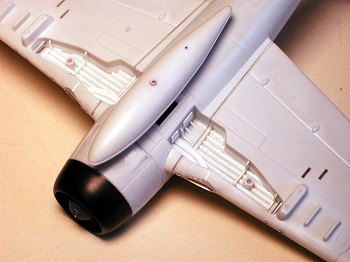
The wings became “the mother of all scratch-building battles” since I had to engineer and install a complete set of detailed gear wells to fill the bottomless pits given in the kit. In preparation for this complex operation I removed the spurious details on the bottom of the wing tops and inside the fuselage then sanded the area smooth. The next phase of the mission was to butt-join a preshaped strip of .040” Evergreen strip to each of the partial well walls on the wing bottoms. After I sanded these extensions flush with the original vertical surfaces, from there it became a lengthy war of attrition as I repeatedly test-fit the wing halves and shaved the tops of the extended walls until the wings mated without visible gaps.
With the wells
fully boxed in, the wings were assembled then attached to the fuselage using a
3/32” piece of brass tubing as a wing spar. I glued stringers and ribs inside
the wells using various lengths of Evergreen .010” and .020” strip, while the
prominent oil cooler ducting was recreated using bits of sprue, bent into
quarter-moon crescents then filed into a semi-square cross-section. After these
were installed, I built mounts for the strut retraction jacks out of .015”
rectangles of Evergreen sheet and detailed them with some Grandt Line bolts.
The access areas in the fuselage were fleshed out with some bits and pieces from
the spares box then I built a pair of catapult bridle hooks from steel wire and
attached them inside.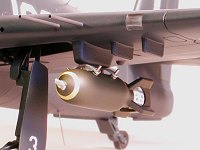
Once the wells
had been completed I moved back to the wings proper and detailed them with
position lights at the tips, new guns constructed of #21 hypo needles, an
all-metal pitot tube, and (still tryin’ to figger this one out) some kind of
clear window on the left wing. Both the Testors and the Hobbycraft kit have
this detail depicted, on both wings (the H/C kit includes separate clear
parts for this item). It is not a landing light or gun camera. My references
made no mention of this, or its function, but it was present portside only.
Finally, in frustration I had my good friend Scott Murphy go the Naval Aviation
Museum in Pensacola (a 10-minute drive for him) and shoot me a couple of photos
of their Bearcat’s left wing. Whatever its purpose, this detail appears as a
square, blue-tinted prism behind a flush plexiglas cover so that’s how I
replicated it.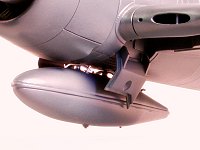
The oil cooler
intakes at the wing roots were rebuilt using oval-shaped bits of aluminum tubing
inserted into the enlarged openings, while the visible vertical diffusers were
installed behind the new intake lips through slots cut into the wing bottoms.
The kit’s wings are bulged in this area but my reference photos belied this
spurious feature. Thankfully, the wall thickness here was such that I was able
to file the offending lumps away. After sanding the remainder of the raised
panel lines off I rescribed the wings to match the recessed details on the
fuselage, then drilled out the shell ejection chutes on the bottoms. A small
inverted ‘U’ antenna on the bottom of the left wing completed the detailing
phase then it was on to the landing gear.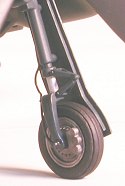
Initially I gave some thought to scratch-building the struts but since I was sure to take incoming fire from my protégés who would gleefully castigate me for exceeding the 100 hours it took coalition forces to subdue the entire Iraqi army during Desert Storm on a mere single-engined fighter plane model, I settled for detailing the struts with some bits and pieces. After drilling out the lightening holes in the oleo-scissors, I installed some hold-outs and threaded some small wire through the holes to serve as brake lines, while brass eye-bolts were used to replicate the tie-down rings. Next, I glued the struts to the wing mounts and modified some Monogram F-100 speedbrake actuators to approximate the vertical torsion rods at the rear of the struts. Finally, I used the retraction jacks from the outrigger wheels of Monogram’s B-52 as stand-ins for the missing articulated arms, anchored to the rear of the struts with steel pins and glued into the wells with Testors liquid cement. Time for the wheels…
Ah yes, the wheels. I picked up a set of TD resin replacements at a shop in Phoenix and I thought I was home free there. T’was not to be however. Upon close inspection in my studio I found both wheels covered in pinholes. Most were in the tire portion though a few errant pits marked the hubs as well. Not only that, the reverse side of the hubs were featureless. The Bearcat wheel’s brake caliper assemblies are pretty prominent so some major rebuilding was clearly in order. After weighing the options, I decided to try and save the hubs and use them in some better tires. I filled all the pits that I could reach with thick paint then sanded them as much as I dared.
 I scored around
both hubs repeatedly until they snapped free of the resin tires then searched my
inventory for some new rubber. Tires from the Italeri RF-4C were a close match
so I cut away the plastic hubs from the outer halves then grafted the resin hubs
to them. To approximate the narrower profile of the Bearcat tires I thinned the
Italeri tire halves from the inside, then glued them together. After shaving
the tires down to the correct outside diameter, new tread was cut to replicate
the post-WWII configuration then I added the brake calipers to the inner hubs
using some sheet styrene and plastic dowel. The wheels were then painted and
set aside for later installation.
I scored around
both hubs repeatedly until they snapped free of the resin tires then searched my
inventory for some new rubber. Tires from the Italeri RF-4C were a close match
so I cut away the plastic hubs from the outer halves then grafted the resin hubs
to them. To approximate the narrower profile of the Bearcat tires I thinned the
Italeri tire halves from the inside, then glued them together. After shaving
the tires down to the correct outside diameter, new tread was cut to replicate
the post-WWII configuration then I added the brake calipers to the inner hubs
using some sheet styrene and plastic dowel. The wheels were then painted and
set aside for later installation.
The doors were way too thick for scale so I sanded them vigorously until they were close then cut an extruded lip on the inside around all four of them. I added simulated hinges to the inner doors, cut two slots in the fuselage portion of each gear well for the hinge mounts, and glued them in place (incorrectly, as fate would have it). At this point, I painted the struts and wells then glued the wheels on. The insides of the main doors were painted and these too were attached, using liquid cement. When the adhesive dried I slipped some paper between the tires and the doors as a mask then painted the door exteriors.
After the extensive skirmish with the landing gear I installed the HF antenna wire from fin to fuselage, using monofilament line. I built mounts from short bits of a #27 needle and glued them in place then attached the line on the fin, threaded it through the fuselage, pulled it taut from the inside and anchored it to the bottom of the cockpit tub with a couple of drops of CA. The prop was cleaned up and assembled then I cut off the shaft and replaced it with a piece of 3/32” aluminum tubing. A shaft bearing was fabricated from 5/16” tubing and inserted at the front of the engine’s gear cover then the cowling itself was glued the fuselage.
I decided to install bombs and a drop tank on the model, foregoing the rockets as I’d committed them to a previous Corsair project. The kit bombs were canned in favor of some Monogram five-hundred pounders from their P-47 kit, attached with steel pins and detailed with scratch-built sway-braces. The drop tank was assembled and likewise detailed with fuel lines, relief vents, and sway braces then hung on the fuselage, again with steel pins. The stores were then temporarily removed and the model rolled to the paint shop.
|
CAMOUFLAGE & MARKINGS |
Nothing heroic here, just a solid coat of Modelmaster blue enamel followed by a shot of white for the fin tip and the deed was done. The propeller was sprayed with flat black, followed by my ‘special blend’ of Pactra yellow enamel for the tips of the blades. When the blades had dried I masked them and gave the hub a quick blast of the Modelmaster blue. The canopy frame and drop tank were likewise painted then I sprayed the bombs FS 34086 Green Drab and set everything aside to dry.
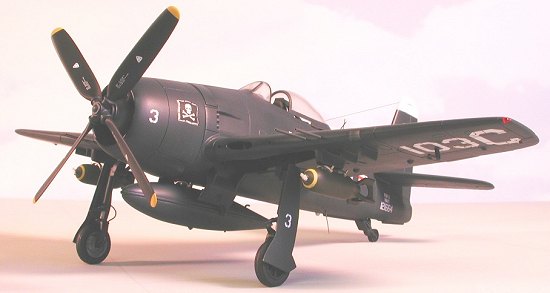 Markings for this
model came from a combination of the kit decals, the sheet included in the
Hobbycraft model, and some items from SuperScale’s 48-431. The national
insignia from the H/C sheet more closely matched the size needed, while the
‘NAVY’ modex and the serials looked better on the Superscale decal. Neither
contained the Aeroproducts logos for the propeller blades so I was forced to
take them from the kit’s decal sheet. The relatively few decals required were
an anticlimactic change-of-pace from some of my more ambitious modern jet
projects and took only a few evenings to apply.
Markings for this
model came from a combination of the kit decals, the sheet included in the
Hobbycraft model, and some items from SuperScale’s 48-431. The national
insignia from the H/C sheet more closely matched the size needed, while the
‘NAVY’ modex and the serials looked better on the Superscale decal. Neither
contained the Aeroproducts logos for the propeller blades so I was forced to
take them from the kit’s decal sheet. The relatively few decals required were
an anticlimactic change-of-pace from some of my more ambitious modern jet
projects and took only a few evenings to apply.
On close inspection of the paint job I discovered numerous areas that should have been more carefully sanded as well as the usual lint, woolly boogers, and dust bunnies. I decided to seal the paint and decals with a semi-matte clear coat rather than a flamboyant fully-glossed finish which would highlight every flaw. Testors lacquers were used and when the model was dry I plugged the drop tank and bombs into their respective mounts, glued the canopy to the rails with Elmers, then installed the prop. Mike Alpha – mission accomplished!
|
CONCLUSIONS |
Sad to say but here it is—nearly half a century since the advent of the plastic model airplane and there is still not an accurate kit of the Grumman Bearcat in any scale. The closest attempt is the old 1:72nd scale offering that Monogram released in its “forty-niner” series about the same time as this kit and even that has a few issues that need to be addressed. It’s a shame that Monogram never pantographed those molds up to 1:48. Thankfully, there are some aftermarket up-grade and correction sets that will enable a modeler to build a fairly accurate quarter-scale F8F though the road is no easy ride.
 This model will never be a contest darling due to the incorrect engine and
kit-bashed cockpit but I was more than satisfied that my modifications produced
an accurate depiction of the Bearcat’s exterior. Truth be told, I could
have arrived at the same conclusion by starting with the Hobbycraft kit though
nearly every facet of the build using the ex-Hawk model would have to be
replicated on the costlier H/C kit as well. Frankly, I’m not really sure
where the Korean designers got their engineering data from…it seemed obvious to
me that they had never inspected a real Bearcat.
This model will never be a contest darling due to the incorrect engine and
kit-bashed cockpit but I was more than satisfied that my modifications produced
an accurate depiction of the Bearcat’s exterior. Truth be told, I could
have arrived at the same conclusion by starting with the Hobbycraft kit though
nearly every facet of the build using the ex-Hawk model would have to be
replicated on the costlier H/C kit as well. Frankly, I’m not really sure
where the Korean designers got their engineering data from…it seemed obvious to
me that they had never inspected a real Bearcat.
Anyhow, a scale Bearcat can be modeled using this kit and the information in the review. A proper R-2800 is cataloged by several aftermarket companies, a resin cockpit is available from Lonestar, and Eduard and TD both offer wheels as well as a vacuform canopy. SuperScale and Aeromaster have the decals covered so as long as a modeler is either willing to spend money or able to scratch-build, (or just doesn't care...Ed) this kit’s shortcomings should not be an impossible impediment.
Oh, the incorrectly-installed inner gear doors…I had posted some down-and-dirty photos of this model on the Hotwash site for some peer review feedback and an eagle-eyed critic spotted this gaff almost immediately. Somehow I’d managed to get them reversed—right to left and left to right. The error was thankfully corrected before this article was written.
Engineering assistance was provided by Steve Mesner and Scott Murphy, David Garcia helped out with a historical genealogy of the original Hawk molds, while Wayne Sharp, Roy Long, and John Doerr handled logistic support. Thanks, guys!
March 2003
|
REFERENCES |
F8F Bearcat In Action—Charles L. Scrivner; Squadron-Signal Publications
US Fighters of the ‘50s—Nico Sgarlato & Franco Ragni; Squadron-Signal
Vietnam: The War In The Air—Rene J. Francillon; Arch Cape Press
If you would like your product reviewed fairly and quickly by a site that has over 200,000 visitors a month, please contact me or see other details in the Note to Contributors.
Back to the Reviews Index Page