Kit: Boeing B-17G Flying Fortress
Scale: 1/48
Kit Number: 5600
Manufacturer: Revell-Monogram
Price: $20
Media: Injection-molded styrene
Decals: Two aircraft:
"Chow Hound": 91st Bomb Group -- Olive Drab/Neutral Gray
" El Lobo II": 457th Bomb Group -- Natural Metal Finish
Accuracy: Very good. The kit depicts an early G model with unstaggered waist guns.
Overall: A landmark model kit that still looks great
Review and Photos by: Lee Kolosna
One of the most famous aircraft ever built, the Boeing B-17 symbolizes the might of United States air power through the practice of high-altitude strategic bombing against the Axis forces in World War II. The stories of the men that flew these aircraft are legendary, and even today the Flying Fortress holds a place of reverence amongst its legion of fans. Monogram's decision in 1975 to create such a large subject in 1/48 scale was a landmark for modern plastic model manufacturing. Over two decades later, this model still is the only example of its kind and it has earned a deserved reputation as a very good kit. It is not state-of-the-art by any means, but its interior detail, fine raised panel moldings, and general accuracy make the kit presentable for every modeler with skills from the novice to the master level.
The kit is molded in silver and clear styrene plastic. All panel line and rivet detail is of the raised variety, in keeping with Monogram's practice of the time. Extra crew figures and a bomb cart are included. My version, purchased in 1988, also had one of the famous Shep Paine inserts that gives pointers on how to create a diorama of a crash-landed B-17. As mentioned above, the model depicts a very early G model, with unstaggered waist positions and a regular tail turret (not the "Cheyenne" version). The recent Pro-Modeler release of this kit (now discontinued) did include a new tail turret and a new decal set. The waist gun positions remain unstaggered. If using after-market decals, make certain that the aircraft you are modeling is an early version of the G model. As usual, check your references.
Interior detail is quite good from the nose to the waist gunner positions. Recent research on interior colors indicate that B-17s were painted with Dull Dark Green, although many B-17s by 1944 had unpainted natural aluminum walls. I used Testors European I Dark Green, FS34092. The tail gunner position has minimal detail. No loss here, though, as it is impossible to see anything once the fuselage is buttoned up. Unfortunately, the wheel wells are much more visible and totally devoid of detail. Quite a bit of work will be needed to make this area look correct. I painted this area Testors Interior Green FS34151. The ball turret is a two piece affair molded in clear plastic. Be careful when gluing the halves together and filling the seams, as some areas that need to remain clear will be affected. The rest of the clear parts are on the thick side, but are adequately transparent. There are quite a few small windows. Make sure to attach them to the interior of the fueslage securely enough so that the masking used in the exterior painting stage doesn't loosen the window and have it rattle around inside the fuselage. Pay extra attention to the windows directly above the two pilots, as this is mostly a friction fit with not a lot of gluing surface.
Four 500 LB bombs are included but not visible when mounted inside the bomb bay because the doors are not openable (unless you choose to cut them out). The modeler can instead use the nicely molded cart provided with the kit as a way to display the bombs. The Wright R-1820 engine moldings are pretty basic. I painted them aluminum and picked out the highlights with a dark gray wash. Insides of the cowlings were painted a light gray.
Since this is a heavy model, make sure that the bulkhead that contains the tail wheel assembly is securely glued to the inside of the fuselage. Mine wasn't, and the joint failed after a couple of years. Fixing it is an awkward exercise with CA glue and accelerator. After the interior was complete and painted, I glued the fuselage halves together and worked on the wings. Fit is generally good. I filled all seams with modeling putty. Sanding removes quite a bit of rivet detail, so protect these areas with masking tape before you sand. The wings and horizontal stabilizers fit snugly and securely to the fuselage. More filling of the resultant hairline seams was required. I rescribed missing panel lines with a scribing tool guided by a piece of Dymo label tape.
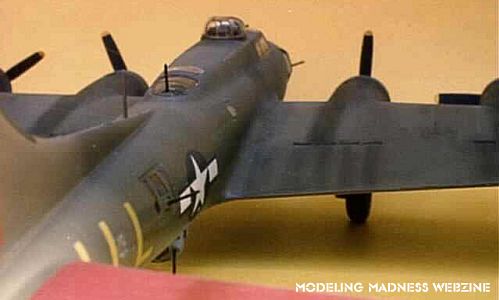
Paint schemes for B-17s are relatively plain: either Olive Drab over Neutral Gray, or natural aluminum. Since all the major seams required filling and sanding, I elected to go with the safer OD/gray scheme using Testors enamels. Most G models had a soft, feathered demarcation between the two colors. The kit decals are very typical 1980s Monogram: thick and glossy, but basically good. I chose to use markings from Super Scale sheet 48-59, depicting the aircraft "Little Patches" of the 401 Bomb Squadron in the 91st Bomb Group. This required red stabilizers (both vertical and horizontal) and wing tips, for which I used Testors Insignia Red. I used the kit decal national insignia. Both the Monogram and Super Scale decals went on fine after first spraying several coats of Future floor polish. I used Micro Scale SuperSol to make the decals snuggle down over the detail. Another coat of Future sealed everything up before the weathering stage.
I've always been surprised at how badly B-17s weathered, considering they probably had the best ground maintenance support of any air force in the world at the time. The Olive Drab paint faded terribly, the Wright Cyclone engines leaked and belched oil, and enemy fighters and antiaircraft guns put holes in the aluminum skin that were repaired in highly visible ways. The real aircraft that I modeled participated in over ninety combat missions, and it looked it! First, I started with a very thin overspray of light gray paint to simulate fading. Olive Drab often faded with a brownish or purplish hue, so I added a drop of each to the wash. The ailerons, rudder, and elevators were doped fabric, so be careful not to fade them in the same manner as the rest of the plane. I used chalk pastels applied with a Q-tip to simulate the exhaust stains from each engine. In photographs, it can be seen that this staining, when viewed from the six o'clock high position (looking from above the tail forward) begins on the left side of each engine nacelle. Also, the four vents towards the rear of the wing had exhaust staining, with the middle two vents being heavier that the outer two. I touched dabs of Olive Drab paint with a brush in random spots to simulate repair patches, and picked out the control surfaces with a wash of dark gray enamel. Satisfied that my Flying Fortress looked weary enough, I sealed all the pastels and washes with Testors Dullcote. Final touches included attaching the nose glass with white glue and three (!) radio aerials made of stretched sprue. Nowadays, I would use my current favorite antenna material, 2 LB fly fishing line, for this. It is much more resilient than sprue. All the turrets and guns and propellers on this model tend to attract curious fingers (especially amongst youngsters), and they inevitably catch one of the aerials and break it.
The final model is a very impressive piece that looks great. Monogram's kit, while not perfect, has stood the test of time and can be highly recommended to anyone interested in this historic aircraft.