 |
 |
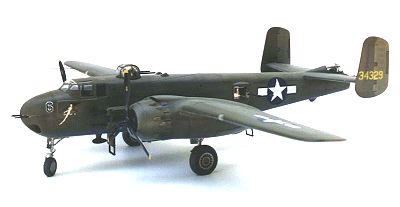
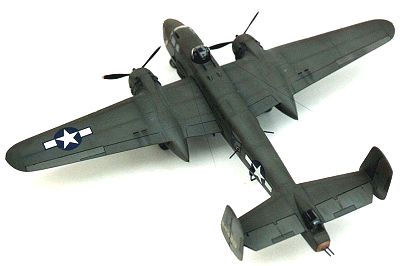
Revell-Monogram 1/48 B-25H Mitchell
Number: 5500
MSRP: Out of production, but available at swap meets for $30 to $50
Decals: Two aircraft, both Olive Drab over Neutral Gray
"Dog Daze" and "Leroy's Joy" from 12th Bomber Group, 10th AF
Date of Review: July 1, 1999
Review and Photos by: Lee Kolosna
|
|
The B-25 Mitchell medium bomber was a workhorse aircraft for the US Army Air Force and was deployed in every theater of operation in World War II. Like its contemporary, the Junkers 88, it was an aircraft that performed a remarkable number of roles, from straight bomber to low-level ground attack. It even performed search-and-rescue and anti-shipping missions. The subject of this kit, the short-nosed H-model, might have been the most heavily-armed aircraft to take to the skies during the war. With no less than fourteen .50 inch machine guns, plus a 75mm cannon fired by the pilot, the amount of firepower that could be brought to bear against targets was truly staggering. When assigned to the China, Burma, and India (CBI) area of operations, it was found that opportunities to use the cannon against enemy ships and hardened emplacements were relatively few. Later gunship models, like the solid-nosed J, dispensed with the cannon in favor of all-machine-gun armament.
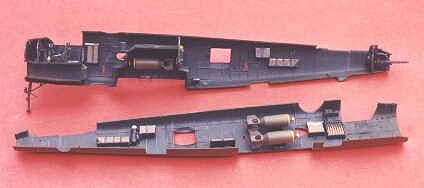
The Monogram kit, issued in 1980, was created during the peak of that company's creative period. A nicely detailed interior is provided, a Monogram hallmark. Molded in dark green plastic, the detail is expressed in crisp raised lines. The clear parts are nicely transparent. Overall accuracy is quite good as well. While the soon-to-be-released Accurate Miniatures B-25 series will no doubt be as excellent as the rest of their kits, an H model will not be offered. If you want the cannon-armed Mitchell with the forward top turret, this is it.
The first task is to paint the interior. My consultations with color expert John Clements led me to use Bronze Green as the color of choice. To get this shade, I added black to Polly Scale RAAF Foliage Green (FS34092). An interior for the machine gun bay in the nose is provided, and the modeler can pose the nose open for display. I'm not a fan of open access panels on models because I find that they generally don't fit very well, so I elected to glue the nose shut. Besides, you will need a ton of weight to keep this tail-heavy model balanced on its tricycle landing gear. I loaded a bunch of BBs and some lead sinkers in the nose, and it still wasn't enough. Out of desperation I finally glued a big hunk of lead (which I painted flat black) to the ceiling of the cockpit, hoping that no one will stoop low enough while looking at the model to notice. I just barely got the thing to sit right. You are warned.
 |
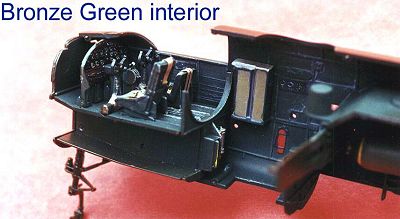 |
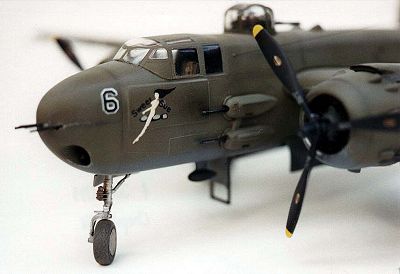
Detail is provided in the waist gun sections, the bomb bay, the upper turret, and the tail gun station. The only addition I made was in the form of photo-etched seat belts for the pilot and navigator's jump seat. (There was no co-pilot in the H, which was a huge controversy between Generals Kenney and Doolittle. General Hap Arnold overruled Kenney and the copilot station was removed.) Three 500 pound bombs are provided. The bomb fins are very thick and out of scale. I tried a new technique for painting the bombs: I first painted the forward section yellow. Then I cut very thin strips of plain, hardware store brand masking tape that had been laid out on a piece of plate glass using a ruler and a sharp knife. I wrapped the piece around the bomb where the yellow stripe goes, burnished it down, and sprayed the bomb overall Olive Drab. This worked quite well, and gave me a nice-looking stripe appropriate for the scale. The bombs were securely glued to the racks before the fuselage was glued together. The attachment points are vague.
The interior pieces received a wash of dark gray artist's oil paint, then a drybrushing of light gray and silver. This picked out the detail nicely. The fuselage seams were filled with thick CA glue. The fit was not especially bad, but it does not have the near perfection that is seen in today's state-of-the art kits. A few sink marks were present on the top and bottom of the fuselage and needed filling.
 The
wings received attention next. The Wright R-2600 radial engines are rather
rudimentary, so I added new pushrods and a wiring harness using fine wire.
Quite a bit of time was spent filling gaps on the seams around each engine
nacelle, especially those on the upper rear. I drilled out the numerous exhaust
ports on each nacelle. The landing lights are embedded in the leading edge
of each wing and are quite large. A very visible seam runs through the center
of the dimple that represents the light. The right way to deal with this
is to find a model railroad locomotive lens and place it there. I didn't
have any around, so I simply painted the area silver and slopped on some
five-minute epoxy, sanding it to match the shape of the wing after it had
dried and dispensing with the kit-provided light covers. While not crystal-clear,
the appearance of the lights is more in line with photographs of the actual
aircraft.
The
wings received attention next. The Wright R-2600 radial engines are rather
rudimentary, so I added new pushrods and a wiring harness using fine wire.
Quite a bit of time was spent filling gaps on the seams around each engine
nacelle, especially those on the upper rear. I drilled out the numerous exhaust
ports on each nacelle. The landing lights are embedded in the leading edge
of each wing and are quite large. A very visible seam runs through the center
of the dimple that represents the light. The right way to deal with this
is to find a model railroad locomotive lens and place it there. I didn't
have any around, so I simply painted the area silver and slopped on some
five-minute epoxy, sanding it to match the shape of the wing after it had
dried and dispensing with the kit-provided light covers. While not crystal-clear,
the appearance of the lights is more in line with photographs of the actual
aircraft.
The horizontal stabilizer and rudders were glued to the fuselage. More seams were filled with my standard process: apply CA glue with a toothpick, dab with a drop of accelerator, sand with wet 320 and then 600 grit sand paper, spray primer to detect flaws, and repeat as necessary. The junction between the top of the fuselage and the leading edge of the stabilizer calls for quite a bit of filling to get exactly right. Since the canopy is an integral part of the fuselage, I glued it firmly to the model with CA glue (after a dip in Future) and filled the seams. I then did one last check of every joint, rescribed lost panel lines, and cleaned the model in preparation for painting. I find that engraving new lines to replace raised ones lost in sanding is not a problem - the eye is fooled enough to not notice the sudden change from raised to recessed.
I assembled the wheels, sanded the seams, and restored the cross-hatch diamond pattern tread by scribing with a X-Acto knife blade. I sanded flat spots on each tire to represent weight. I added brake lines to the main landing struts using fine copper strands (painted silver) that I pulled from a roll of electrical wire.
This is where the first disaster hit. As the model was hanging above my paint bench, I reached to the shelf above to take a look at the Classic Airframes SBC Helldiver kit, accidentally knocking the B-25 off the hook. The model came crashing down to the bench, knocking off the front landing strut, three of the four nose machine guns, splitting open most of the fuselage seams, and putting a big crack in the lead-swollen nose. After a stunned silence, I went back and carefully repaired everything. It took several hours of work, but it came back with no irreparable damage. After all, I am a modeler. Or at least I think I am.
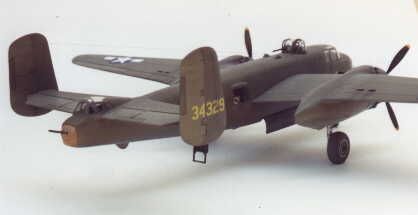
Painting was a pretty straight forward Olive Drab over Neutral Gray. Polly Scale paints were used. The canopy and other clear areas were masked with Parafilm M. I applied a lightened Olive Drab on the fabric control surfaces to simulate fading in the harsh Burma sun, where the aircraft that I was depicting was stationed. Several coats of Future were sprayed to prepare for decals. Since the decals in my kit were nearly twenty years old, I did a search for replacements. Only Super Scale appears to have made a sheet, 48-251, a long time ago. No on-line hobby stores had this out-of-production sheet in stock, so I put a plea out on the rec.models.scale newsgroup. After a couple of weeks, I had the sheet in my hands, courtesy of the kind graces of Dave Roof. Markings for two H model aircraft were provided. I chose one, "Sweet Sue" from the Tenth Air Force's First Air Commando squadron, and applied all the decals except for the multiple white bands around the middle of the fuselage. After a few attempts at making this very large decal work, I became convinced that it was impossible to ever make it look like anything other than a huge sticker, so I elected to leave the bands off. It left a rather plain subject, but that is how most H's were finished anyway.
 I faded
the paint and the decals with a coat of Polly Scale Dust. As I was cleaning
the model in the sink in preparation of another coat of Future to seal the
decals, disaster struck again. My eight-year-old son distracted me momentarily
by asking me a question as I was shaking the water off the model. The right
wing caught my leg as it swung by, shearing it off and sending the fuselage
halfway across the living room. The seams all split open again, the horizontal
stabilizer broke off, the right wing detached itself, and the nose gear strut
snapped in two. This time, things were really bad. I nearly abandoned the
project right there. After calming down, I became determined to finish the
model, no matter how impossible it seemed. More hours of work ensued to return
to the point I had been prior to the accident.
I faded
the paint and the decals with a coat of Polly Scale Dust. As I was cleaning
the model in the sink in preparation of another coat of Future to seal the
decals, disaster struck again. My eight-year-old son distracted me momentarily
by asking me a question as I was shaking the water off the model. The right
wing caught my leg as it swung by, shearing it off and sending the fuselage
halfway across the living room. The seams all split open again, the horizontal
stabilizer broke off, the right wing detached itself, and the nose gear strut
snapped in two. This time, things were really bad. I nearly abandoned the
project right there. After calming down, I became determined to finish the
model, no matter how impossible it seemed. More hours of work ensued to return
to the point I had been prior to the accident.
Since the panel lines are raised, I tried a new technique for bringing them to life. I lightly traced all the lines with a number 2 pencil, then followed up with a dusting of dark gray pastel to blend the line. I then sprayed very thin Olive Drab paint over the line to blend it in even more. I think it turned out quite well. Final details included additional weathering with pastels for exhaust stains, attaching the top turret and side windows, gluing on the wheels, attaching the propellers, and fabricating new nose machine guns from stainless steel tubing (from www.smallparts.com). Two long aerial wires were fabricated using "invisible" nylon thread. A coat of Testor's Dullcote Lacquer finished the model.
In the end, I completed a very nice model of an interesting aircraft. I love the Monogram kits from the late '70's/early '80's. I think they did some of their finest work back then, and the models still look good today. My two accidents represent some of the biggest goofs I have ever made while modeling. The fact that I was able to recover (not contest-quality, mind you), is a testament of the adage that patience is a virtue. If you can find one of these wonderful old B-25 kits, feel confident that you will be building a quality product.
Copyright ModelingMadness.com