Monogram 1/48 B-26B Marauder
|
KIT # |
5501 (original boxing) |
|
PRICE: |
$22.00 MSRP |
|
DECALS: |
Two options |
|
REVIEWER: |
Lee Kolosna |
|
NOTES: |
True Details wheels |
|
HISTORY |
 General James Doolittle for the sleek bomber eventually led to its
enviable record of having the lowest combat loss rate for all USAAF
aircraft operating in the ETO. Early B-26s were assigned to Midway
Island as torpedo bombers and used during the epic battle with no effect,
but later models came to shine in use with the 9th Air Force.
The coordinated use of fighters and medium bombers against the
transportation network of the German war machine was devastating and
undoubtedly a significant overall contributor to the Allied victory.
General James Doolittle for the sleek bomber eventually led to its
enviable record of having the lowest combat loss rate for all USAAF
aircraft operating in the ETO. Early B-26s were assigned to Midway
Island as torpedo bombers and used during the epic battle with no effect,
but later models came to shine in use with the 9th Air Force.
The coordinated use of fighters and medium bombers against the
transportation network of the German war machine was devastating and
undoubtedly a significant overall contributor to the Allied victory.The B-26 was known for its relatively fast cruising speed, was heavily armed, and could carry a bomb load that rivaled the famed B-17. Because of the rigors of tactical operations, B-26s flew many more sorties than other bombers and were deployed close to the front lines as the Allies advanced into Germany. The most famous B-26, Flak Bait, is on display at the Smithsonian Air and Space Museum, still proudly wearing the worn camouflage paint and markings for over two hundred missions. After the war, the B-26 was quickly withdrawn from service, replaced with newer aircraft at the start of the Jet Age. Marauders also served with the RAF, the Free French Air Force, and the US Navy.
|
THE KIT |
Originally released in 1977, the kit possesses all the
characteristics that made the Monogram line so legendary: accurate shape,
a good amount of internal detail, excellent instructions, and several
high quality air and ground crew figures. You also get raised panel
lines (no problem for me), less than state-of-the-art fit, and some
amount of warping of the larger parts. Molded in Olive Drab colored
plastic, the kit provides four 500 LB bombs, bomb bay doors that can be
 positioned open, and a choice of tail turret styles. The earlier (prior
to the B-26B-20-MA production block) hand-held guns require the modeler
to cut off a section of the rear fuselage to mount the necessary parts.
The vertical stabilizer represents the “tall-tailed” version of the B-26,
and the wings are the longer wingspan seen on all B-26Cs (built in Omaha)
and B-26-10-MA and later Marauders (built in Baltimore). The clear
parts, as expected for the era, are a bit thick, but still nicely
transparent. A tail bumper seen on some B-26s is provided.
positioned open, and a choice of tail turret styles. The earlier (prior
to the B-26B-20-MA production block) hand-held guns require the modeler
to cut off a section of the rear fuselage to mount the necessary parts.
The vertical stabilizer represents the “tall-tailed” version of the B-26,
and the wings are the longer wingspan seen on all B-26Cs (built in Omaha)
and B-26-10-MA and later Marauders (built in Baltimore). The clear
parts, as expected for the era, are a bit thick, but still nicely
transparent. A tail bumper seen on some B-26s is provided.
Modelers who are sticklers for accuracy will note that there are no navigation lights on the ends of the wings at all, so they will have to provide the small blisters (early B-26s) or notched leading edge of the wingtip (later B-26s) lights themselves. The identification lights are represented by scribing and will need to be drilled out and filled with an appropriately colored medium. The R2800 engines are reproduced rather simply as half cylinders molded to the front of a blanking plate with no real representation of the wiring harness.
Revell-Monogram has reissued this kit several times over the last twenty-five years, with the latest incarnation coming from Revell AG (Germany). There was a version released in the late 1990s that included resin pieces to further detail the cockpit, wheel wells, and bomb bay. My kit is from the original production run. I chose to build it almost entirely out of the box, only substituting the kit wheels for resin ones from True Details, mostly because sanding the tire seams obliterated the very visible tread pattern.
|
CONSTRUCTION |
The first thing I did was research interior colors for the
B-26. This was a much more difficult task than I had anticipated. The
production run of the Marauder was fairly long with lots of variations
being seen. After studying numerous period color photos plus
contemporary pictures of Flak Bait and other B-26s in museums, I
finally settled on the following choices: the cockpit, nose, and turret
areas were painted Dull Dark Green, which I represent by using Polly
Scale RAAF Foliage Green. The floor of a B-26 cockpit was covered in a
thin rubber mat, so I painted the floor a very dark gray. The bomb bay
was painted in Neutral Gray overall, as were the insides of the bomb bay
doors, wheel well doors, and the landing gear struts. The wheel wells
themselves were most likely unpainted metal or aluminum lacquer, so I
used Floquil Old Silver 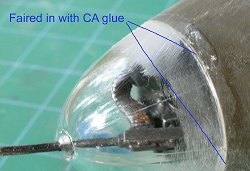 for that. Old Silver was also used for the
inside of the fuselage aft of the bomb bay and forward of the tail gunner
section. The inside of the engine cowlings were aluminum as well. Like
all modelers faced with the complex subject of US aircraft interiors,
these choices represent my best guess and could certainly be wrong. But
I tried….
for that. Old Silver was also used for the
inside of the fuselage aft of the bomb bay and forward of the tail gunner
section. The inside of the engine cowlings were aluminum as well. Like
all modelers faced with the complex subject of US aircraft interiors,
these choices represent my best guess and could certainly be wrong. But
I tried….
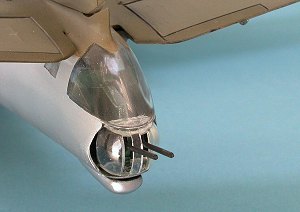
Access to the B-26 was through a hatch located in the nose
wheel well. I cut out the doors in the cockpit floor and repositioned
them open. I glued the small windows into each fuselage half and filled
the inevitable gaps surrounding each window with CA glue and sanded them
flush. I polished the windows back to clarity using a tri-grit nail
buffer and Novus Plastic Polish #2. To me, this is one of the weaknesses
of all bomber kits and taking the time to fair in the windows is well
worth it. I did the same with the main canopy and the nose. It was a
lot of work, but I believe it enhances the look proportionately.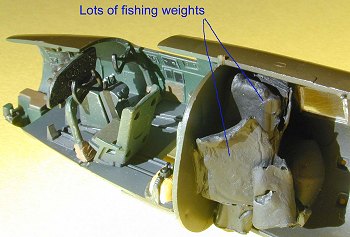
After painting all the interior bits, I applied a dark gray wash and dry-brushed with light gray to highlight the details.
The model is extremely tail-heavy, so it needs a huge amount of weight in the front to balance properly on the tricycle landing gear. With the visible bombardier’s station in the nose, the only place to add weight in the fuselage is right behind the cockpit bulkhead. I crammed a bunch of fishing weights in there and sprayed them black to minimize the chance of them being seen through the two windows. The top turret was painted and thrown inside the fuselage before I glued the two halves together.
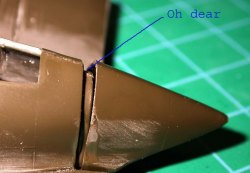 The wings needed a lot of preparation. I found the fit of
the rear cap of each engine nacelle to be terrible, with nearly a ¼ inch
gap to be filled. Several applications of CA glue were needed to finally
fill the void. Each wing has a prominent landing light cluster in the
leading edge. After gluing the wing top to the bottom, I filled the seam
in the landing light area and made my own lights by first pressing in a
punched disc of aluminum foil, followed by a drop of clear epoxy. I
essentially made a poor man’s equivalent of an M/V lens. The clear cover
was glued on and smoothed into the leading edge of the wing with CA glue
and a lot of polishing. Lastly, I notched the front portion of each
wingtip and inserted a piece of clear styrene to represent the navigation
light. This was sanded down to conform to the contours of the wing and
again polished out with the tri-grit file and Novus.
The wings needed a lot of preparation. I found the fit of
the rear cap of each engine nacelle to be terrible, with nearly a ¼ inch
gap to be filled. Several applications of CA glue were needed to finally
fill the void. Each wing has a prominent landing light cluster in the
leading edge. After gluing the wing top to the bottom, I filled the seam
in the landing light area and made my own lights by first pressing in a
punched disc of aluminum foil, followed by a drop of clear epoxy. I
essentially made a poor man’s equivalent of an M/V lens. The clear cover
was glued on and smoothed into the leading edge of the wing with CA glue
and a lot of polishing. Lastly, I notched the front portion of each
wingtip and inserted a piece of clear styrene to represent the navigation
light. This was sanded down to conform to the contours of the wing and
again polished out with the tri-grit file and Novus.
I turned my attention to the rear portion of the
aircraft. The horizontal stabilizer assembly was glued in, followed by
the clear canopy for the tail gunner’s station. None of this fit well at
all. The alignment was visibly off, so I had to repeatedly dip the
entire back half of the model in a big pot of nearly boiling water for a
few seconds to gently bend everything back into proper position. This is
something I've come to routinely expect with just about every older
Monogram model that I build. The seams around the canopy and the
stabilizer were quite prominent and required several hours of work to
fill and blend. My hands cramped up from the repeated cycles of filling
and sanding and filling and sanding and filling and sanding – all in
 awkward, unnatural positions.
The wings were glued on and I encountered even more large seams to fill at the root. Why be different? The engine cowlings are three-piece affairs that also have seams to be filled and sanded.
Satisfied that the seam-filling drudgery was mostly behind me, I restored the panel lines that had been obliterated in the process by rescribing with a sewing needle chucked in a pin vise. Even though this creates a recessed line, I find that it is very hard to tell the difference between this and the kit’s raised panel lines, especially after it is covered with a coat of paint. The model was thoroughly cleaned and dried, ready for the paint shop.
|
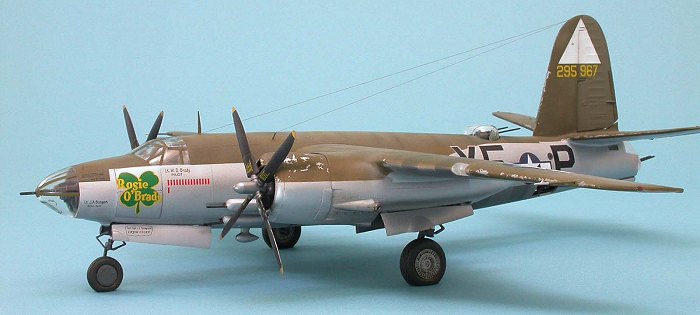
COLORS AND MARKINGS |
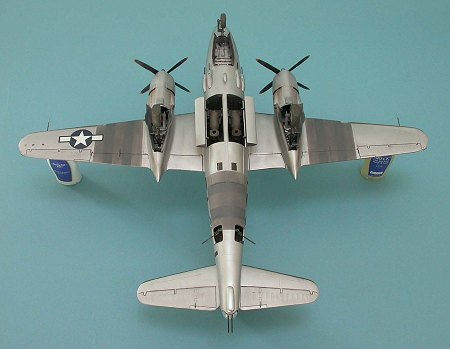
B-26s had some rather interesting variations to the standard USAAF Olive
Drab over Neutral Gray, so I choose to depict the aircraft Rosie
O’Brady of the 495th BS, 344th BG, 9th Air Force, based at
Cormeilles-en-Vexin, France in the spring of 1945. I have two excellent
color pictures of the aircraft, so it was easy to see the specifics of
the camouflage pattern. The aircraft
 was most likely delivered in full
paint, but the lower surfaces were stripped down to the bare aluminum.
During its relatively long operational career, it had D-Day stripes
applied to the wings and fuselage that were later crudely painted over to
comply with regulations. The Olive Drab was quite faded, especially over
the fabric control surfaces. Another interesting characteristic of
Marauders was the unusual (for US aircraft) amount of paint chipping
along the leading edges of the wings and stabilizers. Armed with my game
plan, I set out to replicate the finish on my model.
was most likely delivered in full
paint, but the lower surfaces were stripped down to the bare aluminum.
During its relatively long operational career, it had D-Day stripes
applied to the wings and fuselage that were later crudely painted over to
comply with regulations. The Olive Drab was quite faded, especially over
the fabric control surfaces. Another interesting characteristic of
Marauders was the unusual (for US aircraft) amount of paint chipping
along the leading edges of the wings and stabilizers. Armed with my game
plan, I set out to replicate the finish on my model.
The undersides were painted Floquil Old Silver, which I keep finding
myself going back to as my favored base paint for natural metal
finishes. Thinned with lacquer thinner, it gives a finish almost
identical to SnJ Spray Metal and Alclad II Aluminum. It’s as tough as
Alclad, yet it doesn't require a primer. I masked off the ailerons and
elevators and sprayed them with AeroMaster clear flat acrylic to simulate
the doped fabric. The unanswered
 question is what color was the
underside fabric control surfaces painted: Neutral Gray (from the
original factory paint job) or aluminum? I chose the latter, but that
could certainly be wrong. (Your editor kindly supplied a photo of
an overall bare metal B-26 with OD control surfaces after reading this
part of the review....Ed) The top was the masked and I applied a
lightened shade of Polly Scale US Olive Drab. I mixed up an even lighter
shade of Olive Drab and used it on the upper control surfaces.
question is what color was the
underside fabric control surfaces painted: Neutral Gray (from the
original factory paint job) or aluminum? I chose the latter, but that
could certainly be wrong. (Your editor kindly supplied a photo of
an overall bare metal B-26 with OD control surfaces after reading this
part of the review....Ed) The top was the masked and I applied a
lightened shade of Polly Scale US Olive Drab. I mixed up an even lighter
shade of Olive Drab and used it on the upper control surfaces.
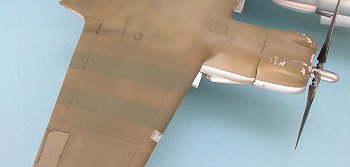
The D-Day stripes were next. Conversations with Steven “Modeldad” Eisenman and others led me to discover that the wing stripes were of smaller width than the standard 24”, probably closer to 18” in width. My guess is that this was to squeeze the five black and white stripes in between the engine nacelle and the aileron without having to paint the aileron itself, upsetting its fine balance. I applied the paint for the stripes very lightly and unevenly with my airbrush, for as soon as they were done, I oversprayed them again with a semi-transparent coat of fresh Olive Drab on the top and Neutral Gray on the bottom stripes. It certainly was a lot of work, but I think the results were worth it.
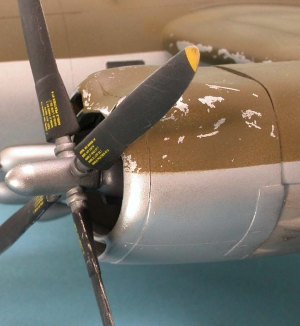 Weathering consisted of chipping paint from the leading edges of the
wings, engine cowlings, and stabilizers. I used a piece of Scotch magic
tape and dabbed it randomly on the hours-fresh acrylic Olive Drab. It
pulled up little flecks paint, leaving the Old Silver underneath, very
convincingly looking like chipped paint because, well, that is what it
is. I applied a dark gray wash to the control surfaces and dirtied up
the areas around the engines. The exhaust stains were sprayed on using
multiple light applications of Tamiya Smoke. The upper surfaces were
munged up by spraying random patterns of increasingly lighter shades of
Olive Drab until I was satisfied with the effect. Chalk pastels were
used to depict the staining around the top escape hatch, turret, and each
fuel filler cap. The effect of all this trickery was to imitate the
grungy look that most B-26s had after flying as many missions as they
did. I applied many light coats of Future floor polish (it’s not a wax,
damn it!) to prepare the non-aluminum surface for decals.
Weathering consisted of chipping paint from the leading edges of the
wings, engine cowlings, and stabilizers. I used a piece of Scotch magic
tape and dabbed it randomly on the hours-fresh acrylic Olive Drab. It
pulled up little flecks paint, leaving the Old Silver underneath, very
convincingly looking like chipped paint because, well, that is what it
is. I applied a dark gray wash to the control surfaces and dirtied up
the areas around the engines. The exhaust stains were sprayed on using
multiple light applications of Tamiya Smoke. The upper surfaces were
munged up by spraying random patterns of increasingly lighter shades of
Olive Drab until I was satisfied with the effect. Chalk pastels were
used to depict the staining around the top escape hatch, turret, and each
fuel filler cap. The effect of all this trickery was to imitate the
grungy look that most B-26s had after flying as many missions as they
did. I applied many light coats of Future floor polish (it’s not a wax,
damn it!) to prepare the non-aluminum surface for decals.
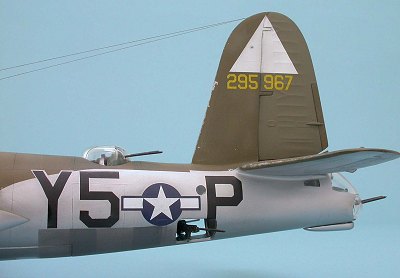
Decals came from Super Scale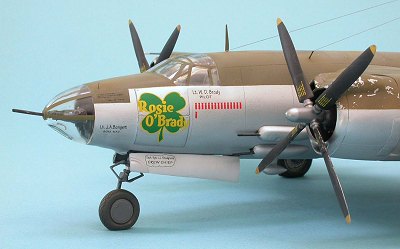 sheet 48-603 and went on perfectly. The
national insignia for the fuselage provided by Super Scale are somewhat
oversized, so I got a smaller set from an AeroMaster sheet. In
photographs of Rosie O’Brady, you'll notice that the squadron
identification letters (Y5) are outlined in natural metal at the top. I
carefully masked the decals with Post-it notes and sprayed the outline.
Each decal was weathered with a coat of Polly Scale Dust, including those
on the underside. I carefully sprayed just the decal itself to avoid
dulling the surrounding aluminum paint. I sealed the Olive Drab sections
with AreoMaster acrylic clear flat. The tires were painted with Polly
Scale Grimy Black and weathered with a grayish brown wash and a light
overspray of Polly Scale Mud. I painted the white triangle marking on
the tail rather than use decals, as this was easy to do and always looks
better, in my opinion.
sheet 48-603 and went on perfectly. The
national insignia for the fuselage provided by Super Scale are somewhat
oversized, so I got a smaller set from an AeroMaster sheet. In
photographs of Rosie O’Brady, you'll notice that the squadron
identification letters (Y5) are outlined in natural metal at the top. I
carefully masked the decals with Post-it notes and sprayed the outline.
Each decal was weathered with a coat of Polly Scale Dust, including those
on the underside. I carefully sprayed just the decal itself to avoid
dulling the surrounding aluminum paint. I sealed the Olive Drab sections
with AreoMaster acrylic clear flat. The tires were painted with Polly
Scale Grimy Black and weathered with a grayish brown wash and a light
overspray of Polly Scale Mud. I painted the white triangle marking on
the tail rather than use decals, as this was easy to do and always looks
better, in my opinion.
|
FINAL ASSEMBLY |
 I attached the landing gear and glued on the resin wheels. I
was relieved that I had put enough weight in the nose to properly balance
the model. I added the four 500 LB bombs to the bomb bay, glued on the
pitot tubes (which I always manage to break), and fished the top turret
out from inside the fuselage and added the transparent covering. I stuck
the tail guns in the end of the aircraft and snapped the clear covering
in place. The propellers were next, followed by the landing gear and
bomb bay doors. I attached two aerial wires, which I replicated with
invisible sewing thread. With the final effort, I was done with the
project, and had a pretty nice-looking B-26 Marauder for my collection.
I attached the landing gear and glued on the resin wheels. I
was relieved that I had put enough weight in the nose to properly balance
the model. I added the four 500 LB bombs to the bomb bay, glued on the
pitot tubes (which I always manage to break), and fished the top turret
out from inside the fuselage and added the transparent covering. I stuck
the tail guns in the end of the aircraft and snapped the clear covering
in place. The propellers were next, followed by the landing gear and
bomb bay doors. I attached two aerial wires, which I replicated with
invisible sewing thread. With the final effort, I was done with the
project, and had a pretty nice-looking B-26 Marauder for my collection.
|
CONCLUSIONS |
I find it interesting the so many modelers tell me that
they built all the classic Monogram bomber kits when they were kids, yet
they are rarely built today. I can't think of a single Marauder model
I've ever seen at any of the local, regional, and national contests that
I have attended in the past five years. The exact reasons for this are
beyond the scope of this review, but it’s kind of sad that single-engined
fighters seem to get the lion’s share of attention from modelers. The
Monogram B-26 is a grand kit, with lots of detail, excellent shape, and
builds up to an impressive replica. I would categorize this kit as
moderately difficult to build, with large gaps to fill, lots of
transparencies to deal with, and a lot of little details like the bombs,
turrets, and guns to align and attach. It took me a total of four months
and a little over eighty hours of effort to complete my model. It was
fun, and I am quite pleased with the results. Despite a closet full of
state-of-the-art Hasegawa and Tamiya kits, I find myself forever drawn
towards the Revell-Monogram line. In my adult modeling career, I've
built the B-17, the B-24, the B-25, the B-36, and now the B-26. Could
the B-29 be next?
I’d like to thank Robert Radlein and Norm Samuelson for their
invaluable help in completing this project.
|
REFERENCES |
Freeman, Roger: The Ninth Air Force in Colour – UK and the Continent,
World War Two
Birdsall, Steve: B-26 Marauder in Action
Scutts, Jerry: B-26 Marauder Units of the Eighth and Ninth Air Force
Famous Airplanes of the World, no. 126: B-26 Marauder
Boyne, Walter: “Magruder’s Marauder”, Wings/Airpower April, May
1973
Spencer, Jay: “Flak Bait, Biography of an Intrepid Marauder”,
Airpower, March 1978
Tamchill, Vic: “The Murderous Marauder”, Wings, October 1981
Radlein, Robert: e-mail conversations about the B-26
Eisenman, Steven: postings to HyperScale Plane Talking about B-26 D-Day
stripes
Boulstein, Laurent: postings to HyperScale Plane Talking about
B-26 interior colors
January 2004
If you would like your product reviewed fairly and fairly quickly, please contact the editor or see other details in the Note to Contributors.