|
KIT: |
Monogram Classics 1/48 F6F-5 Hellcat |
|
KIT # |
0080 |
|
PRICE: |
$14.99 CDN |
|
DECALS: |
Three aircraft |
|
REVIEWER: |
|
|
NOTES: |
Reissue of 1963 kit |
|
BACKGROUND |
For historical notes and a look in the box, click here.
|
CONSTRUCTION |
It all started by the cockpit, since we aircraft modellers rarely stray from the beaten path (ok, maybe!). The detailing inside the pilot’s office is non existent, so I made up a seat from a Bf 109G wing bulge and an ICM Spitfire engine part (which one, I do not know!) glued together since the kit’s seat is grafted unto the back of the pilot figure, a sure sign of the acceleration encountered during catapult launches! A resin seat would do the same job, and I painted the inside Model Master Interior Green and the seat Flat Black. I also painted the top of the wing center section green, since it acts as a floor. I then glued the tail wheel in the down position (remember that you can make the landing gear move on this kit) and the seat on the locating tabs on the right fuselage half. The fuselage halves were then mated together.
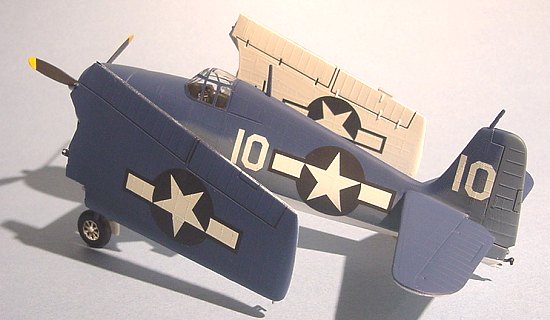 Once it was dry, I attacked the wing,
which is a rather curious affair. Since they are moveable (folded/unfolded), a
strut extends from the center section to the outer section, and both ends are
trapped between styrene clamps. You have to be careful not to glue the strut or
the unit won’t move at all. Furthermore, the landing gear moves on that kit, so
you must glue it in place before closing the center section. I started by
gluing the center section together, with great care been given not to glue the
aforementioned strut. Once everything was dry, it was slid into the fuselage
until centered, and glue was applied to the seam. The fit is excellent, you
just have to swipe the glue away, and no sanding is necessary. The landing gear
struts had previously been glued and retracted, to allow them to pass through
the slot (I extended them afterwards). Make sure you follow the instructions
closely so they are at the right angle. Again, I waited for the glue to set,
then attached both outer wing panels and let them dry for a couple of days to
see if they worked. They did.
Once it was dry, I attacked the wing,
which is a rather curious affair. Since they are moveable (folded/unfolded), a
strut extends from the center section to the outer section, and both ends are
trapped between styrene clamps. You have to be careful not to glue the strut or
the unit won’t move at all. Furthermore, the landing gear moves on that kit, so
you must glue it in place before closing the center section. I started by
gluing the center section together, with great care been given not to glue the
aforementioned strut. Once everything was dry, it was slid into the fuselage
until centered, and glue was applied to the seam. The fit is excellent, you
just have to swipe the glue away, and no sanding is necessary. The landing gear
struts had previously been glued and retracted, to allow them to pass through
the slot (I extended them afterwards). Make sure you follow the instructions
closely so they are at the right angle. Again, I waited for the glue to set,
then attached both outer wing panels and let them dry for a couple of days to
see if they worked. They did.
Since there was no control column, I fashioned one using styrene rod, painted it Aluminium with a Flat Black grip and glued it in place. I also used the kit’s decal for the instrument panel. I glued the stabilisers to the aircraft, and they fit very well, with the locating stubs being keyed to one another. The front cowl was also glued in place with the propeller shaft inserted, but before doing so, I glued styrene strips inside the cowl to hide the see through hole of the nose intakes. Three thin strips solved my problem. I smoothed all the seams using Tamiya Putty, masked the canopy and glued it in place. The aircraft was ready to be painted.
|
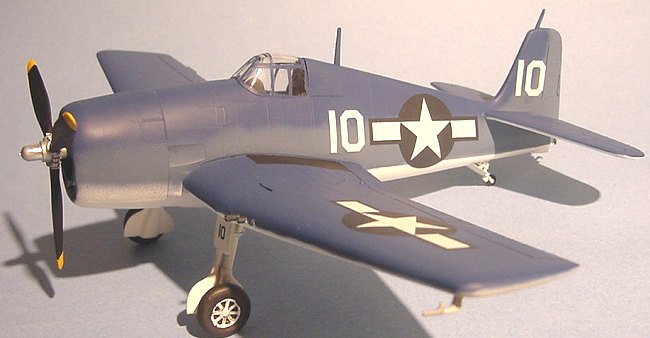
CAMOUFLAGE |
 Since I had elected to do the aircraft
in the tri-colour scheme, I painted the lower surfaces and the wheel wells with
Floquil Reefer White. Once it was dry, I masked everything and used Gunze Blue
Gray for the lighter blue followed by some masking and Tamiya Flat Blue for the
darker one. I did some touch ups with the white, then with both of the blues,
but my talent ran out and I got fed up of having Flat Blue overspray on the tail
(which is supposed to be Blue Gray), so I decided to wave the Flat Blue up on
the rudder, solving my problem. It’s not a 100% accurate, but it gives the
aircraft a nice look.
Since I had elected to do the aircraft
in the tri-colour scheme, I painted the lower surfaces and the wheel wells with
Floquil Reefer White. Once it was dry, I masked everything and used Gunze Blue
Gray for the lighter blue followed by some masking and Tamiya Flat Blue for the
darker one. I did some touch ups with the white, then with both of the blues,
but my talent ran out and I got fed up of having Flat Blue overspray on the tail
(which is supposed to be Blue Gray), so I decided to wave the Flat Blue up on
the rudder, solving my problem. It’s not a 100% accurate, but it gives the
aircraft a nice look.
|
FINAL CONSTRUCTION |
One of the big problems with the kit is
it’s wheels, which are correct in diameter but not in width. A quick search
through various references pointed out that the Hellcat shared the same wheels
as the Corsair, and I had the good fortune of having tow sets of wheels in the
Hobbycraft COIN Corsair box. The redundant set was duly kidnapped on the behalf
of the US Navy and painted white along with the rest of the aircraft. The tyres
were painted Flat Black and the spokes darkened with a felt tip pen. Please
note that the width of the axle is not the same on the two kits, so I enlarged
the Corsair’s wheels with a drill and cut the length of the Hellcat’s axles to
make them fit.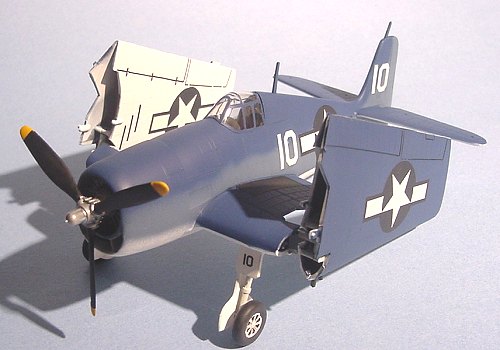
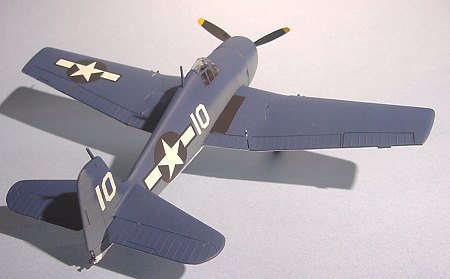
The propeller was painted Flat Black with a Chrome Silver dome and a Testor Silver (small jar) hub. The tips were finished in Model Master Insignia Yellow. I had cut off the dorsal antenna and the tail hook to be able to fit them after the model was built and painted, so I glued them on and slapped the right colour to them. I also painted the interior of the wings Model Master Light Grey to have a semi-authentic look for those times when the aircraft will have its wings folded. The wing walkways were masked and painted by hand, then I used the hairs of the brush to simulate a rough texture while the Flat Black paint dried up. The engine was brush painted Gun Metal with Chrome Silver to pick up the details, and the intakes painted Flat Black.
After a coat of Future, I put the decals on, and they went on very well, with a good reaction to Micro Sol. A Poly Scale Flat Coat completed the finish, and the masks were removed from the windows.
|
CONCLUSIONS |
This Hellcat is a very nice kit. It builds rapidly, looks like the real deal and has folding wing so it doesn’t take that much space on the display shelf. However, it could really be helped by a resin interior and wheels (if you don’t have any Corsair spares), and the propeller is not square enough (especially at the tips). It’s a nice addition to any collection, and with the low price and excellent decals in the box, it’s hard not to pick it up. Don’t you think mine has a TFCish look…?
If you would like your product reviewed fairly and quickly by a site that has 200,000 visitors a month, please contact me or see other details in the Note to Contributors.
Back to the Reviews Index Page