Accurate Miniatures 1/48 SBD-5 Dauntless
|
KIT # |
3412 |
|
PRICE: |
$? |
|
DECALS: |
one option |
|
REVIEWER: |
Randy Lutz |
|
NOTES: |
|
HISTORY |
The Douglas SBD Dauntless dive bomber became a mainstay of the Navy's air fleet in the Pacific, with the lowest loss ratio of any U.S. carrier-based aircraft. Douglas delivered a total of 5,936 SBD/A-24s between 1940 and the end of production in July 1944.
The Dauntless was developed at the Douglas/Northrop facility at El
Segundo, California, and was based on the Northrop Model 8 attack bomber
developed for both the Army (as the A-17 and A-17A)
 and the export market. The SBD Dauntless
featured "Swiss cheese" flaps — dive brakes punched with 3-inch
holes — so that it could achieve pinpoint accuracy by diving to the
target, dropping the bomb and then pulling out of the near-vertical dive.
and the export market. The SBD Dauntless
featured "Swiss cheese" flaps — dive brakes punched with 3-inch
holes — so that it could achieve pinpoint accuracy by diving to the
target, dropping the bomb and then pulling out of the near-vertical dive.
In addition to the U.S. Navy, Marine Corps and Army Air Forces, the Dauntless served forces in New Zealand and Mexico. The first enemy ship sunk by the U.S. Navy in World II is credited to a Dauntless from the USS Enterprise. It went on to sink 18 major warships, including a battleship and six aircraft carriers.
Despite being replaced by the SB2C Helldiver on fleet carriers, the Dauntless was used a great deal by Navy and Marine dive bomber squadrons for general island patrol and for assisting Marine and Army units battling on the many island campaigns throughout the Pacific war. The SBD was particularly effective in archipelago campaigns where one or two major islands were taken before the fleet moved on to other areas. In these 'backwater' battles, the enemy held on tenaciously and SBDs were particularly effective in either rooting them out or keeping them isolated from resupply and reinforcement.
The SBD-5 was the next to last version and the one that was the most effective, having been outfitted with sea search radar and a more powerful engine.
History section provided by your editor and Boeing!
|
THE KIT |
The packaging is typical Accurate Miniatures style, with a painting of the subject on the box top, and a photograph of a completed model on the bottom. Inside, the main parts to the model are wrapped in plastic, while the decal sheet and the clear parts are individually wrapped and placed beneath a protective cardboard liner. These are the little things that made Accurate Miniatures stand apart from the other players in the industry.
With this kit, AM had changed the layout of the instruction sheet. In the past, all painting instructions were grouped on the last page and involved lots of flipping back and forth to identify parts and then determine which colour they should be. However, the Dauntless was a departure from their previous releases, as each separate assembly step has painting instructions. While not appearing to be a major improvement, I found it sure made things easier. What did not change in the instructions, were the detailed assembly notes. A word of advice is in order. Read them and follow the sequence of assembly, as AM did not put them there for nothing.
 As for the model, the scribing is
recessed and appears accurate, aside from the extra aileron trim tab
moulded on the starboard wing, which proved a little tricky to remove
without damaging the surrounding detail. In that context, I have the
impression that there was some kind of a contest out in the modelling
world to see who would be first to find fault with this kit. Complaints
ranged from the not too bad "I think the flaps are little too short" to
the utterly ridiculous "the flare pistol should not go where indicated
and the relief tube is not open".
As for the model, the scribing is
recessed and appears accurate, aside from the extra aileron trim tab
moulded on the starboard wing, which proved a little tricky to remove
without damaging the surrounding detail. In that context, I have the
impression that there was some kind of a contest out in the modelling
world to see who would be first to find fault with this kit. Complaints
ranged from the not too bad "I think the flaps are little too short" to
the utterly ridiculous "the flare pistol should not go where indicated
and the relief tube is not open".
Yes the flaps are a little short in terms of span, but according to my references, this is OK as the original was like this. My sample had two small defects, which were easily rectified by a phone call to AM. The main bomb was short moulded and the underside of the wing had some irregular marks, which while a nuisance, could have been easily corrected with a small amount of putty. A week after my call, I had a new wing and bomb assembly.
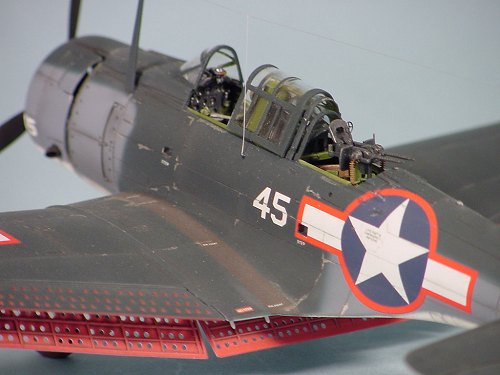
The kit has a fully detailed interior, (yes the relief tube is there) consisting of no less than 39 parts. I have built entire models, with less parts than that! I compared the interior components to photographs in the Detail and Scale on the Dauntless, and the kit is right on. Included in this is the pilot's navigation table, which slides in and out of the instrument panel. It even features a decal for the plotting grid. The instrument panel is moulded in clear plastic and has decals, which are to be applied to the backside to represent the instruments. I decided not to use them, as I prefer to apply individual instrument dials one at a time using generic American instruments and my Waldron Punch and Die set. The seatbelts are represented by decals and would look fine once installed. However, I elected to use a set of photo-etched belts. If you prefer to use the decals, remember, you do not have to make the decals suck down into every crevice, as they will look more convincing, if they are allowed to bridge some low spots and overlap a little.
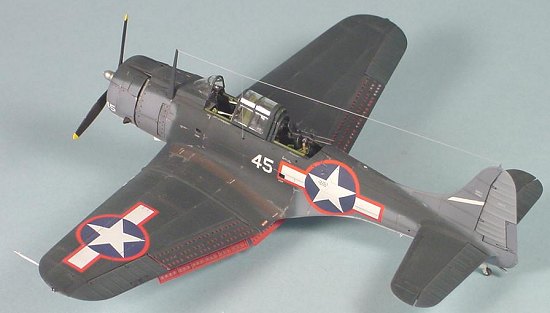
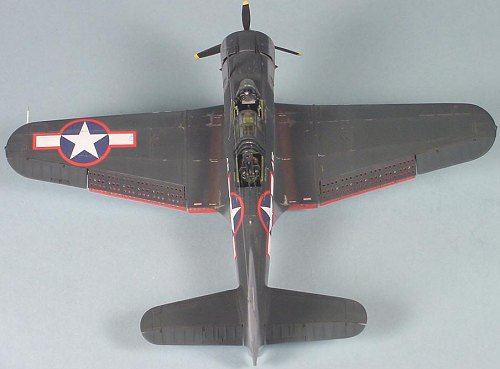 The one area of the kit that
everyone had been talking about is the flaps/dive brakes. Hasegawa took
a beating for not opening all the perforations, and AM did not repeat
that mistake. All perforations are open, and the flaps feature full
inner detail along with the actuating rods and arms, which translates
into a very complete assembly.
The one area of the kit that
everyone had been talking about is the flaps/dive brakes. Hasegawa took
a beating for not opening all the perforations, and AM did not repeat
that mistake. All perforations are open, and the flaps feature full
inner detail along with the actuating rods and arms, which translates
into a very complete assembly.
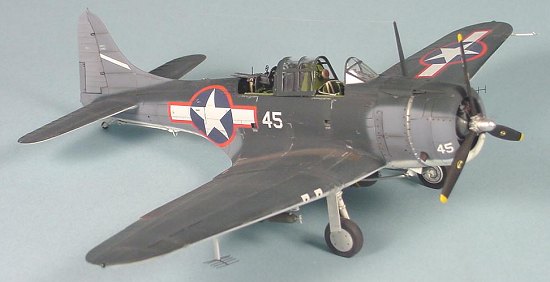
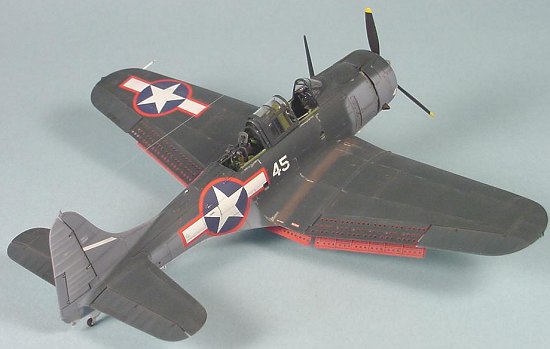
Two choices of canopy are provided; a one piece closed and a multi-piece open assembly. Both sets of transparencies are thin and crystal clear. Also included is a choice of weighted or non-weighted tires. Notice I did not say bulged. Maybe AM had been listening to all the commentary about tires displaying excessive sidewall deformities. A full complement of underwing stores is provided, consisting of a 1,000 lb. bomb and two 100 lb. bombs with fully detailed racks and trapeze mechanism. A nice touch is the inclusion of the yellow stencil decals for the bombs.
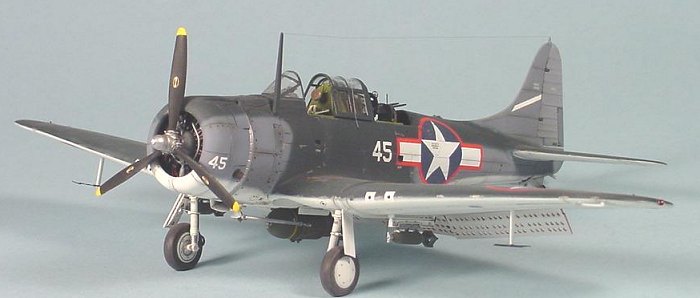
Speaking of decals, a choice of two aircraft are provided on the decal sheet. Numbers 41 and 45, both from VB-16, USS Lexington during the Tarawa landings. Ultimately, both aircraft were written off due to hard landings. Accurate Miniatures provides the star and bar national insignia in the blue and white versions, but I really feel that they should be the short-lived blue and white star and bar, featuring the red surrounds, which I obtained from Aero Master set 48-136. I base this opinion on a good quality photo of #45 crash landing on the deck of the Lexington, which is found in the Squadron In Action on the Dauntless. The decals are printed in Mexico using a Disa-clear process. They rival Scalemaster in terms of adhesion, and easily surpass Scalemaster for registration.
|
CONSTRUCTION |
During construction, the only fit
problem I had encountered was where the trailing edge of the lower wing
meets the bottom of the fuselage. I had a gap that ran on all three
sides of the opening that was filled with styrene stock and then sanded
smooth. Other than that, the fit was perfect. You will have some seams
showing in the upper part of the wheel wells and upper part of the flap
bays where the wing meets the fuselage. For some people, the seams won’t
be an issue, but if you are
 like me, you will want to deal with them. I
found it much easier to cut .005 pieces of styrene to the proper shape
and install them as opposed to trying to fill and sand the seams in such
a small, restricted area.
like me, you will want to deal with them. I
found it much easier to cut .005 pieces of styrene to the proper shape
and install them as opposed to trying to fill and sand the seams in such
a small, restricted area.
The cockpit is a work of art and negates the need for any aftermarket bits, other than a set of seat belts. I finished the majority of the cockpit parts in Interior Green, followed by a darkened Interior Green wash and many dry-brushings of lightened Interior Green. Painting cockpits is one of the things I like most about building and Accurate Miniatures provides the perfect canvas to display one’s painting talents.
If you follow the instructions carefully, you should not have any problems getting all the parts in place. The most difficult parts to assemble were the rudder pedals. Even at that, the word difficult is not really apropos. They are just not as easy as the rest of the interior components.
The landing gear is a little finicky to install and I encourage you to follow the instructions in this regard. The Dauntless gear has a peculiar stance and Accurate Miniatures has sequenced the assembly to ensure that it sits right.
|
COLORS AND MARKINGS |
 The model was airbrushed using
Xtracolor X121 FS15042 Gloss Sea Blue, X125 FS15164 Intermediate Blue and
X141 FS17875 White. All the fabric areas were then finished in a
slightly faded version of the surrounding colour. No preshading here, as
I am not an advocate of this technique. Just call it personal
preference. All my shading is a combination varying paint tones and/or
chalk pastels. The underside was given a medium grey oil paint wash
while the upper surface panel lines were picked out with a light grey
wash, after all the decals were applied. This was followed up with some
paint chipping, replicated using a mixture of Humbrol silver, Winsor &
Newton Raw Umber oil paint and turpentine.
The model was airbrushed using
Xtracolor X121 FS15042 Gloss Sea Blue, X125 FS15164 Intermediate Blue and
X141 FS17875 White. All the fabric areas were then finished in a
slightly faded version of the surrounding colour. No preshading here, as
I am not an advocate of this technique. Just call it personal
preference. All my shading is a combination varying paint tones and/or
chalk pastels. The underside was given a medium grey oil paint wash
while the upper surface panel lines were picked out with a light grey
wash, after all the decals were applied. This was followed up with some
paint chipping, replicated using a mixture of Humbrol silver, Winsor &
Newton Raw Umber oil paint and turpentine.
After a few coats of Testors Dullcoat, some general paint fading and weathering was achieved using chalk pastels.
|
CONCLUSIONS |
Accurate Miniatures set a very high standard with the Avenger, and the Dauntless has easily met this level.
February 2004
Copyright ModelingMadness.com
If you would like your product reviewed fairly and fairly quickly , please contact the editor or see other details in the Note to Contributors.