Monogram 1/48 P-47D Thunderbolt
|
KIT # |
5242 |
|
PRICE: |
$10.00 |
|
DECALS: |
one aircraft |
|
REVIEWER: |
|
|
NOTES: |
Superscale and Aeromaster decals used. |
|
HISTORY |
HISTORY: The Republic P-47 THUNDERBOLT.... A true classic American plane! The familiar lines of the revered JUG were a welcome sight to many ground pounders and “big friends” throughout WW II. Arguably, the original “Strike-Fighter” in today’s terminology, the JUG was an evolutionary plane with its roots dating back to the early 1930’s and competition for a US Army Air Corp Pursuit plane. The Russian born team of Seversky and Kartveli developed their unique lines and rugged approach to aircraft construction into a formidable aircraft. Despite its great size and disarmingly graceful lines, the Thunderbolt had an immense amount of power and a speed/altitude/firepower combination, which few other aircraft could match and one of the fastest roll rates of any airplane (with both wings still on….). As for the routine statistics for the P-47D-10 which is in this kit:
Power: 2,000 hp / 2,300 WEP (water injection)
Weight Empty 9,900 lbs.
Gross 13,500 lbs.
Max 15,000 lbs.
Speed 433 mph @ 33,000 ft
Service Ceiling 42,000 ft
Range 835 miles
 With 15,683 Thunderbolts of various configurations built,
it was the most produced, largest, single-engine fighter ever produced by the
U.S. and at the close of WW II the fastest fighter edging out the sleeker
Mustang by 2-3 mph. In it’s final form, the JUG was to be a 21,200-pound beast
with a range of 2,000 miles (w/ external tanks) that could travel 467 mph @
33,000 feet and carry three 1,000-pound bombs. Look out, man.
With 15,683 Thunderbolts of various configurations built,
it was the most produced, largest, single-engine fighter ever produced by the
U.S. and at the close of WW II the fastest fighter edging out the sleeker
Mustang by 2-3 mph. In it’s final form, the JUG was to be a 21,200-pound beast
with a range of 2,000 miles (w/ external tanks) that could travel 467 mph @
33,000 feet and carry three 1,000-pound bombs. Look out, man.
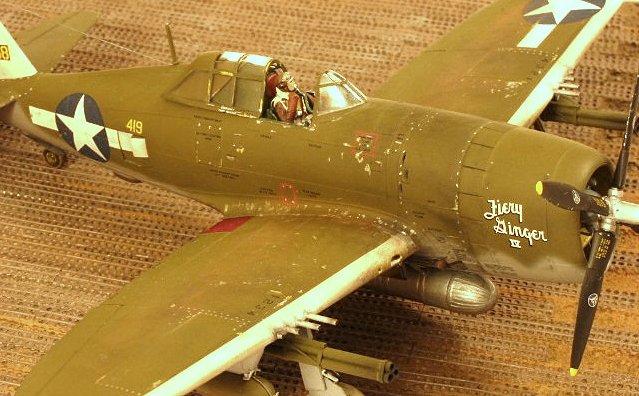
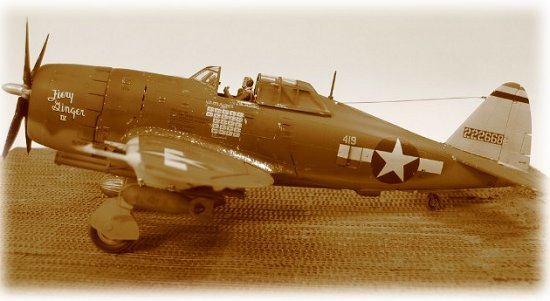
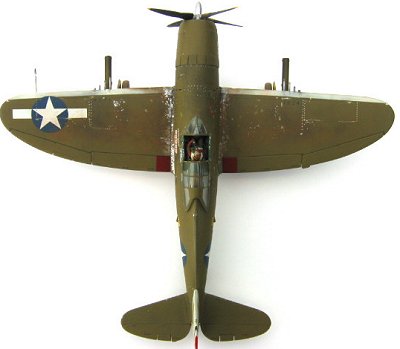
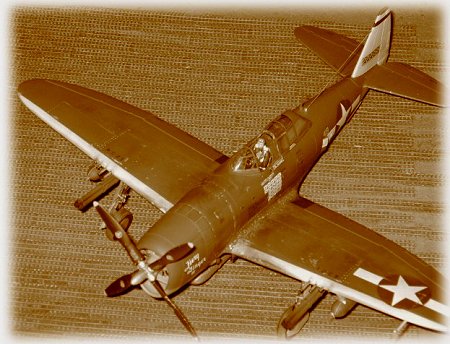
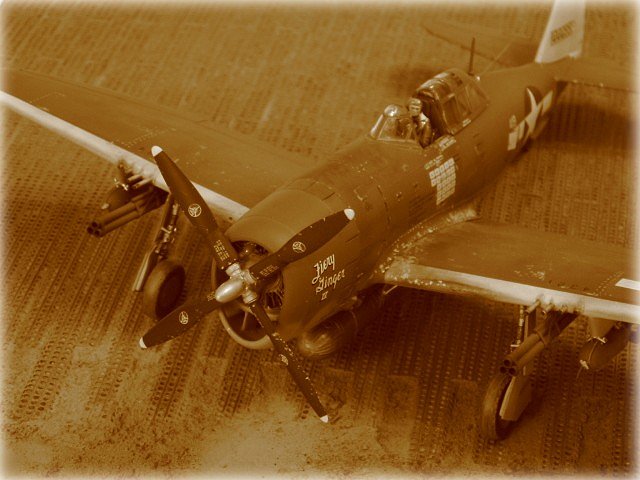
To do justice to this kit I elected to replicate the steed of Congressional Medal of Honor winner Col. Neal Kearby. The Colonel flew four different P-47’s during his time with the 348th FG in the Pacific Theater, this P-47D-4-RE being his last plane during a temporary assignment to 5th AF Staff. Col. Kearby was in a race-for-top-ace, with the very popular P-38 driver Dick Bong, when shot down near the Japanese airfield at Dagau after being jumped by three TONY fighters. The operational environment of the island hopping campaigns in the pacific left the aircraft very weathered and somewhat beat-up looking. This model attempts to capture the sense of enduring effort and the “operational” look of a front-line fighter in the campaigns against the Japanese, advancing from one island PSP airstrip to the next.
|
THE KIT |
DESCRIPTION: A standard layout of gray styrene sprues with conventional sub-assemblies, clear stock for canopy/windscreen.
GOOD POINTS: Overall nice fit of parts, relatively good surface details, enough molded material to work with for detailing and reworking, nice decal sets included for one of two variations.
OTHER POINTS: Clear parts too thick, outlines of tail surfaces inaccurate, sparse cockpit details, poor detailing on wing pylons & rocket tubes, no sway braces for centerline shackles, weak separation lines at control surface hinge lines, no clear wingtip nav lights, poor gun sight.
 RECOMMENDATION:
A good buy. This kit has all the “basics” included and enables the modeler to
go stock from the box or use advanced techniques to bring it up to its full
potential.
RECOMMENDATION:
A good buy. This kit has all the “basics” included and enables the modeler to
go stock from the box or use advanced techniques to bring it up to its full
potential.
FIRST LOOK: Upon opening the box a standard array of gray styrene sprues appears. The parts layout is unremarkable with approximately 50 parts in all. The decal sheet offers two nice options for the builder. First, a P-47D-10-RE, serial number 42-103324, 15th AF, 325th FG, 317th FS flown by Maj. Herschel “HERKEY” Green. Second option is P-47D-16-RE; serial number 42-76076, 9th AF, 405th FG, 510th FS flown by Capt. Charles Mohrle circa 1944-1945. The eight page instructions give a nice assortment of information for the builder to ponder in preparation to build. Several high quality black & white photographs of engine, cockpit, bazooka tube, main gear wells and canopy details offer incentive to rework some of the less well molded parts.
A small chart of recommended paint colors and listings of recommended FS-595B color chips provide a means to orient the choice of color schemes to be used. Each variants decal scheme is portrayed on a nice 4-view that shows decal placement and color layout with shading/coding to FS numbers. Nice! The general molding approach uses left and right fuselage halves with integral fin/rudder, and a separate unitary engine cowl/cowl flap piece. The wings are each top and bottom halves that butt joint into the fuselage with a nice fit (except the corrugations in the wheel wells). Stabilizer/elevator pieces are solid, single unit each, as is the Curtis-electric “pencil blade” prop. As for the minor sub assemblies, there is a bit to be desired here.
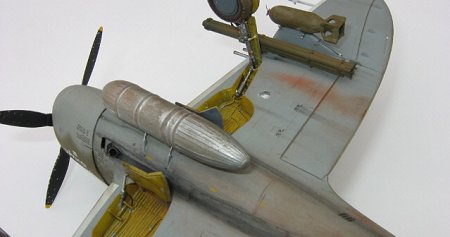
The main gear doors are one piece and need to be sawed apart and attached separately. A 150-gallon drop tank has problems with the seam and the “corrugated surface”. Supplied four-piece bazooka tubes were unsat and replaced with scratch built units. Wing bomb pylons lack detail and needed a fair amount of work to look respectable. All guns, pitot probe, and antenna were very flimsy and removed to be replaced by shaped steel music wire. The engine has nice detail for a 1/48th styrene mold and looks much better when the “molded on” rocker arm tubes are replaced by individual tubes and a set of spark plug wires are added. This kit was built using kit supplied pieces or scratch built items of styrene, music wire, or brass tube. No photo-etch or resin was used.
|
CONSTRUCTION |
Beginning as usual with the engine, the individual rocker tubes were scraped off and replaced with thin copper wire, CAed in place. 032-gage wire was used to make set of spark plug wires, and a chunk of styrene became the coil between the magnetos. Through the core of the engine a hole was drilled into which a piece of steel music wire was epoxied to serve as the shaft for the removable prop. Next step was to prepare the cockpit tub sub-assembly. This took some time to add a throttle quadrant, some electrical control boxes/radios, and a couple of wire harnesses.
 Since this model is replicating an Evansville built JUG, the
cockpit was painted a dark bluish-green, as documented, for interior green (as
opposed to the more chromate-green used in the Curtis built P-47G interiors).
Several cavity vents and the turbo-supercharger doors needed rework. For these,
the inside of the fuselage was scraped until very thin, and the vents “cleaned
up” with a #11 scalpel blade. Likewise, the thick doors on the turbo-doors and
oil coolers were opened and thinned using blades and jewelers files. The waste
gate exit tubes were drilled out and replaced with thin wall brass for a more
crisp look. The gunsight molded onto the right half fuselage was cut off
to be replaced with a scratched MK-5 unit. The antenna mast was replaced with a
much stronger ground-music wire post anchored deep into the fuselage.
Since this model is replicating an Evansville built JUG, the
cockpit was painted a dark bluish-green, as documented, for interior green (as
opposed to the more chromate-green used in the Curtis built P-47G interiors).
Several cavity vents and the turbo-supercharger doors needed rework. For these,
the inside of the fuselage was scraped until very thin, and the vents “cleaned
up” with a #11 scalpel blade. Likewise, the thick doors on the turbo-doors and
oil coolers were opened and thinned using blades and jewelers files. The waste
gate exit tubes were drilled out and replaced with thin wall brass for a more
crisp look. The gunsight molded onto the right half fuselage was cut off
to be replaced with a scratched MK-5 unit. The antenna mast was replaced with a
much stronger ground-music wire post anchored deep into the fuselage.
Fuselage halves went together nicely with minimal putty required. Careful blade-scraping work eliminated the seams and preserved the panel lines and fasteners running across the seam. Windscreen sizing and fit were nice, minimal gap and almost no putty required. The sliding canopy is apparently made to be installed in the closed position as the aft edges are very thick. Careful scraping and sanding are required to thin this trailing edge for display in the open position without damaging the rearmost window pane.
 Before mating the wing halves, the
mounting holes for the rocket tubes were back drilled and the guns were
removed. Replacement gun banks of 4-barrels each were made up and reinstalled
with the proper slope so as to be parallel to the ground plane vice dihedral
line. The right wing root leading edge needed to be filled with putty to allow
the ram-air duct to be machined in using a small tip Dremel grinding ball. The
wing tip nav lights were cut out and replaced with back-drilled/painted clear
wedges, then scraped and polished to conform to the wingtip shape. The wings
attached securely with proper dihedral angle and minimal gap. The bomb pylons
were worked up to give a more reasonable looking set of ejector bars and sway
braces made from styrene strip stock, glued on, then pin-vise drilled to accept
a small piece of wire.
Before mating the wing halves, the
mounting holes for the rocket tubes were back drilled and the guns were
removed. Replacement gun banks of 4-barrels each were made up and reinstalled
with the proper slope so as to be parallel to the ground plane vice dihedral
line. The right wing root leading edge needed to be filled with putty to allow
the ram-air duct to be machined in using a small tip Dremel grinding ball. The
wing tip nav lights were cut out and replaced with back-drilled/painted clear
wedges, then scraped and polished to conform to the wingtip shape. The wings
attached securely with proper dihedral angle and minimal gap. The bomb pylons
were worked up to give a more reasonable looking set of ejector bars and sway
braces made from styrene strip stock, glued on, then pin-vise drilled to accept
a small piece of wire.
At this stage, all flight control surfaces and the cowl flaps were attended to. The minor groove at each hinge line was unsatisfactory and using a wash would not provide adequate visual depth and dimension. Using the back edge of #15 and #11 blades, each hinge line was etched down and forward to create a 3-D hinge look and alleviate need for shading/washes. The rudder was through drilled to accommodate an elevator torque tube and bearing bracket. Using several nice photographs of the “bazooka tubes”, a new pair were scratch built from styrene tube and strip stock and with music wire posts that mate into the lower wing where drilled out putty filling the wing holds them, yet they pop off easily for transportation.
Tail pieces attached easily and lineup was very direct. Centerline station sway braces and fuel/pressure line fittings were installed. Main wheel wells took lots of work to correct misaligned corrugations. Wells were scraped and hydraulic/brake lines were reinstalled using various diameters of soft wire. Small gear/door actuators were made from music wire/brass. The main gear doors were one piece and had to be carefully razor sawed apart, cleaned up, and attached separately.
|
PAINT & DECALS |
 All paints used on this model were Testors enamel/lacquer and some “small
squares”, but mostly Model Masters. Since the colors from the era are not used
today, FS-595 is only an approximation and I elected to custom mix all major
colors used: #41 Olive Drab, #43 Neutral Gray (ref: Bulletin 41 of 16Sep1941),
Republic Interior Green, etc. After final assembly and cleaning, the cockpit
and engine were masked off and stuffed with cotton. Wheel wells, hinge lines,
and elevator torque tube were painted zinc chromate (as was the inside of the engine
cowl earlier). The lower surface Neutral Gray was first, followed by the upper
surface OD.
All paints used on this model were Testors enamel/lacquer and some “small
squares”, but mostly Model Masters. Since the colors from the era are not used
today, FS-595 is only an approximation and I elected to custom mix all major
colors used: #41 Olive Drab, #43 Neutral Gray (ref: Bulletin 41 of 16Sep1941),
Republic Interior Green, etc. After final assembly and cleaning, the cockpit
and engine were masked off and stuffed with cotton. Wheel wells, hinge lines,
and elevator torque tube were painted zinc chromate (as was the inside of the engine
cowl earlier). The lower surface Neutral Gray was first, followed by the upper
surface OD.
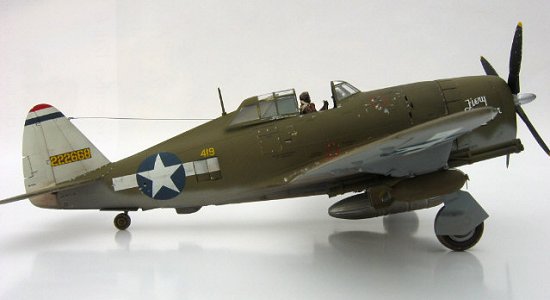
After curing for a couple days, white tail and leading edges were masked and painted. When fully dried, the entire model was pre-weathered with ground chalk pastels. Lime green faintly faded into some upper surfaces, and carefully applied brown, burnt sienna, and a little black, to dull and weather the paint. While weathering, much reference was made to pictures of operational JUGS to see where they took the most abuse and where maintenance left its marks. When satisfied, the entire model was given a few mist coats of enamel gloss clear top-coat and allowed to cure for several days. Decals were applied, set, sucked down with solvent, and allowed to dry overnight. Decaling residue was removed with a damp tissue.
 The second round of weathering with chalk
pastels allowed more depth of color and the decal surfaces were weathered/dulled
to match local patterns. Silver, chrome, and zinc chromate was used to “chip”
paint, and black/sienna washes were used to oil streak/exhaust streak the lower
fuselage. Charcoal chalk pastel and a blending stump provided some subtle gun
gas streaks and miscellaneous panel streaking. The whole show was given the
clear top-coat again to lock-in the weathering/protect decals, and then put away
for a few days. Lastly, the entire model was misted with several coats of dullcoat lacquer to gradually tone off the gloss to the desired level. Once all
painting/decaling was complete, the ordnance, main gear, gear doors, and antenna
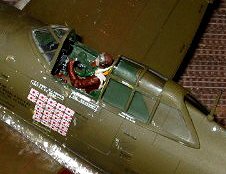
were attached. I have not done figures before, which is painfully obvious upon
inspection of the pilot. He was posed to be adjusting the oxygen mask/hose just
prior to starting up for a mission. All cockpit/pilot paints were enamels
custom mixed on the glass workbench as needed to provide subtle shade/color
differenced on leather items, equipment.
The second round of weathering with chalk
pastels allowed more depth of color and the decal surfaces were weathered/dulled
to match local patterns. Silver, chrome, and zinc chromate was used to “chip”
paint, and black/sienna washes were used to oil streak/exhaust streak the lower
fuselage. Charcoal chalk pastel and a blending stump provided some subtle gun
gas streaks and miscellaneous panel streaking. The whole show was given the
clear top-coat again to lock-in the weathering/protect decals, and then put away
for a few days. Lastly, the entire model was misted with several coats of dullcoat lacquer to gradually tone off the gloss to the desired level. Once all
painting/decaling was complete, the ordnance, main gear, gear doors, and antenna
were attached. I have not done figures before, which is painfully obvious upon
inspection of the pilot. He was posed to be adjusting the oxygen mask/hose just
prior to starting up for a mission. All cockpit/pilot paints were enamels
custom mixed on the glass workbench as needed to provide subtle shade/color
differenced on leather items, equipment.
|
CONCLUSIONS |
Highly recommend this kit. The low cost and relative good quality of this kit allow it to be built by beginners for respectable looks, or advanced modelers for competition. This built/reviewed version of “FIERY GINGER IV” was able to place first in category (1/48 Allied Prop) in a local IPMS contest. It can be built quickly if desired, or take your time (which I personally recommend!) and get a couple months of relaxing modeling that shows itself in a fine piece of work which will look great on your shelf for a long time to come.
|
REFERENCES |
Bodie, Warren M., (1994). Republic’s P-47: From Seversky to Victory. Hiawassee, GA: Widewing Publications.
Freeman, Roger, (1979). Thunderbolt: A Documentary History of the Republic P-47. New York: Charles Scribner’s Sons.
Johansen, Frederick A., (1999). Warbird Tech Series, Vol. 23, Republic P-47 Thunderbolt. North Branch, MN: Specialty Press Publishers and Wholesalers.
Kinzey, Bert, (1998). Detail & Scale Vol. 54, P-47 Thunderbolt. Carrolton, TX: Detail & Scale, Inc. / Squadron Signal Publications.
Okazaki, Nobuhiko (ed.), (1995). Aero Detail 14 – Republic Thunderbolt. Tokyo: Dai Nippon Kaiga Co.
Drendel, Lou, (1997). Walk Around No. 11, P-47 Thunderbolt. Carrolton, TX: Squadron Signal Publications, Inc.
Davis, Larry, (1984). In Action No. 67, P-47 Thunderbolt. Carrolton, TX: Squadron Signal Publications, Inc.
Hess, William N. (1976). P-47 Thunderbolt at War. Garden City, NY: Doubleday & Company, Inc.
McDowell, Ernest R., (1999). Thunderbolt – The Republic P-47 Thunderbolt in the Pacific Theater. Carrolton, TX: Squadon Signal Publications.
Bell, Dana, (1997). Air Force Colors, Vol. 3 – Pacific and Home Front, 1942-47. Carrolton, TX: Squadron Signal Publications.
Archer, Robert D. and Victor G. (1997). USAAF Aircraft Markings and Camouflage 1941-1947: The History of USAAF Aircraft Markings, Insignia, Camouflage, and Colors. Honk Kong: Schiffer Publishing, Ltd.
Hucker, Robert, (July 1979). Neal Kearby – Thunderbolt Ace. Air Classics, Vol. 15, No. 7, p.42.
Nijober, Donald, (1998). Cockpit: An Illustrated History of World War II Aircraft Interiors. Charlottesville, VA: Howell Press.
Copyright ModelingMadness.com
If you would like your product reviewed fairly and fairly quickly, please contact the editor or see other details in the Note to Contributors.
Back to Reviews Page 2016