Xotic 72 1/72 Goodyear F2G Corsair
|
KIT # |
4805 |
|
PRICE: |
$19.95 |
|
DECALS: |
Four aircraft |
|
REVIEWER: |
|
|
NOTES: |
Short run with etched fret and vac canopy |
|
HISTORY |
|
THE KIT |
The $20 price tag for a 1/72 single-engine WWII fighter is likely to cause
“sticker shock” to those of us Auld Pharts who cut our modeling teeth on
50-cent Hawk, Revell, and Airfix Corsairs. But a look at the kit’s contents
reveals that the price isn’t really that bad. Other 1/72 Corsair kits retail
for between six and twenty dollars--let’s call $9 a fair average--and the
Xotic kit includes, besides the “basic” model:
*A fret of photoetched detail parts
*Film instrument panel
*Not one but two resin extended cowling scoops for the racers
*Vacform canopy
*Full-color painting/marking guide
*Detailed marking and conversion instructions
*Six black and white photos of several F2G racers
*Two sheets of excellent decals for four versions
So there’s really nothing else you need to buy. Add up what you’d normally
spend on resin, PE, vac, aftermarket decals, etc. for a typical $9 kit and
you’ll see that for what you’re getting, $20 isn’t a bad price at all. This is
a very complete package. For a look at what is in the box, please
visit the preview.
|
CONSTRUCTION |
Fuselage
Preparation
 The fin of the Xotic F2G is offset a bit, just like the real one. In
dry-fitting the fuselage halves, I found I had to do some careful trimming
with an Xacto blade at the forward edge of the fin, where it meets the
fuselage, on both halves to get them to mate up. That done, the fuselage
halves required only a few careful swipes with Snake’s BAF (Big-Ass File, a
genuine Sears Craftsman 10” single-cut fine-cut mill file--ask for it by
name!) to mate up perfectly. I was pleased to find both fuselage halves the
same length, and to see that all fuselage panel lines matched up side-to-side,
something you don’t see in all limited run
kits.
The fin of the Xotic F2G is offset a bit, just like the real one. In
dry-fitting the fuselage halves, I found I had to do some careful trimming
with an Xacto blade at the forward edge of the fin, where it meets the
fuselage, on both halves to get them to mate up. That done, the fuselage
halves required only a few careful swipes with Snake’s BAF (Big-Ass File, a
genuine Sears Craftsman 10” single-cut fine-cut mill file--ask for it by
name!) to mate up perfectly. I was pleased to find both fuselage halves the
same length, and to see that all fuselage panel lines matched up side-to-side,
something you don’t see in all limited run
kits.
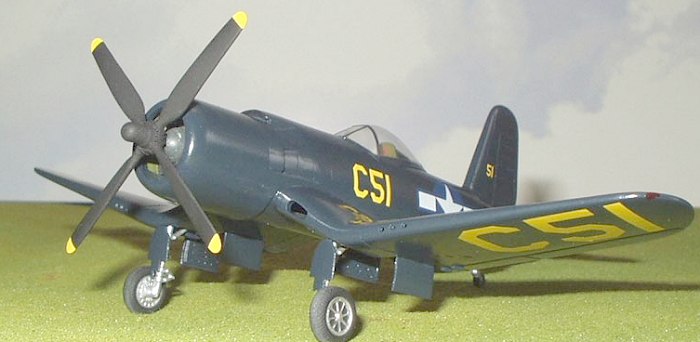
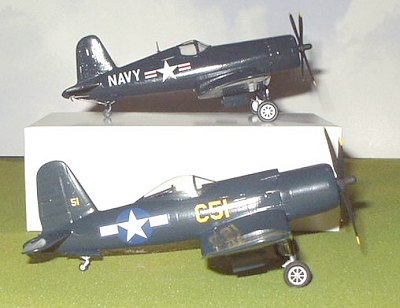
(Image to right) Xotic kit accurately captures the taller fin of the F2G. Compare to
Italeri F4U-5 in background.
The cowling gills are molded closed on their backsides with a bit of irregular
flash. It required only about 20 minutes’ work with an Xacto knife to open
these up. Curiously, the kit gives you no exhaust pipes, but they should be
easily added at some future time (I didn’t do so for this mostly out-of
the-box review).
The tailgear well was a bit too wide for the fuselage. I had to thin it a bit
in the rear to keep it from holding the fuselage halves apart. When it was
fitted and glued in, cockpit work could proceed.
Cockpit:
The kit provides a basic cockpit assembly comprising floor, seat, side
consoles, instrument panel, and joystick. You’ll have to drill out the hole in
the floor to mount the joystick. The instructions are a bit vague as to the
relationship of the side consoles and the floor--do they fit into the
perfectly sized notches in the side of the floor, or should they sit on top of
the floor? After trying the former, and finding that the instrument panel now
had no place to mount, I quickly unglued the consoles and mounted them atop
the floorboard, where they belong. The instrument panel then glues to the
forward edges of the consoles. The gluing surface here is tiny, so I
reinforced the panel/console joints on their back sides with Loctite superglue
gel.
The kit includes a number of photoetched details for the cockpit--instrument
panel, rudder pedals, console tops, etc., and a “film” for the instrument
faces. In the interests of keeping this project moving, I elected not to use
them. Personally, I don’t waste too much time detailing 1/72 cockpits, and
would have been just as happy to paint the inside of the fuselage flat black
and leave an open hole here, but since this is a review, I felt obligated to
report on the fit of the cockpit assembly, which is often a trouble spot in
these limited run kits. I’m pleased to report that the assembled ‘pit fits
onto the pegs molded in the inner fuselage halves just fine with no
interference whatsoever. I painted the entire cockpit area with Model Master
Interior Green FS34151, with flat black instrument panels, console tops, and
joystick handle.
Engine and Prop
There’s one more “little” detail before you can button up the fuselage, and
that’s the engine. Whoops! Somebody goofed up here big-time. The one-piece kit
engine bears no resemblance to the 28-cylinder (7x4) R-4360. There are nine
cylinders depicted, and the engine looks a bit like a “generic” R-2800 (9x2),
or the front bank of one. My spare parts box is not exactly overflowing with
surplus 1/72 R-4360s, and the kit engine fit so well in the spot indicated, so
I elected to use it and just painted the cylinders black so they can hide in
the shadows. Let the Mini-Maglite Police catch me if they can! (Yes, I am the
kind of guy whose initial response to any unusual car engine noise is to turn
the radio up!)
 The engine comes with a stubby prop shaft molded into the gear case. The hole
in the prop was bigger than this shaft, so I cut if off and drilled out the
engine to take a piece of aluminum tubing to mount the prop.
The engine comes with a stubby prop shaft molded into the gear case. The hole
in the prop was bigger than this shaft, so I cut if off and drilled out the
engine to take a piece of aluminum tubing to mount the prop.
One final word about the kit engine if you choose to use it: Placed against
the nub molded in the right fuselage half, the engine was nicely positioned in
the cowling left-to-right and forward-and-backward, and caused no
interference with the installation of the left fuselage half. But after the
fuselage was together, I noticed that the engine is just a hair off in the
up-and-down axis, i.e., it sits just a little high. Mount yours as low as
possible in the fuselage without removing any of the engine’s backing plate
and yours should come out perfect.
The propeller is a nice representation of a Hamilton-Standard. It’s more
accurate in shape, in fact, than the propellers in either the Matchbox F4U-4
or the various Italeri 1/72 Corsair kits. It cleaned up nicely, and I used it
with no modifications whatever.
Fuselage
With tailwheel bay, cockpit, and engine installed in the right fuselage half,
it was time to button up the fuselage, which went off without a
hitch--excellent fit! Filler was required only at the forward edge of the
induction scoop on one fuselage half, where a chip was missing that looked
like someone had broken the part off a large sprue at this point. I filled the
little divot with Loctite superglue gel.
Note that F2Gs had two different tail gear configurations. The F2G-1, intended
for land-based use, carried no tailhook. It had no cutout in the tail cone for
the hook, like other Corsairs, and the tailwheel doors were only half the
“normal” length; behind the retracted tailwheel, the fuselage was solid with a
small fairing immediately aft of the tailwheel. The F2G-2 carried a more
normal Corsair arrangement, complete with tailhook and the cutout for it. The
kit has combined elements of both systems. All parts for the F2G-1 arrangement
are present, but so is the tailhook cutout in the rear fuselage. I did
not discover this anomaly until just before painting the model, and I had a
rather limited window of opportunity in which to paint it, so I had to press
on. Fortunately I discovered that the airplane I’d decided to model was indeed
an F2G-2 so the cutout was correct and
didn’t need to be filled, and I didn’t use the kit’s F2G-1 tail gear well
cover/filler piece, although I did use the kit’s short tail gear doors. (More
on this later.)
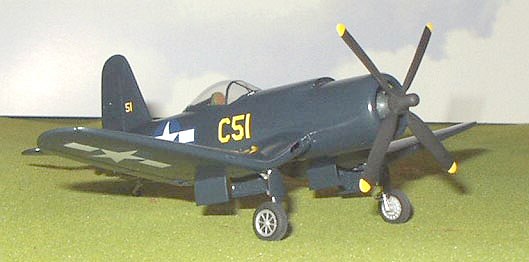
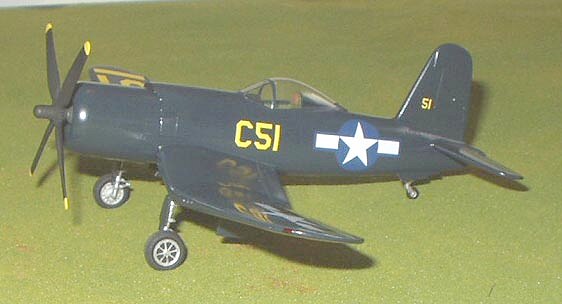
(Image to left) Kit features F2G-1 type tail gear and doors, but F2G-2 type tailhook
cutout in rear fuselage.
Canopy
The clear, cleanly formed and accurately shaped bubble canopy was separated
from its molding sheet with little problem. It fits the fuselage very well
fore and aft, but the lower edges don’t quite meet the mating surfaces
indicated on the fuselage sides. You can avoid this problem on yours by
cutting the lower edges a little lower than indicated and then carefully
trimming to fit the fuselage.
Horizontal Stabilizers
The stabilizers were okay and gave no problems except that the right one
wanted to mount with a noticeable bit of anhedral (droop). I fixed this in
just a few minutes by cutting a few degrees of angle at its root with the BAF.
(My customary building regimen is to mount the horizontal stabilizers and
square them to the fin before I glue the wing on, thus I can use all
three tail surfaces as a handy index of wing dihedral and alignment when I
mount it. Why I’m telling you this will become apparent in a few paragraphs.)
Wing
The wing looks nice at first, and its three parts fit well together, but it
has a number of problems.
First and foremost, the oil cooler intakes in the leading edges are the same
shape as for all production Corsairs, and this is not correct for the F2G
series. Joe Hegedus explained one way to fix this in his FSM article, but I
took an easier route. I cut and filed out the leading edge in the intake area
with the BAF, then inlaid chunks of styrene made by laminating three piece of
.020 strip together. When the cement had dried on these inlays, I shaped them
to match the wing leading edge, and then drilled and filed out the smaller,
egg-shaped F2G openings. Inside the opening I put...nothing! I did, however,
think ahead enough to paint the inside of the wing halves flat black before
gluing them together.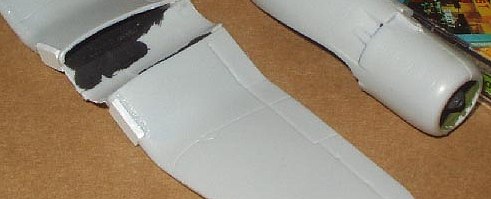
(Image to left) Laminated styrene blocks inlaid into oil cooler area of wing,
later filed to shape and opened up.
The F2Gs also did not have the radiator outlets on the bottom of the wing,
like all other Corsairs. I filed these off the kit parts. There is almost
enough meat in the plastic to get away with this, though it was rather thin in
places. In fact, my first layer of paint (thinned with lacquer thinner) ate a
small hole through the wing in this area, so I’d recommend reinforcing it with
putty, epoxy, or superglue on the inside before assembling your wing.
The kit
includes some nice photoetched faces for the oil cooler intakes, but because
they’re not of the right type for an F2G, of course I didn’t use them. They
might find their way onto another project at some point, though.
The wing’s second problem is very minor. It’s molded with openings for six
.50-cal guns. Not all the F2Gs were built with all six; some carried only
four. Check refs for the airplane you’re building and fill in the extra two
holes if needed. (Fill them all in if you’re building a racer!)
The third wing problem is a little more serious, depending on how serious you
take it. The F2Gs had the same fabric-covered outer panels found on all other
Corsairs through the -4, and the kit wing seems to represent metal-covered
outers as introduced on the -5.
Last summer I had the opportunity to examine and photograph the fabric wing
panels of the late, great Joe Tobul’s F4U-4 with an eye toward seeing how
these should be represented in scale. What I saw was not the classic
“ribs with fabric draped between them” look you might expect. The panels
appear to be more like panel lines right over the ribs, and the fabric did not
sag or bridge at all. In fact, the fabric appeared to be recessed slightly
right over the ribs.
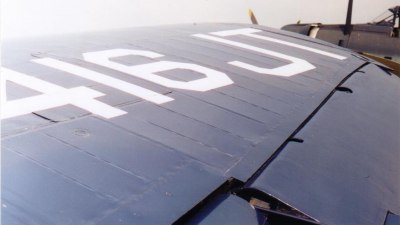 (Image to right) Outer wing panel of real F4U-4, showing slight indenting effect over
ribs.
(Image to right) Outer wing panel of real F4U-4, showing slight indenting effect over
ribs.
I elected not to fix this area on this model, deciding that whatever I did, it
would be difficult to match the very delicate panel line engraving on the rest
of the kit’s surface. It’s not that difficult to fix, though, if you’re so
inclined. At the same time I built the Xotic F2G, I was also working on an
Italeri F4U-4B, which is also incorrectly molded with smooth wings. I cut some
strips of thick vinyl tape exactly .100 (1/10) inch and used these as scribing
guides, starting from the wingtip panel line and working inward,
“leapfrogging” two strips, one over the other, to set the spacing. The whole
job (all four panels) only took about a half an hour and the rib lines seem to
have come out exactly where they were supposed to. There’s no reason this
trick shouldn’t work on the Xotic F2G as well.
 (Image to left) Italeri F4U-4 wing with fabric ribs scribed in.
There are no details in the (unboxed) wheel wells, which bothers me not at
all, but will be of concern to you gear well freaks.
The wing’s final two problems are dihedral and fit to fuselage, which are
inter-related in a way. The wing seems to have just a bit too much dihedral in
the outer panels. It’s not a glaring problem unless you’re pretty seriously
into Corsairs, and/or display the finished model alongside another Corsair
kit. While pondering what if anything to do about this, I discovered that the
wing’s fit to the fuselage was a bit casual, with the wing mating up a bit
“cockeyed” when viewed from the front, and with noticeable gaps between the
wing and the fuselage on the topside at the roots.
Now I have something I use in my daily life I call “Snake’s Doctrine of
Competing Problems,” which states that if you have two or more problems in
your life, see if there’s any way you can play them off against each other and
solve them both. (It doesn’t always work, of course, but you’d be
surprised how often it can be invoked in matters of office politics or
family!) I realized that invoking SDOCP would provide a simple yet effective
solution to the dihedral and alignment problems. I securely cemented
the wing in place exactly where it “wanted” to go, without trying to fix it at
all. The right wing was visibly higher than the left. When it was very
dry, and the underside filled and mated, I made a thin wedge of sheet styrene
and inserted it at the right wing’s upper root/fuselage junction--there was
already a good-sized gap to be filled here, remember--and pushed it in until
it forced the right wing down into roughly equal alignment with the left, as
viewed against the horizontal stabilizers from both front and rear. I then hit
this wedge with a liberal application of Ambroid Pro-Weld, being careful to
keep the stuff out of the joint between the wedge and the fuselage. When the
cement was dry, I trimmed the excess wedge off the top of the wing with an
Xacto. Almost like magic, the wing now had a more proper degree of dihedral,
was properly aligned, and the gap on that side was filled. SDOCP wins again!
Don’t you love it when a plan comes together?
I filled
the upper wing root gap on the right side in my customary way, by filling the
joint with yellow carpenter’s glue and smoothing it with a licked fingertip
while still wet. There might be better ways to fill this kind of joint, but it
works well, and there’s nothing simpler or quicker!
I didn’t get quite enough of the dihedral out of the wing. Compared to a built
Italeri F4U-5, the Xotic F2G still has a little too much. It’s not as bad as
it was, but still noticeable to a sharp eye.
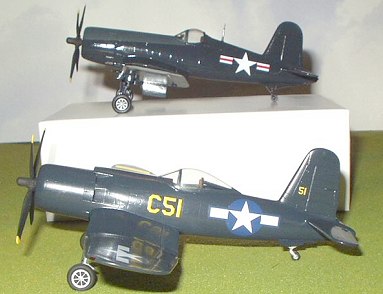
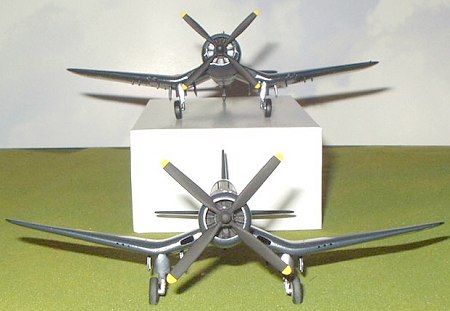 (Image to left) Dihedral is still a bit more than that of the Italeri F4U-5 in the
background. Also note black-painted nine-cylinder engine! (Editor
would like to point out that there is some parallax error in the image as
both aircraft are not being viewed from the same angle. Also note the
toed in landing gear of the upper plane indicating that perhaps the wings
were not installed at the correct angle. Just a thought.)
(Image to left) Dihedral is still a bit more than that of the Italeri F4U-5 in the
background. Also note black-painted nine-cylinder engine! (Editor
would like to point out that there is some parallax error in the image as
both aircraft are not being viewed from the same angle. Also note the
toed in landing gear of the upper plane indicating that perhaps the wings
were not installed at the correct angle. Just a thought.)
The kit doesn’t provide a pitot tube for the left wing, although one is
shown on the instruction sheet with an asterisks. Exhaust pipes are shown
with asterisks, too. I guess asterisk means “Get some plastic rod and make this
yourself, and this is where it goes.” I didn’t add any asterisk stuff for this
(mostly) out-of-box review.
After I’d gotten the wing fixed and glued securely on, my friend Joe
Hegedus suggested a possible fix for most of the wing problems that sounds
easy, elegant, and not too expensive. “Try using the wing from the Testor/Hawk
F4U-1A kit,” he offered. Hmmmmm. That wing has nicely engraved panel lines,
including the outer fabric ribbing; dihedral is better; and the oil cooler
intakes are molded solid, which means you can just drill and file them out to
the correct F2G shape. The kit currently retails for about $6. Could be a good
idea if the wing fits the Xotic fuselage cleanly--I couldn’t try it myself,
but you might want to investigate this idea.
 (Image to right) From certain angles, the dihedral can look excessive. Note no pitot
tube is included in the kit.
(Image to right) From certain angles, the dihedral can look excessive. Note no pitot
tube is included in the kit.
Landing Gear, etc.
The main struts are pretty nice, with molded-in oleo scissors, and I think PE
scissors are included as well. The plastic parts required a good deal of
careful cleanup for flash. Also included are a pair of Y-shaped braces for
each strut, which will be familiar to builders of most good larger scale
Corsair kits. Sadly, these braces had no positive locating points, and after
about 15 minutes of fiddling with them, I gave up on them for the time being
and moved on. I hate little fiddly parts. Perhaps someday I shall have a fit
of industry and install them on the finished model.
The wheels aren’t bad, for a limited run kit. The spokes are a bit thin, but
if this bothers you, resin True Details replacements are available from
Squadron. I used the kit wheels, and I see from my photos that I got the left
one installed just a little pigeon-toed. I’ll fix that someday, too.
 The tail gear is the F2G-1 type with no tailhook. Since the Corsair I modeled
is a hooked F2G-2, I’ll have to add a scratchbuilt tailhook to my list of
things to fix when I get around to it.
The tail gear is the F2G-1 type with no tailhook. Since the Corsair I modeled
is a hooked F2G-2, I’ll have to add a scratchbuilt tailhook to my list of
things to fix when I get around to it.
The main gear doors (wheel covers) are very nice, more detailed on their inner
faces than those in the Hasegawa 1/72 F4U-1 kit. The little front doors (strut
covers) had no positive locating points. Thank heavens for fast-drying
superglue.
The main struts mount to the wing at a near-perfect perpendicular angle. Note
that in profile, a Corsair’s landing gear is at a few degrees rearward rake to
the perpendicular. It’s not a huge point, but something to keep in mind if
you’re interested in “getting it right.”
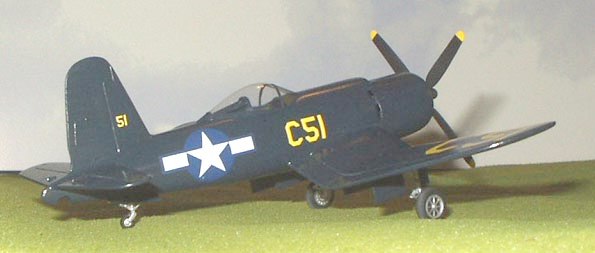
(Image to left) Note F2G-1 tail gear, F2G-2 tailhook cutout, thin spokes on wheels,
and perpendicular mounting angle of main struts. In background is a Matchbox
F4U-4 for comparison.
|
CAMOUFLAGE & MARKINGS |
You’d have read this review about two months ago except for an unusually
miserable winter here on the US East Coast. The paint shop corner of my
basement has no heat, which isn’t a problem unless the outside temperature
gets below freezing and stays there a long time, which it did this year. If it
wasn’t too cold to paint, it was too humid, and most days this winter it was
both.
When Editor Scott sent me the kit for review, he said, “Don’t tell me how
you’re gonna paint it--surprise me.” The race #57 scheme is stunningly
beautiful, but looking at the one million tiny black pinstripe decals included
on the sheet for this scheme scared the hell out of me, and I knew that I’d
never get the model finished if I went this way with it.
Cleland’s all-white race #94 is attractive, but I didn’t like the extended
cowling scoop on it that much. That left Pucket’s stock-bodied #18 as the only
race option. I ultimately decided against it for two reasons: One, I don’t
have any other racers built in 1/72 (had the kit been in 1/48, I might have
built it this way), and, Two, at this point I had no idea how the kit decals
would behave.
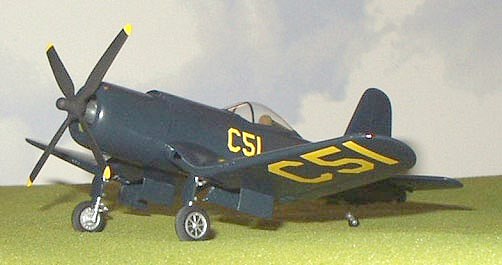
 I decided on the straight Navy option, figuring that if the kit decals
dissolved, crumbled, shattered, shrank, bled, or fell off, I could scrounge up
something from the spares box and press on.
I decided on the straight Navy option, figuring that if the kit decals
dissolved, crumbled, shattered, shrank, bled, or fell off, I could scrounge up
something from the spares box and press on.
Paint is overall Model Master Glossy Sea Blue, thinned with naphtha (lighter
fluid) for a glossier finish. (Cutting this stuff with my customary beloved
lacquer thinner gives a grainier, flatter finish). I am happy to report that
the kit decals were just beautiful--in register, opaque, thin, sturdy,
movable, etc. They were as good as any decals I’ve ever used from anybody, and
better than most of them. I wish all decals were this good. If you want to
build one of the racers, go for it--the decals won’t let you down.
What you see in the photos is the decals right over the paint--no gloss coat,
no sealers, no decals solvents or setting solutions. I did use Testor Decal
Set under the decals as a wetting agent to prevent air bubbles, but nothing on
top of them. Beautiful. I should also point out that in some of the pics it
looks like there’s a white border to the yellow numbers, as if the decals had
yellow printed over white, not quite in register. This is some kind of
photographic anomaly--no such white border appears on the model itself.
Similarly, the blue in the national insignia appears much lighter in the pics
than on the model itself. In reality, this blue is just barely lighter than
the GSB, not the baby blue in the pics. (It should be a shade darker
than the GSB.)
|
CONCLUSIONS |
I built this kit as close to OOB as I could stand, the major “fix” being the
wing root intakes. There are some other things I can fix later, as the mood
strikes me. For a more detailed and thorough look at building and correcting
the Xotic (formerly known as Aviation USK) F2G, I can highly recommend Joe
Hegedus’ cover story in the January 2000 FineScale Modeler magazine, and
Rodney Williams’ multipart feature article on F2Gs at
www.aircraftresourcecenter.com. Both these resources were of invaluable help
to me in this buildup.
May 2003
This was only my second limited-run kit, and compared to the first, it was a
joy to build. I can think of several “mainstream” kits that have given me more
trouble and less pleasure. The wing has issues, but they can be fixed. Missing
details such as the exhausts, pitot tube, and tailhook aren’t outside the
scratchbuilding abilities of the experienced modeler (or even many novices).
Although it seems pricey at first glance, the kit represents good value, and
if you want an F2G for your 1/72 collection, I can recommend the Xotic kit
highly.
Model on!
Thanks to Joe Hegedus for information and ideas, and to Scott Van Aken for
the opportunity to build and review the kit.
Copyright ModelingMadness.com. All rights reserved. No reproduction in part or in whole without express permission.
If you would like your product reviewed fairly and fairly quickly, please contact the editor or see other details in the Note to Contributors.