Tamiya 1/48 F4F-4 “Wildcat”
KIT NUMBER: 61034
RETAIL PRICE: $28
MEDIA: Injected Plastic (but I added Kendall Models resin controlsurfaces, see below)
DECALS: 3 Navy Versions--VF-41 aboard U.S.S. Ranger, VF-22 aboard U.S.S.Independence, and VGF-29 aboard U.S.S. Santee
DATE OF REVIEW: January 30, 1998
The Grumman Corporation entered the monoplane fighter field with the F4F Wildcat. Luckily for the U.S. Navy there were Wildcats assigned to the carriers when World War II erupted rather than the Brewster Buffalo, which was slaughtered by the Japanese Zero everywhere they met in combat.
Although unable to outmaneuver the Zero, American pilots soon developed tactics, like the Thatch Weave, that played to the strong points of their stubby fighters. The Marines used Wildcats, too. Many of their leading aces, like Joe Foss, got the majority of their kills in the F4F. It was the first of the many Grumman ‘Cats, culminating in the F-14 “Tomcat” of today.
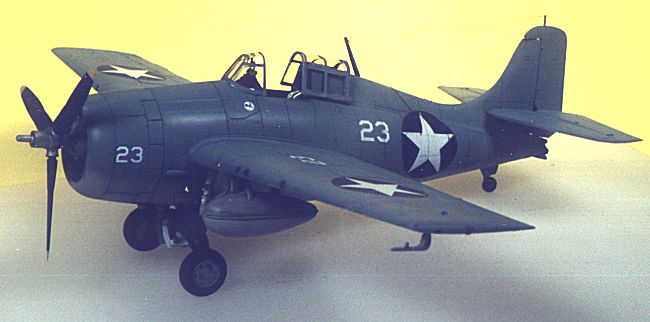
The only other 1/48 scale Wildcat kit I recall is/was the ancient, inaccurate Monogram kit. Tamiya’s Wildcat is the -4 version, the first to have folding wings. Molded in the now common light gray plastic, the engineering of the kit is outstanding! I did, however, have to remove some molding marks, ejector pin marks, and flash from a very few parts. This was somewhat disappointing for a kit of this cost and overall caliber. However, this is real nit-picking considering the amount of cleanup work required on even the best kits ten years ago.
If you’ve read any of my previous reviews, you know I’m not one to leave well-enough alone! I saw the Kendall resin set for the control surfaces of the Wildcat at a local hobby shop, so, naturally, just had to buy them and use them. I decided to use all but the ailerons. Removing the kit ailerons for replacement would have removed too much surface area from the wings after I had already cut out the flaps.
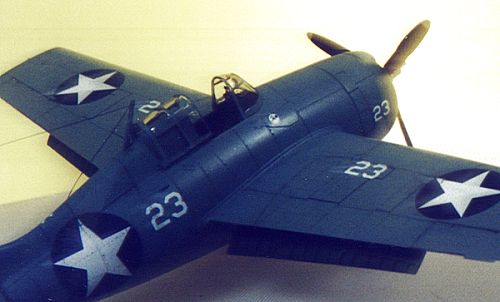
Unlike most aircraft kits, this one starts with gluing the fuselage halves together, adding the empennage (where I replaced the elevators and rudder with the Kendall parts) and the tailhook. The excellent cockpit is next. The major mistake here is that the Wildcat did not have a cockpit floor, as depicted in the kit, but rather had two troughs leading from the seat to the rudder pedals with the stick placed between them.
The pilot was supposed to look through where the floor would have been to see out of the two small windows in the fuselage bottom. The same principle was used in the early model Corsairs. Tamiya got it right in their Birdcage Corsair in this same scale.
Here you get a solid floor. What’s nice is that the oxygen bottle under the seat is molded in place, is nicely executed, and can be seen through the canopy if you look closely enough. I added Reheat seat belts and harnesses. In the Wildcat and later in the Hellcat, the shoulder belts passed over a bar behind the seat before coming to rest on the seat back. The fit of the parts was perfect. I especially appreciated the way the two side consoles attached to the instrument panel and then to the armored panel behind the seat. This left little room for the misalignment that sometimes results with other kits’ cockpit parts.
Recently, Kendall and True Details released updated (and no doubt more accurate) cockpit sets for this kit. Unfortunately for me, I discovered this AFTER I had already painted and assembled the kit cockpit, inserted it in the fuselage, and added the wings/lower fuselage assembly! C’est la vie!
The cockpit assembly attaches to the firewall before this whole assembly is placed in position through the bottom of the fuselage. Again positive alignment slots in the fuselage take the guesswork out of where this assembly goes. Another nice touch is that the chain-driven landing gear retraction mechanism is molded into the front of the firewall. Some drybrushing here brings out this feature nicely.
The wing assembly comes in three basic parts...the two top wing halves and the lower wing halves/fuselage combination. You add the lower windows mentioned earlier in this step. I masked my windows with the Fast Frames masks thoughtfully provided in their Wildcat frames set. No major problems here, other than the ones I caused myself! I did cut the flaps out of the lower wings before attaching the upper wing halves to them. I replicated the wing detail for the missing area with styrene strip. I left off the two light lenses until after painting and decalling. I ran into a small problem next. The instructions have you add the engine intercooler at this point. The instructions aren’t very clear as to the placement of this part. If you don’t get it right, it interferes with the engine installation later. I broke this part off and repositioned it twice before I got it right, test-fitting the engine between each attempt.
When I attached the wings/lower fuselage assembly to the rest of the fuselage I ran into the only major fit problem I had with this kit. The rear of the lower fuselage falls along a natural panel line. That’s the good news. The bad news is that no matter how I tried I still had a noticeable lip between this part and the rest of the fuselage. A medium amount of attention with sanding sticks smoothed this area out eventually. I’ve discussed this problem with two other modelers who have built the Wildcat and they BOTH experienced the same thing (which made me feel better!). So....be ready for it if you build this kit. Another problem is that the bottom of the firewall does not meet the lower fuselage, leaving a small, but noticeable gap. I filled this with stryene strip and white glue.
The Pratt and Whitney R-1830-86 Twin Wasp is next. It is nicely done with ignition wires, push rods, etc., molded into the front cylinder bank. Normally, I might replace these details with wire, rod, etc., but drybrushing really pops them out. The crankcase is a separate part and a poly cap fits between it and the front cylinder bank. This is my first experience with the poly cap and I like it.
The main landing gear can be summed up as follows...the intricate made easy. The Wildcat had a tubular, cage-like gear. By following the instructions exactly you get an intricate, yet strong, gear from a very few parts(be careful, it’s easy to put parts in backwards and/or upside down, so dry fit before committing to glue!). Some of the gear parts had mold lines that had to be scraped before painting. The two small gear doors had ejector pin marks that were difficult to remove. The wheels that come with the kit have separate hub assemblies, easing the painting hassle usually associated with this area.
This was my first experience with True Details Fast Frames and I must say I was VERY impressed with this particular set. Fast Frames are thin, vinyl plastic sheets with the frames pre-cut for you. Not only do you get the bottom window masks (see earlier), but also included are strips of various widths to replace any torn or damaged frames. I sprayed Pactra Acrylic Interior Green, let that dry, then sprayed the top color, Polly Scale’s USN Blue-Gray. I let this dry to the touch before beginning work. I next took an X-Acto knife with a new #11 blade and lightly cut around the frames, inside and out. Next, I peeled away the interiors of the frames before trying to remove the frames themselves from the backing sheet. This is the exact opposite of how the instructions tell you to do it, but after experimenting with the instruction’s method, I found this to be more practical. Luckily, you get two complete canopy frame sets in case you mess up.
I dipped the entire kit canopy and windscreen into a bowl containing 8 ounces of warm water with 2 or 3 drops of dishwashing liquid added. I applied the frame, positioned it to match the frames on the canopy, pressed out the excess water, and was done! The vinyl allows a little bit of stretching room to make sure of coverage. Of course, you do have to paint the canopy edges. Fast (as advertised) and easy with no masking required! After struggling with various methods with varying results over the past 15 years, I find I really like this method of canopy painting.
I sprayed the bottom of the Wildcat with Polly Scale Acrylic USN Light Gray. The topside color, as mentioned, is Blue-Gray. The Light Gray goes on with a decidedly tannish hue but, from experience with the Hasegawa Macchi 202, I knew it would dry to the correct shade of gray. This was my first experience with the new Polly Scale acrylics and I like them. You will have to come up with your own thinning ratio (I settled on 5:1 paint to thinner using Polly S brand thinner), otherwise the paint will be too thick to spray smoothly using the manufacturer’s suggested thinning ratio.
The kit decals are good, but I wanted to do the Wildcat of a famous ace, not a generic Wildcat. After looking at many aftermarket decals, I settled on the Three Guys Replicas decals with the markings of Commander John S. “Jimmy” Thatch, ace and inventor of the famous Thatch Weave mentioned earlier. The markings for this aircraft show his Wildcat as it appeared at the Battle of Midway, flying with VF-3 off of U.S.S. Yorktown (CV-5) where he supposedly used the Thatch Weave for the first time in combat, shooting down 3 Zeros as a result. You do have to use the kit decals for the propeller logos. The Three Guys decals are excellent.
Mine went down without setting solution, conforming pretty well to the combination raised and engraved details. I did have to pop a few air bubbles and dab a little Microsol on the fuselage stars and a few other decals.
I can sum up my feelings about this kit in 6 words...Buy this kit....Build this kit. Another in my Grumman ‘Cat collection is ready for the case. Hopefully, Hobbycraft will not delay much longer the release of the Bearcat.
Copyright ModelingMadness.com. All rights reserved. No reproduction in part or in whole without express permission.