Monogram 1/48 P-39 Airacobra
| KIT #: | 5213 |
| PRICE: | $6 plus s&h via on-line auctions |
| DECALS: | Four Options |
| REVIEWER: | Dale Rannals |
| NOTES: | 1989 boxing |
| HISTORY |
My modus operandi: don’t build the same kits that I built when I was a kid. Build different or unusual subjects or at least buy different manufacturers kits of the same airplanes. So this kit kinda went against my current ideal. I bought this kit for next to nothing on E-bay. It was cheap and I did like the kit when I built it a couple decades ago; so, I figured, there are exceptions to every rule. I did not, however, have any clue of what aircraft to depict. So the kit sat in my closet waiting for that moment of inspiration.
That moment came when I read a book, “Lightning Strike” by
Donald A. Davis. The book is about the P-38 interception of Admiral Yamamoto
and is a great, if somewhat sobering, read. The part that made the little light
bulb above my head light up was the chapters of the book depicting life on
Guadalcanal. The P-400 was the export version of the P-39. The British didn’t
particularly like them, as the high-flying combat over Europe wasn’t really the
Airacobra’s forte. So, apparently the bulk of the order was sent to Russia, the
first of
 thousands to go there. When the US entered the war, she was pretty
desperate for fighters. So the cargo ship Athenia, bound for Russia with a load
of crated up P-400’s was diverted to Guadalcanal. The mechanics and pilots of
the 67th fighter squadron received an unwelcome surprise on receipt
of these, for when they started unpacking the crates, they found the little Bell
aircraft instead of the P-40 Warhawks they had trained in and worked on in the
States. Oh, yeah….and no instructions on how to put them together.
thousands to go there. When the US entered the war, she was pretty
desperate for fighters. So the cargo ship Athenia, bound for Russia with a load
of crated up P-400’s was diverted to Guadalcanal. The mechanics and pilots of
the 67th fighter squadron received an unwelcome surprise on receipt
of these, for when they started unpacking the crates, they found the little Bell
aircraft instead of the P-40 Warhawks they had trained in and worked on in the
States. Oh, yeah….and no instructions on how to put them together.
But put them together they did. Under wretched conditions they assembled the planes. They didn’t know if they would fly, but they got them in more or less one piece. Each one was a puzzle, each one had character. Some had radios. None had oxygen equipment. But they did fly and they were used as best they could be. Since spare parts were sorta hard to come by, mechanics scrounged and salvaged every part they could.
From the book:
“Since there were so few P-400’s in service, every cannibalized part could keep another plane flying. The favorite P-400 on the island was a battered craft that had skidded to a halt one day after landing on its belly because its wheels collapsed. It came to a rest with a wing crumpled and the propeller bent, making it an open source for spare parts. However, the need for flyable aircraft was so great that mechanics nursed it back to health. One wing was U.S. Army olive green and the other was British camouflage. Instruments were plugged into gapping holes in the cockpit panel. The three-bladed propeller contained two blades from one wrecked plane and one blade form another; it was balanced by pouring lead in until it spun almost correctly. The aircraft took on a strange personality all its own and would outlast every other plane in the squadron. It was proudly christened The Resurrection.”
Oh, boy, that light bulb is shining bright now. But I had a problem: no references besides this one paragraph. No problem, I’ll look on the internet………….…..nothing. A few more references to the craft, but no pictures. HHHMMMMM……..okay, I guess I’ll “wing it.” I will build it as more of a tribute to the men who flew and maintained these birds. As far as accuracy…..well, I don’t know, but I’m still gonna have fun! Just call me Mr. Inaccurate!
| THE KIT |
 Let me start off by saying this is 1990 boxing of Monogram’s
P-39 kit that’s been around forever. I have to admit, I am amazed that this
particular boxing sold at all. The box is about as un-exciting as it gets. The
kit itself is great though. It is molded in a dark green plastic and has raised
panel lines (ohhhh nooooooo!). It has very nice, very delicate fabric detail on
the control surfaces. (I don’t know how accurate that is, but it looks nice.)
Mine exhibited very little flash. Options include leaving the right cockpit
door open to show detail, and removable panels to show off engine detail and
nose armament. Two different styles of exhaust are present and your choice of
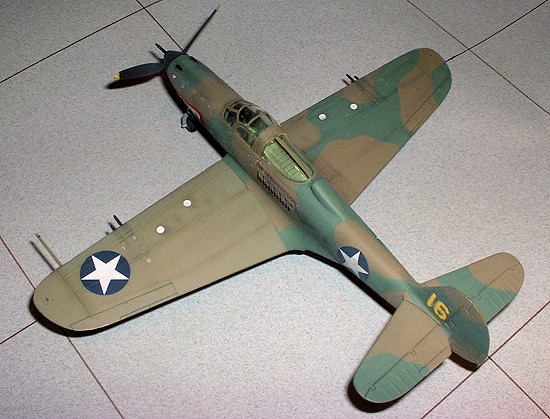
hanging bits are a drop tank or 500lb bomb. The decals are for four aircraft: a
plain-Jane Russian lend-lease bird, two US Army P-39’s and finally a P-400 from
the 67th fighter squadron on Guadalcanal.
Let me start off by saying this is 1990 boxing of Monogram’s
P-39 kit that’s been around forever. I have to admit, I am amazed that this
particular boxing sold at all. The box is about as un-exciting as it gets. The
kit itself is great though. It is molded in a dark green plastic and has raised
panel lines (ohhhh nooooooo!). It has very nice, very delicate fabric detail on
the control surfaces. (I don’t know how accurate that is, but it looks nice.)
Mine exhibited very little flash. Options include leaving the right cockpit
door open to show detail, and removable panels to show off engine detail and
nose armament. Two different styles of exhaust are present and your choice of
hanging bits are a drop tank or 500lb bomb. The decals are for four aircraft: a
plain-Jane Russian lend-lease bird, two US Army P-39’s and finally a P-400 from
the 67th fighter squadron on Guadalcanal.
| CONSTRUCTION |
Construction started with me getting out my trusty Badger
150 and some lightened British Interior Green paint (Model Master be my
preferred mix). I blasted everything that looked like it belonged on the
inside of the plane. With that completed construction actually started
with….no, not the cockpit! The front armament package is built up first,
and then the cockpit bits are added to it (one actual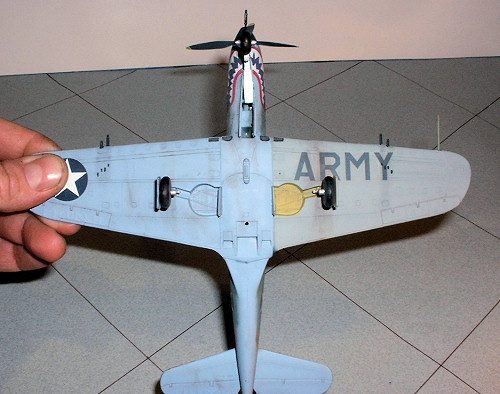 assembly when finished.) Once assembled and dry I applied a very thin oil
wash to pop out some cockpit details.
assembly when finished.) Once assembled and dry I applied a very thin oil
wash to pop out some cockpit details.
Everything goes together well; the decent cockpit assembly to the fuselage, the fuselage halves together. The halves line up pretty well, if you’re careful, I’m sure you can get away with needing no putty. I had to apply a bit of putty to the upper nose, nothing major. Next the wings, then the wings to fuselage…it is here that the rear portion of the wing doesn’t quite jive with the fuselage. Easily fixed with another dab of putty though. Hey, it’s starting to look like an airplane now. So, after a couple of low altitude strafing runs over my work table, including all of the necessary airplane noises and sound effects, and with a kid-like smile on my face, I get back to work. At some point during the build my cannon barrel broke off and sacrificed itself to the carpet monster. No worries… I didn’t like it anyway. A quick look through the spare parts bins netted me a 20mm cannon barrel from a Hasagawa Typhoon. Much nicer looking anyway. I opted to keep everything closed up on the bird, so I glued the door and engine and armament panels shut. Neither the cockpit door nor the armament or engine panels fit perfectly. The fit is ok; I did the best I could without having to resort to putty and sanding away the surrounded raised panel lines.
Off to the paint shed. Yay!
| COLORS & MARKINGS |
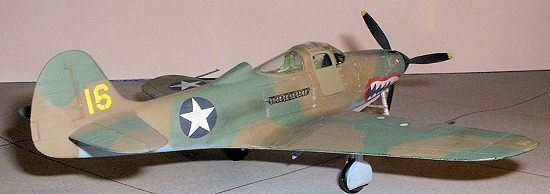
Now, from its description, this is basically (basically?) a
British bird with an American wing, so the fuselage and one wing will be
“British equivalent” colors of dark green and brown over a light blue underside,
with the “American” wing being olive drab with a neutral grey bottom. And just
for a bit more interest, I decided to paint the right side cockpit door Olive
drab also. After first preshaded the panel lines with black, I spay on the
bottom shades of Azure Blue on most and Neutral Grey on one wing. Then I go
back with lighter and darker shades of each and do some highlighting. The top
is a bit more involved; three colors instead of two. I mask off and paint the
 one wing with a faded Olive Drab and throw some highlights on the panel lines.
Now the camouflaged area of the rest of the plane. All the color profiles I
find for P-400s vary quite a bit in color shades, so I decide on lightened Model
Master Field Drab and Dark Green as my representation. These colors go on well,
though I annoy myself on the green highlight stage by mixing my color too thin
and getting some splotches. AARRGGHHHH! Oh well, time to go back over it and
try again. One of the many things modeling has taught me is patience. A good
coat of Future to gloss things up and it’s time for……
one wing with a faded Olive Drab and throw some highlights on the panel lines.
Now the camouflaged area of the rest of the plane. All the color profiles I
find for P-400s vary quite a bit in color shades, so I decide on lightened Model
Master Field Drab and Dark Green as my representation. These colors go on well,
though I annoy myself on the green highlight stage by mixing my color too thin
and getting some splotches. AARRGGHHHH! Oh well, time to go back over it and
try again. One of the many things modeling has taught me is patience. A good
coat of Future to gloss things up and it’s time for……
The decals and final construction.
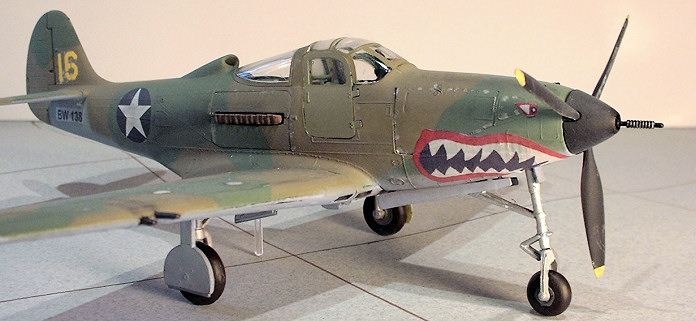
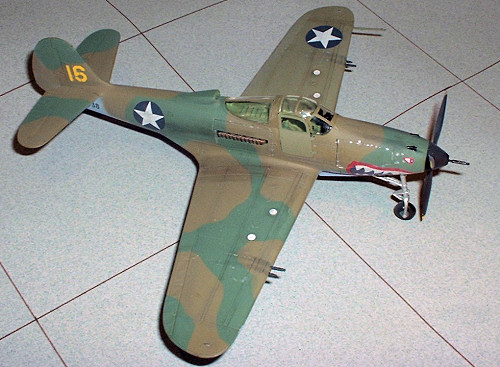
The kit decals are pretty decent, if a bit out of register. One of my references states all the 67th fighter squadron’s aircraft had the shark mouth on them, which is fine by me; I think it looks pretty cool. But, alas, I managed to screw up the first half of the mouth when I try to put it on. Now what? I had bought some Testors decal paper and bonder for this build since I knew I needed to come up with “The Resurrection” label for the aircraft. I took what was left of the original decal sheet and scanned it with a computer, flipped the unused shark mouth half over in a graphics program and printed out new mouth halves, eyes, a different serial number, and my guess at a simple “The Resurrection” stamp. I let them dry for a day just to be sure and applied a coat of bonder to seal things up. Presto….new decals. They applied well, to my pleasant surprise, though they are a bit on the thick side for decals. The clear “Resurrection” also silvered badly…..I should have put a drop of Future under it.
I got out my artists pastels and started weathering a kept but well worn P-400. Exhaust and gun stains, dirtied up the insignia a bit; some general dirtiness all around. Applied some silver “chipping” around some panels and applied several coats of Testors matt clear coat to flatten things out.
| FINAL CONSTRUCTION |
Not much left to do at this point. Add the landing gear and
doors and throw on the clear bits. Then the propeller and hub and that’s pretty
much that. At this point I realized that I forg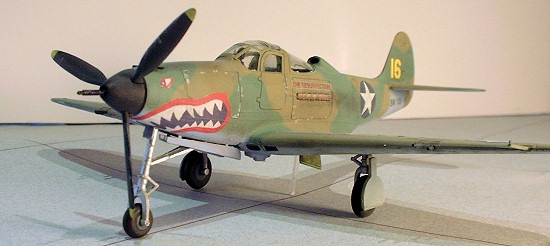 ot to add weight to the nose, so
I had to use the little clear post form the kit to hold it upright. Doohhhh!
And I was going to put the 500lb bomb from the kit underneath, but after I had
painted it, it disappeared, never to be seen again (probably sitting on the
floor right next to the cannon barrel). I didn’t have any spares……..oh well.
ot to add weight to the nose, so
I had to use the little clear post form the kit to hold it upright. Doohhhh!
And I was going to put the 500lb bomb from the kit underneath, but after I had
painted it, it disappeared, never to be seen again (probably sitting on the
floor right next to the cannon barrel). I didn’t have any spares……..oh well.
| CONCLUSIONS |
A good kit of an interesting subject. I’ve always liked the P-39 and for some reason am rather fond of the P-400 version. A real cur of an airplane, it was usually described by its pilots as a P-39 with a Zero on its tail. But you use what you have, so it was used to the best effect possible under pretty arduous conditions. The airplane may not get the praise, but the pilots and mechanics that used and maintained them certainly deserve it.
May 2006
| REFERENCES |
Lightning Strike by Donald A. Davis
P-39 Airacobra in Action (Squadron/Signal No. 43)
American Aircraft of World War Two by David Mondey
If you would like your product reviewed fairly and fairly quickly, please contact the editor or see other details in the Note to Contributors.