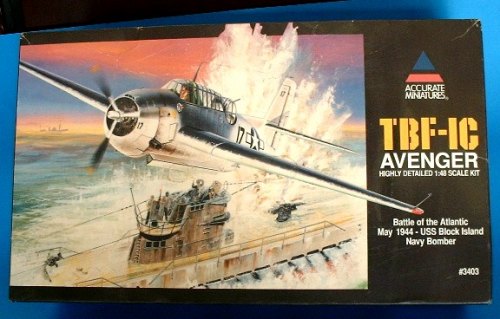
Accurate Miniatures 1/48 TBF-1C Avenger
|
KIT # |
3403 |
|
PRICE: |
$25.00 in 1997 |
|
DECALS: |
one option |
|
REVIEWER: |
C.Wayne Sharp |
|
NOTES: |
'Atlantic' boxing |
|
HISTORY |
This is mostly a preface and short story that has been covered by better writers and historians than me but I will attempt to cover just a short history just to cover the basics to how the Navy ( the ones with the boats) arrived at the use of this old ugly looking “Turkey” bird but a highly used and respected combat WWII carrier based Fighter/ Bomber.
In 1939, the Navy sent out a request for a proposal for a new Torpedo Bomber to replace the slow and short ranged TBD-1 Devastator. The requirements were that it would include a three man crew, at least 300MPH, an internal bomb bay with a capacity for 2000lb of ordinance of a Torpedo, or Bombs, self sealing fuel tanks, armored protection and a powered gun turret.
Grumman at that time was the Navy’s primary carrier suppliers of Aircraft and although they had never designed a bomber type aircraft, they did get the winning design. The most difficult part of this new design was for the powered Gun Turret. This had been a problem with several past designs as the older types were not acceptable because they were mostly hydraulic and slow and heavy.
 Grumman’s approach to
this problem was both unique and innovative. Grumman engineer Oscar
Olsen, applied the principle used on large industrial electric motors
called “Amplidynes” ( this is a Motor-Generator combination which
maintains speed under load and allows control of both the torque and the
speed of the motor).
Grumman’s approach to
this problem was both unique and innovative. Grumman engineer Oscar
Olsen, applied the principle used on large industrial electric motors
called “Amplidynes” ( this is a Motor-Generator combination which
maintains speed under load and allows control of both the torque and the
speed of the motor).
Working with General Electric engineers, Olsen developed smaller versions of the Amplidyne motor that could be synchronized with each other to drive the turret in a both traverse and the elevation. When all this was tested on the prototype, it was so successful that is was approved for mass production without modifications.
After two proto types, with the second containing a lot of adopted modifications such as, the tail Fillet and the ASB radar which was standard on all production Avengers. The first production TBF-1 was officially delivered to the Navy on 30 January 1942 and 5 more were delivered in February and ferried to NAS Norfork, VA. where the first Avenger Squadron was formed
As the production grew to a fever pitch because of the war effort, Grumman needed help to keep up with the Navy’s demand for more Avengers, so with the Auto industry shut down, General Motors was asked to help pick up production. Their version was called, TBM-3 ( after testing and final production) there are some small visual differences, equipment, missions, and some overseas supply to Great Britain in the from of the TARPON Mk II, which was a version of the TBF-1C.
|
THE KIT |
 Well
what can I say about this kit with accolades that has not been said
before. This is, without a doubt, one of the best lifelike 1/48 scale
kits ever engineered up to this point. There is a basket full of parts to
fiddle with and is not for most beginners . the only thing that most
everyone don’t like, including me, is that the instruction sheet, and
Decal sheet is really lacking . The old TBF/TBM Avenger was a large
airplane for a carrier based plane during WWII and so is the kit.
Well
what can I say about this kit with accolades that has not been said
before. This is, without a doubt, one of the best lifelike 1/48 scale
kits ever engineered up to this point. There is a basket full of parts to
fiddle with and is not for most beginners . the only thing that most
everyone don’t like, including me, is that the instruction sheet, and
Decal sheet is really lacking . The old TBF/TBM Avenger was a large
airplane for a carrier based plane during WWII and so is the kit.
The detail is quite good in most places and will satisfy most of the discerning modeler(s) but can use some improvement with the seat, cockpit area, and instruction sheet. There is some detail inside the bottom flap area if you wish to lower the flaps but no detail for the upper portion of the wing but thankfully, Eduard can handle that job. I am not a scale freak but I believe that Accurate Miniatures got it right with all the other nice models that they produced for a while.. they are now back in business and we humbly await the next jewel.
All the clear parts are nice and clear and there are a ton of parts for the interior of which most cannot be seen very well even with the door open. One of the biggest things I did not like was the weak landing gear axles, they are molded great but the weight of the model after construction will stress the little axle to the breaking point. But, over all, a very super kit.
|
CONSTRUCTION |
I actually started this kit a couple of years ago and I had purchased several after market doodads for it as well. I had the Eduard brass sets for the Flaps and the interior. I have got the KMC wing fold set and I also got a resin seat and resin wheels, I can’t help it ( sick with AMS). Because of all the bunches of parts and other considerations, I would get it down once in a while and do a little bit and then re-box the thing and put it up again.
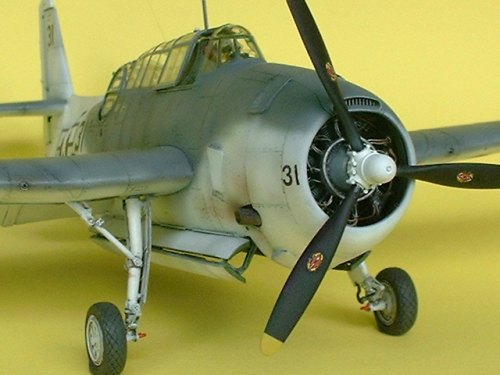
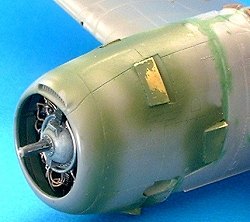
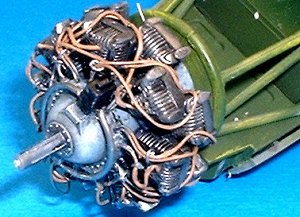 There are so many
sub-assemblies in this kit that you can pick most anyplace to start. I
stared with the nice Wright R-2600-8 engine. All the kit parts are ok but
I felt like the plug harness and the plug wires were just to big and
looked like large water hose. I cut all those off and made new harness
with some small solder and the wiring was done using .015 solder and
painted to look the brownish/ copper colored wire seen on most radial
engines of the period. I painted all the cylinders black and dry brushed
with Testors Square bottle silver. The push rods are gloss black and the
engine case was painted dark gray then dry brushed with lighter shades
of gray.
There are so many
sub-assemblies in this kit that you can pick most anyplace to start. I
stared with the nice Wright R-2600-8 engine. All the kit parts are ok but
I felt like the plug harness and the plug wires were just to big and
looked like large water hose. I cut all those off and made new harness
with some small solder and the wiring was done using .015 solder and
painted to look the brownish/ copper colored wire seen on most radial
engines of the period. I painted all the cylinders black and dry brushed
with Testors Square bottle silver. The push rods are gloss black and the
engine case was painted dark gray then dry brushed with lighter shades
of gray.
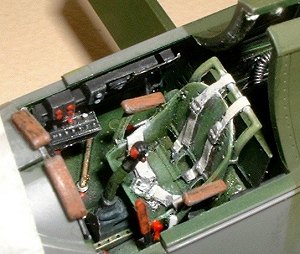
 I started the interior
with trying to figure out what color(s) to use to get the look I wanted
for this model.. AM said to use “Bronze Green” for the cockpit area, and
the rest was for “Interior Green. Now, the only bronze green listed is a
green made by Humbrol and I got some of that, but no way, it was too dark
and in no way resemble the 1/1 scale bird I had seen at the Naval Air
Museum in Pensacola . so, this is what I did, I took some dark MM FS
34079 (model master) green and mixed a little interior green with it and
used it on all the interior. I washed with raw Umber and dry brushed with
lighter shades of green, yellow and some grays to get the effect I
wanted.
I started the interior
with trying to figure out what color(s) to use to get the look I wanted
for this model.. AM said to use “Bronze Green” for the cockpit area, and
the rest was for “Interior Green. Now, the only bronze green listed is a
green made by Humbrol and I got some of that, but no way, it was too dark
and in no way resemble the 1/1 scale bird I had seen at the Naval Air
Museum in Pensacola . so, this is what I did, I took some dark MM FS
34079 (model master) green and mixed a little interior green with it and
used it on all the interior. I washed with raw Umber and dry brushed with
lighter shades of green, yellow and some grays to get the effect I
wanted.
After I painted the cockpit panels with black and highlights with various colors to pick out the details, I painted the resin seat with Interior green and dry brushed all the detail. All the interior parts were fitted inside, ( careful, you must be sure to check your instruction sheet constantly because it is not super clear how all this stuff goes together so, take your time.
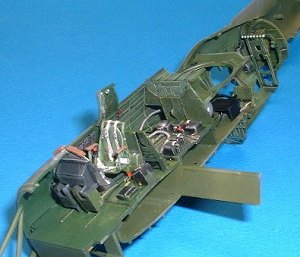
 The Radio/ Radar and tail gunner compartment was
detailed with more Eduard brass parts and the equipment painted and dry
brushed. Most all this cannot be seen anyway after the job is done but it
does add a lot of stuff for it to look busy and at this point it was
ready to glue the two halves together.
The Radio/ Radar and tail gunner compartment was
detailed with more Eduard brass parts and the equipment painted and dry
brushed. Most all this cannot be seen anyway after the job is done but it
does add a lot of stuff for it to look busy and at this point it was
ready to glue the two halves together.
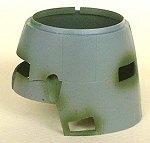 In between all this, I
was fitting some of the other many parts and cutting out the cowling
flaps so that I could install the brass parts from Eduard and since the
cowling was in two pieces, that was really not hard to do.
In between all this, I
was fitting some of the other many parts and cutting out the cowling
flaps so that I could install the brass parts from Eduard and since the
cowling was in two pieces, that was really not hard to do.
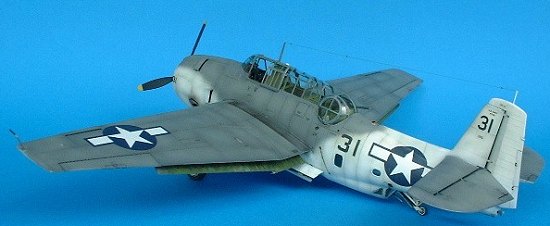
I am like everyone
else, I am not overjoyed to mask off a big greenhouse canopy like the
Avenger which has the gun turret, side windows and stinger gun windows.
My solution was a set of Mask I picked up at a contest and show somewhere
I got the ( E-Z MASKS created by Chris Loney of Ontario, Canada), ( don’t
know if these are still available) set which is the best I have ever
used. (your editor agrees as he used a set on his
ProModeler Me-410
and found them to be excellent) I
 got a set for my Promodler SB2C also that I hope to build one of
these days. This was a no sweat masking job and was the only way to go
for me to help cut some construction time down.
got a set for my Promodler SB2C also that I hope to build one of
these days. This was a no sweat masking job and was the only way to go
for me to help cut some construction time down.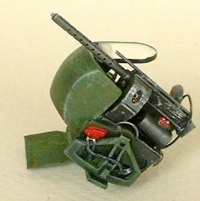
The Grumman 15SE turret Gun has a bunch of parts also and is quite fiddled to get together. After painting, I added some brass parts but you cannot see most of that after it is installed in the glass ball turret but looks very good on completion.
I had the KMC ( not made
anymore) wing fold set which is very nice, but I decided not to use this
on this first go-a-round but I decided to at least drop the flaps. The
kit provides some detail but not enough for me, so, I got the Eduard flap
set and it was a great improvement and they were also painted with mostly
Interior Green and dry brushed with some yellow Zinc chromate after a
wash of Raw Umber.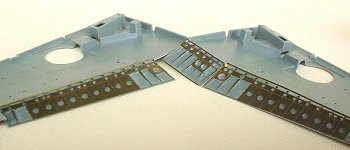
After all the sub assemblies were completed, I fitted all the parts which fitted very well with hardly any filler anywhere, even the wings fit like a glove at the fuselage
After a final going over to catch all the left over blemishes, it was now ready for the paint table before attaching any exterior dangling parts.
|
COLORS AND MARKINGS |
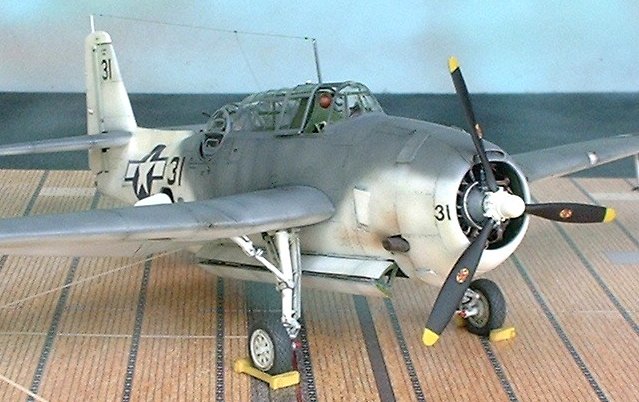
I had already decided to do this one in the Atlantic Scheme when I opened the box and the kit decals looked ok but they turned out to not be ok or at least part of them.
 The Atlantic Paint
scheme is very simple, it consist of white and Dark Gull gray, even the
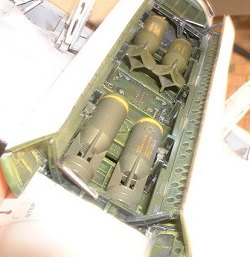
wheel wells and gear are all white. I also decided to open the bomb bay
as well so the doors had to be cut and repositioned but the interior of
the of the bomb bay would be my mix of interior green and wash.
The Atlantic Paint
scheme is very simple, it consist of white and Dark Gull gray, even the
wheel wells and gear are all white. I also decided to open the bomb bay
as well so the doors had to be cut and repositioned but the interior of
the of the bomb bay would be my mix of interior green and wash.
After the cowling flaps were installed, the fit to the fuselage was not as good as the rest of the parts so a little filler was used, sanded, re-scribed.
 I painted all the white
first and then pre-shaded most of the areas where the gray color was to
be. The basic gray color was sprayed first with MM Gunship Gray which is
a little darker that the MM Dark Gull Gray. I then over sprayed all that
with some lightened dark gull gray. I did this a couple of times to get
the look I was looking for and then I gloss coated with Floquil High
Gloss ( three coats with a light wet sand after each coat).
I painted all the white
first and then pre-shaded most of the areas where the gray color was to
be. The basic gray color was sprayed first with MM Gunship Gray which is
a little darker that the MM Dark Gull Gray. I then over sprayed all that
with some lightened dark gull gray. I did this a couple of times to get
the look I was looking for and then I gloss coated with Floquil High
Gloss ( three coats with a light wet sand after each coat).
Now the decal situation,
I was not happy with this kit decal sheet but I had failed to get any
aftermarket stuff when it was readably available. Most every thing worked
well except the National insignia. After those were on a couple of days,
they fractured and split bad. I took some tape and ripped all that off
and located some close to the size I needed from a Braille scale (1/32)
P-38 decal sheet I had.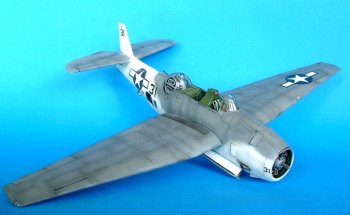
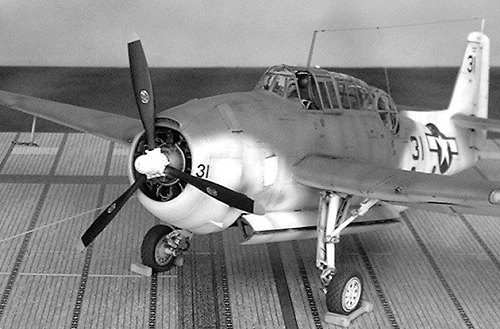
As to what subject to put markings on? Well, the main reference I used was the Squadron In Action book, which showed a few, and not very clear, shots of actual Atlantic Submarine hunting TBF-1C avengers and I wanted one with different markings than the kit version which was for the USS Block Island CVE-21. so, on page 28 of the IA book, I seen a picture of this subject with number “31” which was used on the USS Guadalcanal CVE-60 during April of 1943.
After the decals were on, I light sanded with 2000 wet grit to clean it all up and remove any dust doodies and then re-glossed with an clear acrylic and when that was dry, I used an enamel wash of gray and/ black to make the recess’ all pop-out and then I used two coats of Testors Dull coat .
Now comes the tricky part of attaching all the little parts without breaking things all over again. The first thing now was to do the “bad” deed of trying to get the Turret in place without breaking some or all of it. Basically, the instruction(s) to do this is on the Accurate Miniatures web site, www.accurate-miniatures.com but you have to go the Build site for the SBD –3/ 5 to find it. But it gives you an “idea” on how to install the gun turret. This does work but will take some very careful manipulating to still get it in place but it is not as hard as some folks have said.
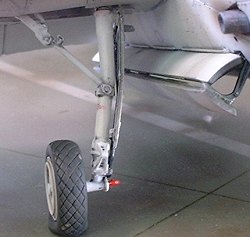 As listed before, the
main gear axles at the gear attachment point is very small about 1/16
inch but could have been engineered to be the diameter of the “hub” just
as well and would have been stronger. I knew it was a problem but I
attached the resin wheels anyway . I broke one the next day and had to
drill out the hubs and replace with brass rod and problem was solved. ( a
good suggestion to all). The kit wheels are not that bad and they give
you the “slick” type and also the tread type. I did not use either and
opted for the resin “treaded, bulged” replacements which were painted a
super dark gray and dry brushed with some tan to bring out the detail. (
after thought would be to cut the molded brake lines off and replace with
small solder/ wire of some sort.)
As listed before, the
main gear axles at the gear attachment point is very small about 1/16
inch but could have been engineered to be the diameter of the “hub” just
as well and would have been stronger. I knew it was a problem but I
attached the resin wheels anyway . I broke one the next day and had to
drill out the hubs and replace with brass rod and problem was solved. ( a
good suggestion to all). The kit wheels are not that bad and they give
you the “slick” type and also the tread type. I did not use either and
opted for the resin “treaded, bulged” replacements which were painted a
super dark gray and dry brushed with some tan to bring out the detail. (
after thought would be to cut the molded brake lines off and replace with
small solder/ wire of some sort.)
Now, the rest of the canopy, and radio aerials, rudder, tail wheel and prop was attached and some touch up was done to all areas that needed attention. The bomb bay was completed at this time also and a load of 2 each MK 54 depth bombs and 2 each 500lb bombs because the kit only supplied 2 Mk 54s.. ( I don’t know why!).
|
CONCLUSIONS |
Well, I don’t think the kit is over engineered but is not a good project for a novice or beginning Modeler. It is one of the best detailed and complete plastic models still on the market. It will take patience and time to tackle some of the intricate assemblies but well worth the effort. I enjoyed the time spent with this thing and will build another one with the folded wings but not until I do some of all the other things I have planned.. ( never enough time). The Avenger was a super ugly, but super performing airplane for it’s time and place in history.
|
REFERENCES |
 There are
many, many sources for good information about all these World War Two
Navy Carrier based planes. I used mostly what is listed below.
There are
many, many sources for good information about all these World War Two
Navy Carrier based planes. I used mostly what is listed below.
TBM/TBF AVENGER – In Action book Number 82 - by Squadron / Signal publications, Inc.
USN Aircraft Carrier Units Volume I by Duane Kasulka – Squadron Signal publications, inc.
GOLDEN WINGS 1941 – 1945 – USN/USMC Aircraft of WWII by Jim Sullivan& Dave Lucabaugh- Squadron, Publications Inc.
U.S. NAVY CARRIER BOMBERS OF WWII – Aerodata International by Squadron Publications inc.
The Internet – Various sites. keyword USN Avenger.
January 2004
Copyright ModelingMadness.com
If you would like your product reviewed fairly and fairly quickl, please contact the editor or see other details in the Note to Contributors.