AMT 1/48 A-20G Havoc
|
KIT # |
8894 |
|
PRICE: |
$15.00, in 1994 |
|
DECALS: |
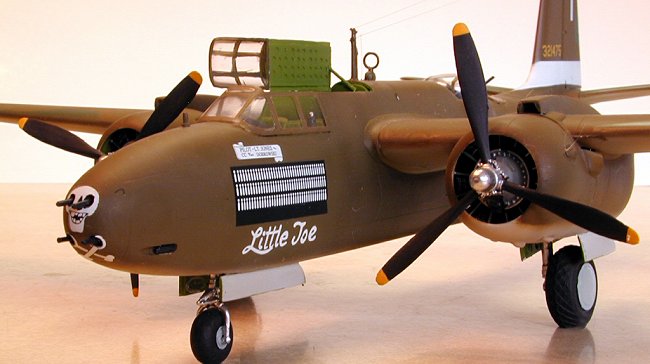
'Little Joe' 389 BS / 312
BG, 5th AF 'Little Isadore' 89 BS / 3 BG, 5th AF |
|
REVIEWER: |
Blair Stewart |
|
NOTES: |
|
|
HISTORY |
The A-20 was born out
of a design that was started at the Douglas Aircraft Company in 1936. Douglas
designers recognized that twin-engine attack aircraft were the wave of the
future. The initial version, the Model 7A, was designed around a gross weight of
9500 pounds, a speed of 250 mph, and a three-man crew. After several
modifications, the Model 7B completed its first flight on October 26, 1938.
After the French showed interest in the aircraft in 1939, Douglas set about
redesigning the Model 7B to accommodate French requirements. This resulted in a
deepened fuselage and a narrower cross section.
 Another major change was
mounting of the wings in more of a mid-fuselage position instead of high up on
the fuselage. When these design changes were complete, the aircraft was again
redesignated as the DB-7. When the US Air Corps finally placed an order for the
aircraft, it was officially called the A-20.
Another major change was
mounting of the wings in more of a mid-fuselage position instead of high up on
the fuselage. When these design changes were complete, the aircraft was again
redesignated as the DB-7. When the US Air Corps finally placed an order for the
aircraft, it was officially called the A-20.
More than 7,000 A-20s were built for the U.S. and its allies. Known as the “Boston” by British crews, there were four different RAF versions of the A-20. In the USAAF, the A-20 was called the “Havoc.” Additional aircraft models included the A-20A, B, C, G, J, and a radar-equipped night fighter version designated the P-70.
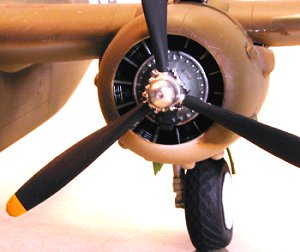
The A-20G was the first in the series to have a "solid" nose, which mounted six .50 caliber machine guns (the G model originally was designed to mount four 20mm cannons, but these had jamming problems and were replaced by the .50 cals). Douglas built some 2,850 G models in its Santa Monica, California plant. A-20 production ended in September of 1944. The Havoc served throughout World War II in virtually every theater.
|
THE KIT |
First released in 1994, the AMT kit of this airplane is, overall, an excellent model. Molded in light gray plastic, the box contains 8 gray plastic sprues and one clear sprue. The instructions are the standard AMT exploded view panels with painting instructions on each step. The kit can be displayed with an open bomb bay, in which case there are four 500 pound bombs included in the kit. If one chooses to display the model with the doors shut, there is the additional option of an external belly fuel tank. The kit also includes optional 20mm cannons for the nose armament to replicate earlier than the two aircraft depicted by the kit decals.
 The kit tires are molded
with that flat appearance that has become popular with modern day aircraft kits.
The main landing gear have molded-on brake lines and the gear doors are
detailed. I have read other modeling reviews that criticize the tread pattern of
the kit’s tires, but I compared the kit tires with the references I had
available and decided that I would not worry about this particular issue for my
model. Others should judge for themselves accordingly.
The kit tires are molded
with that flat appearance that has become popular with modern day aircraft kits.
The main landing gear have molded-on brake lines and the gear doors are
detailed. I have read other modeling reviews that criticize the tread pattern of
the kit’s tires, but I compared the kit tires with the references I had
available and decided that I would not worry about this particular issue for my
model. Others should judge for themselves accordingly.
The kit includes engraved panel lines and a minimum of flash on the individual parts. The cockpit is not overly detailed but certainly adequate for those who are not into “super detailing.” It includes the cockpit floor, side control panels with appropriate instrument boxes and controls, the seat, a control yoke, molded in rudder pedals, and an instrument panel.
|
CONSTRUCTION |
As usual, the first item for construction is the cockpit interior. After assembly, I painted the cockpit with MM chromate green. The various boxes and the instrument panel were painted flat black, and then dry brushed with flat white to highlight the instruments. Knobs and some gauges were then painted red and yellow.
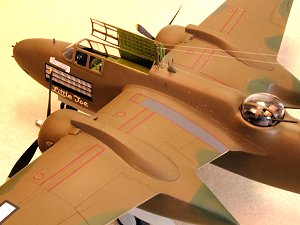 The next assembly was the
rear gun turret. After assembly, it too was sprayed chromate green. The twin .50
cal guns were brush painted with MM gunmetal and the ammunition was painted with
MM brass.
The next assembly was the
rear gun turret. After assembly, it too was sprayed chromate green. The twin .50
cal guns were brush painted with MM gunmetal and the ammunition was painted with
MM brass.
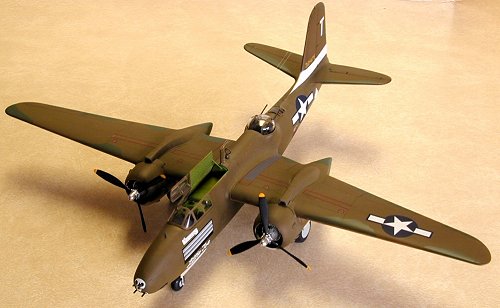
I chose to model the plane with the bomb bay doors closed, so I now glued the cockpit into the left fuselage, mounted the gun turret in that side, installed the wing spar, and then glued the fuselage halves together.
The next assembly was the nose. Here a little careful dry fitting is required to minimize the seams that result from joining the two nose halves and the end of the nose. Prior to gluing this assembly to the fuselage, I used white glue to secure some lead weight in it to allow the model to sit on its tricycle landing gear. I then glued the nose to the fuselage, and then moved to the five-part tail assembly. Again, careful fitting here will minimize the amount of sanding and filling that must be done.
 I
then assembled the wings and the carburetor intakes. I assembled the engine
nacelles and glued them to the wings. I installed the nine exhaust fairings to
each engine cowl, painted the interiors chromate green, and set them aside.
I
then assembled the wings and the carburetor intakes. I assembled the engine
nacelles and glued them to the wings. I installed the nine exhaust fairings to
each engine cowl, painted the interiors chromate green, and set them aside.
The next assemblies I tackled were the engines. After assembly, I sprayed them flat black, then dry brushed the cylinders with silver. The engine crankcases were brush painted with MM Medium Gray. I then glued the engines into the cowls and attached the whole engine and cowl assembly to each wing.
I sanded down all the seams and checked to see if there were any major seam problems that I could not live with once the model was painted. After installing the bomb bay door, I masked the canopy using Scotch Magic Tape and secured it to the model using Tacky Glue. The model was now ready for the paint shop.
|
PAINT & DECALS |
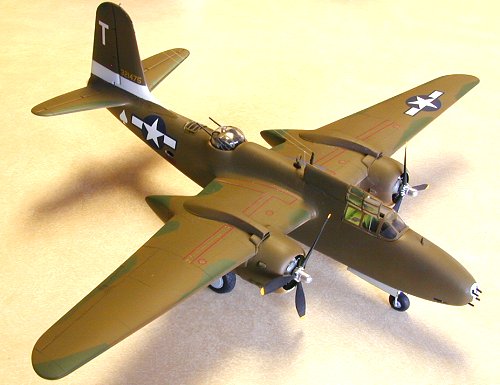
After sanding down all the seams, I painted the wheel well interiors with MM Chromate Green, and then stuffed wet tissue into the various openings that would remain chromate green. Once this was done, I sprayed the entire model with MM Neutral Gray. I then painted the tail flat white in anticipation of masking the stripe on the vertical stabilizer to match the chosen paint scheme. Next, I masked off the demarcation line between the upper and lower surfaces, covered the bottom of the model with paper and tape, masked the white stripe on the lower vertical stabilizer, and then painted the upper surfaces using MM Olive Drab. Once dry, I removed all of the tape and looked for any overspray, missed areas, or general spots that needed to be repainted or touched up. While in the paint shop, I sprayed the two props flat black, then masked off their tips and painted these chromate yellow.
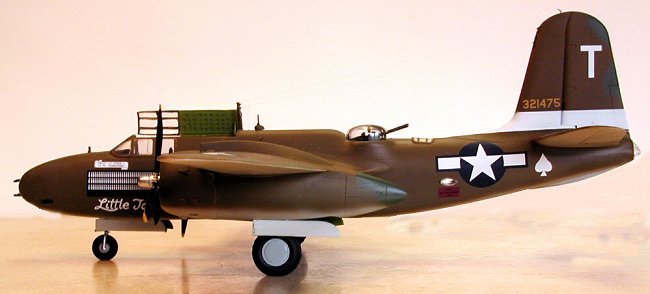
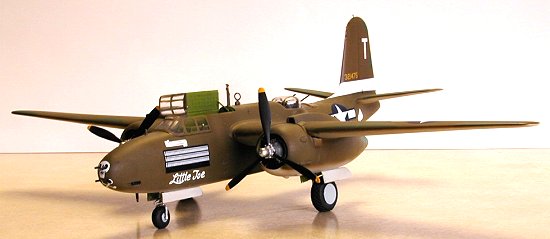 Once dry, I coated the
entire model with Future in preparation for applying the decals. For my model, I
chose “Little Joe” from the 389th BS, 312 BG, 5th Air
Force, which is the paint scheme of the Air Force Museum’s A-20G. Both the
kit-supplied decals are special to me because my Dad served in the Pacific
during World War II with the 5th Air Force, and he actually ditched
in the ocean off New Guinea one day in an A-20 while he and the pilot were
checking out some new radar equipment (I don’t know if the airplane was a G or
some other model).
Once dry, I coated the
entire model with Future in preparation for applying the decals. For my model, I
chose “Little Joe” from the 389th BS, 312 BG, 5th Air
Force, which is the paint scheme of the Air Force Museum’s A-20G. Both the
kit-supplied decals are special to me because my Dad served in the Pacific
during World War II with the 5th Air Force, and he actually ditched
in the ocean off New Guinea one day in an A-20 while he and the pilot were
checking out some new radar equipment (I don’t know if the airplane was a G or
some other model).
The Scalemaster decals supplied with the kit are perfectly adequate for me, as I usually construct kits straight out of the box. The national insignia appear to have the correct blue background and all of the other markings associated with “Little Joe” appear to be correct when compared to the AF Museum’s website image of the aircraft. The decals settled down just fine on the model’s surfaces using Microset and Microsol. Once the decals were dry, I washed off the excess setting solutions with warm soapy water and then set the model aside to dry. I then sprayed the entire model with Testors Dullcote to give it that flat finish.
At this stage, I realized to my horror that I had not reproduced the FS34092 Dark Green splotches that are present on the AF Museum prototype; rather, I had painted the airplane’s upper surfaces overall OD as depicted on the kit’s box. Since the decals were already in place, and given my basic laziness, I debated whether or not to try and correct this oversight. My basic concern was how I was going to mask off the areas that needed to be painted while reducing the risk that I might inadvertently lift off a decal when removing the masking.
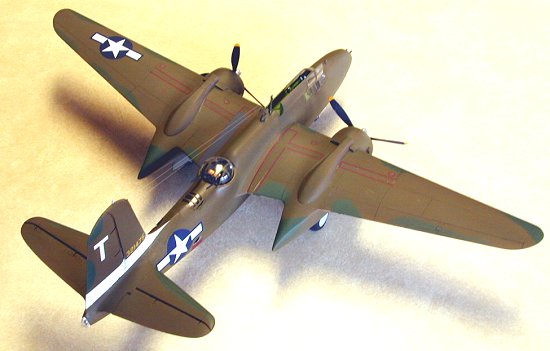 After lot’s of hand wringing,
viewing two large sacks of chicken entrails, and consulting the Farmer’s
Almanac, I decided to break out the old Parafilm and see if I could fix this
problem with minimal damage to my finished paint/decal job. I carefully masked
the first splotch area and surrounding surfaces (to minimize any overspray
problems) with the Parafilm, then shot MM Euro Dark Green onto the masked off
area (the Euro Dark Green appeared to match the color in the photo, and,
besides, I didn’t have any FS34092 on my workbench, which would mean I would
have to wait until the next day, go to my local hobby store, and…well, you
probably get the picture!). After removing the Parafilm on the first attempted
repaint, I breathed a sigh of relief to see that I had momentarily “dodged a
bullet.” Now there was no turning back. This temporary success gave me the
courage to repeat this process for each of the selected areas on the upper
wings, upper horizontal stabilizers, and both sides of the tail. With lots of
patience and persistence, I finally finished applying the splotched areas
associated with “Little Joe’s” correct camouflage pattern (assuming, of course,
that the Air Force Museum has it right in the first place!). Again: a big sigh
of relief!
After lot’s of hand wringing,
viewing two large sacks of chicken entrails, and consulting the Farmer’s
Almanac, I decided to break out the old Parafilm and see if I could fix this
problem with minimal damage to my finished paint/decal job. I carefully masked
the first splotch area and surrounding surfaces (to minimize any overspray
problems) with the Parafilm, then shot MM Euro Dark Green onto the masked off
area (the Euro Dark Green appeared to match the color in the photo, and,
besides, I didn’t have any FS34092 on my workbench, which would mean I would
have to wait until the next day, go to my local hobby store, and…well, you
probably get the picture!). After removing the Parafilm on the first attempted
repaint, I breathed a sigh of relief to see that I had momentarily “dodged a
bullet.” Now there was no turning back. This temporary success gave me the
courage to repeat this process for each of the selected areas on the upper
wings, upper horizontal stabilizers, and both sides of the tail. With lots of
patience and persistence, I finally finished applying the splotched areas
associated with “Little Joe’s” correct camouflage pattern (assuming, of course,
that the Air Force Museum has it right in the first place!). Again: a big sigh
of relief!
I certainly don’t recommend this approach for other modelers, but what I learned from my original oversight was that Parafilm is indeed useful if you need to touch up something that is already painted and decaled, and you want to reduce the risk that you might inadvertently lift off a decal in the process of applying and removing any masking required for the touchup.
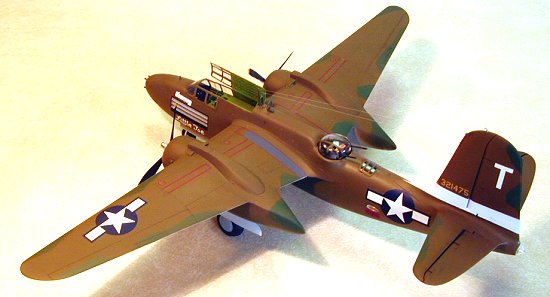 After all of this major
painting was completed, I glued on the assembled landing gear, the gear doors,
and the props. I then attached the antenna mast and the radio direction loop. I
painted the nose guns MM Gunmetal and glued them into the nose. I attached the
remaining clear parts using Tacky Glue, then fashioned an antenna system out of
stretched sprue and fastened it with Tacky Glue. Finally, I pulled off the top
cockpit (which had been lightly tacked down using the Tacky Glue) and glued it
in the open position to display the cockpit and life raft stowage compartment.
As a final touch, I brush-painted the propeller hubs with Humbrol Bright Silver
(if you don’t already know about this stuff, it is wonderful for replicating a
polished aluminum look on small parts using only a brush. You just need to make
sure you brush it on thick and let it smooth out as it dries).
After all of this major
painting was completed, I glued on the assembled landing gear, the gear doors,
and the props. I then attached the antenna mast and the radio direction loop. I
painted the nose guns MM Gunmetal and glued them into the nose. I attached the
remaining clear parts using Tacky Glue, then fashioned an antenna system out of
stretched sprue and fastened it with Tacky Glue. Finally, I pulled off the top
cockpit (which had been lightly tacked down using the Tacky Glue) and glued it
in the open position to display the cockpit and life raft stowage compartment.
As a final touch, I brush-painted the propeller hubs with Humbrol Bright Silver
(if you don’t already know about this stuff, it is wonderful for replicating a
polished aluminum look on small parts using only a brush. You just need to make
sure you brush it on thick and let it smooth out as it dries).
|
CONCLUSIONS |
This is a pretty good kit of an historic airplane. Hey…it passes my true test: it looks like a real A-20! Assembly is straightforward and filling and sanding can be minimized by carefully test fitting the major parts. I have another one of these in my kit collection as well as AMT’s glass nosed A-20B/C (Kit No. 8644), so someday I hope to build another A-20 (God willing and the creek don’t rise!).
|
REFERENCES |
1. Mesko, Jim, “A-20 Havoc In Action,” Squadron/Signal Publications, 1983.
2. “Douglas A-20G ‘Havoc’,” Air Force Museum website, http://www.wpafb.af.mil/museum/modern_flight/mf14.htm 2002.
3. “Douglas A-20 Havoc – Chapter 17, A-20G,” http://www.csd.uwo.ca/~pettypi/elevon/baugher_us/a20-17.html, May 1998.
If you would like your product reviewed fairly and quickly by a site that has well over 100,000 visitors a month, please contact me or see other details in the Note to Contributors.