| KIT: | Trumpeter 1/48 P-40B/C Tomahawk |
| KIT #: | 02807 |
| PRICE: | $29.95 MSRP |
| DECALS: | Two options |
| REVIEWER: | Tom Cleaver |
| NOTES: |
| HISTORY |
The revolution in fighter design that took place between 1936-41 left the U.S. Army Air Corps well in the rear. The first low wing, all-metal fighters with retractable landing gear taken onto operational service by the USAAC were the Seversky P-35 and the Curtiss P-36, both of which were out-performed by their European and Japanese contemporaries.
Curtiss, which had made an entire industrial strategy out of stretching a given airframe to the maximum through incremental improvements from the P-1 to the Hawk III, sought to continue this with their new Model H-75-A1 P-36 Hawk, with the result that the airplane they would eventually create by this process was obsolescent upon its initial appearance and obsolete by the time it entered combat.
Internationally, the best fighters were powered by inline liquid-cooled engines. The Allison V-1710, which provided over 1,000 horsepower, was chosen. The first development of the P-36 airframe with the new powerplant was the YP-37 interceptor, which appeared in early 1938. Given that the Allison engine gave best power at only 12,000 feet, the YP-37 had a turbocharger directly behind the engine, which resulted in the cockpit being moved so far aft that the pilot’s forward vision was severely compromised. The airplane was complex and actually underpowered.
 A more direct
adaptation of the P-36 airframe resulted in the XP-40, which did away with
the turbocharging since the USAAC fatally did not see the need for such
high-altitude capability. The prototype flew in late 1938, but required
extensive modification regarding the placement of the cooling radiator.
Successful in the USAAC Pursuit Contest staged at Wright Field in May 1939,
the P-40 was awarded what was then the largest single production contract
for a fighter. 197 P-40s were built for the USAAC in 1939-40.
A more direct
adaptation of the P-36 airframe resulted in the XP-40, which did away with
the turbocharging since the USAAC fatally did not see the need for such
high-altitude capability. The prototype flew in late 1938, but required
extensive modification regarding the placement of the cooling radiator.
Successful in the USAAC Pursuit Contest staged at Wright Field in May 1939,
the P-40 was awarded what was then the largest single production contract
for a fighter. 197 P-40s were built for the USAAC in 1939-40.
Curtiss had always seen its best markets as being overseas, and with the buildup for war in Europe, the market was better than it had ever been. Having sold over 400 P-36A aircraft to the French Air Force in 1938, another 150 P-40s, known as the Model 81-A, were ordered by the French and an additional 140 by the RAF, where it was known as the Tomahawk IA and IB and was used primarily for training in the UK.
The P-40 was further modified with an additional two .30 caliber wing-mounted machine guns, for a total of 4 with two .50 caliber weapons mounted over the engine and firing through the propeller, self-sealing fuel tanks and armor for the pilot. This version entered USAAC service in late 1940 as the P-40B. The RAF ordered 1,040 of this H-81-A2, under the designation Tomahawk II. Of these, 100 were diverted to the American Volunteer Group in the summer of 1941, and 146 others were trans-shipped to the Soviet Union after the German attack on June 22, 1941, with the last 49 of the order sent direct to the Russians.
The weight of armor, self-sealing fuel tanks, and additional guns and ammunition increased the weight of the P-40B from 7,215 pounds for the P-40 to 7,645 pounds, and reduced the maximum speed from 367 m.p.h. to 352 m.p.h. The RAF quickly realized that the Tomahawk II, with its altitude restriction due to lack of supercharging, did not meet the requirements of air combat over northern Europe.
 However, by the
summer of 1941, the RAF was in deep trouble in North Africa, where the
Gladiators that had managed to hold their own against Italian C.R.42s were
badly outclassed by the Macchi C.200 Saetta and the even-newer C.202
Folgore, while the Hurricanes that had been sent a year earlier were
certainly no match for the Bf-109Es and newer Bf-109Fs that JG 27
had brought to the battle that spring and summer. The Tomahawk wasn’t much
of an improvement over the Hurricane other than in top speed, but it
certainly outperformed the Gladiators.
However, by the
summer of 1941, the RAF was in deep trouble in North Africa, where the
Gladiators that had managed to hold their own against Italian C.R.42s were
badly outclassed by the Macchi C.200 Saetta and the even-newer C.202
Folgore, while the Hurricanes that had been sent a year earlier were
certainly no match for the Bf-109Es and newer Bf-109Fs that JG 27
had brought to the battle that spring and summer. The Tomahawk wasn’t much
of an improvement over the Hurricane other than in top speed, but it
certainly outperformed the Gladiators.
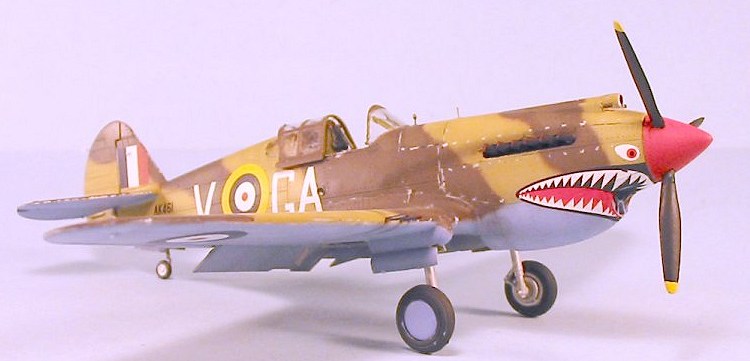
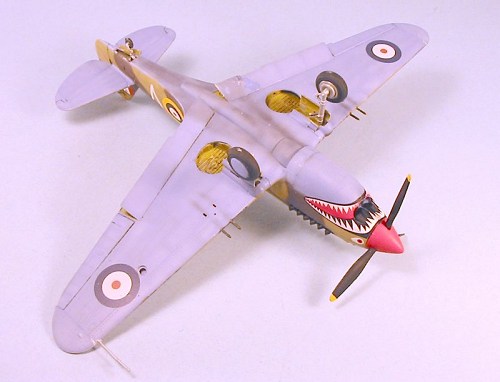
Among the squadrons of the Desert Air Force to re-equip with the Tomahawk II over the summer of 1941 was 112 Squadron, which had an outstanding combat record with the Gladiator, and would go on to become permanently associated with the P-40 in all its RAF guises as Tomahawk and later Warhawk, fighting across North Africa, over Sicily, and into Italy before they re-equipped with the Mustang III in the fall of 1944, carrying their notorious “sharkmouth” insignia on their airplanes. 112 Squadron became the top-scoring P-40-equipped unit of the Desert Air Force, with such aces as the Australians Clive “Killer” Caldwell scoring over 20 victories and John Waddy, who scored over 15 victories in North Africa while flying the Tomahawk. Other Tomahawk aces included the legendary Squadron Leader Neville Duke who would go on to a celebrated post-war career as a test pilot. The Tomahawk’s legendary ability to “take it,” returning to base even when badly shot up by the enemy, endeared it to its pilots.
| THE KIT |
Modelers have been crying for years that there was a need for a new, state-of-the-art 1/48 model of the P-40B/C, to replace the 39-year old Monogram kit. Trumpeter’s announcement of the pending release of such a kit was not met with universal hosannahs, given the company’s uneven record in producing accurate kits of highly-desired airplanes.
Quite frankly, when I first opened the box and took a look at this kit, I was of the opinion that all my fears had been met; the kit was a pantographed-down version of the 1/32 kit, which had not lived up to my hopes either. I was so disappointed after doing a test-fit of the main parts, that the kit went back in its box and I contemplated using what parts I could to update a Monogram kit. My main argument with the kit was the same that I had had with its larger predecessor: the horizontal stabilizers were too small, the rudder was too big, and the rear fuselage was too long. While I hadn’t been able to compare the 1/32 kit with any other accurate P-40 kit, that was no problem in 1/48. The rudder really was too big, and the tail feathers were too small.
Shortly after, I had the chance to be around the newly-restored Hawk 75A-1
out at Chino, and a friend and I did a quick tape measurement from the rear
bulkhead of the cockpit to the rudder post, and then a measurement of the
rudder at its maximum chord just above the trim tab. I also looked at the
airplane while it was sitting next to the Planes of Fame P-40N.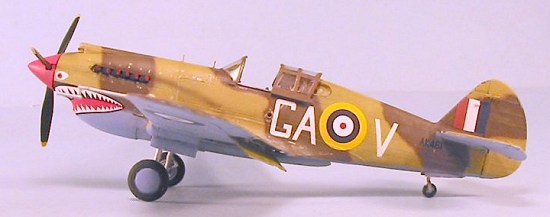
Visually, I saw the problem with the tail feathers: the kit has P-36 horizontal stabilizer and elevator. The P-40, which is several feet longer in the nose than the P-36 - which changes the moment arm significantly - had a larger horizontal stabilizer and elevator than the P-36, to maintain maneuverability. The horizontal surfaces were the same in all P-40s. Now I knew what I disliked about the model, and it was one of those things you can’t fix without making an entirely new tail.
I measured the kit fuselage and it is only a scale two inches too long between the rear cockpit bulkhead and the rudder post. However, the rudder is a scale 10 inches too wide in chord! No wonder the completed model looks “too long.”
Later - when it was too late to do anything with this particular model - I managed to figure out that the rudder can be corrected to a proper chord by taking off the offending 3/32 of an inch from the leading edge of the rudder, since the outline shape of the trailing edge is correct.
The end result of all this is the discovery that one can make a P-40B model from this kit that is (mostly) okay - if you don’t mind fabric detail that is so overdone it would almost be overdone in 1/24 scale, and rivets that are the same diameter as the rivets on the 1/32 kit.
When I received the new Cutting Edge 1/48 resin cockpit that allegedly corrected the too-shallow kit cockpit, I decided to build the kit to see what the end result would be.
| CONSTRUCTION |
The first thing I discovered is that the new cockpit doesn’t solve the problem! That is because the sidewalls are exactly the same parts as those in the P-40E/F cockpit. The problem with that is, the P-40B cockpit is about 10 inches deeper than the cockpit of the later-model P-40s, which had a fuselage that was reduced in fuselage depth and cross-section. As the only modeler I know of who has sat in both the P-40C restored by Fighter Rebuilders and the Planes of Fame P-40N, allow me to explain the difference: in the early P-40, the seat lets you sit like you’re in a chair, in an upright position, due to the cockpit depth. The seat in the later P-40s is right on the cockpit floor, and your feet are out in front of you nearly horizontally, while your shoulders are above the cockpit sill. The cockpit floor of a P-40 is right above the upper surface of the one-piece wing, so fuselage depth is the controlling factor.
 If one attaches the Cutting Edge sidewalls to the floor and then mounts
that to the rear bulkhead, there is not enough room between the floor and
the lower edge of the headrest to place the seat. Interestingly, however,
the rear bulkhead is the right depth.
If one attaches the Cutting Edge sidewalls to the floor and then mounts
that to the rear bulkhead, there is not enough room between the floor and
the lower edge of the headrest to place the seat. Interestingly, however,
the rear bulkhead is the right depth.
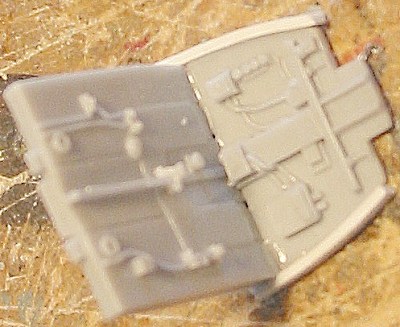
My solution was to section the resin side walls and splice in pieces of the
kit-supplied cockpit sidewalls, to give the correct depth to the Cutting
Edge cockpit walls. As you can see from the accompanying photograph
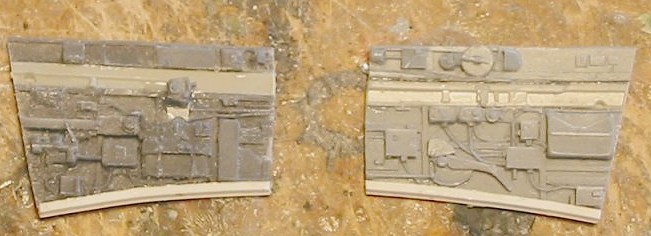 ,
this isn’t really hard to do. As far as accuracy is concerned, the truth
is that 99.9999999999% of all modelers don’t have a bloody clue whether any
of these resin cockpits are right or not - we only really worry if they
look “busy enough.” I eyeballed the correct-depth resin cockpit sidewalls
of my Monogram P-40B to get something that approximates that with the CE
walls. Once installed and the model completed, even someone who knew the
P-40 cockpit as well as the late Erik Shilling did (he flew plenty of the
early ones) couldn’t tell if it was “completely right” or not.
,
this isn’t really hard to do. As far as accuracy is concerned, the truth
is that 99.9999999999% of all modelers don’t have a bloody clue whether any
of these resin cockpits are right or not - we only really worry if they
look “busy enough.” I eyeballed the correct-depth resin cockpit sidewalls
of my Monogram P-40B to get something that approximates that with the CE
walls. Once installed and the model completed, even someone who knew the
P-40 cockpit as well as the late Erik Shilling did (he flew plenty of the
early ones) couldn’t tell if it was “completely right” or not.
A note here for those of you doing AVG Tomahawks: the reflector gun sight on those airplanes was mounted on a pedestal - you can see how it should look if you go check out the photos in my review here of the Monogram P-40B. Many of the RAF Tomahawks were not equipped with reflector sights, using only the ring-and-bead. On my kit, I used a photoetch ring-and-bead.
 One thing about
Trumpeter kits is that they are well-designed from the point of view of
ease of construction. There are no mysteries to be solved here, other than
to remember that on the early P-40 the exhausts do indeed point up, not
down. Do not decide you know better and reverse them - as I did - or the
air will turn as deep a purple shot through with lightning bolts over your
workbench as it did over mine when it came time to pry those out of
position and put them in right.
One thing about
Trumpeter kits is that they are well-designed from the point of view of
ease of construction. There are no mysteries to be solved here, other than
to remember that on the early P-40 the exhausts do indeed point up, not
down. Do not decide you know better and reverse them - as I did - or the
air will turn as deep a purple shot through with lightning bolts over your
workbench as it did over mine when it came time to pry those out of
position and put them in right.
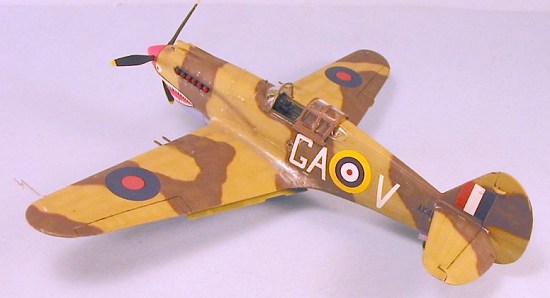
While P-40s almost never sit on the ground with their flaps down, since this gives them problems when taxiing because the flaps blank the rudder in the tail-down position, I decided to build this model with the flaps down to display the detail provided in the kit.
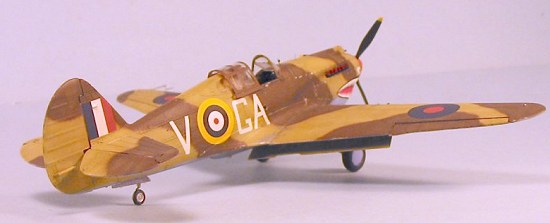
I also couldn’t stand the “turned down” profile line of the upper rear fuselage, so I puttied that immediately to the rear of the cockpit and sanded it to give the straight profile line; the canopy had no problem sliding over it.
The model sits on its gear “nose low” in comparison with the Monogram kit and other P-40s. This is due to the fact the gear legs are 1/16" too short - you can either fix that or live with it, depending on the severity of your OCD. I left it alone so you can see it.
| COLORS & MARKINGS |
Painting:
 After
“pre-shading” the model with flat black airbrushed over the panel lines, I
used Hannant’s Xtracrylix paints for this model, thinned with the
Xtracrylix thinner that has retardant in it and allows the paint to be
thinned 50-50 without drying prematurely in the airbrush tip. The colors
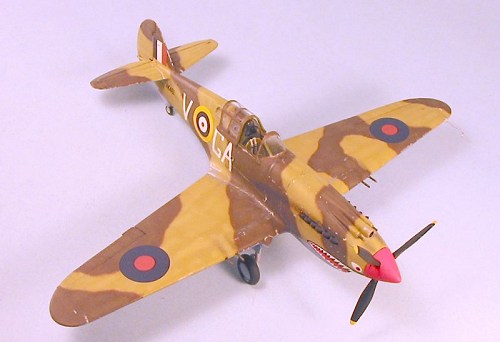
of Dark Earth, Middle Stone and Azure Blue are dead-on, and with the proper
thinner it was no problem whatsoever to freehand this scheme - inasmuch as
all the Tomahawks were delivered from the factory in dark earth/dark
green/sky grey, and were repainted in desert colors at the Aboukir
modification center in Egypt, where they would have been freehanded in the
original.
After
“pre-shading” the model with flat black airbrushed over the panel lines, I
used Hannant’s Xtracrylix paints for this model, thinned with the
Xtracrylix thinner that has retardant in it and allows the paint to be
thinned 50-50 without drying prematurely in the airbrush tip. The colors
of Dark Earth, Middle Stone and Azure Blue are dead-on, and with the proper
thinner it was no problem whatsoever to freehand this scheme - inasmuch as
all the Tomahawks were delivered from the factory in dark earth/dark
green/sky grey, and were repainted in desert colors at the Aboukir
modification center in Egypt, where they would have been freehanded in the
original.
Now that I have full control of these paints I really love them and consider them superior to both Gunze and Tamiya, unless you are modeling against a deadline and find you need the faster drying time of those paints. That’s not to say I won’t continue to use Tamiya and Gunze, but my first choice if the color is available is Xtracrylix.
Decals:
The kit decals were useless. I did the markings with an out-of-production AeroMaster sheet for 112 Shark Squadron. This is not a particular pilot’s airplane, but rather an anonymous memorial to all those anonymous pilots whose presence and sacrifice in the Second World War was the base for ultimate victory.
| FINAL CONSTRUCTION |
I “dinged” the model and gave it both oil and gunfire stains as well as exhaust stains, to represent a well-used front-line airplane in North Africa in the fall of 1941, finishing off with Xtracrylix Flat Finish varnish, which leaves the model “not quite dead flat,” which is accurate.
| CONCLUSIONS |
 With quite a bit
of effort, you can make an “acceptable” P-40B model from the Trumpeter kit,
but not a correct one. The truth is that the Monogram P-40B is still the
more accurate model. It is accurate in outline shape, and its surface
detail is much superior - only the leading edge of the wing back to the
main spar is flush-riveted on P-36s and P-40s (from up-close-and-personal
examinations of the real thing), and many of the panels are lapped, so that
you only really need to scribe the panels around the cowling to end up with
a more accurate model, not to mention that the fabric surfaces of the
Monogram kit are closer to the real thing. If you use the cheaper (and
more correct) True Details P-40B cockpit, the Squadron vac canopy, and any
of the myriad of P-40B decals, you can make a model that is right
for about $30. With this Trumpeter kit, even after you add in an incorrect
resin cockpit and correct it, correct as much as you can of the original
kit and use those aftermarket decals, you will lay out about $50 and it
will still be wrong when you’re done. As I said above, you know
your own level of Obsessive-Compulsive Disorder, so the choice is yours.
With quite a bit
of effort, you can make an “acceptable” P-40B model from the Trumpeter kit,
but not a correct one. The truth is that the Monogram P-40B is still the
more accurate model. It is accurate in outline shape, and its surface
detail is much superior - only the leading edge of the wing back to the
main spar is flush-riveted on P-36s and P-40s (from up-close-and-personal
examinations of the real thing), and many of the panels are lapped, so that
you only really need to scribe the panels around the cowling to end up with
a more accurate model, not to mention that the fabric surfaces of the
Monogram kit are closer to the real thing. If you use the cheaper (and
more correct) True Details P-40B cockpit, the Squadron vac canopy, and any
of the myriad of P-40B decals, you can make a model that is right
for about $30. With this Trumpeter kit, even after you add in an incorrect
resin cockpit and correct it, correct as much as you can of the original
kit and use those aftermarket decals, you will lay out about $50 and it
will still be wrong when you’re done. As I said above, you know
your own level of Obsessive-Compulsive Disorder, so the choice is yours.
This kit proves that just because it’s new doesn’t necessarily mean it’s better. We are still in search of the definitive state-of-the-art early P-40B kit.
January 2005
Review kit courtesy of Stevens International, importer of Trumpeter kits.
If you would like your product reviewed fairly and quickly by a site that has nearly 300,000 visitors a month, please contact me or see other details in the Note to Contributors.