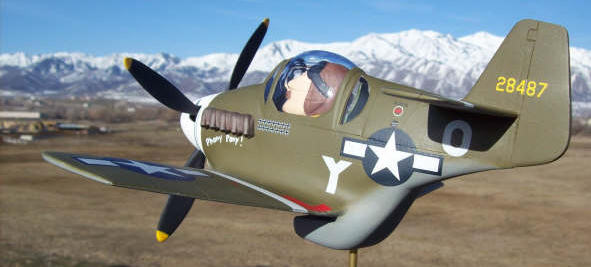
P-51B Mustang “Phony Pony!”
| KIT #: |
|
| PRICE: | $12.99 MSRP ea |
| DECALS: | Used ones from various old Mustang kits. |
| REVIEWER: | Bryan Bodily |
| NOTES: |
| HISTORY |
For all you rivet counters: Put down the magnifying glass and the calipers and
step away! This model was never intended to win an IPMS contest. It was a, “I
wonder if I could” kind of model. My brother thought that it was something to
write about and I said
 maybe it
is.
maybe it
is.
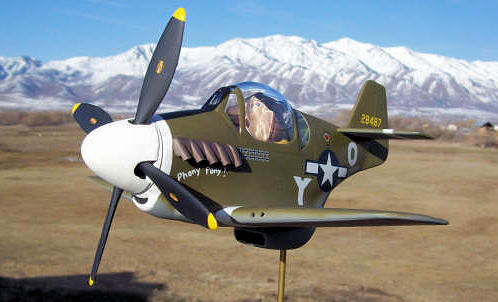
The “Phony Pony” P-51B Mustang is a kind of Frankenstein model based on two
Revell kits; the RIF RAF Spitfire and the Messa Schnitzel 109. The majority of
the plane is from the Messa Schnitzel kit. This project start out as a “fun”
project and it ended as such, with little concern of scale, panel line, correct
dimensions, and correct colors used. I am sure that if Revell wanted to create
this neat example of a famous plane the detail would look better.
I wanted it to resemble the “Ding Hao!” P-51B. I think I came fairly close. Ok, ok… the tail numbers are not correct and most of the markings, but who cares!
| THE KIT |
This project contains two kits (RIF RAF Spitfire and the Messa Schnitzel 109)
and is not for those who would be concerned about starting with two kits and end
with one model. There is a bit of
cutting, sanding and good ole’ eye balling it. The decals are from
 both 1/32
and 1/48 scale Mustangs. I have thought about creating a semi-kit for this
project if there is enough interest. This is not for the beginner. It is up to
you on how much detail you choose to add. Just remember this is for fun!
both 1/32
and 1/48 scale Mustangs. I have thought about creating a semi-kit for this
project if there is enough interest. This is not for the beginner. It is up to
you on how much detail you choose to add. Just remember this is for fun!
The kits are a nice change of pace and never meant to be on the same detail
scale level as Hasegawa or Tamiya. This is exactly why they are so much fun!
Unlike a real scale project… if you mess up, and destroy a scale feature, the
IPMS contest win is lost. Not so with this plane! Who cares? Fix it and it is
still “scale”!
I began this project by first building a Revell RIF RAF, which is a fun kit! When the Messa Schnitzel 109 came out I bought it and started to scope it out. I notice immediately that some of the parts were exactly the same. I think it is great that Revell could come up with two kits for planes that were on opposing sides during WW II (well, not exactly these planes) and have them easily recognizable. I then thought, “I wonder what other plane can be created by using the majority of the same parts?” I started by hand drawing the future model on a piece of paper and the Phony Pony is the end result.
| CONSTRUCTION |
1)
1) You need to go to your local hobby store and purchase a Revell RIF RAF Spitfire and the Messa Schnitzel 109 before they are out of production. I purchased my kits at a great local shop. I am a stock holder (I think so, because of my “investments”) and paid dividends in models, but don’t tell my wife!
 2)
Remove the main fuselage, tail sections, propeller, propeller shaft, exhaust
pipes, cockpit piece, and wing from the Messa Schnitzel 109 kit. Then remove the
canopy, turtle deck, propeller, propeller shaft, pilot, and the spinner from the
RIF RAF Spitfire kit.
2)
Remove the main fuselage, tail sections, propeller, propeller shaft, exhaust
pipes, cockpit piece, and wing from the Messa Schnitzel 109 kit. Then remove the
canopy, turtle deck, propeller, propeller shaft, pilot, and the spinner from the
RIF RAF Spitfire kit.
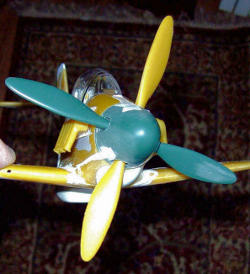
 would be called). The lone remaining
cradle is used to align the back plate and the spinner. Place the completed four
bladed prop on the back plate and place it over the other good remaining prop
shaft (that was not accidently glued to the prop). Mark where the blades will
protrude out. Cut and fit as necessary to make it work.
would be called). The lone remaining
cradle is used to align the back plate and the spinner. Place the completed four
bladed prop on the back plate and place it over the other good remaining prop
shaft (that was not accidently glued to the prop). Mark where the blades will
protrude out. Cut and fit as necessary to make it work.
 holes and
filling as needed with additional material and putty. Place styrene pieces
behind the radiator holes. Remove the radiator scoops off the bottom of the wing
and fill as needed. I used styrene sheets and sanded them flush.
holes and
filling as needed with additional material and putty. Place styrene pieces
behind the radiator holes. Remove the radiator scoops off the bottom of the wing
and fill as needed. I used styrene sheets and sanded them flush.
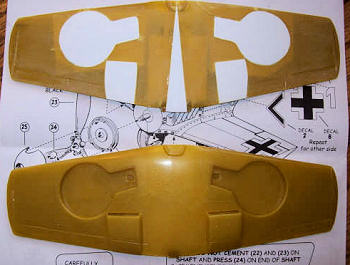
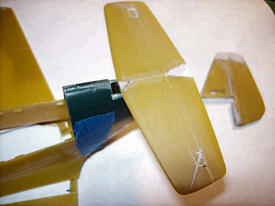
 (do not cut it length wise), BUT not
all the way. Leave a little of the wing connected to help with aligning. The
wing is separated 7/16” at the training edge. Then cut a piece of styrene to be
glued on the inside surface of the wing to maintain the spacing. Glue an
addition piece to fill in the gap. Sand as needed.
(do not cut it length wise), BUT not
all the way. Leave a little of the wing connected to help with aligning. The
wing is separated 7/16” at the training edge. Then cut a piece of styrene to be
glued on the inside surface of the wing to maintain the spacing. Glue an
addition piece to fill in the gap. Sand as needed.
 7)
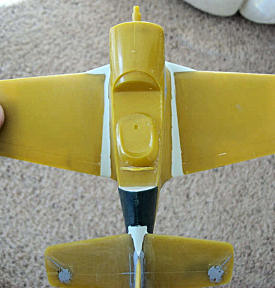
Place the RIF RAF turtle deck on the Messa Schnitzel’s fuse. Remove the vertical
tail as shown in the pictures. Cut and fit the new Mustang tail section on.
7)
Place the RIF RAF turtle deck on the Messa Schnitzel’s fuse. Remove the vertical
tail as shown in the pictures. Cut and fit the new Mustang tail section on.
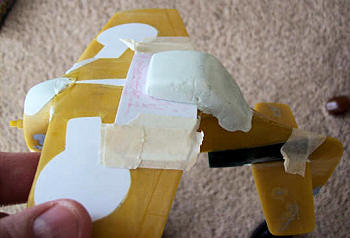
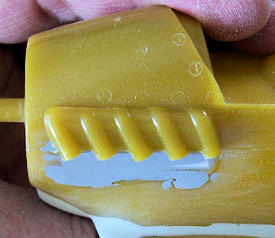
 did use the Spitfire canopy, but it was only the center
section. I came up with the “scalloped” window by using a 7/8” circle cut from
tape and then cut in half. The tape is placed over the rear of the canopy and
putty is applied around the edges. Do not allow the tape to sit too long or the
putty chemicals will fog the plastic under the tape!
did use the Spitfire canopy, but it was only the center
section. I came up with the “scalloped” window by using a 7/8” circle cut from
tape and then cut in half. The tape is placed over the rear of the canopy and
putty is applied around the edges. Do not allow the tape to sit too long or the
putty chemicals will fog the plastic under the tape!
 of styrene with a triangle shape cut. This allows the
shape to look pretty close and to create the gap. If you are going to do this,
make sure that the epoxy clay does not stick to the spacer!
of styrene with a triangle shape cut. This allows the
shape to look pretty close and to create the gap. If you are going to do this,
make sure that the epoxy clay does not stick to the spacer!
| COLORS & MARKINGS |
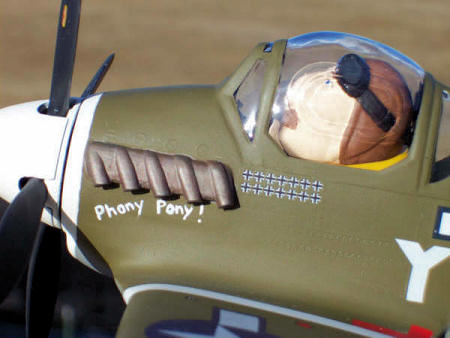
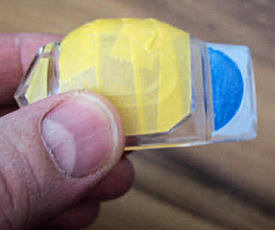
As mentioned in the article I gave the pilot a nose job, removed the pipe, and
did not use that hand part. I painted the pilot’s helmet leather color and the
goggles black. The base under the pilot looks like a life vest and so I painted
it flat yellow. The cockpit is painted black with white for the instrument
detail.
 Now you
need to decide if yours will build a British or American Phony Pony.
Now you
need to decide if yours will build a British or American Phony Pony.
I decided to make mine American and tried to make it look similar to the “DING
HAO!”
I painted my Phony Pony using neutral gray and olive drab. The spinner and nose
is painted flat white. All the paints I used are enamels.
If you are going to use the RIF RAF’s decals, you are ready to apply the decals.
Just find a picture of a Mustang you like and try to make your Phony Pony match.
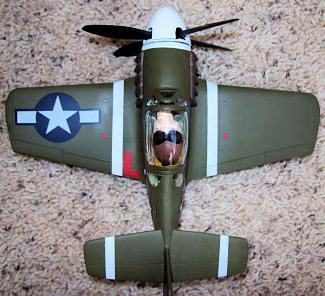
If you are going with an American Phony Pony, you will notice that the wing
insignias (in the kit) are about 1/32 scale size. The fuselage area is too small
to use 1/32 scale decals. This is why I used the 1/48 scale insignias on the
fuselage. Use what ever looks right. Add any additional makings as you like.
Remember that this is your Phony Pony and it can be whatever you wish, and it
does not have to match any “real” Mustang… hence the name of Phony Pony!
I tried to follow the same “style or spirit” of the other Revell kits using the
approximately the same kind of oversized insignias to kind of make it look like
it was a kit and not something created by me.
The 1/32 Scale decals I used are from the Revell P-51B Mustang III – kit #4740 and 1/48 Scale P-51 Mustang decals are leftover from other builds. The decals were applied and flat lacquer was applied as the final seal coat. I did not gloss coat the model prior to applying the decals.
| CONCLUSIONS |
 This was
fun and I guess if I was seriously thinking of entering it into a contest I
might have spent more time, engraved the panel lines and so on.
This was
fun and I guess if I was seriously thinking of entering it into a contest I
might have spent more time, engraved the panel lines and so on.
I would like to see pictures of other Mustangs as they are built.
Thanks Revell for keeping some of the great kits around, for us to enjoy and just for the love of building.
April 2009
Copyright ModelingMadness.com. All rights reserved. No reproduction in part or in whole without express permission.
If you would like your product reviewed fairly and quickly, please contact the editor or see other details in the Note to Contributors.