
Revell 1/72 B-17F Flying Fortress
| KIT #: | 0479 |
| PRICE: | $51.00 |
| DECALS: | Two options |
| REVIEWER: | Lee Kolosna |
| NOTES: | Basic kit build. Kits-World decals |
| HISTORY |
The Boeing B-17 Flying Fortress was the United States Army Air Force’s primary heavy bomber at the entry of the US’s participation in World War II and served throughout the entirety of the war. Replaced by the B-24 Liberator after sporadic operations in the first days of hostilities in the Pacific, the aircraft was deployed to Europe in mid-1942 to embark on a three-year campaign of daylight bombing from bases in England and Italy.
The B-17F model carried the load during the first years
of combat in Europe for the US Army Air Force. Operating from airbases
located in East Anglia, the first Flying Fortresses began to tentatively
explore the skies over occupied France as their squadrons learned how to
execute precision bombing raids in daylight, a primary tenet of the US
8th Air Force’s strategy. As more aircraft arrived and the crews gained
experience, the missions were pushed further into France and Germany to test
the soundness of the belief that tightly-packed formations of bombers could
fight their way int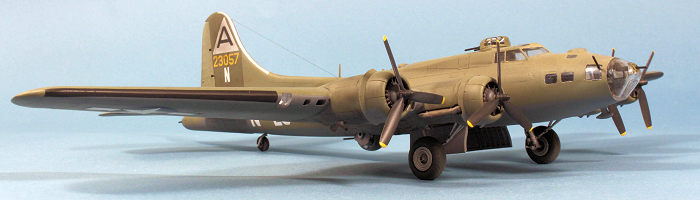 o the target, drop their bombs with great accuracy, and
then fight their way back to their home bases with minimal
casualties. Unfortunately, they were mauled by German fighters and
anti-aircraft artillery. Stubbornly determined to validate the concept of
daylight precision bombing, the missions continued with the low point coming
in the second half of 1943 with two fateful missions, one targeting German
ball bearing manufacturing facilities in Schweinfurt on August 17, and the
other on October 14 to the Messerschmitt manufacturing facility in
Regensburg. In the Schweinfurt mission, 376 bombers attacked with 60 being
shot down, a 16% loss rate, and on the Regensburg mission 291 B-17s attacked
with 60 shot down again, with another 17 written off as irreparably damaged
-- a staggering 26% loss rate.
o the target, drop their bombs with great accuracy, and
then fight their way back to their home bases with minimal
casualties. Unfortunately, they were mauled by German fighters and
anti-aircraft artillery. Stubbornly determined to validate the concept of
daylight precision bombing, the missions continued with the low point coming
in the second half of 1943 with two fateful missions, one targeting German
ball bearing manufacturing facilities in Schweinfurt on August 17, and the
other on October 14 to the Messerschmitt manufacturing facility in
Regensburg. In the Schweinfurt mission, 376 bombers attacked with 60 being
shot down, a 16% loss rate, and on the Regensburg mission 291 B-17s attacked
with 60 shot down again, with another 17 written off as irreparably damaged
-- a staggering 26% loss rate.
It was clear to the Army Air Force high command that these losses were unsustainable, which contributed to a decision to halt deep-penetration raids into enemy territory for five months until a suitable long-range escort fighter could be introduced. Enter the P-51B, in time for the start of the “Big Week” offensive in February 1944. By then the B-17G model, with improved forward defensive firepower, had been delivered in quantity and B-17Fs were slowly withdrawn from the inventory through attrition and battle weariness.
| THE KIT |
A modification of the Revell 1/72 scale B-17G issued in 2010, the F model kit came out a year later with a blanking plate for the G’s chin turret position and clear parts for an earlier configuration of the top turret, nose windows, and nose canopy.
The detail provided for the interior is quite impressive, particularly in this scale. The Wright R-1820 engines are very nicely done, although there are no wiring harnesses. The wheel wells have decent representations of the internal structure. The nose, cockpit, radio room, bomb bay, waist and tail gun positions are all adequately detailed, although there is no floor for the rear fuselage and the bright yellow oxygen breathing tanks are not provided. There is a decal for application to the instrument panel.
The flaps can be posed open, something almost never seen on B-17s while parked on the ground, and the bomb bay doors can be installed closed or open if one cuts the piece in two. There are two sets of cowling flaps for each nacelle, one for flaps open and one for the flaps closed.
Revell continues to print their instructions on newspaper-quality stock in black ink, a minor irritant, and the drawings are small. The model comes in the annoying side-opening box that Revell Germany continues to use, so be prepared to transfer the contents of the model to something more robust while working on it.
 There have been many model kits released of this iconic aircraft
over the years in this scale from Revell, Airfix, Hasegawa, FROG, Matchbox,
and Academy. I have noted the deficiencies of this series of Flying
Fortress models from Revell in my review of the B-17G, available in the
Modeling Madness review section. To summarize, there remains the same
issues with the kit as with the G, and few new ones are introduced with this
F release. Note this is not a complete list of all the items, but the ones
that I considered while building my model:
There have been many model kits released of this iconic aircraft
over the years in this scale from Revell, Airfix, Hasegawa, FROG, Matchbox,
and Academy. I have noted the deficiencies of this series of Flying
Fortress models from Revell in my review of the B-17G, available in the
Modeling Madness review section. To summarize, there remains the same
issues with the kit as with the G, and few new ones are introduced with this
F release. Note this is not a complete list of all the items, but the ones
that I considered while building my model:
· Accuracy of outline has been matched to reliable drawings and things unfortunately deviate from the plans in that the wing airfoil is too thick, and the nose tapers too severely. Both of these issues are nearly impossible to fix without major surgery of the kit parts, something I wasn’t willing to tackle. Enterprising B-17 fans have been known to graft on fuselage parts from the older Hasegawa, Academy, and even Matchbox kits as their particular subject warrants.
· The panel lines molded into the nose pieces are overly deep and questionably arranged into an almost brick-like pattern that doesn’t match the actual aircraft’s rivet patterns. The remaining fuselage and wing parts have finely recessed panel lines and while not true to the aircraft’s overlapping aluminum sheets with raised rivets, these are what modelers tend to prefer in modern kits. I elected to fill the panel lines in the nose and lightly draw in more representative lines with a pencil after the model was painted.
· The top turret sits way too high. I shaved off the flange on the outside of the turret structure and lopped off the locating pin at the bottom of the frame, lowering it a good 2 mm for a much more realistic look.
· The kit decal and painting instructions for Memphis Belle are accurate, but the other marking alternative, Shamrock Special, has numerous errors. First, there is no evidence in period photos that this aircraft had the Medium Green splotches on the leading and trailing edges of the wings and stabilizers, which feature prominently in the kit painting instructions. Photos show that the de-icer boots on the wings appeared to have been removed and painted over with fresh Olive Drab on the topside, but not with Neutral Gray on the underside, something also not captured in the painting instructions.
· Both Memphis Belle and Shamrock Special had a window
configuration in the nose section with two extra flat windows above the
navigator’s position. Revell does not provide these
pieces. Shamrock Special also had the astrodome observation blister in
place, an unusual configuration. Lastly, Shamro
· The kit decals themselves are of decent quality, but the printing of the colors yellow and red on the sheet is very weak and lacks vibrancy.
· The nose canopy piece is thick as a Coke bottle bottom. The only alternative for this is to source one of those Falcon/Squadron vacuum-formed replacements if you can find one.
· The glazing for the tai l gunner position mounts about 1.5 mm
too far aft. If one draws a line straight down from the trailing edge of
the rudder, it should intersect the canopy framing as it angles
downward. Also, the clear part is marred by plastic residue on the inside,
making for a very cloudy piece that should be crystal clear.
l gunner position mounts about 1.5 mm
too far aft. If one draws a line straight down from the trailing edge of
the rudder, it should intersect the canopy framing as it angles
downward. Also, the clear part is marred by plastic residue on the inside,
making for a very cloudy piece that should be crystal clear.
· There are no pitot tubes provided. These were mounted on both sides of the forward fuselage.
· The de-icer boots on the wings and horizontal stabilizers are not defined by lines on the corresponding pieces.
· The air deflector for the radio room gun hatch is way too prominent for the scale.
· The window frames for the ball turret reflect a later version seen on B-17Gs.
· The rectangular slot fuel wingtip vents on the top side of the wing are appropriate for a B-17G. These need to be filled for a B-17F.
· The B-17F did not have a trim tab on the starboard aileron. The outline needs to be filled and smoothed.
· The ammunition bins attached to the Y-shaped mount for the ball turret are not appropriate for a B-17F as the ammunition was stored inside the turret itself. Leave these pieces off.
· The bomb bay doors open too wide if attached to the retraction struts as designed. I cut the locating pins off the struts and gave the doors a more downward angle when gluing them in.
Like Revell’s 1/72 new-tool B-17G kit upon which this is based, this release fixes none of the problems with that kit and introduces a few more specific to the B-17F. So, why not build the Academy or Hasegawa kits instead? Well, they too have issues. Academy’s offerings have terribly overstated wing dihedral, shallow depressions representing the carburetor air intakes on the wing leading edges instead of proper openings, and it lacks interior detail. The Hasegawa kit suffers from an incorrectly shaped windscreen, almost no interior detail, and wings mounted a scale foot too far forward. That tilts the balance slightly in favor of this troubled Revell kit. I wanted a B-17F in my 1/72 scale WWII bomber collection because I actually prefer it to the G. To my eye, it looks cleaner without the chin turret and I have always been drawn to the tales of the incredibly brave airmen who first challenged the Luftwaffe in 1943 when the daylight bombing campaign battle was engaged.
| CONSTRUCTION |
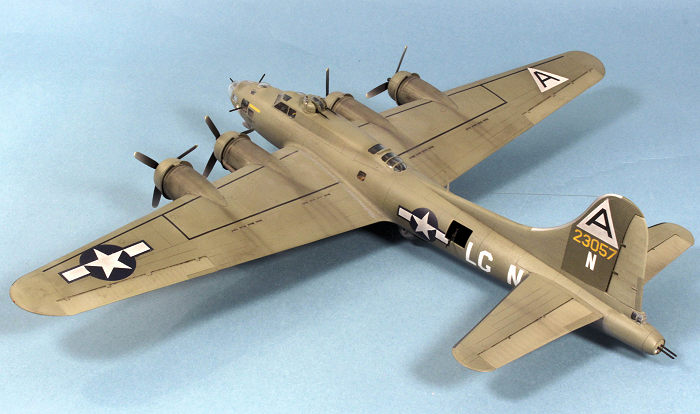
First off, I had to decide which B-17F I wanted to depict. This is important because of the varied configurations of turrets, gun arrangements, and fuselage window locations. The kit markings for Memphis Belle did not interest me, and I was generally disinclined to do Shamrock Special for the aforementioned accuracy issues listed above. The number of aftermarket decal makers that issue products in 1/72 scale is smaller than those working in 1/48 scale. I purchased a Kits-World decal sheet 172013 “B-17Fs of the Mighty Eighth Air Force - Nose Art”, but was dismayed when I inspected it due to a serious lack of research by their artist. Of the eight schemes available, six of them had glaring omissions or misinterpretations of the subject, such as not providing artwork for both sides of the nose or not understanding what orthochromatic black and white film does to reds and yellows. After hours and hours of looking at the photographic evidence, I chose the markings with the least errors, and those were for a B-17F-20-DL, serial number 42-3057, manufactured by Douglas Aircraft and delivered to the 91st Bomb Group in March 1943. It was first adorned with the name Picadilly Commando, then later renamed Blonde Bomber. It was lost in action on its 38th mission on 11 January 1944 after colliding with a German fighter near Hornhausen.
This B-17F had the same unusual window configuration as Shamrock Special did of two flat windows on the upper nose section above the navigator’s position, as well as an astrodome observation blister on top. I drilled out the rectangular window openings and found some suitably-sized clear parts in my spares box to fill the space.
 The interior of a B-17F was mostly unpainted, but it had
fabric pads that were dyed Bronze Green attached to the walls of the nose
compartment, cockpit, and radio room for sound insulation purposes. The
bomb bay was Neutral Gray, and the rear half of the fuselage interior was
unpainted aluminum. I used Alclad II Lacquer Aluminum to paint the interior
rear sections. The areas with fabric padding received a lightened coat of
Vallejo Model Air USAF Green FS34092, which is a reasonable match for Bronze
Green. Other accents like the seats, instrument panel coaming, and control
columns were painted with USAF Green straight from the bottle. The bomb bay
was painted with Vallejo Neutral Gray, darkened with 20% flat black to match
the World War II color.
The interior of a B-17F was mostly unpainted, but it had
fabric pads that were dyed Bronze Green attached to the walls of the nose
compartment, cockpit, and radio room for sound insulation purposes. The
bomb bay was Neutral Gray, and the rear half of the fuselage interior was
unpainted aluminum. I used Alclad II Lacquer Aluminum to paint the interior
rear sections. The areas with fabric padding received a lightened coat of
Vallejo Model Air USAF Green FS34092, which is a reasonable match for Bronze
Green. Other accents like the seats, instrument panel coaming, and control
columns were painted with USAF Green straight from the bottle. The bomb bay
was painted with Vallejo Neutral Gray, darkened with 20% flat black to match
the World War II color.
The plywood floors and table tops in the radio room and nose section were painted with a light tan, dry-brushed with brown to simulate wood grain, and given a coat of Testors Acryl Clear Orange. The consoles, the instrument panel, and radio equipment were painted with flat black. I soaked some tissue paper cut to the proper size with white glue and painted it yellow for the seat cushions. Thin strips of paper were painted medium gray and glued over the cushions to simulate the lap belts for the pilot and co-pilot. There was a rubber mat installed on the floor behind the pilot seats, which I painted flat black.
The bomb bay was assembled first, with the interior assemblies for the rear fuselage, radio room, cockpit, and nose sections added until the entire interior was built up. This was inserted between the two fuselage halves, which I glued together with CA glue to avoid the appearance of ghost seams later.
The nose section involves adding inserts for the windows and cheek gun emplacements, and then the astrodome on top. I cut the barrels off the gun breaches for the cheek guns and glued the breaches inside their locating holes. I did this to prevent the barrels from breaking off as the model was being assembled and painted, adding them back during final construction. The clear inserts were glued on and the seams filled. The overly heavy panel lines from the windscreen forward were filled with Mr. Surfacer 500 and sanded smooth. The blanking plate for the hole for the missing chin turret was glued in but the fit was poor, so the entire area around the plate was filled with CA glue and sanded flush.
At the rear of the fuselage, the tail gunner’s interior parts were inserted between two halves and then attached to the back of the airplane. I filled the resulting seams and then turned my attention to blending in the cockpit canopy, radio room glazing, tail gunner windows, and clear nose cone to the surrounding fuselage. These seams were carefully filled and sanded smooth.
The wings were next, as I glued in the structural pieces and oil tanks in the wheel wells, as well as the intake trunking for each of the carburetor air intakes on the leading edges of the wings. The engines were painted with Alclad Jet Exhaust and a dark gray wash was applied to bring out the raised details. The crankcases were painted with Vallejo Gunship Gray. The wings and horizontal stabilizers were attached to the fuselage and those seams were filled with thick CA glue followed by Mr. Surfacer 500 to fill any remaining micro-holes.
B-17s only had their flaps extended in the open position for takeoff and landing, but the kit provides the modeler the option to pose them this way if so desired. I glued mine shut. The ailerons, elevators, and rudder were all glued in the neutral position, as seen on parked aircraft. The outline of a trim tab on the starboard aileron was filled and sanded smooth. The engines went on each nacelle and the cowlings placed over them, with the pieces for the open cowl flaps used, again as typically seen on Flying Fortresses on the ground.
I restored the panel lines lost in the seam filling process with a scriber, washed the model to remove sanding dust and fingerprints, and masked all the of the clear parts in preparation for paint.
| COLORS & MARKINGS |
I started by priming the entire model with Vallejo Grey Surface Primer. This helps greatly with adhesion for the somewhat fragile Vallejo Model Air paints used for the camouflage colors. The underside got a custom mix of Neutral Gray, darkened with 20% black. The Olive Drab on the topside was lightened with 30% white and 10% Neutral Gray to depict the faded paint. The control surfaces, covered with doped fabric, faded even more severely so I masked them off and painted them with Olive Drab lightened with 60% white. The large panel of the vertical stabilizer was supplied by a subcontractor to Douglas and was pre-painted in a darker shade of Olive Drab than what was used to paint the rest of the aircraft, so I replicated this with Vallejo Olive Drab lightened just slightly with 10% white.
The de-icer boots on the leading edges of the wings were masked and painted with flat black, lightened with 10% white. The de-icer boot on the vertical stabilizer was removed due to flak damage to the tail surfaces on Blonde Bomber, so I masked this and painted the leading edge with Aluminum. You’ll need to measure the length and width of the de-icer boots as Revell does not emboss this on the kit parts as almost every other B-17 model does. The propellers had flat black blades and hubs, with yellow tips (4 scale inches only – please!). The backsides of the blades were weathered with a translucent spray of Aluminum, with a silver color pencil used to depict paint chipping on the leading edges. It does not appear that the props on Blonde Bomber had the Hamilton Standard logo markings.
The turbosuperchargers were painted with Alclad Jet Exhaust and dry-brushed with Polly Scale Rust. A dark wash was applied to the recessed areas.
A coat of Quick Shine Multipurpose Floor Finish prepared the model
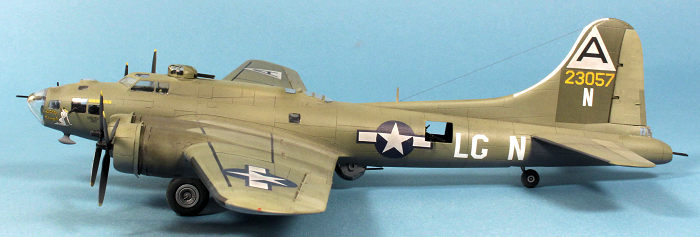
for decals. I used the kit decals for the triangle-A mar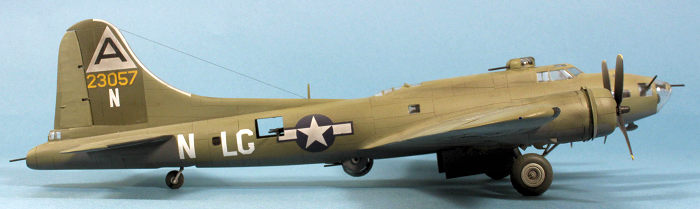 kings and the wing
walk striping, an old Aeromaster sheet of US national insignia with dark
blue outlines (not red, as instructed by Kits-World), an Eagle Strike sheet
of yellow numbers for the serial number, and the nose art and white aircraft
letters came from the Kits-World sheet.
kings and the wing
walk striping, an old Aeromaster sheet of US national insignia with dark
blue outlines (not red, as instructed by Kits-World), an Eagle Strike sheet
of yellow numbers for the serial number, and the nose art and white aircraft
letters came from the Kits-World sheet.
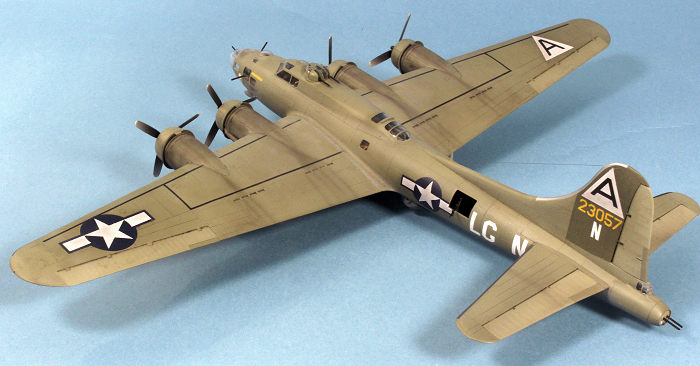
The white aircraft letters were a source of great internal debate. Specifications called for B-17 squadron code letters to be either Medium Gray or Yellow on camouflaged aircraft. There’s a clear black and white photo of the side of 42-3057 where the aircraft letters are much brighter in tone than the yellow serial number or even the white triangle-A Bomb Group markings and the white parts of the national insignia as well. I decided that the triangle-A and national insignia were grayed-out by the application of patchy medium gray paint, something seen in other photos of 91st Bomb Group Flying Fortresses, but the squadron code letters appeared to have been painted on in white rather than the proper yellow for some unknown reason, perhaps for expediency in repairs after it suffered flak damage in combat. At any rate, I went with the white code letters as an educated guess. I could be wrong.
I rubbed medium gray pastel chalk dust into the white portions of the triangle-A and national insignia markings to give them an uneven grayed-out appearance.
Weathering consisted of a dark wash in all the panel lines and wheel wells, dark gray pastel chalk for the exhaust staining coming out of the turbosupercharger ports underneath each nacelle, and a thin line of oil staining coming from the one o’clock position (when viewed from the front) starting behind the cowl flaps. As mentioned in my other B-17 kit reviews, this stain pattern travels back across the top of the wings and fans out wider before it goes between the four hot air vents.
Paint wear on both wing roots was added with multiple stabs of a silver color pencil and slowly built up until it matched what I see in period photographs of B-17s. More chalk pastels were used to add grime on random areas of the wings and nacelles. A coat of Testors Acryl Clear Flat sealed in the weathering. The tires were painted with Vallejo Tire Black with a thin spray of light tan to reflect operations on an often-times muddy airfield.
The kit provides no representation of the wingtip navigation lights, so I added a dab of clear blue (starboard) and red (port) paint on the ends of the wings. There are two signaling lights below the tail guns, one red and one white.
I painted the ball turret the same darkened Neutral Gray as the rest of the underside, and the top turret’s frames were painted with lightened Olive Drab. Rather than mask these impossibly tiny windows, I just sprayed the entire clear pieces with the appropriate color and then scraped away the acrylic paint from the clear areas using a sharpened toothpick.
| FINAL CONSTRUCTION |
 The main landing gear struts were glued in and the wheels
attached. The attachment points aren’t very robust, so I flooded the joint
with CA glue for extra strength.
The main landing gear struts were glued in and the wheels
attached. The attachment points aren’t very robust, so I flooded the joint
with CA glue for extra strength.
The top turret without the flange around the circumference was dropped down into its hole. The waist machine guns were added inside the openings without windows, as was the typical configuration for a B-17F. In the B-17G, these waist positions received Plexiglas coverings to protect the gunners from the sub-zero blast of air. The two tail machine guns were glued into the holes in the canvas tail gun cover. The cheek gun barrels that I had previously cut off were glued into place. The nose gun was slipped through the hole and carefully glued in the proper position. I slipped the ball turret and its mounting frame into the bottom of the fuselage, facing rearwards. As I found with the B-17G kit, this didn’t fit very well and I ended up cutting off a bit of the Y-cradle to make the turret settle properly into position. The props went onto their shafts. The bomb bay doors were carefully glued onto the retraction mechanisms. The antenna mast and ADF football were glued on. I didn’t have any pitot tubes in my spares box, so this feature was left off the model. It appears that Blonde Bomber had just one aerial wire running from the front of the tail fin to the base of the antenna mast, which I replicated with nylon invisible thread and painted Vallejo Gunship Gray.
| CONCLUSIONS |
27 April 2026
Copyright ModelingMadness.com. All rights
reserved. No reproduction in part or in whole without express permission from
the editor.
Review kit courtesy of my wallet If you would like your product reviewed fairly and fairly quickly, please contact the editor
or see other details in the
Note to
Contributors. Back to the Main Page
Back to the Review
Index Page
Back to the Previews Index Page