Revell 1/48 P-51D Mustang
| KIT: | Revell 1/48 P-51D Mustang |
| KIT #: | 5241 |
| PRICE: | $12.99 MSRP |
| DECALS: | Three options |
| REVIEWER: | Greg Ewald |
| NOTES: | Fantastic instructions, a good deal for the dollar. |
| HISTORY |
Without the
British support, the much improved Allison engine was used to power the F-51
Thundercat, sold as an export fighter to the South African, Ceylonese, and
Egyptian air arms in their attempts to thwart the Empire’s growth, while the
Mounting two heavy cannon in the
wing, and a grenade launcher in a “through the spinner” configuration, this
anti-tank fighter was the bane of many a Roman or British tanker.
Later versions
had pylons mounted for the use of napalm filled tanks, which could decimate the
Imperial rank and file as they marched on their conquest of
Film at eleven.
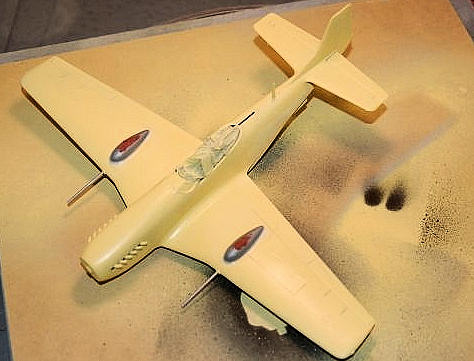
| THE KIT |
 This has to
be one of Revellogram’s best…cleanly molded, great instructions, easy to
assemble.
The detail is so-so, but with some
foil belts, and a bit of time with a small brush, the cockpit looks good, as
does the rest of the basic assembly.
This has to
be one of Revellogram’s best…cleanly molded, great instructions, easy to
assemble.
The detail is so-so, but with some
foil belts, and a bit of time with a small brush, the cockpit looks good, as
does the rest of the basic assembly.
The styrene is perfect, not to brittle, not too waxy…just right ! Even the clear bits are easy to remove from the sprue, and without much sanding, the test fit shows this to be a superbly engineered kit. The Revell instructions have b/w photos for reference at most steps, which is a nice touch.
If you want to have a fun time building, this is the kit for you. Seven steps and bing, bang, boom…you have a nice sized model !
| CONSTRUCTION |
The cockpit goes together just fine, some basic painting, an oily black wash of India ink…and you are there. Aftermarket sets are available for you superdetailers out there, but for me, the factory stuff worked out really well. The floor was finished as to be plywood, and the interior painted a very dark grey that is almost black.
 To be honest, this one of those
kits that you can put together quickly, and have nice results in the end. The
only flaw that I could pick up on was the dubious addition of having a removable
( ? ) lower engine cowling…hey, this kit does not have an engine! The piece at
least fits in o.k. without too much filler.
To be honest, this one of those
kits that you can put together quickly, and have nice results in the end. The
only flaw that I could pick up on was the dubious addition of having a removable
( ? ) lower engine cowling…hey, this kit does not have an engine! The piece at
least fits in o.k. without too much filler.
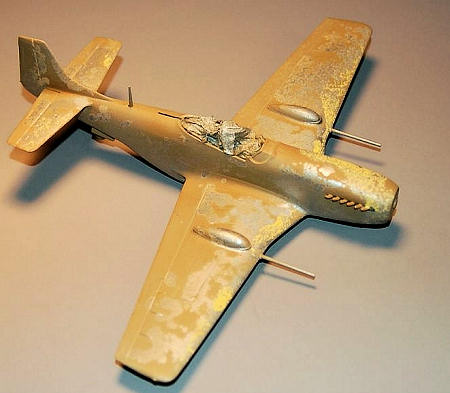
Hollow metal tubing was used to make the cannon barrels, and the grenade launcher. The amount of different styles and sizes available today is head-spinning, be sure to check out the links below!
For the upper receiver of the cannon’s, I used 1/72nd drop tanks from the spares box, glued in place and then psr’d to death, without removing detail from the wings, they work as a convincing approach to the massive upper breach necessary for the cannons.
A smaller tank was used as the ammunition holder for the small grenade launcher, (white phosphorous, to ignite the napalm held in the tanks), and puttied into the nose section, slightly off center and low enough so that the pilot could actually see what the hell he was aiming at.
I did drill out the holes of the canopy mount using a Dremel, with that big bulging canopy, you can’t help but see it.
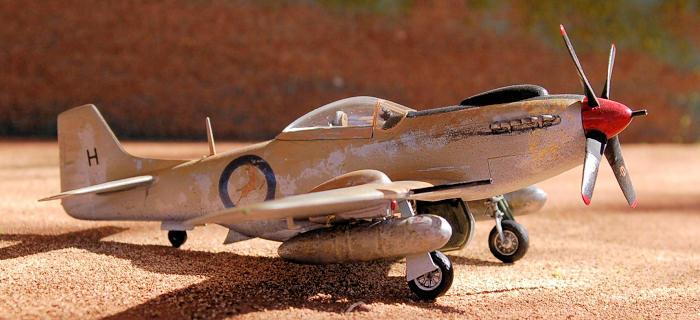
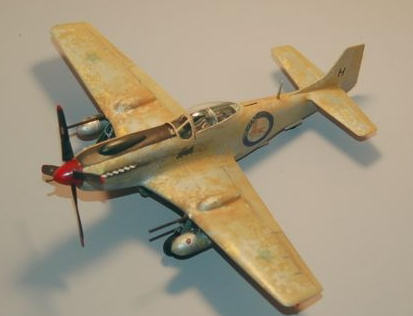
| COLORS & MARKINGS |
 This was a plane that
was being run out of a defunct airfield in
This was a plane that
was being run out of a defunct airfield in
After it was dry, I took a 3M pad and scuffed the surface lightly, then coated the whole affair in Future. The decals were printed out on my inkjet in a faded motif, you have to remember the hot and dry sun of the Kalahari, and what it would do to paint, then applied with Microset and Sol, over-coated with a satin acrylic finish.
The tires go on, the prop goes on, the canopy goes on. You are finished.
| CONCLUSIONS |
For the sheer dollar value vs.
fun factor, this kit is an outstanding winner.
It would be perfect for a group
build, a contest, a first-timer’s kit, or a what if for an old whacko like me.
Can’t recommend it enough !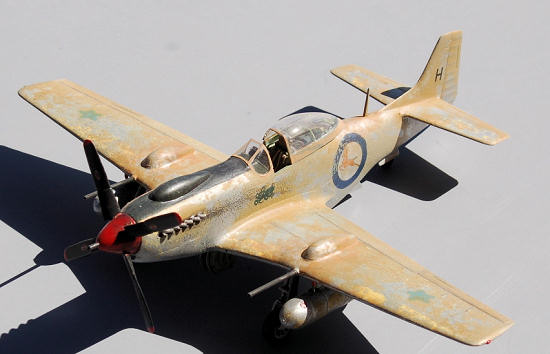
| REFERENCES |
Some good close up reference can be found here:
If you would like your product reviewed fairly and fairly quickly, please contact the editor or see other details in the Note to Contributors.