| KIT #: | 5500 |
| PRICE: | $Free (well, I paid shipping) |
| DECALS: | one option |
| REVIEWER: | Lee Fogel |
| NOTES: | You know, there’s a reason why started kits can drive you nuts… |
| HISTORY |
 The North
American B-25 Mitchell is regarded by many to one of the finest if not the
finest allied medium bomber of World War II.
It was capable of being modified both at the factory and in the field to
work a multitude of tasks and missions.
From launching off of the USS Hornet to strafing the Imperial Japanese
Navy into submission this aircraft proved its mettle time and again.
The H model in particular was a real beast.
This was an improved version of the B-25G featuring two additional fixed .50 in
machine guns in the nose and four in fuselage-mounted pods (theses were added
later on). The M4 cannon was
replaced by a lighter 75 mm cannon. Approximately
1,000 were built. However I do not
know if this number includes any aircraft converted in the field.
At this time there is only one H model left I existence and it is
completely restored and in flying condition.
The North
American B-25 Mitchell is regarded by many to one of the finest if not the
finest allied medium bomber of World War II.
It was capable of being modified both at the factory and in the field to
work a multitude of tasks and missions.
From launching off of the USS Hornet to strafing the Imperial Japanese
Navy into submission this aircraft proved its mettle time and again.
The H model in particular was a real beast.
This was an improved version of the B-25G featuring two additional fixed .50 in
machine guns in the nose and four in fuselage-mounted pods (theses were added
later on). The M4 cannon was
replaced by a lighter 75 mm cannon. Approximately
1,000 were built. However I do not
know if this number includes any aircraft converted in the field.
At this time there is only one H model left I existence and it is
completely restored and in flying condition.
| THE KIT |
To date there have three different boxing of
the H and J series. These are the
cannon nose H, solid nose J and clear bomber-nose J.
Various re-boxings of the J have been released over the years by both
Monogram and (later on) Revell.
The J has had
 parts for
both versions packaged together but the H has not been re-released nor have its
parts been included in any other re-boxing that I know of.
I received this kit from Scott in a Zip-Loc bag.
It had no box, no decals and photo-copied instructions.
Assembly had been started at some point so some parts were on the sprues,
some were off and others glued into place (more
on that later). The sprues are
molded in a filed drab color and are representative of Monogram kits of the day.
By this I mean no flash, fine raised details with a very detailed
interior and cockpit. The clear
sprue was cleanly cast and no distortion is present.
The instructions are very clear and concise about part placement and
colors. The kit decals were not
included but I do recall that they are typical of Monogram decals of this
era…colorful but thick and difficult to get to conform/lay down properly.
The kit sheet does come with stencils as well.
The Zotz decals for this particular aircraft were sent to me by fellow
modeler Jim McLaughlin. They are
very well printed and opaque. The
color instruction sheet offered only a side profile for placement and notes.
parts for
both versions packaged together but the H has not been re-released nor have its
parts been included in any other re-boxing that I know of.
I received this kit from Scott in a Zip-Loc bag.
It had no box, no decals and photo-copied instructions.
Assembly had been started at some point so some parts were on the sprues,
some were off and others glued into place (more
on that later). The sprues are
molded in a filed drab color and are representative of Monogram kits of the day.
By this I mean no flash, fine raised details with a very detailed
interior and cockpit. The clear
sprue was cleanly cast and no distortion is present.
The instructions are very clear and concise about part placement and
colors. The kit decals were not
included but I do recall that they are typical of Monogram decals of this
era…colorful but thick and difficult to get to conform/lay down properly.
The kit sheet does come with stencils as well.
The Zotz decals for this particular aircraft were sent to me by fellow
modeler Jim McLaughlin. They are
very well printed and opaque. The
color instruction sheet offered only a side profile for placement and notes.
| CONSTRUCTION |
First up was to assess the damage.
The wings had been glued together with the landing gear in place.
The engines and cowlings were also assembled as were the nacelles/gear
bays. However, these sub-assemblies
had not been glued together. The
exhaust stacks had been glued the cowlings and the rudders had been assembled
and glued to the horizontal stabilizer (and
were broken off). Also, many
interior parts had been assembled and glued to their respective places in the
fuselage. Three of the four wing
spars, molded as part of the interior cabin, had been snapped off.
The 75mm cannon in particular was sloppily
 assembled
and was going to require major reconstruction.
It also appeared that Testors tube glue was used meaning the assembled
parts would be quite difficult to separate/repair.
The main gears were both snapped off and would also require surgery to
repair and strengthen as did the rudders.
So, with all of this ahead of me I decided to see what I could live with
and what needed repair.
assembled
and was going to require major reconstruction.
It also appeared that Testors tube glue was used meaning the assembled
parts would be quite difficult to separate/repair.
The main gears were both snapped off and would also require surgery to
repair and strengthen as did the rudders.
So, with all of this ahead of me I decided to see what I could live with
and what needed repair.
 were
cleaned up quickly with the wheel wells painted MM Metalizer Aluminum, .5 oz. of
weight added to each nacelle and then glued to wings with Plastruct liquid glue.
A little bit of filler was required here in a few spots but no big nasty
gaps were present. The engines were
not able to be separated from the firewall/cowling flaps so I painted them Model
Master Flat Black, dry brushed them with Testors Siler and Steel, painted the
crankcase Intermediate Blue and then used Citadel’s Armor Wash for a grimy look.
I then painted the inside of the cowlings MM Metalizer Aluminum and glued
the cowling to the engine fronts.
The port engine is slightly off-center due to the prior assembly of the parts.
The completed engines were glued to the nacelles and the wings set aside
to await completion of the fuselage.
were
cleaned up quickly with the wheel wells painted MM Metalizer Aluminum, .5 oz. of
weight added to each nacelle and then glued to wings with Plastruct liquid glue.
A little bit of filler was required here in a few spots but no big nasty
gaps were present. The engines were
not able to be separated from the firewall/cowling flaps so I painted them Model
Master Flat Black, dry brushed them with Testors Siler and Steel, painted the
crankcase Intermediate Blue and then used Citadel’s Armor Wash for a grimy look.
I then painted the inside of the cowlings MM Metalizer Aluminum and glued
the cowling to the engine fronts.
The port engine is slightly off-center due to the prior assembly of the parts.
The completed engines were glued to the nacelles and the wings set aside
to await completion of the fuselage.
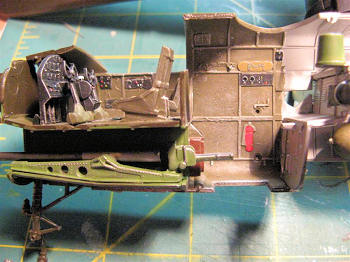
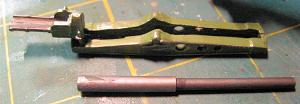 he
smaller section MM Metalizer Steel.
The mount and gun bay was painted MM Green Zinc Chromate (referred
to as GZC from here on out).
Funny thing about this is that once the fuselage is all closed up you can only
see the very front of the cannon barrel!
But it is a vast improvement over the kit barrel and I know it was done
“right” and that’s what counts. I
definitely recommend making the time and minimal effort to do this one
modification.
he
smaller section MM Metalizer Steel.
The mount and gun bay was painted MM Green Zinc Chromate (referred
to as GZC from here on out).
Funny thing about this is that once the fuselage is all closed up you can only
see the very front of the cannon barrel!
But it is a vast improvement over the kit barrel and I know it was done
“right” and that’s what counts. I
definitely recommend making the time and minimal effort to do this one
modification.
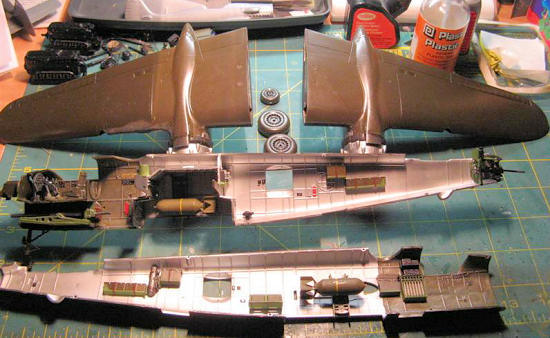 o
figure that the aluminum color makes seeing the details inside a bit easier.
Anyhow, with this quandary solved I painted the assorted bits and pieces
per the instruction color call-outs. The
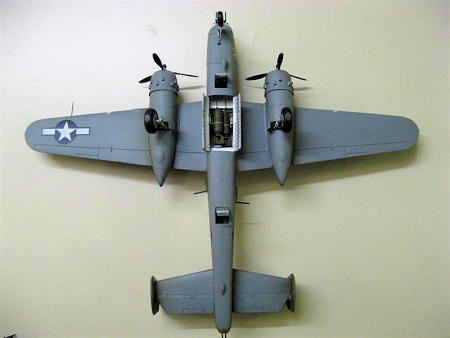
kit-supplied bombs are lacking in detail especially the fins.
So I raided my spares box and found a pair of bombs that look much
better. I believe that they are
from the AM B-25C/D kit but cannot be entirely sure.
Anyhow these were painted with Testors Olive Drab and Flat Yellow and
then glued in the bomb bay. The
upper turret assembly was painted and assembled per the instructions and set
aside as it can be added at the end of the build.
Please note that the upper framing should not be painted.
Tom Cleaver was kind enough to point this out on a recent MM group build.
o
figure that the aluminum color makes seeing the details inside a bit easier.
Anyhow, with this quandary solved I painted the assorted bits and pieces
per the instruction color call-outs. The
kit-supplied bombs are lacking in detail especially the fins.
So I raided my spares box and found a pair of bombs that look much
better. I believe that they are
from the AM B-25C/D kit but cannot be entirely sure.
Anyhow these were painted with Testors Olive Drab and Flat Yellow and
then glued in the bomb bay. The
upper turret assembly was painted and assembled per the instructions and set
aside as it can be added at the end of the build.
Please note that the upper framing should not be painted.
Tom Cleaver was kind enough to point this out on a recent MM group build.
Please look here
for a brief but complete explanation.
| FINAL CONSTRUCTION |
 The interior
of the gun nose was painted GZC and then dry brushed with Testors Silver and
heavily weathered with pastels. The
quad .50 gun pack was then glued into place.
MM Metalizer Burnt Iron was used to paint the guns.
The props were painted MM Flat Black with the tips done in Testors Flat
Yellow and set aside. The main
wheels had already been assembled.
These were cleaned up and painted Testors Flat Black with the center section/rim
being brush painted MM Metalizer Aluminum Plate.
The cover for the nose wheel was painted MM Neutral Grey.
The canopy, fuselage glass and rear gunner’s canopy were masked using BMF
and then tacked into place with 5-minute epoxy.
The waist guns were attached to the waist windows with 5 minute epoxy
along with the pitot tube…which was immediately broken!
The canvas twin .50 cover for the rear guns was painted Floquil Rust and
set aside for the final assembly.
The interior
of the gun nose was painted GZC and then dry brushed with Testors Silver and
heavily weathered with pastels. The
quad .50 gun pack was then glued into place.
MM Metalizer Burnt Iron was used to paint the guns.
The props were painted MM Flat Black with the tips done in Testors Flat
Yellow and set aside. The main
wheels had already been assembled.
These were cleaned up and painted Testors Flat Black with the center section/rim
being brush painted MM Metalizer Aluminum Plate.
The cover for the nose wheel was painted MM Neutral Grey.
The canopy, fuselage glass and rear gunner’s canopy were masked using BMF
and then tacked into place with 5-minute epoxy.
The waist guns were attached to the waist windows with 5 minute epoxy
along with the pitot tube…which was immediately broken!
The canvas twin .50 cover for the rear guns was painted Floquil Rust and
set aside for the final assembly.
| COLORS & MARKINGS |
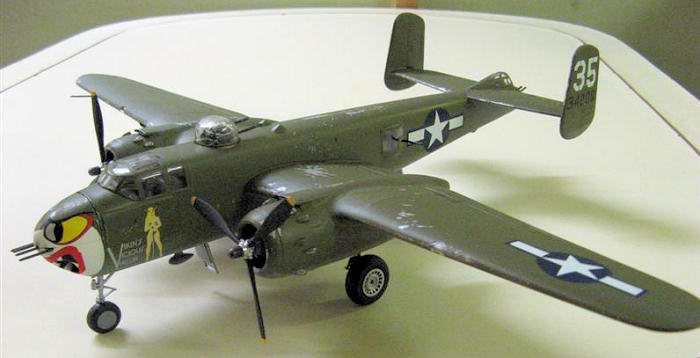
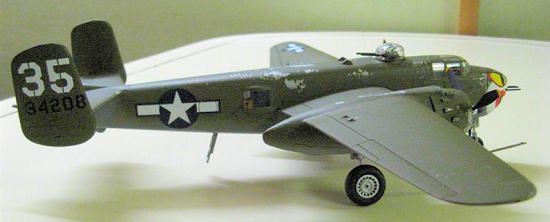
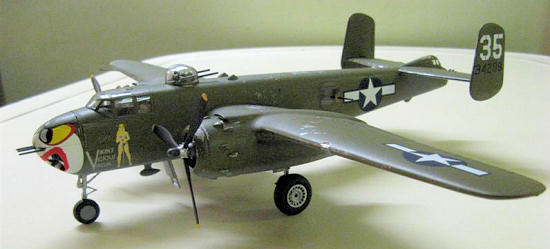
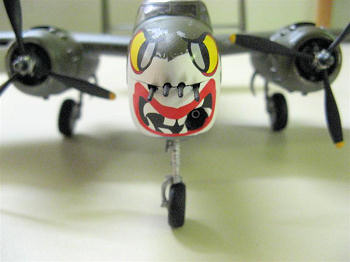
As mentioned previously the kit decals were long gone. So I put out an APB for a set of H model decals. Jim McLaughlin came through for me and I soon had the decals to build “Vikin’s Vicious Virgin” in my hands. Produced by Zotz these decals are very cleanly printed and have good opacity. The instructions mentioned that this aircraft did not have the optional side-mount twin .50 guns mounted on it. What pictures I could find verified this. Unfortunately these had been glued into place already. These required some serious cutting, prying and swearing to remove. Once this was done I cleaned up, filled and sanded smooth these areas.
B-25’s in the Pacific Theatre
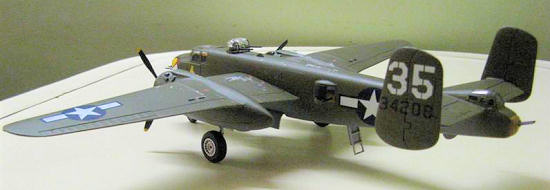
were known to be heavily used and showed moderate to heavy wear and tear.
I wanted to replicate this followed my tried and true “wear and tear”
method. I gave the model an overall
coat of MM Metalizer Aluminum via rattle can.
This was then buffed in preparation for the overall colors.
The airframe is the standard USAAF Olive Drab over Neutral Grey and I
used MM paints for this. The decal
instructions show a white background for most of the “sharkmouth” nose art.
I masked this area off the best I could and sprayed MM Flat White until
satisfied with the opacity. I let
the model sit overnight to let the paint completely cure.
I then took used Duct Tape, white Masking Tape and brown Packing Tape to
replicate random wear areas. This
is done by applying a piece of tape and burnishing it down into place.
Then, with a quick jerk, I remove the tape from the area.
 Sometimes
it takes a few applications to get the amount/look you desire.
Why the different types of tape?
I have found that the different grades result in a slightly different
look especially with Duct Tape.
Sometimes
it takes a few applications to get the amount/look you desire.
Why the different types of tape?
I have found that the different grades result in a slightly different
look especially with Duct Tape.
| CONCLUSIONS |
You don’t seem to see this kit
build up to often and that is a real shame.
With the success that the J model has in the marketplace you would think
that Revell (who now owns these molds)
would see fit to re-release this kit at some point.
The H model makes for a unique and striking aircraft especially when
parked next to its other siblings.
The detail, ease of assembly and good all
 around fit
really made this build quite enjoyable.
The previous work started on the kit made for some frustrating moments
though and really slowed down the build.
My understanding is that there are very few H model decals available so
if you buy this kit complete I would suggest trying to make the kit decals work
for you. If you do not already have
this kit I suggest that you add it to your “gotta get” list…especially if you
want to build a PBJ-1H.
around fit
really made this build quite enjoyable.
The previous work started on the kit made for some frustrating moments
though and really slowed down the build.
My understanding is that there are very few H model decals available so
if you buy this kit complete I would suggest trying to make the kit decals work
for you. If you do not already have
this kit I suggest that you add it to your “gotta get” list…especially if you
want to build a PBJ-1H.
Special thanks to Jim McLaughlin and Karl
Hauffe for their assistance.
Model courtesy of Scott Van Aken…and my wallet!
| REFERENCES |
March 2010
If you would like your product reviewed fairly and quickly, please contact me or see other details in the Note to Contributors.