Academy and Tamiya 1/72 P-51 Mustang
| KIT #: | 1667/60749 |
| PRICE: | $12.50/17.50 MSRP |
| DECALS: | Three Options in each kit |
| REVIEWER: | Joel Hamm |
| NOTES: | Apparently from the same molds. |
| HISTORY |
Who me? Model a mustang?
Model multiple mustangs? Me? Who likes only trainers, utility
transports, experimentals, and other also-rans? Chalk it up to age.
Merlin and Mach II were wearing me down and I needed a dose of
instant gratification. Besides
- what sort of a
I used to have several.
Revell’s 49 center was one of the original batch I snatched off the shelves
of the Patch Barracks PX
 for only 26 cents apiece.
Those got me into adult modeling just about 40 years ago.
A prop and a few wheels are all that’s left of it, rattling around in
the spare parts box. If I
recall correctly, it wasn’t a half bad rendering. There was a Matchbox P51-D
sitting for many years in the
for only 26 cents apiece.
Those got me into adult modeling just about 40 years ago.
A prop and a few wheels are all that’s left of it, rattling around in
the spare parts box. If I
recall correctly, it wasn’t a half bad rendering. There was a Matchbox P51-D
sitting for many years in the
That was actually the kit I was looking for.
Those ancient Monogram classics took all of an afternoon to build and
paint into a fine model. No
sanding, no filling, no filing, no fiddling. They’ve been re-issued, by
Accurate Miniatures I believe, at a whopping $30. I figured if I was going
to shed big bucks I might as well see what
the high rollers roll out.
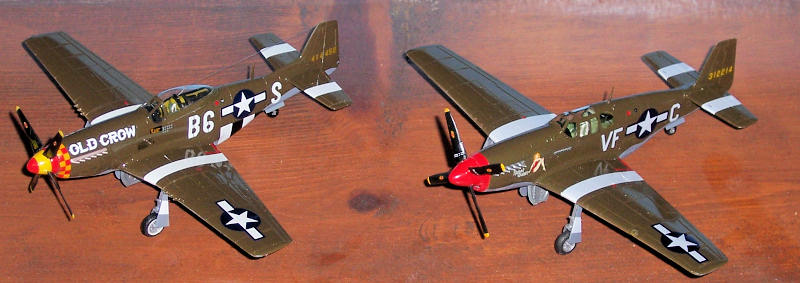
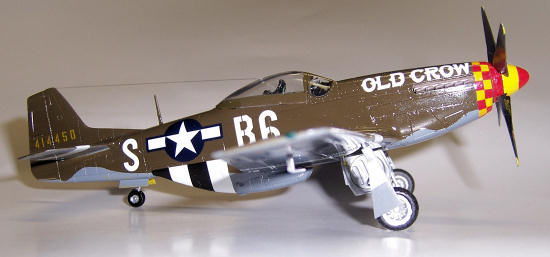
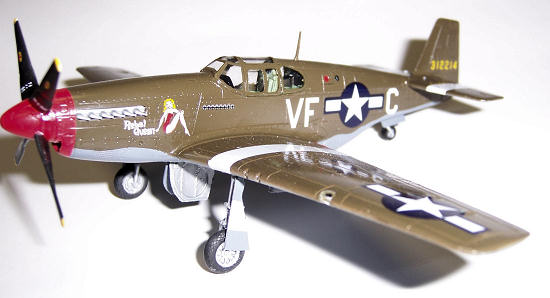
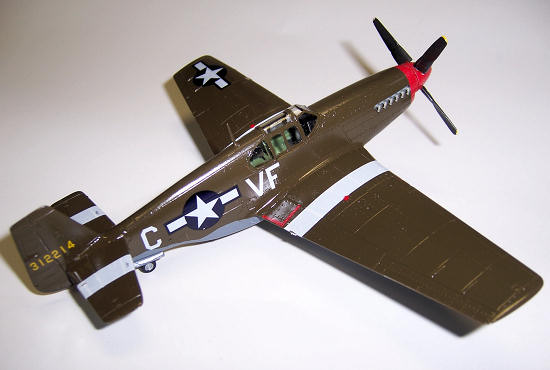
Traipsing through Squadron Shop’s e-catalogue I settled on the razor
back from Academy and the bubble top from Tamiya.
MM already has reviews of these kits, and many photos on the Mustang
Readers’ Page, but I thought I’d add my own tuppence ha’penny, particularly
to cover the subject of color, which has been batted around on the Readers
Forum. Rather than, as usual,
cranking the pictures through Photoshop to fix exposure levels, I’ve sent
along raw shots taken under various lighting sources, most less than
optimum, to demonstrate how drastically hues change in different viewing
conditions.
| THE KIT |
Though the two companies are not known to be connected, both kits
obviously came from the same molds, or at least the same mold makers.
Many parts are identical.
The parts breakdown and engineering are identical. Scribing,
alternate choices,
 wheel well detail … all point to a common provenance,
though some differences are present. Notably, the B model fuselage is
laterally split aft of the cooing scoop, as if another variant was planned
with a different empennage.
wheel well detail … all point to a common provenance,
though some differences are present. Notably, the B model fuselage is
laterally split aft of the cooing scoop, as if another variant was planned
with a different empennage.
As far as quality goes, nothing is left to be desired in the molding,
engineering, and fit. Both kits offer choices of canopies.
The B can be fitted with the bird cage or Malcolm hood. The D model
also has two bubble tops, one supposedly slimmer for late or post-war
models, though even under magnification the difference is
hard to discern. A selection of exhaust stacks is also offered with
each kit, so careful photo research is needed to model a particular subject
other than the ones in the instruction sheets, for which specific parts are
referenced by number.
As for accuracy, unless something seems drastically amiss, I don’t
generally get out the micrometer and calipers.
One item did need checking.
The
| CONSTRUCTION |
 As always starts with
the cockpits, which is the only
point worth mentioning. Because seats and such can be inserted through the
opening, these are best left to the post-painting stage.
The Academy B featured
complete, detailed, and well proportioned furnishings. The Tamiya D,
however, was equipped with a seat and backrest assembly sized for a shrunken
pilot. Scratch building skill
were not overly taxed by forming a new one out of bits and pieces.
As always starts with
the cockpits, which is the only
point worth mentioning. Because seats and such can be inserted through the
opening, these are best left to the post-painting stage.
The Academy B featured
complete, detailed, and well proportioned furnishings. The Tamiya D,
however, was equipped with a seat and backrest assembly sized for a shrunken
pilot. Scratch building skill
were not overly taxed by forming a new one out of bits and pieces.
The Academy aft cockpit floor is slightly narrower than the fuselage width. Resist the temptation to squeeze and glue, lest you end up sanding and re-scribing the now overly wide tail section. Other than those two points nothing is notable about the assembly, other than the lack of need for filler, even on the often troublesome radiator scoop lip.
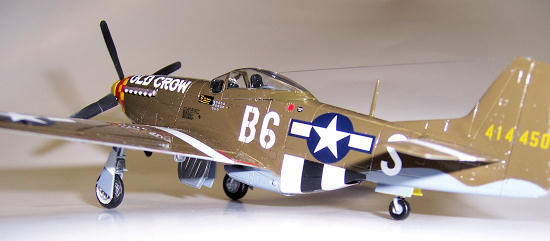
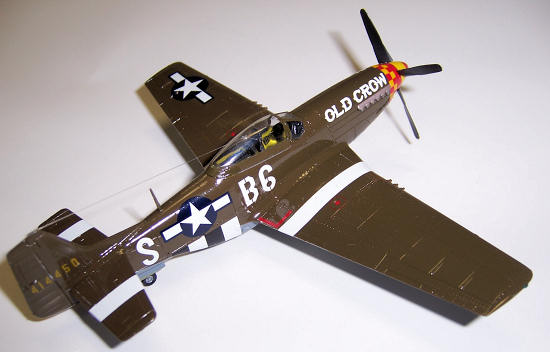
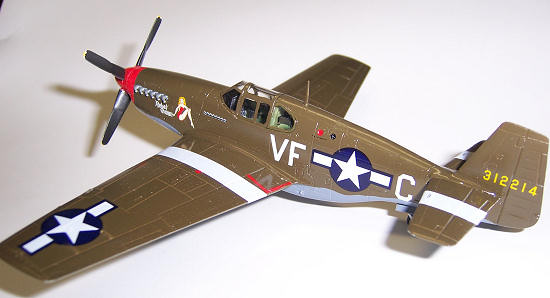
| COLORS & MARKINGS |
NMF mustangs are boring, and impossible to mask without resort to
$10-a-bottle Alcald, with all its foibles and prerequisites. O.D. over
neutral gray is sexy . Which
brings up the point about color recognition.
The experts, once again, are always eager to point out that the shade
in a particular photograph is not quite green enough, or too much purple, or
a lemon yellow rather than a cadmium yellow.
Forum threads further are awash with angst over whether the federal
standard gray in gloss differs from federal standard gray in matte.
The
un-tweaked photos show what IMHO is the foolishness of all this fretting.
The same paint under different light appears to have been poured from
different cans. Khakis and
olive drabs are particularly prone.
In dim light they are nearly black. Under fluorescents they turn
cyanotic. Close-up flash morphs them into desert pink, and the dark blue of
the national insignia into robin’s egg pastel.
 Add
to that uncertainty the inability of the photo medium, electronic or
chemical, to capture and then display precisely what the eye perceives, not
that all eyes equally perceive.
Additionally, there is the factor known as “scale effect”.
Even under identical light, large areas of color appear different
from small swatches. The explanation for scale effect might best be left to
experts in optical physics, or psychology; and while they’re at it, would
they please explain why a “harvest moon” on the horizon looks ten times the
size of a mid-month moon high
in the sky?
Add
to that uncertainty the inability of the photo medium, electronic or
chemical, to capture and then display precisely what the eye perceives, not
that all eyes equally perceive.
Additionally, there is the factor known as “scale effect”.
Even under identical light, large areas of color appear different
from small swatches. The explanation for scale effect might best be left to
experts in optical physics, or psychology; and while they’re at it, would
they please explain why a “harvest moon” on the horizon looks ten times the
size of a mid-month moon high
in the sky?
Having vented my spleen, also my pancreas and gall bladder, concerning
obsessions with absolute color accuracy, I will nevertheless deprive no
person of the pleasure of performing a fandango upon his Focke-Wolfe should
he be tortured by thoughts of having doused it with
the wrong RLM (whatever that stands for).
I
should also defend myself against inevitable accusations of gloss
negligence, i.e. slathering in Future airframes that historically should be
non-specular. In the words of Bonaparte:
“Pas de lieu rhone que nous”.
Or, you play with your toys the way you want; I’ll play with mine the
way I want.
By
way of overkill I might add:
http://www.ww2incolor.com/gallery/albums/new_war_photos/p51mustang_f15.jpg
If he can be shiny, I can be shiny.
| FINAL CONSTRUCTION |
Not much noteworthy in this department. As mentioned, flight deck
furnishings can be added through the cockpit opening; and the under-size
D-model seat needed to be scratch built. A recent Off
Topic Forum thread concerned doubts regarding
the
 need to study algebra and other math subjects.
Permit this opportunity to demonstrate the applicability of algebra
to life’s most pressing
problems: how big should be the part?
An exhaustive survey of all chairs in the domicile indicated a
universally accepted tush width of 18 inches. Reducing that to 1/72
scale required resort to the formula for figuring proportions.
First establish the legend:
Let X = width of pilot’s seat in 1/72 scale. Therefore:
X is to 18 inches as 1 is to 72; or:
need to study algebra and other math subjects.
Permit this opportunity to demonstrate the applicability of algebra
to life’s most pressing
problems: how big should be the part?
An exhaustive survey of all chairs in the domicile indicated a
universally accepted tush width of 18 inches. Reducing that to 1/72
scale required resort to the formula for figuring proportions.
First establish the legend:
Let X = width of pilot’s seat in 1/72 scale. Therefore:
X is to 18 inches as 1 is to 72; or:
Cross
multiplication yields:
72
X = 18”
or X
= 18 / 72
Resorting to Microsoft’s calculator accessory we find that
And,
sure enough, a scratch-built seat one quarter inch wide and proportionately
tall fit and looked absolutely perfect.
There you have it, Folks; proof indisputable of algebra’s
indispensability. Stay in
school, Kiddies. And don’t let
the dog eat your homework.
I’ve already mentioned that both kits offer a choice of
transparencies, which can be
posed open or closed. Al
alternate birdcage on the B has a separate side panel, but its thickness
looks out of place. A properly
scaled window can easily be made from a snippet of acetate, but
I prefer all canopies closed.
Interiors in 1/72 scale are seldom convincing. Besides, it’s hard
enough to keep clean the outside of a model, without having to worry about
schmutz getting inside.
| CONCLUSIONS |
March 2010 If you would like your product reviewed fairly and quickly, please
contact
me or see other details in the
Note to
Contributors.