Hasegawa 1/72 B-26B/C Marauder
| KIT #: | 00556 (E26) |
| PRICE: | $47.95 MSRP |
| DECALS: | Two options |
| REVIEWER: | Scott Jamieson |
| NOTES: |
| HISTORY |
“The Flying Prostitute”, ”The Baltimore Whore”, and”The Widow Maker”. These and other less printable titles have been bestowed upon Martins B-26, but despite some early teething problems, the mighty Marauder has etched it's place in WWII history. It's clean lines and stout construction brought many a crew home to fight another day. And despite having the lowest operational loss rate of any aircraft during WWII, it's “hotship” flying characteristics along with its high unit price (almost as much as a B-17G!) caused its early removal from the inventory. Sadly, most were scrapped before the end of hostilities. The North American B-25 “Mitchell” however, with its pilot-friendly handling, not to mention lower operational/unit cost, soldiered on til the sixties.
| THE KIT |
In the 1/72nd modeling world, the
same can be said about the popularity of the B-26. Revell, FROG, and Matchbox
all had “okay” but not very accurate kits in 1/72.
Airfix released a B-26B in the late
seventies, and this was about the best you could get for many years. Monogram
released a “snap-tite” early B-26B. Despite being accurate, its sim plistic
construction (aimed more at kids) kept the kit out of the realm of serious
modeling. Hasegawa, however, has been steadily releasing 1/72 twins that have
been accurate and very detailed. When the B-25H/J kits came out, I hoped this
was a precursor of things to come, and they did not disappoint.
plistic
construction (aimed more at kids) kept the kit out of the realm of serious
modeling. Hasegawa, however, has been steadily releasing 1/72 twins that have
been accurate and very detailed. When the B-25H/J kits came out, I hoped this
was a precursor of things to come, and they did not disappoint.
Announced in October of 2006, the kit arrived in my hands on the weekend of New Years 2007. Housed in the typical sturdy Hasegawa box with the new computer enhanced box art of “Flak Bait” on the cover, my first impressions upon opening it was, “wow, look at all the parts.” Closer inspection revealed cockpit sidewall detail (something sadly lacking in the B-25 kits), full bomb bay with open or closed doors, and a tail gun position with separate seat, gun mount and armor plate. The armor plate is molded in clear plastic to replicate the bulletproof glass in front of the gunner. The waist guns can be posed open or closed, with hatches molded in clear plastic and two different gun mounts. The landing gear bays were multiple-part affairs that added a lot of realistic depth, with the gear legs and gear doors being clean yet detailed.
| CONSTRUCTION |
It was at this point that I started to think where the nose weight would go. Looking at pictures of B-26s at the end of the war showed them sitting on their tails with no engines. That was it! I would put the weight in the engine nacelles. The radio operators compartment was forward of the main gear, and since there were only two small windows that you could barely see through, this was the perfect place for more weight. What I use for nose weight is shotgun pellets. Why you may ask? Because they have a greater density of weight than fishing line sinkers.
Using sheet plastic I made half
round bulkheads to glue into the nacelle halves. Next, I sealed them with CA so
the 30-minute epoxy holding the lead shot would not leak out. A small box was
created from sheet plastic and glued to the floor of the radio operators
compartment directly behind the cockpit bulkhead. After sealing it with CA, I
added the weight. The process I use is to put some lead shot into the weight
box, then drip epoxy off of a stir stick on top of the lead shot, slowly adding
more weight, then
 glue, then more weight until the space is filled. Let this dry
overnight. Remember as you build the model it will become rather heavy! But it
will sit on its gear when you are finished. At this stage I decided I also
wanted to open the crew door in the cockpit floor. After cutting it out and
squaring up the opening with a flat file, I made a new door from sheet plastic.
glue, then more weight until the space is filled. Let this dry
overnight. Remember as you build the model it will become rather heavy! But it
will sit on its gear when you are finished. At this stage I decided I also
wanted to open the crew door in the cockpit floor. After cutting it out and
squaring up the opening with a flat file, I made a new door from sheet plastic.
Research has shown that the entire interior of a B-26 is aluminum, including the landing gear bays. The exceptions will be the cockpit and the tail gunners compartment. These areas are painted Bronze Green with the cockpit floor and seats being painted Flat Black. I used MM Non-Buffing Aluminum, Humbrol Bronze Green and Testors for the Flat Black. I used MM Panzer Buff to paint seat belts made out of lead foil. After cutting photo-etched buckles from a True Details seat belt set, I painted them Testors Steel, along with the bomb racks and bay door hinges. The bombs themselves were painted MM Olive Drab ANA 613. The bay doors are painted Neutral Gray inside and out. The scratch built crew door has one side black the other Aluminum. Most of the assembly went pretty straightforward. I found that by beveling the edges of the bulkheads that make up the bomb bay, cockpit and tail gunners compartments, the fuselage halves will close up easier and make for a tighter seam.
Fit the nacelles to the wings first. This will be necessary because the fit of the forward part of the nacelles to the wings is not very good, and will require filler. I used CA and accelerator sanding in between fillings until the wings and the nacelles fit smoothly. I suggest re-scribing the panel lines before you attach the wings to the fuselage. Hasegawa has cleverly molded the tail planes in clear plastic for the two windows above the tail gunner. The way this fits to the top of the fuselage is not very good, and will require some time with filler and sanding. The rudder, however, fits well and needs very little in the way of filler.
Now you should have several large
sub-assemblies sitting on your bench. The fuselage, with the rudder and tail
planes attached, and both wings. Fitting the wings to the fuselage takes a
little care. I used 5 minute epoxy to attach the wings to the spar, and Slow Dry
CA for the wing to fuselage glue seam. Once I had it lined up, a quick touch of
accelerator on the wing seam and it was on. Let this dry overnight so the epoxy
will dry hard. Some light sanding and a quick re-scribe of the wing panel lines,
 and you should have what resembles a B-26 in your hands! Just be careful how
nose heavy it is!
and you should have what resembles a B-26 in your hands! Just be careful how
nose heavy it is!
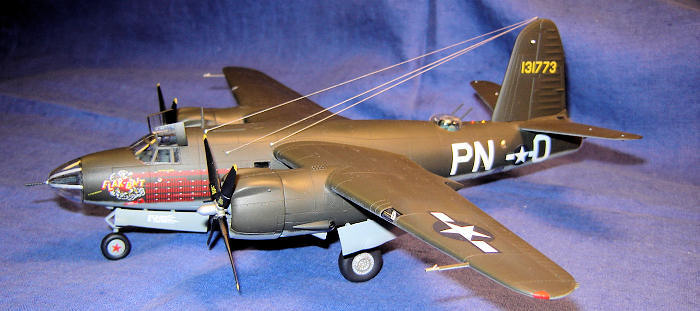
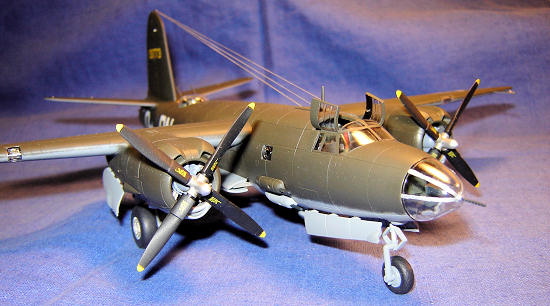
At this time I painted all the smaller details. The engines received Testors Steel with Testors Flat Gray crankcases. The main ignition harnesses were made from soft wire and bent to conform around the base of the crankcase. Sheet plastic was used to box in the undersides of the carburetor air ducts for the cowlings. Then the insides were painted MM Non-Buffing Aluminum. At this point the engines were attached and the cowls placed over them. The landing gear were painted MM Neutral Gray with Testors Chrome Silver to represent the oleos. After the paint had dried, they were attached with CA and accelerator. I would like to mention that the kit's main wheels are correct for the variants that the kit represents. If you want to use True Details resin wheels, be aware these are only correct for As and early Bs. Also, the front wheel with the visible spokes is for the F/G variants. I painted the tires with MM Cockpit Black with some Flat Gray mixed in to make the color less “black” and a little more to scale. The back side of the main wheel hubs were painted Testors Steel, and the outer edge of the rim and the front side were painted Testors Flat Aluminum. The back side of the nose wheel and the front hub were painted MM Neutral Gray. I suggest using 5 minute epoxy for mounting the wheels to the struts, since the weight of the model will require a more secure attaching point then regular glue will provide.
| COLORS & MARKINGS |
Now
for the fun part. Painting! Using facial tissue to stuff all the openings I did
not want to get paint into, I was ready to go. At this point the waist gunners
windows were glued in place with white glue and the windows masked off with
Micro Mask. A quick coat of Non-Buffing Aluminum was sprayed over
the hatches. Using MM Neutral Gray
for the lower color, I was able to rough in the bottom of the plane quickly. Now
for the top color. For this I reached into the bottom of my paint drawer and
pulled a jar of Pactra ( yes you read right) Dark Olive Drab. It was a bit thick
but thinned out nicely with MM Airbrush Thinner, and sprayed just fine from my
Badger 350. Last but not least were the props. These have to be the nicest
Curtiss Electrics I have seen in this scale yet. Blades were painted Testors
Flat Black with Testors Flat Yellow at the tips. The center of the prop was
painted Testors Steel and the hub
Non-Buffing Aluminum.
yes you read right) Dark Olive Drab. It was a bit thick
but thinned out nicely with MM Airbrush Thinner, and sprayed just fine from my
Badger 350. Last but not least were the props. These have to be the nicest
Curtiss Electrics I have seen in this scale yet. Blades were painted Testors
Flat Black with Testors Flat Yellow at the tips. The center of the prop was
painted Testors Steel and the hub
Non-Buffing Aluminum.
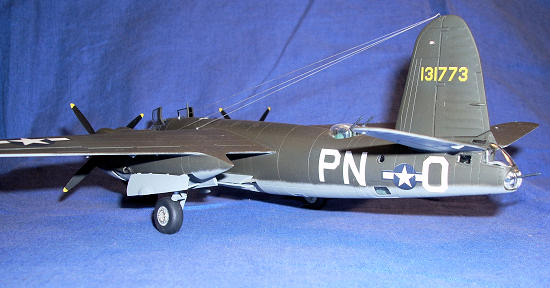
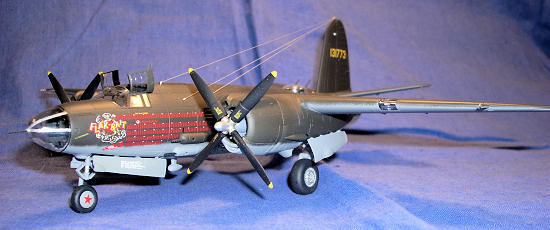
To me this is where a model starts to come alive. Putting the markings on! After a nice coat of Testors Gloss the model is ready for decals. The kit offers three markings options and I opted to do “Flak Bait”. Over the course of several evenings I was able to put on all the necessary markings. One word of caution though: The directions show you to put a stencil on the right nose gear door. This is incorrect! It should be on the left door, so when the door is opened it is on the same side as the nose art. I took a Russian red star and cut out a smaller star from the center for the front hub. I have a clear color photo of “Flak Bait” showing this red star on the front wheel. I had no problems getting the decals to go on and just the use of Micro-Sol worked great. Once the decals had dried I took a piece of damp soft foam and removed all the glue residue from the surface of the model. Another coat of Clear Gloss and I put it aside to dry.
| FINAL BITS |
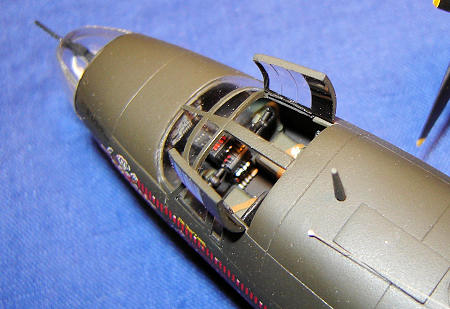
The kit comes with two canopies
(the second canopy is for the F/G version). I wanted to open up the top hatches,
so after looking at some good photos for reference, I used my small
battery-powered Craftsman (Dremel) motor tool to cut out the openings on the
canopy. Next I cleaned up the edges with a flat file and cut up the other canopy
with a razor saw, saving the top hatches. Once again, I cleaned them up with a
flat file. First I masked them off with Micro Mask. To represent the black
interior framing I used Testors Flat Black. Pactra Dark Olive Drab was then used
over that for the exterior. Now that the Clear Gloss was dry it was time for a
final finish with Dull Coat. The last details include all the radio leads from
the tail to the radio operators compartment. The canopy top hatches where glued
to the main canopy by thin lead foil “hinges”, and then the canopy was
 attached
to the plane with white glue. MV lenses were put in for the landing lights in
the leading edges of the wings, with the glass included in the kit fitting over
the top. All the small windows fit well with just a small amount of white glue.
A quick tip: I paint all the edges of the windows the same color as the area
surrounding the glass on the airplane. This eliminates the white frosted edge
that you see. The formation lights on the fuselage by the tail are also MV
lenses that are clear and tinted with Tamiya Clear colors. I did not paint the
frame work on the top turret. Research shows that the framing was pieces of plexiglass that were screwed to the bubble, not metal framing.
attached
to the plane with white glue. MV lenses were put in for the landing lights in
the leading edges of the wings, with the glass included in the kit fitting over
the top. All the small windows fit well with just a small amount of white glue.
A quick tip: I paint all the edges of the windows the same color as the area
surrounding the glass on the airplane. This eliminates the white frosted edge
that you see. The formation lights on the fuselage by the tail are also MV
lenses that are clear and tinted with Tamiya Clear colors. I did not paint the
frame work on the top turret. Research shows that the framing was pieces of plexiglass that were screwed to the bubble, not metal framing.
The gear and bomb bay doors are a bit tricky to get on, but be careful and you should have no problems. At this time I added the crew door to the cockpit floor. The hinge point is on the right side of the opening in the floor and hangs towards the ground. Now you look right through the top of the canopy out the bottom to the ground. Just like the real thing! The kit includes a crew ladder that fits beautifully if you position it according to the instruction sheet. Since I opened up the crew door, I was unable to come up with a way to mount the ladder to the plane so it hung down without breaking off every time I set it on its wheels.
Other minor details that I added were drilling out all the gun barrels and I adding brake lines made from stretched sprue to the main gear. Whew! At this point I was done! And with that I now have a B-26 in my collection. Now if I can just finish my B-25H.............
| CONCLUSIONS |
 I enjoyed building this kit. The
many years I have waited for an accurate kit of the B-26 has finally paid off.
The near $50.00 price tag may keep some people from purchasing this model, but
they would be missing out on the chance to have a very clean and accurate
Marauder to add to their collection. In the near future, after-market companies
will come out with update and or enhanced detail sets for this kit. I found that
a few simple scratch built items and some extra time was all this model needed.
I have about 100 hours into this project. I know this sounds like a lot, but
consider that the first 10 to 12 hours were just fitting the main parts together
with masking tape so I could figure out where the nose weight would go. Also I
spend a good amount of time researching my projects before and during the
building process, and the extra details I add contribute to the build time. Not
everyone should feel the need to spend this much time to complete this kit. It
will take patience and some careful fitting, but it should not be too much of a
challenge for any builder with some basic modeling experience.
I enjoyed building this kit. The
many years I have waited for an accurate kit of the B-26 has finally paid off.
The near $50.00 price tag may keep some people from purchasing this model, but
they would be missing out on the chance to have a very clean and accurate
Marauder to add to their collection. In the near future, after-market companies
will come out with update and or enhanced detail sets for this kit. I found that
a few simple scratch built items and some extra time was all this model needed.
I have about 100 hours into this project. I know this sounds like a lot, but
consider that the first 10 to 12 hours were just fitting the main parts together
with masking tape so I could figure out where the nose weight would go. Also I
spend a good amount of time researching my projects before and during the
building process, and the extra details I add contribute to the build time. Not
everyone should feel the need to spend this much time to complete this kit. It
will take patience and some careful fitting, but it should not be too much of a
challenge for any builder with some basic modeling experience.
| REFERENCES |
B-26 Marauder at War by Roger A.Freeman
The Ninth Air Force in Colour by Roger A.Freeman
Warbird Tech Series “Martin B-26 Marauder” by Frederick A.Johnsen
FAOW no.126 B-26 Marauder
Squadron Signal B-26 Marauder in action by Steve Birdsall
Camouflage&Markings no.14 “Martin B-26 Marauder” by Roger A.Freeman
Wings April 1973 “Magruder’s Marauder pt.1” by Walter J.Boyne
Airpower May 1973 “Magruder’s Marauder pt.2” by Walter J.Boyne
June 2008
If you would like your product reviewed fairly and fairly quickly, please contact the editor or see other details in the Note to Contributors.