Minicraft 1/144 VC-54C 'Sacred Cow'
| KIT: | Minicraft 1/144 VC-54C 'Sacred Cow' |
| KIT #: | 14497 |
| PRICE: | $27.00 MSRP |
| DECALS: | One option |
| REVIEWER: | John Kauck |
| NOTES: |
| HISTORY |
Shortly after FDR’s 1943 trip to meet Churchill in Casablanca, Morocco aboard mostly commercial planes transferred to the military for the trip, the need for a specifically assigned military aircraft dedicated solely to presidential transport was recognized. Subsequently, the Army Air Force worked secretly with Douglas Aircraft Company to develop the VC-54C, adapted from the DC-4 Skymaster, with secure communications equipment and an elevator discretely incorporated into the fuselage to accommodate FDR’s wheelchair, required due to his polio.
Dubbed the “Sacred Cow” for its distinguished purpose, it carried President Roosevelt to the USSR for the Yalta Conference in February 1945 just prior to his death. The plane was subsequently used by President Truman until 1947 after which it served as a VIP transport. Also, in July of that year, in a special ceremony on board, President Truman signed the National Security Act of 1947 creating the United States Air Force as a separate military service branch, rendering the Sacred Cow the birthplace of the U.S. Air Force.
Specifications:
Length: 93 ft. 5 in.
Wingspan: 117 ft. 6 in.
Tail Height: 27 ft 7 in
Engines: Four Pratt and Whitney R-2000 engines @ 1,450 hp each
Takeoff Weight: 80,000 lbs Loaded
Normal Range: 3,900 miles
Ceiling: 30,000 ft
Speed: Cruising: 245 mph Max: 300 mph
| THE KIT |
Overall, I like Minicraft kits. The parts generally have minimal flash and fit well together. The kits are generally good, albeit simple, renditions of their subject aircraft, with no interiors.
I also
like the fact that Minicraft 1/144 cabin windows are usually represented with
black decals rather than molded in. It’s just easier sliding decals than
dealing with all those clear parts and masking, etc. But I find it curious that
the cockpit windows on  Minicraft
kits are usually molded clear, as they are on this kit. However, this kit
provides a black cockpit window decal to enable the modeler to black out the
cockpit windows as well, which I did.
Minicraft
kits are usually molded clear, as they are on this kit. However, this kit
provides a black cockpit window decal to enable the modeler to black out the
cockpit windows as well, which I did.
The instructions are thorough – four pages containing nine diagrams, noting when and when not to glue, and indicating right next to the drawing what colors small parts or assemblies should be painted. The fifth page on the back has a very good painting/decal diagram for both sides, the top, and bottom of the aircraft. There’s also a diagram of the parts sprues.
It’s best to always check references for proper markings as painting/decal diagrams may have minor inaccuracies, though I didn’t find any on this one. (But I did find that the front landing gear placement is wrong and the elevator door is on the wrong side.)
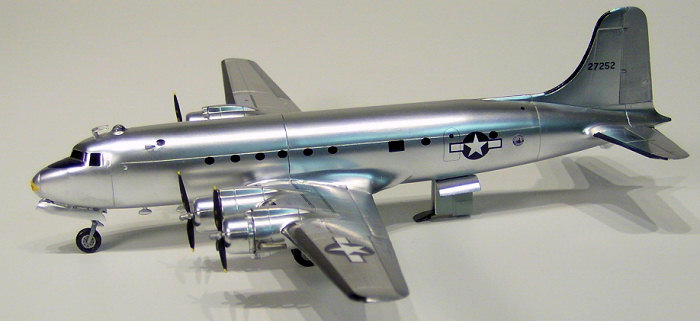
The kit has four silver plastic parts sprues and one clear parts sprue with the cockpit windshield/roof, navigator’s observation bubble, and tail light. One plastic sprue contains the left fuselage half and upper wing halves. The second contains the opposite parts. The third and fourth contain all the other smaller parts to construct the engines, landing gear, gear doors, and elevator, etc. Again, some had minor flash to be lightly sanded, but nothing out of the ordinary.
| CONSTRUCTION |
After first gluing a good size fishing weight into the nose cavity so the finished plane will sit properly on its tri-landing gear, the two fuselage halves fit together very well and were clamped then bonded with a few touches of Zap CA super thin glue, letting capillary action draw it into the seams.
Unlike the instructions, I preferred to complete the entire fuselage first, so the clear cockpit window/roof section was attached next with thick super glue, and then sanded after first covering the windshield frame lines with masking tape to preserve the scribed surface detail.
Note:
this plane has a bare metal exterior which means a silver or metallic paint
finish. These finishes reveal any imperfections which are even more noticeable
at small scales like 1/144. I use Flex.i.File sanding sticks, working down to
and including the #3210 Polisher/Finisher to a very smooth finish. I then draw
a Metallic Silver Sharpie marker along the seams to reveal any tiny
 gaps requiring extra
attention with super glue and more sanding.
gaps requiring extra
attention with super glue and more sanding.
After cleaning up all the seams, I re-scribed any sanded down panel lines across the top and bottom of the fuselage with my #11 blade.
On the wings, I again deviated from the instructions slightly. After dry-fitting to check the fit, I decided to put the front wing bottom on the fuselage first. Then I attached the upper wing halves to the bottom of the wing and to the plane where I used thick super glue to attach them and fill the minor gap at the same time which I subsequently sanded smooth. The rear wings were molded as single pieces and required only very light sanding around the edges and were attached with a few drops of thick super glue.
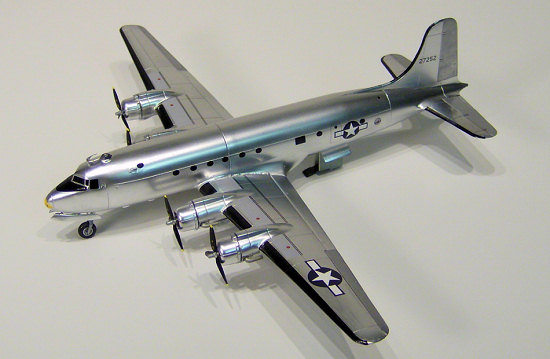
Next, I cut and cleaned up all the engine parts and propellers. At this point I attached the piston pieces inside the cowlings only, but not the exhausts. Then I dry fit all the engines, exhausts, and propellers to each other and to the aircraft. When assured every thing would fit together properly, I attached the cowling/piston assemblies to the wings (see note below), but left the exhausts and propellers off for painting separately and attachment later.
Note: On this kit, the engines are specific to each side of the plane with the exhausts on the outermost sides, so make sure to attach them in the correct way (exhausts out) on each wing.
Next, I cut and cleaned the landing gear pieces, tire/hubs, and gear doors. Then I dry fit them to each other and to the aircraft. When assured everything would fit together properly, I left these pieces off the aircraft and wings for painting separately and attachment later.
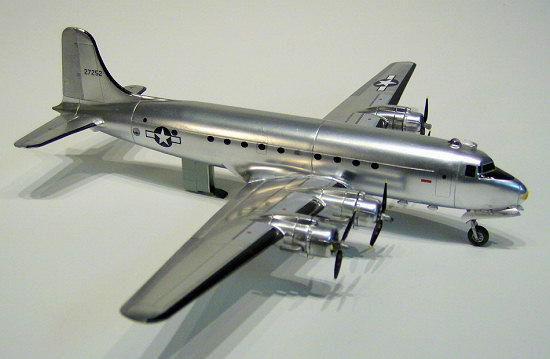
 Having decided to model the
plane with the optional wheelchair elevator down, I cut and cleaned the elevator
parts, including part #34, the open fuselage door, leaving #35, the closed door,
on the sprue for the spares box. Again, after dry-fitting to ensure proper fit,
I left these pieces apart and off the aircraft for painting, assembly, and
attachment later. (NOTE: My reference photos showed the elevator door on the
opposite side, but I discovered it too late and decided to leave it as
delivered. You may want to do some minor surgery and move it to the other
side.)
Having decided to model the
plane with the optional wheelchair elevator down, I cut and cleaned the elevator
parts, including part #34, the open fuselage door, leaving #35, the closed door,
on the sprue for the spares box. Again, after dry-fitting to ensure proper fit,
I left these pieces apart and off the aircraft for painting, assembly, and
attachment later. (NOTE: My reference photos showed the elevator door on the
opposite side, but I discovered it too late and decided to leave it as
delivered. You may want to do some minor surgery and move it to the other
side.)
The kit also provides wheel chocks, but I didn’t use them. If you do, they should be painted yellow and receive the “Sacred Cow” decals on the front.
Detailing:
My references showed two “bulbous” antennae (I’m sure there’s a proper technical name for them) on the underside of the front fuselage and I just happen to have some in the spares box from a DC-6 kit. So those went on in the appropriate positions.
| COLORS & MARKINGS |
For the
bare metal finish I decided to use the Alclad ll metal painting system. For
those not familiar, the Alclad system consists of a black primer coat, which
dries as hard and smooth as glass, over which the metallic carrier coats are
sprayed. While the primer requires at least 24 hours to cure, the subsequent
metallic carrier coat(s) dries within a half hour and then may be masked and
 painted over if needed.
I made a makeshift handle out of a coat hanger by cutting it on each side of the hook, then twisting masking tape around each of the three “prongs” and bending them to fit into each of the three landing gear openings. This allowed me to prime, paint and hang to dry without ever having to touch or set the plane down. I then Alclad primed the entire plane and the separate landing gear, exhausts, antennae, and fuselage elevator door.
While the Alclad primer dried, I used Testors enamel #1145 Gloss White and Model Master enamel FS#16473 Aircraft Gray on the elevator, and #1149 Flat Black on the elevator ramp and back.
With the primer fully cured, I used Alclad #105 Polished Aluminum on the entire plane, gear doors, and fuselage elevator door. I used #119 Airframe Aluminum on the landing gear, and #112 Steal on the exhausts.
Once the plane was dry, I used enamels on the rest of the parts: Testors #1146 Silver on the control surfaces, and #1149 Flat Black on the tires and the propellers.
| FINAL CONSTRUCTION |
First, I attached the four engine exhausts to the engines. Next I attached the landing gear, struts, and gear doors. Note: the front landing gear is shown incorrectly in the instructions; it should be reversed with the main gear strut, #27 in the back hole, and the support strut, #28, in the front hole.
Precise placement of these often tiny parts without unsightly gobs of glue is always difficult at the 1/144 and smaller scales. For this reason I find the use of a “third hand” indispensable. Available at most hobby shops and on-line, it is a small stand with a heavy iron base and one or more ball joint mounted arms with alligator-type spring clamps to hold a part in any angle required. I use them in combination with plastic hemostats (i.e., scissor clamps,) so as not to scratch the part, to position and then hold these small parts in place while the super glue dries, as using super glue accelerant may mare the finish and maybe even dissolve surrounding paint.
Next, I assembled and attached the elevator and attached the fuselage elevator door. Then I attached the horseshoe antennae, again with the aid of the third hand.
Finally I attached the clear navigator’s observation bubble with white glue after painting the circle it sits on black, so that when the white glue dried the bubble would have a black “look” to match the rest of the windows rendered in black decal.
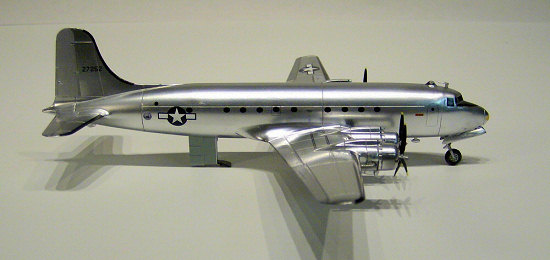
 For decals, I started with the
black “ice boot” decals on the leading edges of the wings and tail fin. They
were not thick enough on the main wing in that they don’t wrap all the way
around from panel line to panel line on the top and bottom of the wings. My
references also showed that they extended further in some spots, and were
shorter elsewhere. I made all the required adjustments with some black stripe
decals and black stock decal or a #11 blade as necessary. But, if you don’t, it
won’t be the end of the world; the provided decals will look ok.
For decals, I started with the
black “ice boot” decals on the leading edges of the wings and tail fin. They
were not thick enough on the main wing in that they don’t wrap all the way
around from panel line to panel line on the top and bottom of the wings. My
references also showed that they extended further in some spots, and were
shorter elsewhere. I made all the required adjustments with some black stripe
decals and black stock decal or a #11 blade as necessary. But, if you don’t, it
won’t be the end of the world; the provided decals will look ok.
On the tail - same situation - I had to supplement with black stripe decal. I also had to use a lot of red Micro Sol setting solution to get the decals to conform to the tail fin properly.
Next, I did the wing walk decals, just behind the engines on each wing. Then the nose decals went on. Then I placed the cockpit window decals within their frames scribed in the model.
As mentioned, the kit provided black decals for the windows, and these window decals are connected by clear carrier film. But similar to minor gaps and scratches, the carrier film is rather unsightly and sticks out on the bare metal finish at this small scale.
To get around this problem, I made actual size (1/1) copies of the decal sheet to use as decal placement templates. On each side, I first cut out the copy of the entire side decal from my 1/1 decal copy and taped it above the fuselage to the tail at one end and at the bottom to the fuselage at the other. With a new sharp #11 blade, I then carefully trimmed away the clear carrier film from around each individual window decal before floating and then placed each window individually on the metal finish fuselage using my copy above as a guide for the exact location of each window and insignia. This yields an great looking result.
Next, I trimmed as much clear carrier from around the tail numbers as possible and placed them. And finally, I placed each of the insignias on the top and bottom of the wings as instructed.
I finished with the propellers, first coating them in Future, and then placing the center decals and tip decals. The tip decals took a lot of red Micro Sol to get the front and back decals to join together and nestle down. I then hit them with Testors Dullcoat from a can.
After letting the decals dry over night I gave the entire model a coat of Future to give it a gloss finish. I then set in the propellers.
| REFERENCES |
· Planes of the Presidents: An Illustrated History of Air Force One; Bill Holder; Schiffer Military History Books, Atglen, PA, 2000
· Air Classics Magazine, April 1973, Volume 9, Number 4
· Various web sites for reference photos, generated by search engine entries on the plane’s military designation, callsign, and/or nick name, i.e., “VC-54C” and/or “Sacred Cow” into Google Images and scroll through the results and you’ll get at plenty of good photos from many angles. Save the photos (right click on them and click “save photo as”) to your hard drive, then just zoom in on the area you want.
| CONCLUSIONS |
FYI, this was the second kit in a little theme build I’ve done of the history of presidential aircraft, of a total of eight planes and one helicopter. (See my other reviews of Presidential/VIP Aircraft.)
I enjoyed the kit. It’s a fairy easy kit to build, without windows or any interior. Beginners and intermediate (me) modelers will be challenged to get a flawlessly smooth bare metal finish. (I wasn’t entirely successful!) It should be a fun build for the expert modeler. And the historical subject, with the elevator, makes it interesting.
December 2007
If you would like your product reviewed fairly and quickly, please contact me or see other details in the Note to Contributors.