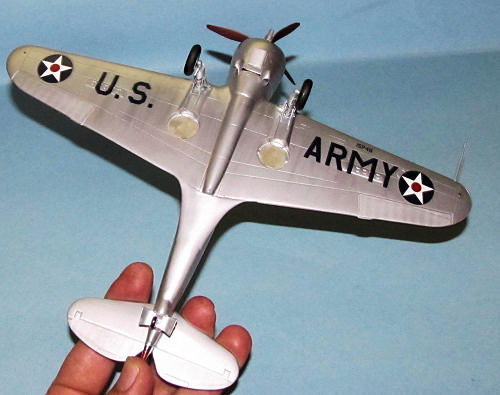
Hobbycraft 1/48 Hawk 75A "Blitz Hawk"
| KIT #: | HC1415 |
| PRICE: | $29.95 SRP |
| DECALS: | Ten options |
| REVIEWER: | Dan Lee |
| NOTES: | Legends P-36A cockpit |
| HISTORY |
The P-36 Hawk (or Mohawk in British Service)
was originally the Curtis Model 75, Curtis’s entry into a 1935 USAAC fighter
competition. It flew against the
Seversky P-35 which was selected as the winner.
Later, the P-36 was ordered as well as the USAAC had doubts about
Seversky’s ability to produce enough fighters.
The P-36A used by the USAAC was equipped with
one .30 and one 50 caliber machine guns synchronized to fire through the prop
arc while later versions had different armament configurations up to and
including two .50 calibers firing through the prop and
four .30 calibers mounted in the wings.
 By the time WW2 began, the P-36 Hawk was
already considered obsolete due to the rapid advancements in aerodynamics and
engine technology. However, it was
purchased in large quantities by the French to compliment their slowly produced
domestic fighters. The Hawks
acquitted themselves well in air combat during the “Phony” War and then the
German invasion of May 1940 but most if not all the Hawk equipped squadrons fled
to North Africa just before the German/French Armistice to escape capture.
Later the French Hawks fought against US Navy fighters till the French
North African leadership ceased all combat operations against the Allies.
It was one of the few fighters that was flown by both sides during the
conflict as
By the time WW2 began, the P-36 Hawk was
already considered obsolete due to the rapid advancements in aerodynamics and
engine technology. However, it was
purchased in large quantities by the French to compliment their slowly produced
domestic fighters. The Hawks
acquitted themselves well in air combat during the “Phony” War and then the
German invasion of May 1940 but most if not all the Hawk equipped squadrons fled
to North Africa just before the German/French Armistice to escape capture.
Later the French Hawks fought against US Navy fighters till the French
North African leadership ceased all combat operations against the Allies.
It was one of the few fighters that was flown by both sides during the
conflict as
On 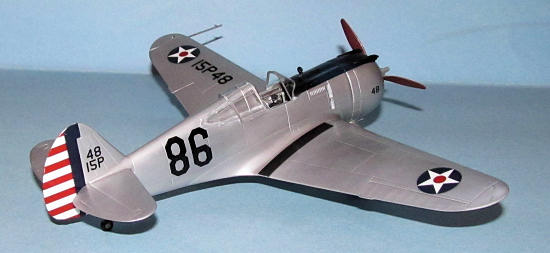 apanese forces.
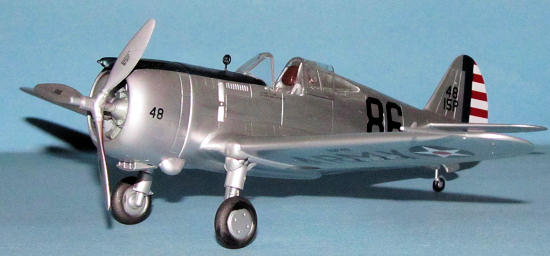
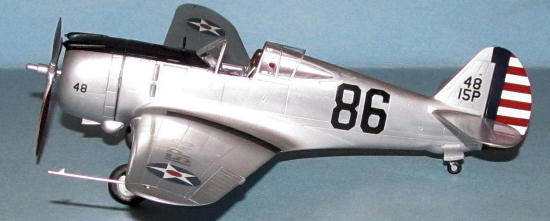
Among those startled out of a sound sleep was
Lt Phil Rassmussen of the 15th Pursuit Group based at Wheeler Airfield.
During the brief lull between the first and second waves, he strapped his
service pistol over his pajamas and ran out to find an undamaged fighter to jump
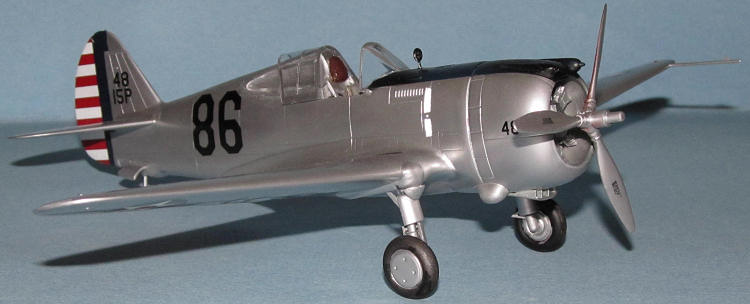
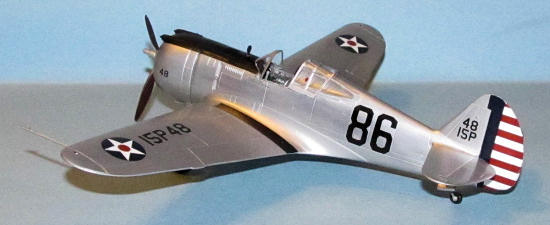
into. Number 86 was the first plane
he found so he strapped in and took off to defend
| THE KIT |
See Scott’s excellent preview of the Hobbycraft kit.
One of the weak points is the cockpit.
I bought the Legends P-36A cockpit to improve the detail.
It did do that, but it had its own problems as described later on in this
review.
| CONSTRUCTION |
It all began with the cockpit.
As mentioned earlier the HC provided cockpit is rather weak so I had
purchased a Legend P-36 cockpit.
The parts were washed and then sprayed TS-30 Old Silver because the early USAAC
P-36s had aluminum lacquer color in the interior instead of the more familiar
interior green.
The Legend cockpit detail is much better than
the simple cockpit that HC provides, but I had a rather difficult time with it.
It fit into the cockpit with no issues, but then I tried to install the
instrument panel with rudder pedals and it didn’t fit.
Why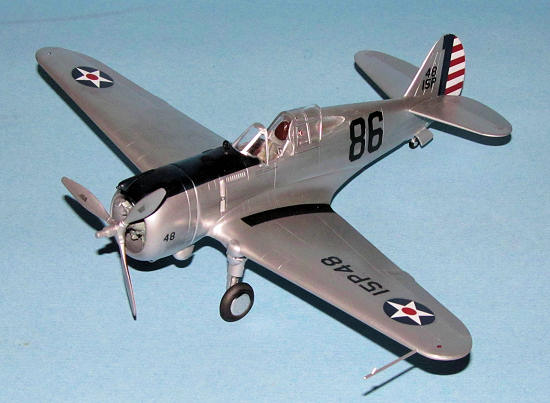 ? The instrument panel is
too big for the cockpit. Being a
stubborn sort, I kept trying to find ways to jam that instrument panel in with
the rudder pedals. None of them
worked except my solution to cut the pedals off.
? The instrument panel is
too big for the cockpit. Being a
stubborn sort, I kept trying to find ways to jam that instrument panel in with
the rudder pedals. None of them
worked except my solution to cut the pedals off.
Otherwise the assembly of the fuselage went
okay. It was at this point when I
realized that doing a foil covered plane was not a good idea for me and stopped
because I had a near impossible task trying to get the foil to not crease on a
curve.
I resumed building the plane after it sat on
the Shelf of Doom for six months.
The wing assembly proved to be a pain in the butt for me.
When I slapped the wing onto the fuselage I found there were some large
gaps that needed to be dealt with.
Lots of sanding and filling everywhere the wing and fuselage met.
I used Mr Surfacer 500 first then filled in the rest of CA glue.
I sanded it as smooth as I could but it took several attempts to get
every smooth enough for an NMF.
The engine was easily assembled and the cowling
was glued together. After the
engine was painted metallic grey and grey I then added the engine to the
fuselage and the cowling over the engine, Several other detail parts were added
before painting. At that time, I
thought the engine was a little deep but I didn’t think it would be a problem.
Previously, I had cut out the gun chutes on the wings. I did not know at the time the P-36A had only two guns in the cowling and none in the wings. Chastened, I filled and sanded (and sanded and sanded) in the gun ports I had cut out.
| COLORS & MARKINGS |
Paint
Originally I wanted to build this model as a
tribute of long trashed models of my childhood so I decided to do the markings
of Philip Rassmussen’s 86. As
mentioned earlier in the review my initial plan was to cover it with foil to get
that polished look without the headaches of using NMF techniques did not go
well.
 It turns out that I was building even more
frustrating models so I decided to go back to the P-36A.
I cleaned off all the foil glue residue, assembled it and prepped the
model for painting NMF.
It turns out that I was building even more
frustrating models so I decided to go back to the P-36A.
I cleaned off all the foil glue residue, assembled it and prepped the
model for painting NMF.
I first sprayed on Tamiya Fine Primer and
discovered that I did miss a few spots with my sanding.
Grrrr. It took several tries
to get the surface smooth done to my satisfaction as the silver paint
highlighted flaws in my sanding. I
then sprayed on a couple of coats of TS-30 Old Silver.
Once dry I began to polish the surface to make it smooth using sanding
cloths. During a polishing session
the top left wing seam broke off which I had to repair and only added to my
frustration.
After a week of frustrating work and headaches,
I finally got the paint smooth enough for my satisfaction.
Next I polished the surface using Hawkeye/SNJ Metal polishing powder.
The excess dust was wiped off with a damp rag before I masked off and
sprayed on the flat black antiglare panel.
I did a little bit of internet “research” to
confirm the color scheme for 86 because the color profiles I had seen showed no
red band around the cowling but the Hobbycraft Box did.
Despite my love of red planes, I decided against this and trusted the
color profiles to be correct.
The polished silver prop, main wheels and other
bits including the canopy (which was masked off using Tamiya tape) were painted
at the same time. Afterwards the
rear side of the props were given a coat of anti glare paint (Tamiya Hull Red)
while the wheels were masked off using Tamiya tape and painted flat black.
 Lastly I masked off the rest of the plane
except the fabric moving surfaces of the wing and stabs and then sprayed on
AS-12 from the can to emulate the silver doped fabric.
Unfortunately the pictures do not capture the subtle difference in tone
but it is there.
Lastly I masked off the rest of the plane
except the fabric moving surfaces of the wing and stabs and then sprayed on
AS-12 from the can to emulate the silver doped fabric.
Unfortunately the pictures do not capture the subtle difference in tone
but it is there.
Decals
These are the newer HC decals so they went on
without too much trouble and some MicroSet.
I should be thankful these didn’t have too many stencils as the decal
placement guide was almost nonexistent.
I didn’t need to provide a gloss coat as the paint was super smooth--it
had better be considering the amount of work and sweat and cursing that went
into it!
I did trim a little bit of the tail decals and
used Solvaset for the more stubborn ones, but no other issues.
Weathering and Final Coat
I refrained from weathering at all.
From what I understand, the planes were maintained very well and kept in
very good condition.
| FINAL CONSTRUCTION |
 The landing gear was installed, but I was
easily confused by what was provided.
Based on walk around photos of the USAF’s P-36, I used the cut down
louvers and had to cut part of them off so they would attach to the landing gear
as they interfered with the oleo struts!
The HC instructions say “?” which summed up my feelings on the situation.
The landing gear was installed, but I was
easily confused by what was provided.
Based on walk around photos of the USAF’s P-36, I used the cut down
louvers and had to cut part of them off so they would attach to the landing gear
as they interfered with the oleo struts!
The HC instructions say “?” which summed up my feelings on the situation.
I also discovered that the Hawk’s engine is too
deep in the cowling or I screwed up somewhere because the prop shaft was too
short and could not sit in the engine.
I had to trim off the spare prop hub, glue it into the mounting hole and
then CA glue the prop. As a general
rule I like to leave my props free to spin so this was kind of disappointing but
it fit the childhood memory narrative because I ended up gluing the prop in
place on the
The rest of the parts went on the plane okay except for the gunsights. They turned out to be more of a pain than I imagined they would have been.
| CONCLUSIONS |
 Despite some issues with the cockpit and the
engine mounting plus some self inflicted ones like ham handedness, I am happy
with my trip back in time to build the model to the quality my nine year old
self imagined he could build but couldn’t due to lack of skills and most
importantly, patience.
Despite some issues with the cockpit and the
engine mounting plus some self inflicted ones like ham handedness, I am happy
with my trip back in time to build the model to the quality my nine year old
self imagined he could build but couldn’t due to lack of skills and most
importantly, patience.
The HC Hawks are decent kits with some issues like weak cockpit detail and vague/confusing instructions, but with some work will turn out fine in the hands of the average modeler. I strongly suggest that you do some research to find out what options you need and what you should discard.
October 2011
If you would like your product reviewed fairly and fairly quickly , please contact me or see other details in the Note to Contributors.