
Ace 1/72 P-47D Thunderbolt
| KIT #: | 500 |
| PRICE: | AUD $4.00 |
| DECALS: | Three options |
| REVIEWER: | George Oh |
| NOTES: | 35 parts. A lesser-detailed knock-off of a Hasegawa kit. |
| HISTORY |
There have been many excellent briefs on the development and combat record of the P.47 Thunderbolt in its razorback and bubble canopy formats. As I cannot add anything new, I will not try. Except to say that the P.47D Thunderbolt looks like a brute of an aircraft (to me) and that it proves the old adage that, if you give a brick enough propulsion, it too, will fly.
| THE KIT |
 I bought this
kit because it was cheap. And while
the plastic is a bubbletop, the boxart, and one instruction panel, shows a
razorback. The plastic comes in two
sprues holding the 34 pale grey parts.
The details are very finely engraved, though the parts are marred by some
flash, mould-slippage and knock-out pin scars.
The propeller is moulded with a step along the length of each blade and
each undercarriage door is moulded as one piece that has to be cut apart - a pet
hate of mine.
I bought this
kit because it was cheap. And while
the plastic is a bubbletop, the boxart, and one instruction panel, shows a
razorback. The plastic comes in two
sprues holding the 34 pale grey parts.
The details are very finely engraved, though the parts are marred by some
flash, mould-slippage and knock-out pin scars.
The propeller is moulded with a step along the length of each blade and
each undercarriage door is moulded as one piece that has to be cut apart - a pet
hate of mine.
| CONSTRUCTION |
 I started
this model when I mustered the components for my big idea and washed the kit
parts prior to painting the insides.
I was working on the cockpit, the wings and the engine all at the same
time. In the cockpit, the pilot’s
throne was butchered to make it look more utilitarian, and some detailing lumps
were thrown against the plain smooth walls.
I used the IP plate & decal, and added a stick & gunsight for the pilot.
The wings required internal strips of
plastic card and careful gluing together to bring the undersurfaces level with
the moulded-in trailing edge.
I started
this model when I mustered the components for my big idea and washed the kit
parts prior to painting the insides.
I was working on the cockpit, the wings and the engine all at the same
time. In the cockpit, the pilot’s
throne was butchered to make it look more utilitarian, and some detailing lumps
were thrown against the plain smooth walls.
I used the IP plate & decal, and added a stick & gunsight for the pilot.
The wings required internal strips of
plastic card and careful gluing together to bring the undersurfaces level with
the moulded-in trailing edge.
Before being mated to the fuselage sides, a portion of the upper wing-half’s mating surface had to be removed. To leave it would create an obstructing fence across the wheel well. As well, the upper wing/fuselage join required plastic card as a heavy-duty filler, followed by putty, then Mr Surfacer. Do you know how hard it is to fill the roof of a wheel well? Well, I do!! Fortunately, the rest of the airframe behaved itself, requiring only a little putty.
| COLORS & MARKINGS |
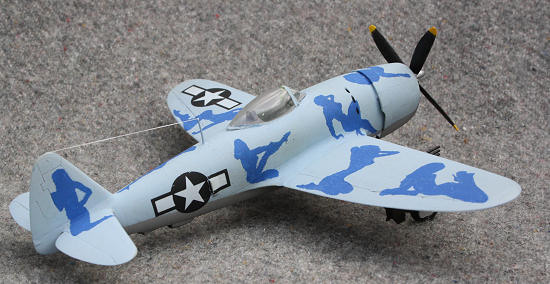
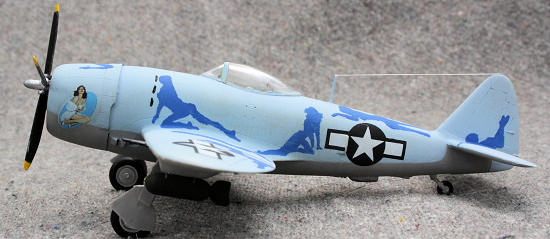
I wanted a light grey belly with a
dark blue cam over a blue/grey upper surface.
But I got lazy and elected to brush-paint her with Citadel Miniature
paints - Fortress grey for the belly (which is too dark) and Space wolves grey
for the uppers (which is too blue).
At this point, she was Futured, then decaled.
Only the ones on the fuselage sides put up a fight, so I resolved the
issue by 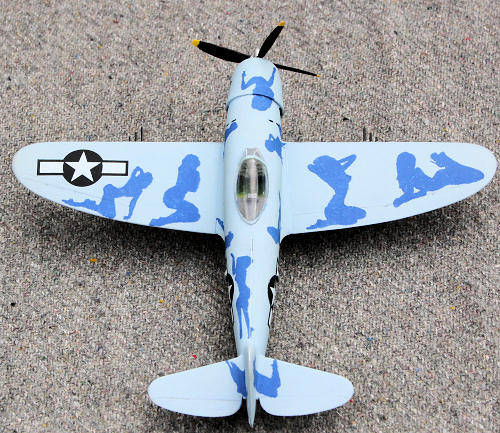 separating
a bar from the star. The loose bar
was placed squarely over the open door and sliced with a sharp blade to make it
conform - a touch of touch-up paint and you’d never know, while the Star (&
other bar) went on normally.
separating
a bar from the star. The loose bar
was placed squarely over the open door and sliced with a sharp blade to make it
conform - a touch of touch-up paint and you’d never know, while the Star (&
other bar) went on normally.
Now for my big idea.
I took the three decal sheets of Nose-art girls produced by Starship
modeller and enlarged them to 400% in a photocopier.
My intention was to cover the copies with a clear sticky plastic sheet
(called Contact here in
The Ladies were positioned so that they did not cover, and were not obstructed by, the national markings. And since I had the Girls out, I placed one on the nose as per normal.
| FINAL CONSTRUCTION |
All of the other bits were
attached. I’m particularly proud of
the way I hid the knock-out pin scars by converting them into lightening holes
with spots of grey paint. As the
underwing pylons were moulded with the wings, I was forced to use them, and
chose the bombs because they look tougher than fuel tanks.
To round-off the bombs, I added arming vanes to the noses.
They are only little +’s cut from bits of PE ship railing.
I used Krystal Kleer to attach the canopy, and botched it because a
little crept up the inside. Add an
antenna wire from EZ-Line and she was done.
| CONCLUSIONS |

When my young daughter saw my model, she pointed to one of the silhouettes and asked “Is that a duck?”, and every time I look at my model, I see that b|()()|)y duck!! I accept that you P.47 Purists will condemn me for being a naughty boy, but my P.47D is exactly as I imagined she would look. Displaying it was a lotta fun, and so was the building and the painting. And isn’t that what this hobby is all about?
November 2010
If you would like your product reviewed fairly and quickly, please contact me or see other details in the Note to Contributors.