AMT
1/48th P-40N
Warhawk
|
KIT #: |
8798 |
|
PRICE: |
$24.95 MSRP when new |
|
DECALS: |
Two options |
|
REVIEWER: |
Jonathan Prestidge |
|
NOTES: |
Injected plastic kit, True details
wheels, Eduard pre-painted seatbelts
|
The Curtiss-Wright P-40 began life as a re-engined
P-36, itself a mid-30’s design that was a delight to fly, but too slow for a
modern fighter. The XP-40 was first flown in 1938 and delivery of production
aircraft to the Army Air Corp began in June of 1940.
In air-to-air combat, the P-40 proved itself
highly effective when flown by the skilled pilots of the American Volunteer
Group known as “The flying Tigers”. Gen. Claire Chennault demanded that pilots
exploit the P-40’s strengths of rugged construction, heavy firepower, and fast
dive speed, and avoid trying to out climb or out turn their opponents. In the
E.T.O., the P-40 was found
 to be
wanting due to its rather lackluster high altitude performance (a common problem
with all Allison V-1710 engined aircraft).
to be
wanting due to its rather lackluster high altitude performance (a common problem
with all Allison V-1710 engined aircraft).
As the war progressed, the airframe
was constantly modified to keep it competitive, but the P-40 was never a
“leading edge” fighter. Although the P-40 was the
America’s
primary fighter at the beginning of the war, it was gradually replaced by newer
types in front line service. Because of its second line status, the P-40 was
sent to less critical fronts where it was increasingly used as a fighter-bomber.
In an effort to increase performance, the P-40
was put on a diet. Lighter wheels, reduced fuel and equipment loads, and a
reduction in armament from six “fifties” to four “fifties” made the early P-40N
the fastest of the P-40s. The early P-40N was able to see 378 mph with its 1200
hp Allison V-1710-81 and reduced weight. Only a few of the truly light weight
P-40N’s were produced.
The P-40N-5 saw the return of the
six “fifties” and the addition of the improved vision canopy that visually sets
the “N” apart from the rest of the Warhawk line. The P-40N was the most produced
P-40 with 5,215 being built.
Universally loved by the pilots who
flew it, the P-40 gave sterling service when it was needed most and held the
fort until newer types were available.
Released in 1995, the
AMT/Ertl
P-40N comes in a large box with nice box art of “Geronimo” downing a Betty. Upon
opening, one finds four sprues of soft, light gray plastic, a sprue of clear
parts, and a decal sheet with markings for two aircraft: “Geronimo” of the 15th
Fighter Group, 45th Fighter Squadron and “Rosy the Riviter” of the 49th
FG, 7th FS. This particular kit was made in the
USA
before
AMT
sent production to
Mexico
and the production quality plummeted. There is a little flash, but nothing that
won’t clean up easily. This kit has finely engraved panel lines and rivit
detail, a basic interior, clear but thick transparent parts, and only a few
decals. The fairly low number of parts makes this kit look like a relaxing
weekend build. I should know better, having built
AMT’s
P-40F!
I started this one by removing the fuselage
halves and engine covers from the sprue and cleaning them up. As with all
AMT
P-40 kits, once the engine covers are glued in place, there are two major
depressions on the nose that must be shimmed to provide a flat area for the
spinner. I cut out two pieces of plastic sheet stock and glued them in place. I
also scribed and cut out the rear fuselage section specific to the N model.
 Fitting
the fuselage halves together, it became apparent that this wouldn’t be a weekend
build. The nose intake needed to be blocked off, the exhausts fit at a weird
upward angle, the locating pins didn’t line things up nicely, etc. I cut off all
the locating pins and then glued a series of plastic tabs on the inside surface
of one half such that they would give support to the other side when the halves
were glued together. I then shimmed the lower side of the exhaust mounting
plates so the exhaust would be level once glued in place. Finally, I cut and
glued plastic sheet to block off the nose intake. I painted the inside of the
fuselage halves interior green and, once the radiator was painted and glued in
place, I glued the fuselage halves together.
Fitting
the fuselage halves together, it became apparent that this wouldn’t be a weekend
build. The nose intake needed to be blocked off, the exhausts fit at a weird
upward angle, the locating pins didn’t line things up nicely, etc. I cut off all
the locating pins and then glued a series of plastic tabs on the inside surface
of one half such that they would give support to the other side when the halves
were glued together. I then shimmed the lower side of the exhaust mounting
plates so the exhaust would be level once glued in place. Finally, I cut and
glued plastic sheet to block off the nose intake. I painted the inside of the
fuselage halves interior green and, once the radiator was painted and glued in
place, I glued the fuselage halves together.
At this point, I printed out a
picture of the instrument panel for a P-40N and proceeded to paint the kit part
accordingly. I cut the solid plastic reflector from the kit gun sight and
replaced it with a piece of thin clear plastic. The interior pieces were painted
interior green, detailed, washed (I used a thin black oil-based wash), and
dry-brushed to bring out the detail. The rear fuel tank was painted olive drab
and weathered prior to installation.
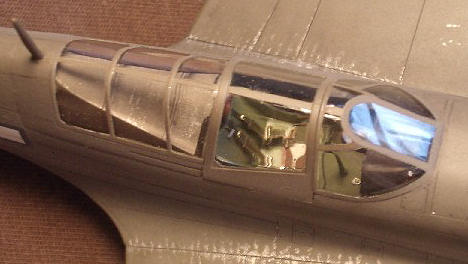
I had to fill a sink mark right in
the middle of the pilot’s backplate armor, since it is clearly visible through
the canopy. Do yourself a favor at this point and reshape the backplate armor
behind the pilot’s head. As it comes in the kit, the pilot could not see
anything behind him. I did not notice this until after I had glued on the canopy
and had to rip it (the canopy) off and dremel away the sides of the backplate on
either side of the headrest pad.
 I
assembled the interior and added Eduard’s pre-painted USAAF seatbelts at this
time. They are simply beautiful! I installed the interior in the fuselage, glued
in the shimmed exhaust and set the fuselage aside to dry. Once dry, I filed the
nose flat for the spinner and sanded the seams. Next, as a departure from the
norm (and the instructions), I decided to glue the upper wings to the fuselage
prior to attaching them to the lower wing. I did this to avoid the dreaded wing
root seam so common on aircraft models. I was able to get a very good alignment
of the wing roots using this method. Once dry, I glued the lower wing and
tailplanes to the model. Fit here was good requiring minimal filler. The bulges
on the leading edge of the wing and the radiator outlet flaps were glued on, as
was the belly fuel tank. I also attached the canopy with white glue at this
time. The middle, sliding section of the canopy was too wide, so I had to hold
it in place with toothpicks and tape until it was dry.
I
assembled the interior and added Eduard’s pre-painted USAAF seatbelts at this
time. They are simply beautiful! I installed the interior in the fuselage, glued
in the shimmed exhaust and set the fuselage aside to dry. Once dry, I filed the
nose flat for the spinner and sanded the seams. Next, as a departure from the
norm (and the instructions), I decided to glue the upper wings to the fuselage
prior to attaching them to the lower wing. I did this to avoid the dreaded wing
root seam so common on aircraft models. I was able to get a very good alignment
of the wing roots using this method. Once dry, I glued the lower wing and
tailplanes to the model. Fit here was good requiring minimal filler. The bulges
on the leading edge of the wing and the radiator outlet flaps were glued on, as
was the belly fuel tank. I also attached the canopy with white glue at this
time. The middle, sliding section of the canopy was too wide, so I had to hold
it in place with toothpicks and tape until it was dry.
Masking the canopy was almost easy.
While masking, my #11 Exacto blade slipped and I made a nice gouge right across
the front windscreen. No alternative but to rip it off and sand out the scratch
with 1500 grit wet or dry sandpaper. I then polished the windscreen out with
auto polishing compound and a cotton cloth. I reattached the front canopy
section using white glue and finished masking the canopy (Tamiya tape is the
bomb!). While reading another review of the P-40N I noticed a dorsal frame
member that runs down the spine of the canopy. There is no mention of this in
the kit instructions, so I had to track down a wartime picture of a P-40N for
reference. Once confirmed, I removed the tape where the spine would run and she
was ready for paint.
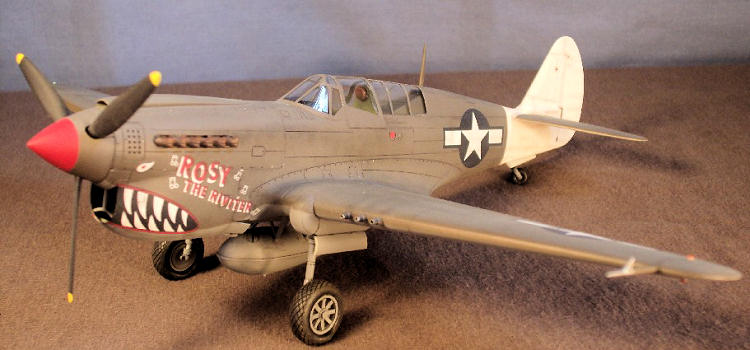
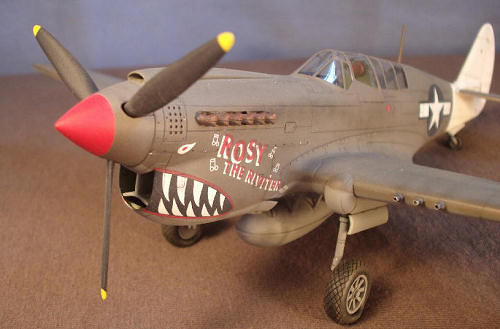
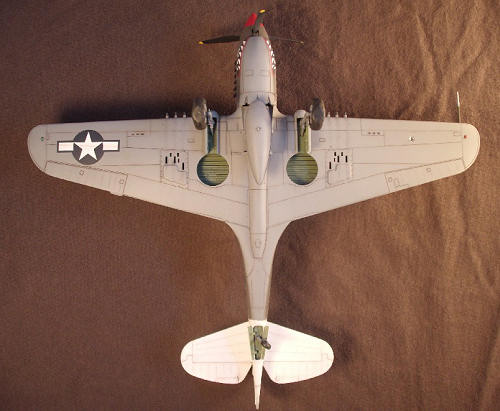
I chose to use the kit markings for “Rosy the
Riviter” of the 49th FG, 7th FS. This plane was in the
Pacific theater and wore Olive Drab over Neutral Gray. A nice shark mouth and a
white vertical tail added some spice to the rather boring scheme. I usually like
to have a photo of the aircraft that I am modeling, but having none I proceeded
with a best guess approach. The directions called for Medium Green disruptive
camouflage to be applied to the leading and trailing edges of the wings and
elevators. Since I could find no pictures of 49th FG P-40N’s with
this, I left it off. I can add the Medium Green later if I find a picture of
this plane confirming that it is there.
 I
air brushed Poly Scale acrylics, first spraying interior color on the window
framing, then spraying the white base for the red nose and white tail. I masked
the spinner with automotive pin striping. I masked off the white tail with
Tamiya tape and used a piece of kneadable eraser that was rolled into a snake
and wrapped around the fuselage for a soft edge between the white and the olive
drab. I then sprayed Poly Scale Neutral Gray for the underside color. Once the
underside was masked off, I sprayed Poly Scale Olive Drab on the upper surfaces.
Once dry, I sprayed Olive Drab lightened with RLM 02 gray green onto areas more
likely to be faded by the sun.
I
air brushed Poly Scale acrylics, first spraying interior color on the window
framing, then spraying the white base for the red nose and white tail. I masked
the spinner with automotive pin striping. I masked off the white tail with
Tamiya tape and used a piece of kneadable eraser that was rolled into a snake
and wrapped around the fuselage for a soft edge between the white and the olive
drab. I then sprayed Poly Scale Neutral Gray for the underside color. Once the
underside was masked off, I sprayed Poly Scale Olive Drab on the upper surfaces.
Once dry, I sprayed Olive Drab lightened with RLM 02 gray green onto areas more
likely to be faded by the sun.
I let the plane dry overnight and
then I applied various powdered artist pastels to bring out panel lines, exhaust
stains, etc. I applied the pastels with a soft, closely cropped paintbrush,
removing the excess with kneadable eraser. I then sealed the pastels with an
airbrushed coat of Future floor polish diluted slightly with water.
The kit decals were used and went
down fine. It took a lot of Champ setting solution to get them settled into the
panel lines. To help, I cut them along the panel lines with a sharp #11 Exacto
blade when they were almost dry. The shark mouth decals were the most difficult,
needing many stress relief cuts to conform to the curved radiator shroud. I had
to touch up the front of these decals with paint where they wrap around the
cowling.
At this point I decided to give the airframe a wash before the final
flat coat was applied. I used a very fine paintbrush and an oil-based dark brown
wash. The gloss coat allowed the wash to flow freely in the panel lines and it
was easy to clean up any excess with a Q-tip dampened with mineral spirits.
Finally, I airbrushed Poly Scale
clear flat acrylic over the entire airframe. I think I sprayed a bit too much
because it came out very flat and somewhat milky, obscuring some of the detail I
had added. I buffed the flat back down to an acceptable level using a kneadable
eraser first and then rubbing it with a used dryer sheet.
I did a final application of
pastels, and brush painted the guns, landing lights, etc. Then, I glued on the
landing gear and other final bits. I had decided to use True Details’ resin
P-40N wheels and I’m glad I did. They really set the model off. I used Testors
silver (oil-based) to simulate chipping around maintenance panels and scuffing
on areas walked on by pilots and ground crew. I had some great photos of actual
planes that I used as reference for this step.
This kit was way more work than I expected! I
came close a couple of times to pitching it, but I’m glad I didn’t. I love the
way this bird turned out. I would like to thank Tom Cleaver for the great P-40N
reviews he has done for this site – they were a tremendous reference! As far as
the kit is concerned, I have mixed emotions. While I can’t recommend this kit
over the Hasegawa P-40N on any criteria save price, it can be turned out well
and it is simple enough for modelers of any skill level.
Ethel,
Jeffrey L. Warbirds, American Legends of World War II.
Ann Arbor,
MI:
Lowe & B. Hould Publishers, 2003.
Jonathan
Prestidge
February 2010Thanks to If you would like your product reviewed fairly and quickly, please
contact
me or see other details in the
Note to
Contributors.
Back to the Main Page
Back to the Previews Index Page