MPM 1/48 P-63H Kingcobra
| KIT #: | 48024 |
| PRICE: | $40.00 |
| DECALS: | options |
| REVIEWER: | Dale Rannals |
| NOTES: | Short run kit |
| HISTORY |
I have often pulled my MPM
Kingcobra kit out of the stash to look things over and with good intentions
to build. Alas, it always ended up back in the closet ...... more or less
due to the lack of interesting schemes for it.
Thoughts up front were to do a whiffer bubbletop P-63D version, but
this just never took off. While
looking thru my "Allied Aircraft Piston Engines of WWII" book I reread the
chapter on Allison’s turbo-compounded V1710 and its mention of its intended
mating to the P-63H. Okay so what is this aircraft?
A couple of quick searches and I was soon reading an article:
“Supercharging the Allison.” A
very interesting article. I was further intrigued by two things: a 3-view
drawing of the P-63H and a book cited in the references.
Looking at the drawing, I realized that was this was what I was
looking for and I'm pretty sure I heard the kit calling from the stash! I
found and ordered the book, “V's for Victory” and soon read
 this and
another, "Cobra", a history of Bells aircraft. These are all very good reads
with gobs of reference data and great pictures and drawings.
this and
another, "Cobra", a history of Bells aircraft. These are all very good reads
with gobs of reference data and great pictures and drawings.
Out again came the kit.
Looking at the kit and the drawings, I realized this could be fairly easy to
do. A basic airframe with a few
more holes drilled for exhaust piping.
And I might as well do some cutting and fit a bubble canopy to it
.... the kits canopy were uselessly yellowed anyway.
First off, lets start with the basic Kingcobra.
It was an evolutionary design of the Airacobra, though it shared no
parts. A longer fuselage allowed a two-stage Allison driving a four-blade
propeller for better critical altitude, while overall aerodynamic
refinements (with extensive
studies and recommendations by NACA) and a laminar flow wing improved
overall performance. It
used Bells trademark nose-wheel, and put the engine behind the cockpit, the
propeller being driven by an extension shaft.
This left the nose area free for a large 37mm cannon and two .50cal
machine guns.
Performance-wise, it was definitely a step up from the Airacobra.
Though slightly slower than it's contemporaries, it had a phenomenal
roll rate and could turn tighter than any of them (it was known to out-turn
T-6 Texan trainers).
So, good speed, great maneuverability, heavy firepower.........sounds
like a winner. So why didn't
the USAAC want anything to do with it?
Well, it didn't offer any marked increase in performance, certainly
not enough to re-equip existing squadrons with established types and supply
lines. But the biggest factor
was the range. It just didn't
have enough. Now, the Airacobra
had sufficient internal fuel capacity for the requirements it was built
around, namely a 1 hour endurance.
And remember, thinking at this time sported US fighters defending the
shorelines against invading bombers. So the one hour endurance seemed
adequate. However, that
requirement translated into actual combat conditions rather poorly; the
Airacobra was always short-legged.
Okay, “fine”, you say.
They should have learned from their "mistakes".
But no, the Kingcobra shares this excuse.
One must remember that the Kingcobra was being designed when the
Japanese attacked Pearl Harbor, and first flew exactly one year later.
As it was, the Kingcobra went thru life with the smallest internal
fuel load of any production US fighter.
 Okay then, why not add more fuel?
Simple. But where?
Remember, this is a tiny fighter.
Not an abundance of space anywhere.
Behind the cockpit? Nope
.... engine there. Nose is
filled with landing gear and weapons.
Wings already have tanks.
Other wing areas area occupied with landing gear and ammo belt racks
for the ,50 machine guns (in under-wing pods because there was no space for
them in the wings). Wait!
What about the wing/fuselage center section?
Perfect place for fuel tanks. Nope.
This was occupied by Bells very compact and efficient cooling
radiators and duct-work. Bell
should have opted for a normal chin or belly scoop instead of the internal
radiators. A less elegant
solution for sure, but it may have solved the range issues.
Okay then, why not add more fuel?
Simple. But where?
Remember, this is a tiny fighter.
Not an abundance of space anywhere.
Behind the cockpit? Nope
.... engine there. Nose is
filled with landing gear and weapons.
Wings already have tanks.
Other wing areas area occupied with landing gear and ammo belt racks
for the ,50 machine guns (in under-wing pods because there was no space for
them in the wings). Wait!
What about the wing/fuselage center section?
Perfect place for fuel tanks. Nope.
This was occupied by Bells very compact and efficient cooling
radiators and duct-work. Bell
should have opted for a normal chin or belly scoop instead of the internal
radiators. A less elegant
solution for sure, but it may have solved the range issues.
Alright then, lets throw some drop tanks under the wings.
Even with these as standard equipment, the Kingcobras total fuel load
was less than the internal fuel load of the Mustang.
So the King was in effect a very potent point defense fighter when we
had no need for one.
Now lets talk about that power-plant.
The Allison V1710. It's
gotten a lot of bad press, especially compared to the Rolls-Royce Merlin.
Odd when you think about it, the engines were developed at the same
time and were of similar layout, displacement, and power. Yet the Merlin has
attained almost legendary status while the V1710 is almost an also-ran.
Most people will tell you about the Mustang and how the Merlin
transformed the dog into a world beater.
(truth be told, below 15000ft the Allison Mustangs could run rings
around the later versions, which were heavy trucks in comparison .... But I
digress). Well, the big difference wasn't the engines themselves .... like I
mentioned, they were surprisingly similar.
The difference was in what supplies the air to the engines, the
supercharger. Rolls Royce was
somewhat lucky. They had a two
stage supercharger developed for the ill-fated Vulture engine
that was grafted to their Merlins which allowed the engine to supply
its rated power to a much higher altitude than the single stage supercharged
Allison that it replaced in the P-51.
(Interestingly, if one compares single stage Merlins to single stage
Allisons, or dual -stage to dual-stage,
it's a dead heat ....but nobody compares apples to apples).
So why wasn't the V1710 designed with a second, or auxiliary stage
supercharger? Well, it was
....in a way. The Army Air
Corps stipulated that the single stage supercharger always be supplemented
with the then new turbo-supercharger.
In the end, this did not occur on most aircraft.
And those aircraft were altitude limited as a result.
Once the realization of turbo production and installation
difficulties became apparent, impetus was put behind auxiliary stage
development (Allison had recommended this years prior, but interest and
development money was nonexistent).
What emerged from Allison was an auxiliary supercharger package that
was essentially an add-on (a result of a great modular design philosophy
taught by GM and seen thru-out the Allison design.
Case in point: while a typical Merlin had around 11000 parts and 4500
piece or different parts, the Allison had around 7100 with only 700 piece
parts). Two-stage Allisons performed on par with two-stage Merlins but .....
and there is always a but .... they were longer and would need redesigns to
fit. Since it wasn’t prudent to
interrupt 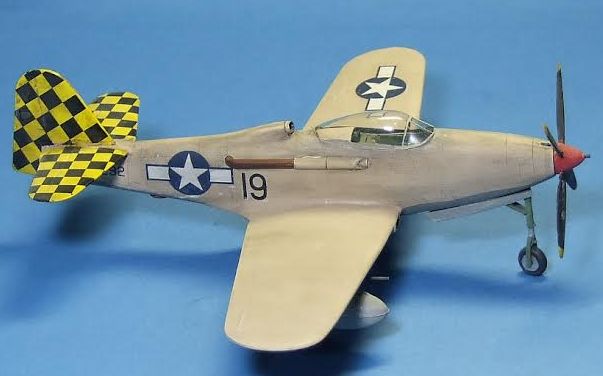 wartime
production for no real performance gain, the Merlins stayed.
wartime
production for no real performance gain, the Merlins stayed.
The Kingcobra was designed with the two-stage Allison and its
performance showed. It was the
equal of any of the contemporary US fighters (except in range of course).
But equal isn’t good enough ...... so lets go one better shall we?
Lets see, supercharger is good, dual stage is better (for altitude
performance anyway). What about turbochargers?
Well, turbos are essentially a different style of second stage
supercharging using exhaust heat energy instead of energy from the engine.
But everything has its downsides.
Driving a supercharger, or two, requires power from the engine.... a
LOT of power. Turbocharger
power is essentially free, coming from otherwise wasted exhaust heat energy.
But there is a lot of extra plumbing involved, increasing weight and
complexity. (One thing turbos
do give is better fuel efficiency, IE: range.
Fun fact: a Merlin powered Lightning would have given comparable
performance but reduced range compared to the turbo'd Allisons).
Lets try this. Lets mate
an engine to a dual stage supercharger.
But lets run the exhaust to a turbo, one connected directly back to
the engine crankshaft. The turbo would supply the power to run the
supercharger and any excess would add to the engine total, or more to the
point, the propeller. Design
the final exhaust right and maybe get a few pounds of additional thrust
there.
This is just what Allison proposed with the V-1710-127 , the worlds
first turbo-compounded engine.
Bell designed this into the P-63H, shoe-horning the power plant into the
tiny airframe. It was a tight
fit, and left no room for exhaust ducting internally.
The exhaust exited the engine, ran rearward outside the airframe.
They re-entered and turned downward to enter the GE CT-1 turbo.
While this my seem crude at first, it had some benefits.
Namely it helped cool the exhaust to keep it below the critical temp
of 1725F. What all this did was
give the V1710, an engine that
started around 750hp, almost 3100hp to play with.
And this wasn't some napkin-scribbled pipe dream.
This engine was built, tested, and installed into the airframe.
Unfortunately it was never flown.
As promising as it was, both Bell and Allison asked that the project
be stopped. They understood
that the new jet turbine offered even greater potential.
With that ended the prospect of the ultimate V1710.
| THE KIT |
T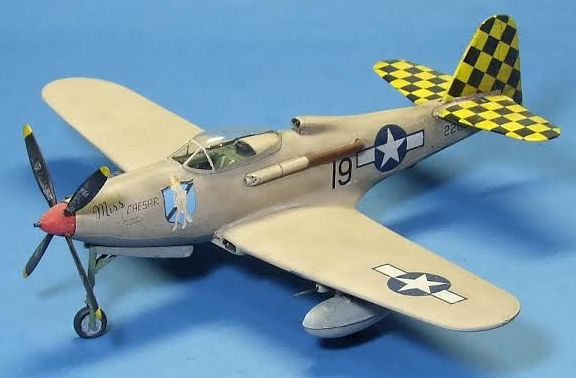 his is
short run, so expect large sprue gates, no locator pins (which isn’t necessarily
a bad thing), and poor fit. The kit
is labeled as "Expert Series" which translates into "Ohhh, this is gonna take
some work.” The parts are molded in gray plastic and do have nice, petite
detail. However, it is so petite it could very well be lost under paint.
Clear parts are vacu-formed but unfortunately mine were very badly
yellowed and unusable. Instructions
are done well enough, with black and white assembly drawings and decent profile
drawings. Resin bits are included
and these are quite well done.
Decals are for several aircraft, one US and several Russian ...
all a very uninteresting OD over gray.
his is
short run, so expect large sprue gates, no locator pins (which isn’t necessarily
a bad thing), and poor fit. The kit
is labeled as "Expert Series" which translates into "Ohhh, this is gonna take
some work.” The parts are molded in gray plastic and do have nice, petite
detail. However, it is so petite it could very well be lost under paint.
Clear parts are vacu-formed but unfortunately mine were very badly
yellowed and unusable. Instructions
are done well enough, with black and white assembly drawings and decent profile
drawings. Resin bits are included
and these are quite well done.
Decals are for several aircraft, one US and several Russian ...
all a very uninteresting OD over gray.
As poor as the kit fits, it is the best of your options. .... The other
being a Hi-Tech kit (see Tom Cleavers review here).
Hopefully someone will come out with a new kit, but for now this is it.
| CONSTRUCTION |
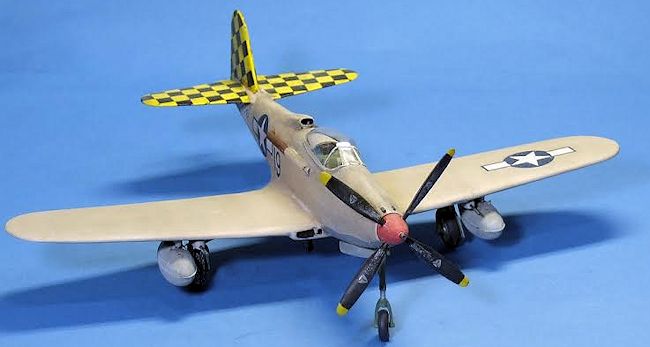
Now it was time to start drilling and cutting.
I needed to place holes for the places were the exhausts re-enters the
fuselage and where it finally exits again.
I studied the profile drawing of the P-63H and located and drilled the
necessary holes. Definitely not
NASA accuracy, but it doesn't need to be.
The exhaust outlet pipe was easy .... made from appropriate diameter
evergreen tube with one end cut at a 45° angle.
The intermediate pipes took a little more effort.
I figured the forward halves could have shrouding for some added ram-air
cooling (the Achilles-heel of the setup was always going to be critical exhaust
temperature to the turbine). I
looked thru the parts bins and found some gun pods (from a Harrier I think) that
cut in half might look convincing.
The rear exhaust halves were just sprue corners.
I looked thru several kits before I found sprue with the right diameter
and tight enough corner bends. Once
found they were cut to length and cleaned up.
I then turned my attention to the fuselage canopy rear deck.
It was 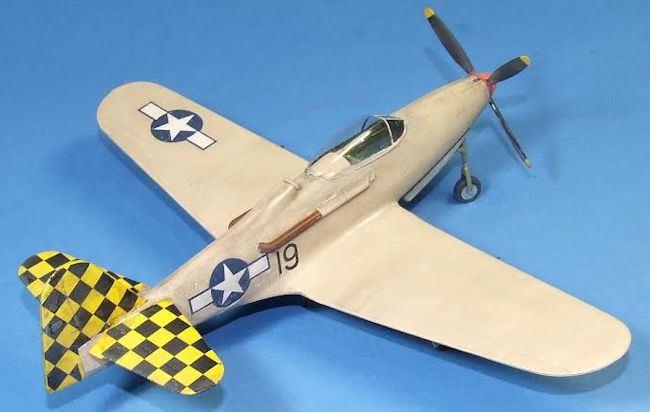 going
to have to come off. First though,
I needed to find something suitable to replace it.
Again looking thru spare parts I came across a spare nose cone from a
Bf-110G. Amazingly enough, the
bottom looked to be the right width and curvature I was after.
I marked and cut the fuselage and cut the cone to fit.
going
to have to come off. First though,
I needed to find something suitable to replace it.
Again looking thru spare parts I came across a spare nose cone from a
Bf-110G. Amazingly enough, the
bottom looked to be the right width and curvature I was after.
I marked and cut the fuselage and cut the cone to fit.
Slather on some putty and do some sanding and all looked okay.
(Seriously, the car doors took more putty and sanding than this mod
did!). While I was at all this I
cut back and slightly angled the air intake.
I made a new mouth ring for it (again from a parts bin doodad.)
Interspersed with all the above, I took time here and there to look at
different aircraft profiles in my books and online.
I was looking for a bubble canopy that at least resembled the P-63D's
dome. I finally settled on and
ordered a Squadron vac P-51 Dallas
canopy. Two canopies come in the
package which helped a bunch. I
rough cut and trimmed up the first to get a decent fit then used it as a
template to cut out the second. It
worked out but the canopy was a bit too wide (which again shows this is a small
aircraft) ... I would have to see
if I could get a decent fit at the end.
Onto the wings..and here there were only two areas that I had problems
with. First off, the openings for
the radiators were poorly formed. I
never did get that area to look decent.
The other is the landing gear attachment.
It is essentially a butt joint.
Poorly done. I tried
drilling holes for a piece of paper clip to strengthen things.
I ended up drilling thru the wing top.
Hhhmmmm.... more putty and
sanding. I ended up making a socket
by finding a piece of evergreen plastic tube
that the gear leg fit snugly inside.
I cut a small section off the tube, making a ring and glued the ring to
the wheel well. When dry this
formed a shallow socket into which I could glue the landing gear.
Not perfect, but it's simple and it worked.
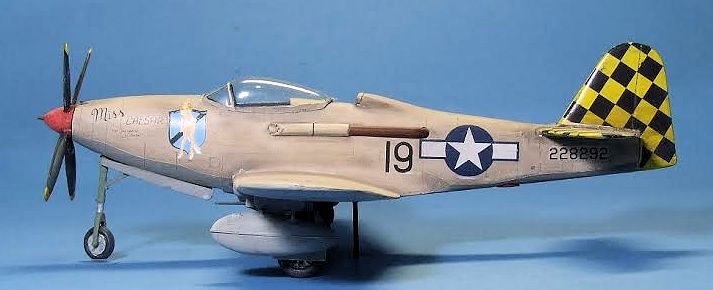
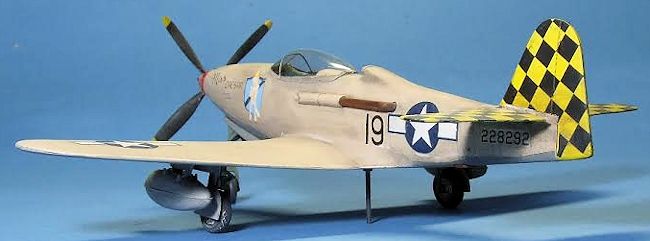
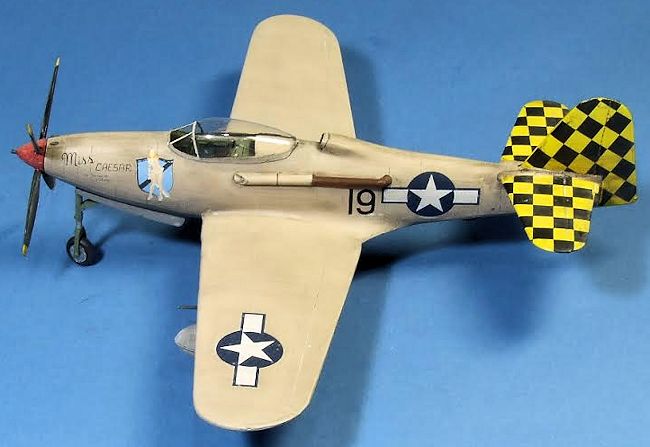
| COLORS & MARKINGS |
On start of this build, all I knew
was that it wasn't going to be Olive Drab.
Has to be plausible too, IE: a long range escort Kingcobra isn't going to
work. So where and how could have
this aircraft been deployed?
Something at the front lines, an attacker ala Typhoon, where long range isn't
needed. In this case, an
attacker/defender (point defense interceptor).
Okay, how about North Africa and the push up thru Italy, replacing
P-40's. That could work.
And some kind of desert camo would definitely be different on a King.
Soon my eyes fell upon a desert tan P-40 profile and I decided to go that
route. I have a huge Checkertails
decal sheet that needed some love, and that would add color and interest.
I sprayed the whole tail gloss white, and then yellow (the checkerboard
decals contain only the black portions).
After this the fin and tail-planes were masked and neutral gray (bottom),
and sand (for the top .... mixed with a few drops of red to give it a faded
desert pink look) were dutifully applied.
All went well, so far so good.
The decals were applied.
Luckily, checkerboard decals for a Thunderbolt were big enough to apply and trim
down. Nose art was from a
Thunderbolt sheet. This almost
seems too big for the slender nose
 of the
Cobra. I masked and then painted
the canopy, first black for the frames inside color then the sand top coat.
of the
Cobra. I masked and then painted
the canopy, first black for the frames inside color then the sand top coat.
But.....and there is always a but.... this is where things went downhill.
Trying to glue the canopy in place was a real chore.
I managed to get it done, but not as well as I wanted.
It was still too wide ...... not by much, but there were gaps on each
side. I filled the gaps with white
glue and this worked well. But now
I had to repaint the area around the canopy.
I ended up using (literally) the last couple drops of the paint I had
mixed up for this. Whew. But
when the paint dried, it was very noticeably a much lighter shade than the rest.
I cannot explain why, but the result looked comical. Well, I really
didn't want to mix up new batch and repaint and decal everything...... not at
this point. I still had washes to
apply ... maybe I could hide/blend the area with those.
So I tried, and for the most part it worked.
I do think the plane looks too dirty now, and I think I should have
painted the rear deck under the canopy black, as now it looks too bright.
Butt okay, I can live with that.
Starting with this kit I knew this was gonna be a three-footer.
Now its a five footer.
One last thing .... if you
build this kit make sure you put weight in the nose ... lots of it.
The instructions remind you to do so, but without any recommendations to
how much. I guessed and put in too
little. I then added more weight in
the nose-wheel well till I ran out of room.
Still a tail-dragger. I
ended up drilling a hole bottom center just aft of the main gear and made a post
to prop it up on. It works
| CONCLUSIONS |
Well, the kit itself is pretty blah.
It is a short-run kit so while it is buildable, it's going to take
some work. Once that work is
put into it you will end up with a fine rendition of the King.
Definitely not recommended
 ever, but
it is surely something unique and hopefully will create questions from those
who see it.
The end result will look just fine in the display
case.
ever, but
it is surely something unique and hopefully will create questions from those
who see it.
The end result will look just fine in the display
case.
But there is more here than just the plastic. The plastic was the
reason, of course, but the desire to put glue to plastic resulted in me
reading two fantastic books and numerous online articles.
I have learned much about this plane and engine and what might have
been, and of Bell and Allison in general.
Knowledge is good.
Pick something, build it, and have fun.
| REFERENCES |
The internet
- “Cobra! Bell Aircraft
Corporation 1934-1946”
ISBN 0-88740-911-3
- “V's for Victory: The Story of the Allison V-1710 Aircraft Engine
1929-1948” ISBN: 0-7643-0561-1
- Squadron/Signal “P-39 Airacobra in Action”ISBN: 0-89747-102-4
- Supercharging the Allison http://www.enginehistory.org/Convention/2009/Presentations/SuperchargingAllison.pdf
October 2014
If you would like your product reviewed fairly and fairly quickly, please contact the editor or see other details in the Note to Contributors.