
Czech Models 1/48 XP-56 'Black Bullet'
| KIT #: | 48-008 |
| PRICE: | $29.95 MSRP |
| DECALS: | One options |
| REVIEWER: | Dale Rannals |
| NOTES: | Short run with resin bits and vac canopy |
| HISTORY / THE KIT |
For a history and a look at what’s in the box, I can do no better than Tom Cleavers excellent preview:
| CONSTRUCTION |
First things first: get out the trusty razor saw and start removing the resin bits from the casting blocks. The tiny fragile bits I left “protected” until I needed them, but all the larger bits were duly assaulted by the saw. Then it was time for some major test fitting. To my surprise, the cockpit pieces looked to fit quite nicely. The resin air intakes fit inside the wings beautifully though the wheel wells were going to need some sanding down to fit correctly. All in all, I was impressed with the fit of the resin bits.
Okay then, on to the cockpit. All
the cockpit interior pieces got shot with a lightened green zinc chromate. I
think it is still a bit to dark though. I tend to use British interior green as
I think green zinc chromate is a bit to intense for the scale (and if it gets
 lightened proportionately, you basically get the British color anyway). It just
looks more “right” to me, thank you very much. And of course just talking about
aircraft interior colors is opening up a can of worms. Basic rule of thumb:
Zinc Chromate is a corrosion resistant agent, not a specific color. It differed
from batch to batch and manufacturer to manufacturer. Just Google “zinc
chromate aircraft ww2” or something similar for a good primer on the subject
(pun intended). Okay, off on a tangent there.
lightened proportionately, you basically get the British color anyway). It just
looks more “right” to me, thank you very much. And of course just talking about
aircraft interior colors is opening up a can of worms. Basic rule of thumb:
Zinc Chromate is a corrosion resistant agent, not a specific color. It differed
from batch to batch and manufacturer to manufacturer. Just Google “zinc
chromate aircraft ww2” or something similar for a good primer on the subject
(pun intended). Okay, off on a tangent there.
Anyway, with the cockpit assembled, the nose gear well installed, and an adequate amount of lead weight in the front, I glued to fuselage halves together. There are no alignment pins on these kits, but the parts fit together well, and the lack of alignment aids was not a problem at all. I set the fuselage aside for a couple days to dry, for I had some minor surgery to do on it and I wanted it completely set before I manhandled it later. So…….
I moved on to the wings. As I mentioned before, and Tom mentioned in his preview, the wheel wells need some sanding down to fit inside the wings. I use lots of water when sanding resin, to keep the particles from building up in the sandpaper and, more importantly, to keep the particles out of my lungs. After getting these sanded down, the wings where assembled. I put a small ball of “fun tack” at the end of each wing tip in the blown-air jets area so one could not see directly thru these.
 Heading
back to the portly fuselage it was time to modify things a bit. This beastie
housed a large radial engine in its midsection. The only indication of this on
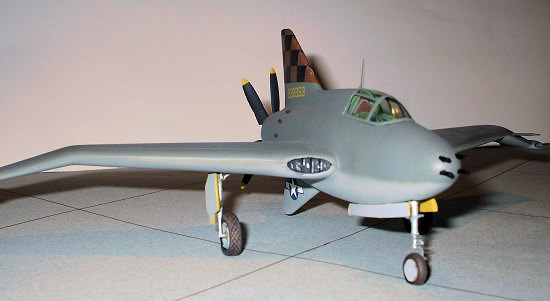
the kit are dimples in the plastic where the exhaust stubs would be. I drilled
out each dimple and added a small length of plastic tubing to each hole. Each
of these were cut on the outer end at a 45 degree angle to mimic the individual
exhaust stacks. This is relatively simple to do and realty enhances to final
look.
Heading
back to the portly fuselage it was time to modify things a bit. This beastie
housed a large radial engine in its midsection. The only indication of this on
the kit are dimples in the plastic where the exhaust stubs would be. I drilled
out each dimple and added a small length of plastic tubing to each hole. Each
of these were cut on the outer end at a 45 degree angle to mimic the individual
exhaust stacks. This is relatively simple to do and realty enhances to final
look.
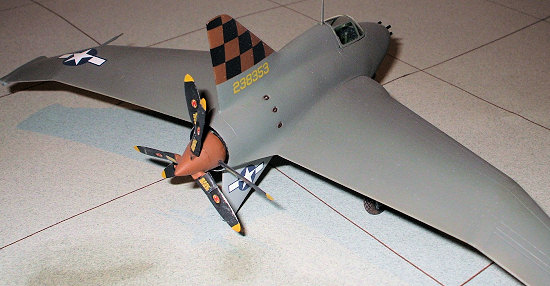
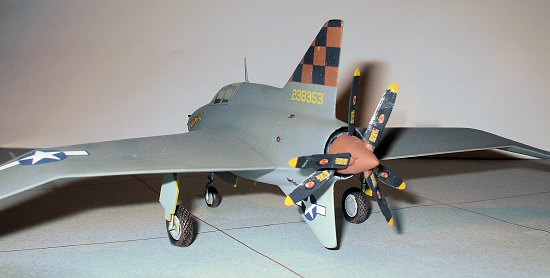
The propeller was a pain. Contra-rotating so we have six individual blades to glue on at the proper angles. If that doesn’t scream “fun” then I don’t know what does. It does look pretty cool when it’s done though. I glued the wings to the fuselage just using the butt joint…again there are no locating tabs or anything. If you are worried about the strength of this you may want to fabricate some tabs. I wasn’t….so I didn’t.
So now I have a semi- complete airframe ready for, yes……the paint shed.
| COLORS & MARKINGS |
 Okay,
first off I sprayed the wheel wells with a lightened zinc chromate yellow (or at
least a close…….no, no, I am not going to go there again). After that dried I
stuffed the wheel wells with dampened tissue to protect them from the rest of
the painting. The underside was painted a neutral grey (I use Testors Model
Master enamels for all these colors) and then I shot the top (and the masked
canopy) with a faded olive drab. I highlighted the panel lines with a darkened
mixture, both top and bottom, but I may have done it a bit too subtly for the
camera to pick up.
Okay,
first off I sprayed the wheel wells with a lightened zinc chromate yellow (or at
least a close…….no, no, I am not going to go there again). After that dried I
stuffed the wheel wells with dampened tissue to protect them from the rest of
the painting. The underside was painted a neutral grey (I use Testors Model
Master enamels for all these colors) and then I shot the top (and the masked
canopy) with a faded olive drab. I highlighted the panel lines with a darkened
mixture, both top and bottom, but I may have done it a bit too subtly for the
camera to pick up.
As for markings, I applied the kit decals along with the “Pudgy” moniker I got from the decal dungeon (I believe it was from a P-38 sheet). I thought it appropriate.
| FINAL CONSTRUCTION |
I added four cannon or machine gun
barrels to the nose. Not perfect but hey, nothing I do is perfect!
The landing gear/wheels were then installed (the resin wheels being a HUGE
improvement over the plastic parts) and I was done. I wanted to depict the
aircraft relatively well kept but in a service mode, so I kept weathering to a
minimum. I realized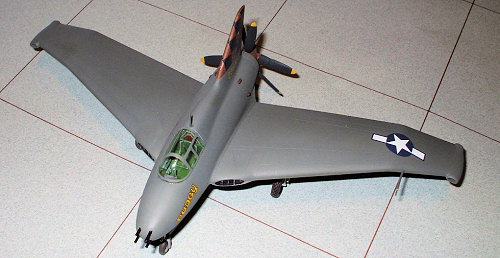 after
I was all done that I completely forget to put on some kind of squadron code to
the fuselage. Oh well, this plane belonged to that one squadron that
didn’t use any codes. Yeah, that’s it. And don’t ask me about the
brown fin and spinner. I wanted to do something different and well, it is.
after
I was all done that I completely forget to put on some kind of squadron code to
the fuselage. Oh well, this plane belonged to that one squadron that
didn’t use any codes. Yeah, that’s it. And don’t ask me about the
brown fin and spinner. I wanted to do something different and well, it is.
| CONCLUSIONS |
A fun build. I had reservations when I started this. Really didn’t know what to expect from these kits. But I like them. They can be turned into a pretty nice addition to the collection. Its look and size are deceiving. Think of the front two-thirds of a P-47 Thunderbolt and you get the idea. It’s those wicked cranked wings and the lack of a tail that make it stand out a bit. It’s always nice to have people ask: “what the h*** is that?”
I guess no better tribute can be said by the fact that I now have three more of these kits (XP-55 Ascender, Me-309, and the Me-263) in my stash.
Grab a kit (ANY kit) and build it!
January 2007
If you would like your product reviewed fairly and fairly quickly, please contact the editor or see other details in the Note to Contributors.