| KIT #: | 1118 |
| PRICE: | £14.99 |
| DECALS: | Three options |
| REVIEWER: | Frank Reynolds |
| NOTES: | 2015 reissue |
| HISTORY |
In World War 2 the major powers each developed glider-borne assault forces. With a suitable tow plane, gliders were a cheap method of conveying troops to their tactical objectives. Silent on landing, there was potential for them to be used in surprise attacks and they were capable of landing on short rough strips that were impassable to powered transport aircraft of similar size. They enabled armies to deploy equipment that was too heavy or bulky to be handled by parachute drop and unlike blind parachute drops they could be steered with some precision towards a selected landing zone.
Developed for US forces and capable
of being towed by a C-46 or C-47, the Waco CG-4A was an ex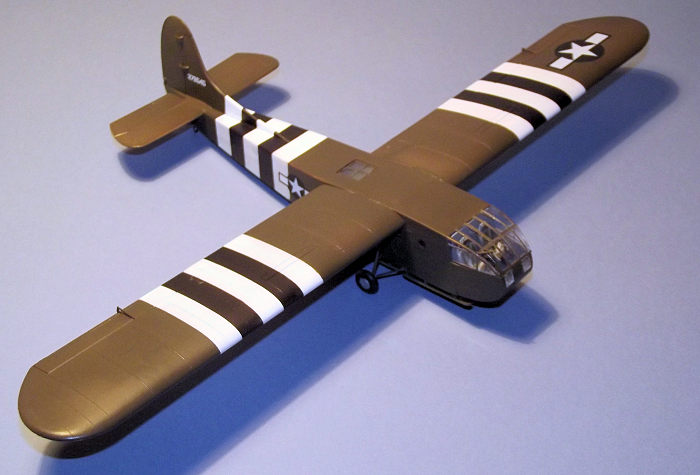 cellent
example of industrial design and manufacture. It could carry a jeep or its
trailer, a 75mm artillery piece or 13 troops. The CG-4A figured prominently in
the European Theatre of Operations in the Invasion of Italy, D-day and the Rhine
River Crossing.
cellent
example of industrial design and manufacture. It could carry a jeep or its
trailer, a 75mm artillery piece or 13 troops. The CG-4A figured prominently in
the European Theatre of Operations in the Invasion of Italy, D-day and the Rhine
River Crossing.
Constructed primarily of a steel tube framework clad in doped fabric, its structure harked back to an earlier age of aviation, but it was capable of mass production in a short period and some 13,900 were produced by some 20 sub-contractors throughout the USA. At a nominal price of $20,000 per unit they were cheap enough by wartime standards and there is some suggestion that some senior Army Officers considered the CG-4As to be little more that the packaging that their cargoes were delivered in, so in some cases little effort was made to extract them from the battlefield for re-use.
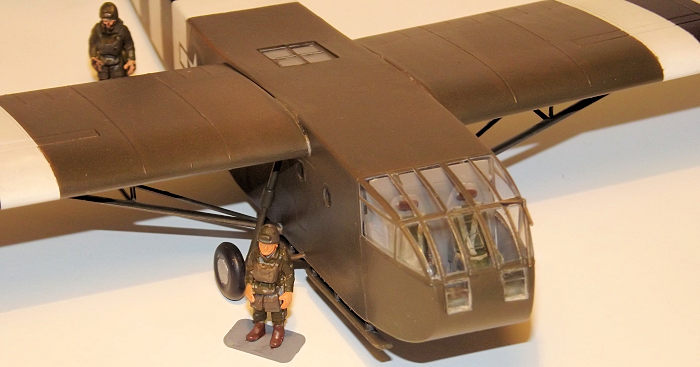
The CG-4A was an intelligent design, featuring an up swinging nose section that carried the cockpit up out of the way to enable the cargo to be extracted directly from the low set floor directly onto the landing area.
With the numbers produced and the type’s involvement in some of the most significant battles of the 20th Century, it is a true classic.
I live in central Southern England
in an area replete with historic airfields, some still active, other merging
gently back into the farmland from which they emerged. Bases such as Blake’s
Farm, Ramsbury, and Down Ampney are fading into the landscape; Fairford and
Brize Norton are still active military bases, Lyneham is now a non-flying Army
base. Membury is now partly a motorway service
 stop. Many
have a strong connection with airborne forces and military air transport,
British and American. All are within a pleasant hour’s ride from my home but the
one that draws me the most often is Middle Wallop, Hampshire, a British Army
helicopter training base that is also home to the Museum of Army Flying. It is a
front line Battle of Britain Airfield with a curiously rural air since it is
still a grass flying field. I have been going through an “Airborne Forces”
modelling phase for a while now and among the museum exhibits in the airborne
forces gallery is a Waco CG-4A. Finding an example in my LHS made this project
irresistible.
stop. Many
have a strong connection with airborne forces and military air transport,
British and American. All are within a pleasant hour’s ride from my home but the
one that draws me the most often is Middle Wallop, Hampshire, a British Army
helicopter training base that is also home to the Museum of Army Flying. It is a
front line Battle of Britain Airfield with a curiously rural air since it is
still a grass flying field. I have been going through an “Airborne Forces”
modelling phase for a while now and among the museum exhibits in the airborne
forces gallery is a Waco CG-4A. Finding an example in my LHS made this project
irresistible.
| THE KIT |
Supplied in a light weight top
opening tray type box, this is a simple kit with just two main parts frames
moulded in pale grey. The kit dates from the 1970s, yet is cleanly moulded and
essentially flash free with recessed panel lines and commendably light fabric
effect detailing. A third, smaller, parts frame is moulded in clear providing
the nose glazing and cabin windows. The instructions run to ten pages in folded
newsprint style covering ten stages of construction, a parts diagram and decal
placement drawings for three aircraft: An invasion-striped US aircraft from
D-day in Olive drab over Neutral Grey; an anonymou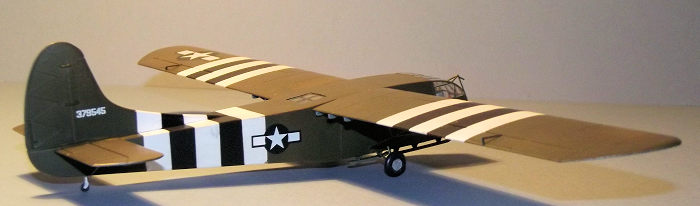 s
looking Olive Drab US aircraft from the invasion of Italy; and an all-sliver RAF
aircraft from a training squadron on the 1950s. The decals subjects are confined
to national insignia and small serial numbers for the tail fins.
s
looking Olive Drab US aircraft from the invasion of Italy; and an all-sliver RAF
aircraft from a training squadron on the 1950s. The decals subjects are confined
to national insignia and small serial numbers for the tail fins.
The parts count is around 140, although 30 of these relate to troop seats which will never be seen in the interior of my version and another 26 to the various tiny control horns and struts under the wings.
The kit offers plain and simple parts for the fuselage and flying surfaces with the external details being built up from small struts and brackets, rather in the style of a short run kit of today, but is none the worse for that. It is possible to build it with a flip up nose section to display the fuselage interior and the four cabin side doors can be left open, but I chose my normal method of doing everything buttoned up. There is little doubt that Italeri has over simplified the cockpit and there is much scope for super-detailing for those who wish to.
| CONSTRUCTION |
The upwards hinging nose section can be built as a separate unit and I began by painting all of the interior parts and the fuselage interior while they were still on the parts frames, using Tamiya XF-71 Cockpit Green applied with my Iwata HP-C airbrush.
The cockpit floor, rudder pedals,
centre console and instrument panel were glued into the nose and a few dials
added to the tiny instrument panel using items from a generic decal sheet. The
seats were buil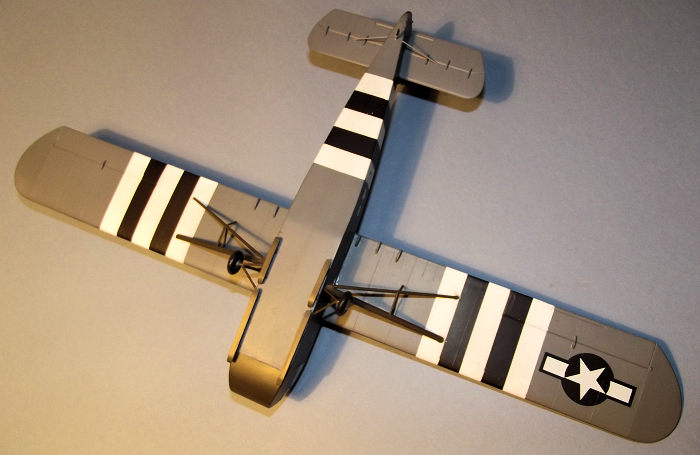 t
up with their separate base frames and glued to the floor and the cockpit rear
bulkhead glued in place with the access door to the freight bay glued shut.
Simple seat belts were made up with strips of Tamiya tape cut to size. I omitted
all of the main fuselage interior detail, seats and flooring since nothing could
be seen through the tiny porthole windows in the fuselage sides. I chose to omit
the moulded glazing for these tiny windows, preferring to finish them with
Kristal Klear after the painting stage. In due course it was time to join the
fuselage halves, being simplicity itself, pausing only to trap the large square
window on the fuselage spine. The fuselage nose and one piece nose glazing were
glued in place, then the rudder and the whole structure set aside for a couple
of days to harden.
t
up with their separate base frames and glued to the floor and the cockpit rear
bulkhead glued in place with the access door to the freight bay glued shut.
Simple seat belts were made up with strips of Tamiya tape cut to size. I omitted
all of the main fuselage interior detail, seats and flooring since nothing could
be seen through the tiny porthole windows in the fuselage sides. I chose to omit
the moulded glazing for these tiny windows, preferring to finish them with
Kristal Klear after the painting stage. In due course it was time to join the
fuselage halves, being simplicity itself, pausing only to trap the large square
window on the fuselage spine. The fuselage nose and one piece nose glazing were
glued in place, then the rudder and the whole structure set aside for a couple
of days to harden.
The wings consist of simple upper and lower panels and the horizontal tail planes one piece units, simply glued into place, although I used the main wing struts dry fitted to ensure that the wings were correctly aligned while they dried.
The nose glazing was masked off with carefully trimmed Tamiya tape and I elected to paint the main airframe at this stage
| COLORS & MARKINGS |
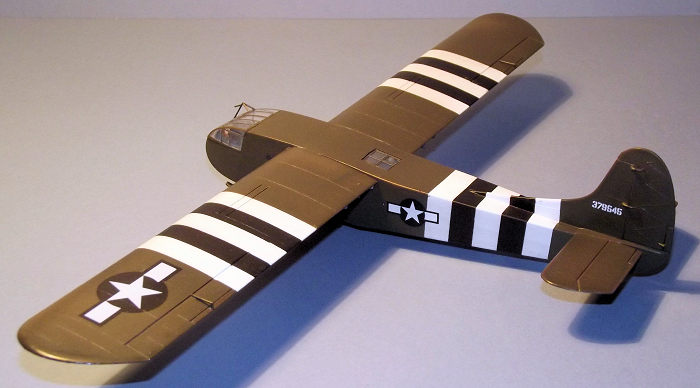
The areas that would receive the black and white invasion stripes were first painted White using Tamiya Ultra Fine white primer applied from a rattle can and the white areas were then masked out with Tamiya tape. The under surfaces were sprayed with Tamiya XF-54 Neutral Grey, masked off and then the uppers in Tamiya XF-51 Khaki Drab. Having identified which of the remaining struttery and hinges on the parts frames were which, they were sprayed in the appropriate finish at this stage. Finally the wing and fuselage stripes were re-masked so that the black striping could be applied in Tamiya XF-1 Flat Black.
 The finished
airframe received two hand brushed coats of Future/Klear as a sealing coat while
the simple decals were applied and they went on satisfactorily with a little
assistance from Micro Sol and Micro Set.
The finished
airframe received two hand brushed coats of Future/Klear as a sealing coat while
the simple decals were applied and they went on satisfactorily with a little
assistance from Micro Sol and Micro Set.
Finishing required a little care with the installation of some 40 parts for the struttery, hinges and landing gear. The airframe was propped upside down while some 22 little hinges were glued to the trailing edge of the flying surfaces. The landing skids under the main fuselage consist of four skis supported by ten small V brackets. The main gear units, a V strut/axle and vertical suspension strut were held in place by low tack putty until dry when they could support the weight of the main wheels. Finally the underwing struts were glued in place.
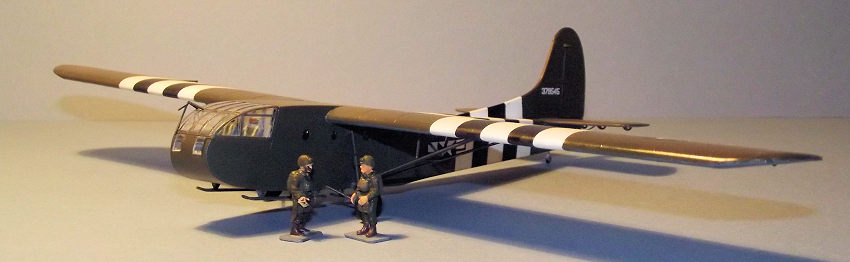
As a little extra decoration I painted up the two figures in the kit; both standing figures of paratroopers. No way am I a figure painter so they were just treated to an overall coat of Olive Drab, a splash of Tamiya Flesh colour and a bit of dark brown for the webbing and boots. Purely a nod to nostalgia and happy hours spent decades ago with Airfix OO/HO figures. They look neat in my showcase standing next to the finished glider.
| CONCLUSIONS |
With no engines, nacelles or bomb bays to mess around with, this is a relatively simple kit and two of the options in the kit have very simple colour schemes. A little care is needed at the finishing stage in adding the external details, but it just needs time and patience. I thoroughly enjoyed the build and this old kit stands the test of time well. The price was reasonable, so it is recommended by me. It is still a little gem.
| REFERENCES |
The internet and the kit instructions
21 February 2017
Copyright ModelingMadness.com If you would like your product reviewed fairly and
fairly quickly, please
contact
the editor or see other details in the
Note to
Contributors. Back to the Main Page
Back to the Review
Index Page
Back to the Previews Index Page