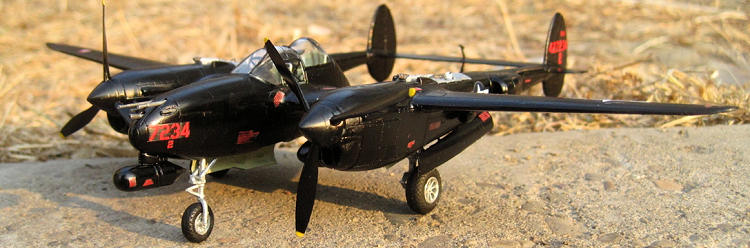
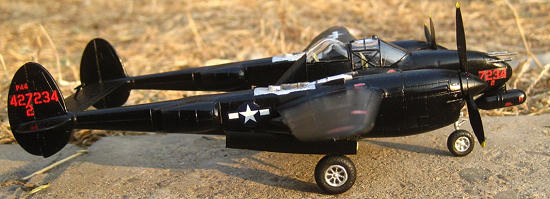
Dragon 1/72 P-38M
| KIT #: | 5019 |
| PRICE: | 60 RMB SRP |
| DECALS: | One version |
| REVIEWER: | Richard F |
| NOTES: |
| HISTORY |
The dedicated night-fighter was born in World War II. Early efforts to
attack the new breed of fast-flying bombers included ground controlled radar
guiding a searchlight equipped plane towards enemy bombers, which would light up
the targets for regular day fighters to attack.
Not surprisingly this wasn't very effective and it was the new invention
of radar that made the night-fighter a real proposition.
 By
the end of the war a wide range of aircraft had been fitted with radar, and the
roll-call of night-fighters includes the popular-with-modellers purpose-designed
P-61, the modified work-horses like the Bf-110 and Ju-88, and tricked-out high
performance fighters like the P-38 Lightning.
By
the end of the war a wide range of aircraft had been fitted with radar, and the
roll-call of night-fighters includes the popular-with-modellers purpose-designed
P-61, the modified work-horses like the Bf-110 and Ju-88, and tricked-out high
performance fighters like the P-38 Lightning.
The P-38M was an interim solution - a small extra cockpit was built into
the plane's central pod and a short guy could squeeze in there with his feet
either side of the pilot sitting in front of him. A small AN/APS-6 radar
apparatus was installed in a little pod under the nose. Apart from that and the
bubble canopy over the new rear cockpit, the P-38M was basically a standard
Lightning. It still carried the heavy armament of four .50 cal machine guns and
a 20mm cannon. Apparently its performance was more or less the same as a regular
Lightning.
There were 75 P-38Ms built and, according to Wikipedia, some of them
served in World War II but didn't see combat. Tell that to the guy who painted
the box art!
You can read more historical information about the P-38M
right here on MM in a review of the Trumpeter 1/32 P-38 converted by Tom
Cleaver to a P-38M.
| THE KIT |
This one is an older kit and my example showed it with a reasonable
amount of flash.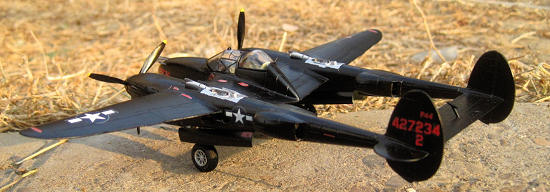
The cockpit detail is quite sparse aside from a nice instrument panel
for the pilot. Other detail is reasonable and the panel lines are nicely
engraved.
It includes two drop tanks in that distinctive Lightning style and comes
with underwing rocket launcher racks and the rockets to mount on them as well.
Another Dragon Lightning is previewed
right here on Modeling Madness The
Night Fighter kit does not come with the PE that's in the previewed recon
Lightning kit.
| CONSTRUCTION |
I bought this to join in the Modeling Madness "WW2 Twins" Group Build. I
rarely build WW2 subjects, and when I do, they are normally "turn and burn"
HobbyBoss easy kits. Naively I saw a Dragon kit on the shelf at my local shop
and thought "Dragon, how bad can it be?". I stopped at a tiny fishing supplies
place near my LHS and picked up a pocketful of little lead weights. It was
pretty obvious that this model would need a ton of ballast up front. Later I
discovered that some people think this kit is not so hot,
 and that
it is over-engineered.
and that
it is over-engineered.
Well, I didn't let that stop me and I began up front by putting together
the cockpit. This happens with relative ease but there was some flash to clear
out and also plenty of moulding artifacts which I didn't bother to fill on the
grounds they would be invisible at the end. The detail in here is quite sparse -
a nice raised instrument panel for the pilot and a barely detailed radar set
with scope for the shrimp in the back.
I put a bucketload of lead in the nose to be sure I wouldn't get a
tail-sitter.
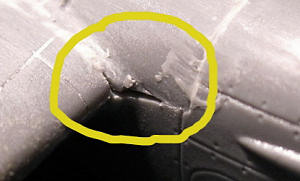
Getting the cockpit into the central fuselage pod is fairly easy but it
shows the overall fit of the kit to be less-than-perfect. I was a bit surprised,
but then I haven't build a Dragon kit in a long time. I remembered them fitting
better, but was probably comparing t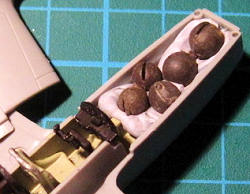 hem
to old-school Airfix.
hem
to old-school Airfix.
Still, it isn't appalling. It's just that you need a bit of putty here
and there.
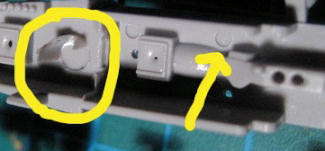
Remember to put some kind of blanking inside the rear air intakes either
side of each boom. I just used plastic card and painted it black.
I forgot to drill out the holes for the inboard drop tanks and for the
outboard rocket launcher rails. Ooops.
 The
rest of the plane goes together fairly easily. There's a bit of filling to be
done where the wings join the fuselage, but the twin booms fit nicely. Getting
the tail together isn't too hard either. The undercarriage takes a bit of
patience and I needed to trim the front parts to get them to fit into the nose
bay. The main bays have a long bent pipe or tube running front-rear and it is
quite hard to tell from the instructions how that should be installed. In the
end I used my best guess, based on the idea that the big kink in the tube was
meant to accommodate the main wheel when retracted. I tried to line it up with
that in mind. I put the doors on here to
The
rest of the plane goes together fairly easily. There's a bit of filling to be
done where the wings join the fuselage, but the twin booms fit nicely. Getting
the tail together isn't too hard either. The undercarriage takes a bit of
patience and I needed to trim the front parts to get them to fit into the nose
bay. The main bays have a long bent pipe or tube running front-rear and it is
quite hard to tell from the instructions how that should be installed. In the
end I used my best guess, based on the idea that the big kink in the tube was
meant to accommodate the main wheel when retracted. I tried to line it up with
that in mind. I put the doors on here to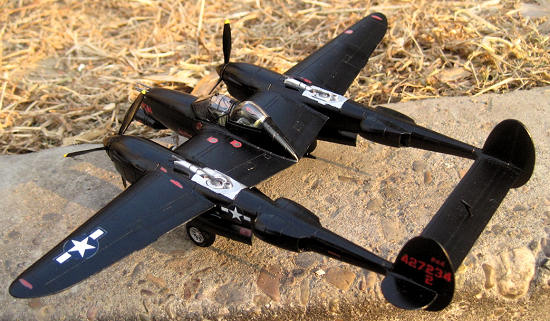 o,
which was delicate and took a few tries. They fell of several times during the
rest of the build.
o,
which was delicate and took a few tries. They fell of several times during the
rest of the build.
By that stage, you're basically done. Install the machine guns up front,
which is easy. I drilled out the front of the 20mm cannon but didn't have a
drill bit thin enough to do the machine guns. Now you need to add the canopy and
propellers and you're ready to go.
Doing those last two steps isn't so easy though. My canopy didn't end up
fitting perfectly, and it was hard to squeeze it down because there were so many
breakable things in the way of getting a secure grip. I got it in the end but
needed to fill the gaps either side with little bubbles of paint. The props are
a mighty hassle. I much prefer a single-moulded prop than a two piece spinner to
which you need to add each blade individually. Boring! And hard. Right at the
end I had to actually sand down the mounting points so the prop unit would
actually sit flush on the engine area. Doing so I broke off two of the very
flimsy landing gear bay doors. Still, I got it in the end.
I decided to leave off the rocket racks and rockets.
| COLORS & MARKINGS |
Hmm. Once there were two kinds of black: matt and gloss. Now of course,
in modeling's Golden Age, there are all kinds of blacks. Well, I decided on the
middle ground - I used Tamiya Semi-gloss black (acrylic X-18). I figured that
was about right. Two brush-coated coats was a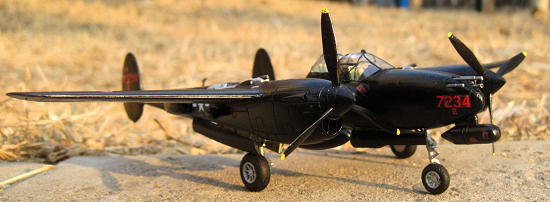 ll
I applied. Inside the wheel wells and cockpit I used the closest approximation I
have to the colours I see in other people's builds.
ll
I applied. Inside the wheel wells and cockpit I used the closest approximation I
have to the colours I see in other people's builds.
I painted the area where the turbochargers are in accordance with
this colour
photo of the same aircraft:
The Dragon decals go on relatively easily but they are quite silvery
despite the semi-gloss finish. It's only noticeable under direct harsh light, so
I didn't worry too much. Apart from the US insignia and some numbering, there
are just a large number of red stencils to apply. Unusually for me, I applied
most of these, because the little splotches of red break up the otherwise pretty
monotonous (but still good-looking) overall black finish.
| CONCLUSIONS |
A good kit that needed a bit more work than I might have expected from
Dragon. Patience is called for on the undercarriage, canopy and props. Decals
are a bit silvery.
Don't forget the nose weight!
Not a totally straightforward build, but easy enough. Recommended for
anyone with a basic skill set and who won't freak out at the thought of 20
minutes of putty and sanding. Some steps require patience and a steady hand.
| REFERENCES |
Wikipedia, and the following photographs of the aircraft 7234
represented by this kit:
http://www.
http://www.
Richard F
January 2012
Copyright ModelingMadness.com. All rights reserved. No reproduction in part or in whole without express permission from the editor. If you would like your product reviewed fairly and fairly quickly, please contact the editor or see other details in the
Note to
Contributors.