Tamiya 1/32 P-51D Mustang
| KIT #: | 60322 |
| PRICE: | $168.00 SRP |
| DECALS: | Three options |
| REVIEWER: | Len Roberto Jr. |
| NOTES: | Long awaited, best mustang kit in any scale. |
| HISTORY |
I’ll not bore you with the
history of the Mustang. There are
plenty of places to go online, books, magazines, etc to discover this!
| THE KIT |
There are a bunch of 1/32 scale
P-51D kits out there going back to the old Monogram kit of the 1960’s-
but all miss the mark in many ways.
The Hasegawa kit was OK but had poor detail in many areas.
Dragon’s latest had reversed props, phantom holes, and oh those divots.
 This
kit wipes the slate clean and provides all the options you could ask for and the
detail level is unmatched.
This
kit wipes the slate clean and provides all the options you could ask for and the
detail level is unmatched.
A
few quick high points of what the kit contains:
1.
2 tails provided-
with fillet and without
2.
2 instrument panels and shrouds
3.
2 different gunsights
4.
2 different radio sets
5.
Finally a properly done wheel well going back to spar
6.
3
different canopies
 7.
Moveable flaps, ailerons, and elevators
7.
Moveable flaps, ailerons, and elevators
8.
Ability to reconfigure model from gear down to in-flight easily using magnets
and screws
9.
Very
thin cowling pieces held on with magnets
10.
Masks
included for windscreen and canopy
11.
Display stand – same as Spitfire kits.
12.
2 Photoetch frets included.
In short, the kit is all that everyone has said it is… and more. To me, it’s the best plastic model airplane kit ever made. Now let’s build it!
| CONSTRUCTION |
 There
are about 78 construction steps with lots of things to pay attention to.
If I could give you a quick word of advice, it is to sit down with the
instructions for a couple hours and write notes in each step.
Use colored highlighters to note where the photoetch is used, where the
decals are used throughout, and a pen to make notes on each step.
It will prevent any mistakes and focus you on what each step entails.
It was a big help for me.
There
are about 78 construction steps with lots of things to pay attention to.
If I could give you a quick word of advice, it is to sit down with the
instructions for a couple hours and write notes in each step.
Use colored highlighters to note where the photoetch is used, where the
decals are used throughout, and a pen to make notes on each step.
It will prevent any mistakes and focus you on what each step entails.
It was a big help for me.
Also, even though the
instructions are well thought out, I still jumped around a bit to speed things
up and because I had to pay attention to how I would be painting -
so that dictated what sub-assemblies I worked on.
Here are the basic sub-assemblies
I worked on:
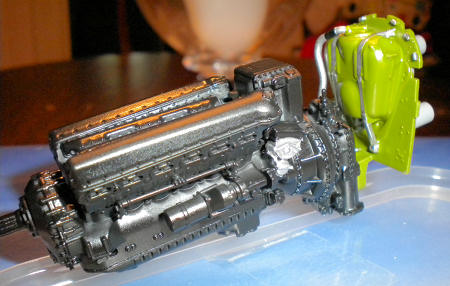
1.
Merlin engine-
easy assembly and 99% of it is semi-gloss black!
2.
Cockpit sidewalls-
assorted bits to add to each side so those were completed on their own
and put aside for painting.
3.
Cockpit-
a model in itself!
Very detailed and everything fits superbly.
These first 3 assemblies are glued together and a screw is used to help
make it very secure. This then fits
into the fuselage side.
 4.
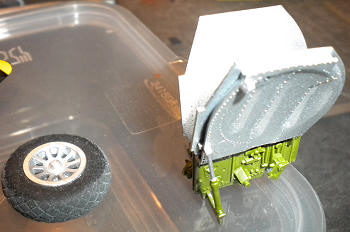
Wheel well-
a fun little night’s project here.
Again with tweezers for help, this fits together very well and has great
detail- much better than any other
wheel well and finally we have it going back into the wing to the spar-
missed on every other Mustang kit.
The gear doors are a separate removable assembly allowing modeler to
reconfigure model to in-flight.
4.
Wheel well-
a fun little night’s project here.
Again with tweezers for help, this fits together very well and has great
detail- much better than any other
wheel well and finally we have it going back into the wing to the spar-
missed on every other Mustang kit.
The gear doors are a separate removable assembly allowing modeler to
reconfigure model to in-flight.
5.
Wings and control surfaces-
flaps use a very useful design with polycaps-
to allow movement and metal pins used for other control surfaces to be
posed.
6.
Landing gear-
these screw into the wheel well and can be removed easily for converting
to in-flight. Solid rubber tires
have been maligned a bit but I managed to sand them down to get rid of the seam
line.
7.
Canopy-
all 3 have a seam line down the middle as well as an antenna entry bump
which is not correct for the decal options. I
tried to sand it down and was going to future it as most will do-
well…they are quite thin and I broke 2 of the 3 canopies during what I
thought was careful sanding!
BEWARE! So I did not mess with the
3rd one- it is what it
is…seam and all.
8.
Various other bits like
radiator scoop, elevators, rudder, prop…all went together easily and make nice
little evening projects. Think of
each as a mini-model!
9.
Final assembly went together easily
with one minor point to watch for.
 Two
areas to watch for: (could be my
own fault but want to bring them up anyway)
Two
areas to watch for: (could be my
own fault but want to bring them up anyway)
1.
Gear door assembly-
did not fit into the wheel well easily. I
had to reattach the actuator part a couple times.
It seems like the slot they fit into is almost flush against the spar yet
the notch they are to glue to is farther back on the door part causing them to
not line up with the slot.
2.
Wing to fuselage join-
was fine at the back and sides of fuselage but at the front, there are 2
small areas just under rear of engine for attaching and they took a long time to
hold and set- no real way to attach
a clamp so I had to hold them quite a while.
A tiny bit of filler used here and they look fine.
3. Magnets- careful with the metal tweezers! They are powerful things and got a bit frustrating at times. Small drops of CA glue used.
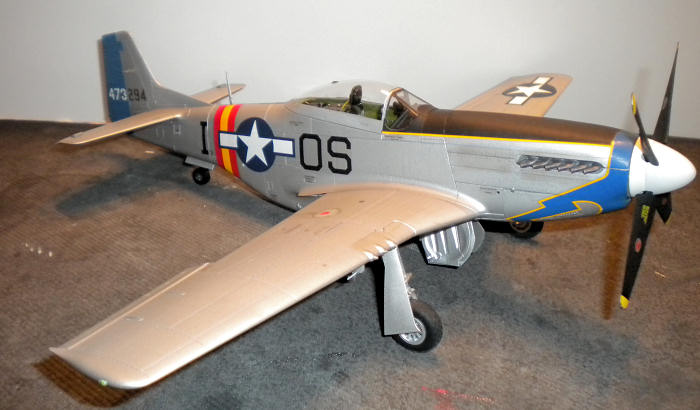
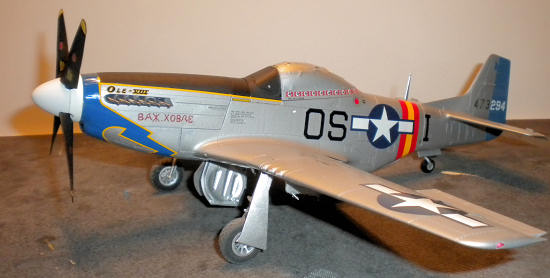
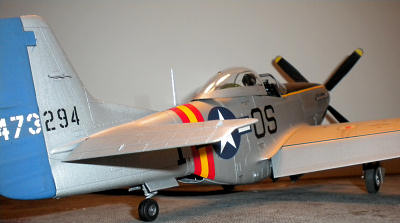
| COLORS & MARKINGS |
The kit offers 3 decal options:
79th Fighter Squadron, 20th
Fighter Group- early- no fin
fillet.
487 Fighter Squadron, 352nd
Fighter Group- Petie 2nd
Red-nose 4th FG-
Blondie
I have quite a few decals saved
for 1/32 scale Mustangs and decided on a colorful 355th FG post-war
occupation forces aircraft. There
were a couple challenges here.
Mainly, the nose decals were going to go across the 4 cowling pieces and I would
have to slice them when dry to allow the panels to be removed to show the
engine. Also, I would have to match
the blue with paint for the rudder and the chin scoop piece which was not
covered by the nose decal.
 Interior
Green was used extensively for the cockpit, sidewalls, engine bracing and the
wheel well. Probably more accurate
to do as Lee Kolosna points out and go
with Yellow Zinc Chromate for wheel well.
Interior
Green was used extensively for the cockpit, sidewalls, engine bracing and the
wheel well. Probably more accurate
to do as Lee Kolosna points out and go
with Yellow Zinc Chromate for wheel well.
Blue-
I mixed Blue Angel blue with some white to get the match to the decal for
rudder and for the chin that was not covered by the decal.
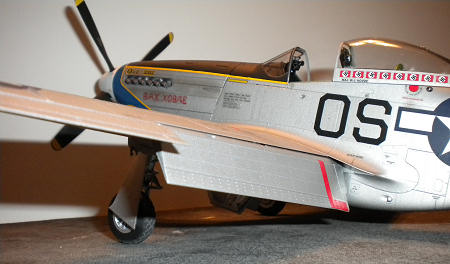
Bare Metal Finish-
I used Tamiya’s AS-12 BMF spray over a light grey primer.
Flat black used for prop, radio
gear, engine (then glossed) and anti-glare panel.
Light weathering done with pastel
chalks. I have a great color photo
of this aircraft and it looks pretty well kept.
| CONCLUSIONS |
Simply
the best airplane kit ever. With
the choices in the box, the level of detail and the reconfigure options; the kit
is a masterpiece of design. Parts
fit as you would expect from modern Tamiya-
fantastic.
| REFERENCES |
http://www.modelingmadness.com/scotts/decals/aero/am32020.htm
September 2011
If you would like your product reviewed fairly and fairly quickly, please contact me or see other details in the Note to Contributors.