| KIT #: | 3401 |
| PRICE: | $22.50 |
| DECALS: | One option |
| REVIEWER: | Fernando Rolandelli |
| NOTES: |
| HISTORY |
Conceived as
a means of keeping the USAAC involved in the Mustang program, the A-36 was
really an attack fighter-bomber used with some success by three Groups, one in
the CBI theater (together with P-51As) and two in the Mediterranean. About 500
 were
produced, of which 177 were lost in combat, while reportedly performing over
23.000 combat missions.
were
produced, of which 177 were lost in combat, while reportedly performing over
23.000 combat missions.
Two myths
immediately come to mind when referring to the A-36: the question of the name
and that of the air brakes. Fear not: the name of this machine was not Invader
nor Apache, but Mustang, according to the latest doctrine, Apache appearing in a
company’s private brochure and Invader proposed and rejected on the basis the
plane already had a name. Regarding the airbrakes, early theories about its
ineffectiveness are now reported to be untrue, the devices being wired shut only
when used in mixed formations with P-51s. Sadly –should I add amusingly?-,
Accurate Miniatures has fallen into both traps. It is true that molding the
airbrakes opened, involving the bays for them, would have been expensive.
Reportedly, the company argued that they didn’t dare put “Mustang” in the box
lid because the misconception about the name was too widespread.
| THE KIT |
| CONSTRUCTION |
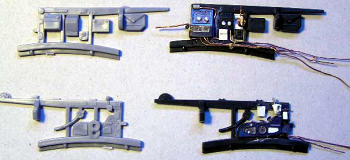 Though at
first sight the interior may appear good and complete, being of the “hollow
sidewall” variety (preventing both the appearance of sink marks in the surface
as well as the cramped “tub-like” interior), it does not bear much resemblance
to the real thing. Both the sidewalls and the floor were extensively modified,
partly with scratchbuilt items, partly with some pieces from the Eduard PE set
(itself not very accurate either! I would strongly recommend the Part one); the
pictures show the additions made to both (the light grey parts come from the
Mustang Ia kit, identical to those in the A-36). The kit’s seat is rather
hopeless, but the
Though at
first sight the interior may appear good and complete, being of the “hollow
sidewall” variety (preventing both the appearance of sink marks in the surface
as well as the cramped “tub-like” interior), it does not bear much resemblance
to the real thing. Both the sidewalls and the floor were extensively modified,
partly with scratchbuilt items, partly with some pieces from the Eduard PE set
(itself not very accurate either! I would strongly recommend the Part one); the
pictures show the additions made to both (the light grey parts come from the
Mustang Ia kit, identical to those in the A-36). The kit’s seat is rather
hopeless, but the
 Eduard one
is very good. Harness was sourced from the Eduard Pre-painted P-40E set. The
instrument panel is the first of the “clear” variety; some people do not like
it; while I do, the presence of one in the Eduard set made the choice easy
(neither is completely accurate, be warned! I did not correct anything on it,
but added the handles for charging the .50s). It is however very, very flimsy.
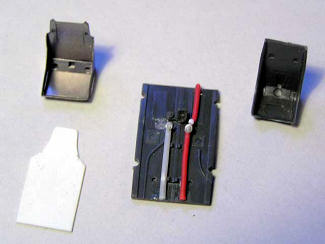
The kit lacks completely the head and back armor, which I made of sheet styrene.
The gunsight is not correct; making a better one is easy, using styrene rod. The
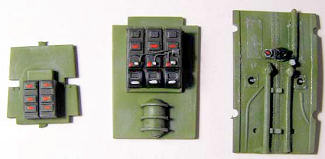
rear shelf electrical and radio boxes were detailed and painted following the
excellent P-
Eduard one
is very good. Harness was sourced from the Eduard Pre-painted P-40E set. The
instrument panel is the first of the “clear” variety; some people do not like
it; while I do, the presence of one in the Eduard set made the choice easy
(neither is completely accurate, be warned! I did not correct anything on it,
but added the handles for charging the .50s). It is however very, very flimsy.
The kit lacks completely the head and back armor, which I made of sheet styrene.
The gunsight is not correct; making a better one is easy, using styrene rod. The
rear shelf electrical and radio boxes were detailed and painted following the
excellent P-
 The
interior was painted in US Interior Green FS 34151. I was in doubt about this
shade, for it came to use at the same time the A-36 were being built, but some
emails to Colin Ford (who’s field of expertise is RAF Mustangs) I opted for it,
brushing aside Bronze Green and Dark Dull Green.
The
interior was painted in US Interior Green FS 34151. I was in doubt about this
shade, for it came to use at the same time the A-36 were being built, but some
emails to Colin Ford (who’s field of expertise is RAF Mustangs) I opted for it,
brushing aside Bronze Green and Dark Dull Green.
Constructing
the fuselage is not so simple. Everything fits well, if you take your time. I
assembled the sidewalls to the fuselage halves, then the instrument panel, the
floor and the rear shelves to the right one (you cannot glue them from below).
Next I glued the barrels of the chin .50s (I did not want to risk them
falling inside the completed fuselage, and it would be easier to cope with
alignment problems this way). They have a strange conical muzzle, which I cut
and replaced with proper ones made of Contrail rod. I also made a bulkhead for
the carburetor intake.
AM has made
no attempt of detailing the radiator exit ramp, and neither did I; this is very
prominent part of the airframe, and there is no easy way of doing anything about
it. With some boldness that I lacked at the moment, it could be opened and
detaile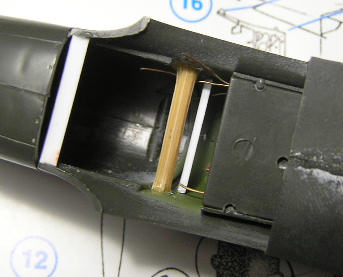 d,
possibly using the circular radiator provided in the PE set and the excellent
Tamiya example as a model.
d,
possibly using the circular radiator provided in the PE set and the excellent
Tamiya example as a model.
The fuselages were assembled as per de instructions, the rear halves and then the front ones. I resorted to some wideners to achieve a smooth surface.
Wings
Well, they
are very good, but not without their problems. The wheel wells are well
detailed, and, anyway, the main doors should be closed; even so, I added a few
things, including twin pipes which are really prominent (though actually hardly
visible). They were painted Aluminium lacquer (adding a bit of Light Grey to
Aluminium paint)
The pylons
are too long, they should not cover the ejection ports, but, not being able of
finding a way around them, I let them alone. I blanked off the backs of the
airbrakes (painting the plates in camouflage color), but I shunned from
depicting them deployed (the Eduard PE set brings the complete set for doing so,
but they look very flimsy) Then, I decided to cope with the landing lights. AM
correctly depicts the paired lights on the left wing, but they provide only the
opening and the clear cover; I “boxed” the opening and made two circular lights
from rod. It is not 100% accurate, but better than nothing. The opening was
painted Zinc Chromate.
 I also
feared the .50s muzzles would fall inside the wings, but gluing them before
closing the wings would leave them exposed when puttying and sanding the leading
edge. I cut the muzzles themselves from their backs, which I glued as stops. It
worked.
I also
feared the .50s muzzles would fall inside the wings, but gluing them before
closing the wings would leave them exposed when puttying and sanding the leading
edge. I cut the muzzles themselves from their backs, which I glued as stops. It
worked.
The
instructions made you attach the L-shaped pitot tube. This is incorrect; A-36s
used a spear-type pitot tube in the right wing leading edge. No problem, it is
provided, just search for it and attach it in its socket. It goes in remarkably
well.
Mating wings
to fuselage was troublesome, in part due to the wideners, but once everything
“clicked” together, the seam is not a problem. Just filling and sanding a bit.
After that, I added the radiator intake part. Inside, I added the small intake
that can be seen in pictures, made from a square chunk of plastic.
Well, the
provided parts are crystal clear but somewhat thick. Wanting to depict it open,
I bought a Squadron replacement, which is intended to have you cut the entire
spine around the canopy. I did not, but cut the canopy itself in a more
traditional manner. The kit’s quarterdeck windows were used. The vac canopy fits
admirably; I did not cut the fixed birdcage part from the windscreen and they
fit great. In hindsight, you could even leave the roof attached; if just marking
it with a few knife passes; you could easily flex it to pose it open. A little
drop of cyano on some strategic points, some white glue and putty bed and it
blended in reasonably well. I added some gimmickry of the opening mechanisms to
the inner frames. Masking the frames is a pain; I used the quarterdeck windows
as a template for their tape masks. I painted many of the frames also from the
inside, something unusual but forced by the peculiar nature of this canopy.
Once the
airframe was glued, puttied and sanded and polished, it went to the paint shop
for a Light Grey primer and some radical preshading (a technique not cherished
by everyone).
| COLORS & MARKINGS |
 Another
“well…” The instructions have you paint the model in “Olive Drab FS
Another
“well…” The instructions have you paint the model in “Olive Drab FS
Weathering
was achieved by oils, airbrushed washes and some pastels, all applied after the
decals. I use to protect my enamel painted models with a acrylic clear gloss
varnish coat; it makes them impervious to white spirit thinned oils and washes.
The same dark wash used for the exhausts was liberally sprayed over some panel
lines, recesses, flying surfaces and following the air stream over most of the
airframe. Some chipping was made via a silver pencil. Pastels were used to dust
the well trodden
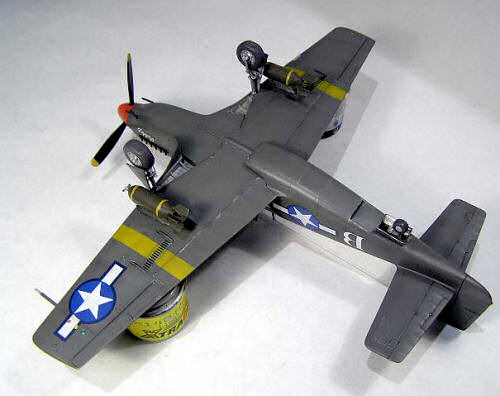 areas. All
this treatment went a long way in giving the model that battered –but not
dilapidated- look seen in period pictures (in my experience, weathering does not
photograph well, which show it very subdued, so, when I see pictures showing
dramatically weathered models, I invariably think “I’d like to see that model in
person”).
areas. All
this treatment went a long way in giving the model that battered –but not
dilapidated- look seen in period pictures (in my experience, weathering does not
photograph well, which show it very subdued, so, when I see pictures showing
dramatically weathered models, I invariably think “I’d like to see that model in
person”).
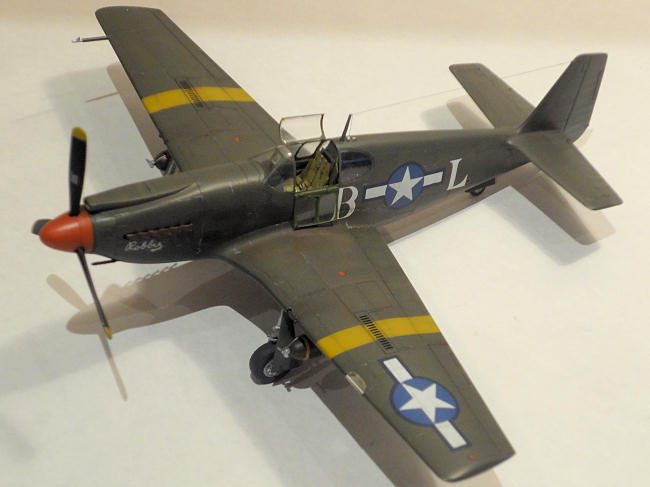
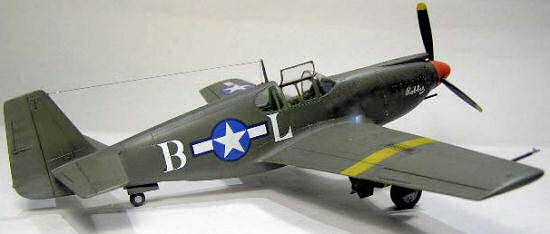
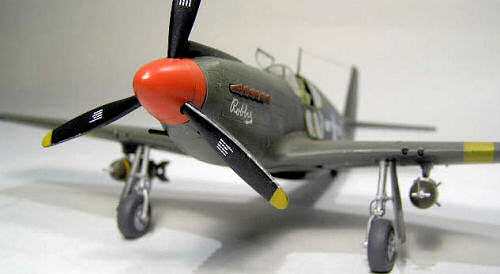
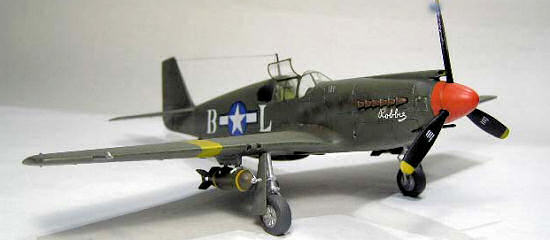
As usual,
there is only one decal choice in the kit, “B”, from the 522nd FBS/27th
FG,
| CONSTRUCTION CONTINUES |
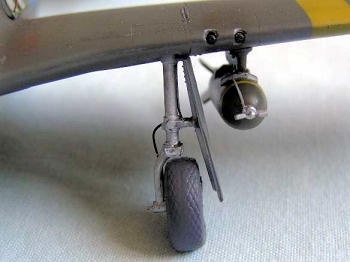
The
undercarriage is notably flimsy… pay a lot of attention to it. The Eduard parts
really add detail to it. Remember to glue the main doors closed.
The bombs
looked wrong at first sight, far too big; the reason is that the restored
example shown in the D&S book carries two 250lbs! However, some photos do show
the big bombs carried, and the ones provided are entirely correct for 500
pounders.
The movable
parts of the canopy did not give any trouble either; I attached the roof with
white glue and the folding side with super glue.
The antennae
and wire pretty much ended the kit.
| CONCLUSIONS |
| REFERENCES |
- “US
Army Air Corps Color Guide”, Don Archer, Monogram Publishing
- “Straight
down – The A-36 Dive Bomber in combat”, Peter C. Smith,
- Squadron Walkaround “Allison Mustangs”, Squadron Signal
Fernando Rolandelli
July2012
If you would like your product reviewed fairly and fairly quickly, please contact the editor or see other details in the Note to Contributors.