| KIT: | Eduard 1/48 P-400 Airacobra |
| KIT #: | 8061 |
| PRICE: | $22.50 from Roll Models |
| DECALS: | Two options |
| REVIEWER: | Fernando Rolandelli |
| NOTES: |
| HISTORY |
 Bell
P-400, flown by Lt. Eugene Wahl, from 35th/39th FG, Port
Moresby, May 1942
Bell
P-400, flown by Lt. Eugene Wahl, from 35th/39th FG, Port
Moresby, May 1942
From being one of the culprits of the early 1942 Pacific debacle, the Bell fighter is nowadays being reappraised as a good, reliable aircraft that held its own against one of the best trained, highest motivated and most determined enemies you could find. Though, undoubtedly, an aircraft of rather lackluster performance, it managed to keep the enemy at bay (with a probable 1-1 kill ratio) in the wake of the Allied defeat, amidst the utter chaos of Northern Australia and New Guinea, without adequate support and lacking the most minimal early warning system. No fighter could have done well in those conditions. Besides, the exploits of Soviet pilots with it are now beginning to be fully appreciated (though no Western historian will take their victory claims at face value!) The additional fact that it is a very handsome machine which donned very interesting camouflage schemes makes it a highly desirable modeling subject.
| THE KIT |
Well, though discussions will rage forever regarding the relative merits of the old Monogram kit and the new Eduard ones, the latter are among the best kits in the market, not only due to the quality and detail of the plastic components themselves but for the clever packaging of many interesting options in terms of decals, additional PE parts, painting masks and optional parts.
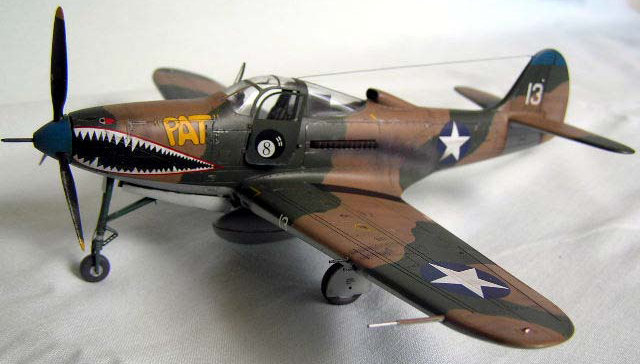
Requisitioned Airacobra
The subject of this build is a Bell P-400, flown by Lt. Eugene Wahl, from 35th/39th FG, Port Moresby, May 1942. It was one of a batch of 179 ordered by the British Purchase Commission and requisitioned by the USAAC. One hundred of these were rushed to Australia, where they fought mixed with P-39D-1BE and -2BE, still in their British livery.
| CONSTRUCTION |
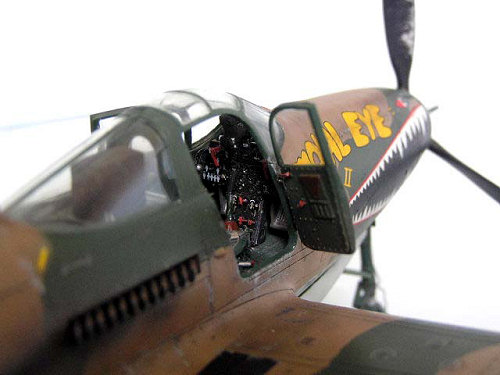
 Interior: it is a very flimsy assembly that includes the nose wheel bay; if
this assembly results narrower than should be, the nose strut won’t fit. The
three-piece nose will not align well unless everything is perfect. The gunsight
is somewhat simplified; the relationship between the gunsight and the windscreen
is complex and lot of dry testing is needed to avoid the gunsight glass being
buried below the windscreen level. The lack of coaming forces you to attach the
rear of the upper row of instruments, at least. The seat is great, but you
should add the rails at its back. I used Eduard prepainted PE sets sold
separately; they assemble well, of course, and provide useful parts, specially
the instrument panel.
Interior: it is a very flimsy assembly that includes the nose wheel bay; if
this assembly results narrower than should be, the nose strut won’t fit. The
three-piece nose will not align well unless everything is perfect. The gunsight
is somewhat simplified; the relationship between the gunsight and the windscreen
is complex and lot of dry testing is needed to avoid the gunsight glass being
buried below the windscreen level. The lack of coaming forces you to attach the
rear of the upper row of instruments, at least. The seat is great, but you
should add the rails at its back. I used Eduard prepainted PE sets sold
separately; they assemble well, of course, and provide useful parts, specially
the instrument panel.
Canopy:
it just does not fit well. It seems just a tiny bit narrower than the fuselage,
just enough to fit badly; the fact that fuselage halves are usually assembled a
little loose to make room for the instrument panel composes the problem. I have
worked hard to blend it from the outside, but the results are far from perfect.
Doors are another problem: they do not fit in the closed position. Now, left
door was usually wired shut… but the choice is yours. My lazy nature won, and
left it open. I still have to find a picture of
 a P-39 parked with the flaps
deployed, so I readily found an excuse to skip the complex PE flaps.
a P-39 parked with the flaps
deployed, so I readily found an excuse to skip the complex PE flaps.
Wings: strangely, the left leading edge intake fits much better than the right one; even so, I made a lot of dry fitting. I painted Black all the center of the wing to avoid a nasty see-through effect when using Eduard’s PE mesh screen,. The trailing edges must be thinned a lot; but these were split-flaps, so the trailing edge should not be razor-sharp! It could even have a little separation. I glued the PE wheel bay reinforcements from the inside of the wing before adding the wheel roof.
Propeller/gun muzzle assembly: though a blade-by-blade assembly, it is not so fiddly as it seems. The instructions are pretty clear regarding which one must be used. The Hispano muzzle is ridiculously long… I cut at least 3 mm, and then reattached the muzzle carefully.
| COLORS & MARKINGS |
 Interior:
it seems that Bell fighters were painted in the once called “Bell Interior
Green”… now thought to be just a variant of the usual Dark Dull Green of the
early years. I used Testors MM FS 34092, some Xtracrylix Medium Green 42 and
some Floquil RAAF Foliage Green!
Interior:
it seems that Bell fighters were painted in the once called “Bell Interior
Green”… now thought to be just a variant of the usual Dark Dull Green of the
early years. I used Testors MM FS 34092, some Xtracrylix Medium Green 42 and
some Floquil RAAF Foliage Green!
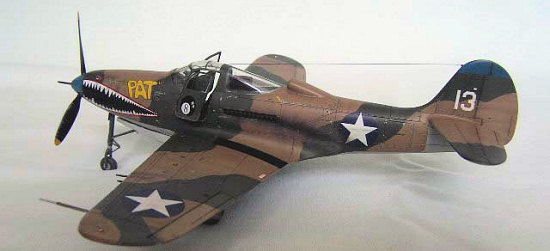
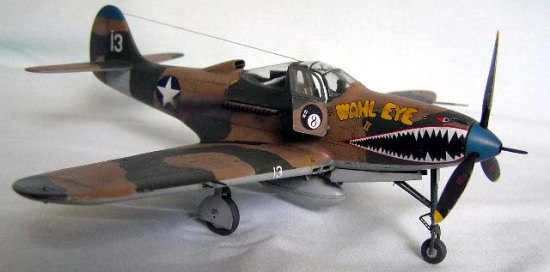
Exterior: painted to BPC specifications in standard British camouflage… in
colours from the Du Pont range. The exact hue of each is not known, samples have
not yet been unearthed, yet It seems they were a poor match for the originals,
specially the Dark Earth 71-009: too light and reddish, and much prone to
weathering; while the Dark Green 71-013 was honestly different, lacking the
olive tint of the original. Undersides were a pale grey, Sky Grey 71-021, though
of course it is argued, some people saying that
 it was a pale blue, and some
even maintaining it was Sky Type S. Much the same arguing that exists around
early Tomahawks/Kittyhawks, which were painted in the same fashion. Well, I used
as base colors FS 30219 and Medium Green 42, mixed with some of the original
British shades, on ADC Grey 36473, all from the Xtracrylix range. They have a
smooth sheen, and decals could be applied without a gloss varnish… I didn’t
dare. They are also thick and clog the airbrush easily, specially the varnishes.
I applied them with liquid mask; I think the originals were painted with rubber
masks at the factory, just like Curtiss did. All by themselves, the contrast was
much too stark, but it went down with weathering and flat varnish. To give the
model that battered look seen in operational machines, I used some preshading,
postshading, oil washes, airbrushed exhaust and gunpowder stains and, in sheer
desperation, mottles and strakes in a dark glaze. But I shall never reach that
state of “almost single color uppers” sometimes seen in pictures.
it was a pale blue, and some
even maintaining it was Sky Type S. Much the same arguing that exists around
early Tomahawks/Kittyhawks, which were painted in the same fashion. Well, I used
as base colors FS 30219 and Medium Green 42, mixed with some of the original
British shades, on ADC Grey 36473, all from the Xtracrylix range. They have a
smooth sheen, and decals could be applied without a gloss varnish… I didn’t
dare. They are also thick and clog the airbrush easily, specially the varnishes.
I applied them with liquid mask; I think the originals were painted with rubber
masks at the factory, just like Curtiss did. All by themselves, the contrast was
much too stark, but it went down with weathering and flat varnish. To give the
model that battered look seen in operational machines, I used some preshading,
postshading, oil washes, airbrushed exhaust and gunpowder stains and, in sheer
desperation, mottles and strakes in a dark glaze. But I shall never reach that
state of “almost single color uppers” sometimes seen in pictures.
I chose
to paint the propeller tips Yellow. Most P-39s do not sport them, but those
which do are almost always P-400s.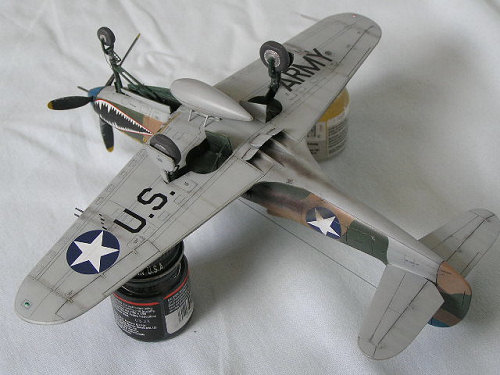
Decals: I used those included in the box, they are of aftermarket quality. There are some issues, however, but not with the airframe I chose… well, almost! In the Osprey book a profile is shown of “Pat/Wahl Eye II” where the graffiti is painted in Blue, the Flight color, which is fairly reasonable. Some other book shows the trims as yellow! The second P-400 offered, from the 80th FG, may have sported a highly weathered British camouflage, and not the OD/NG shown, which makes it a much more interesting finish. Nothing serious, just some contested schemes. With such a camouflage is depicted in a Polish book.
| CONCLUSIONS |
The early US star really shows in a DG/DE machine, making this and their P-40 mates very attractive modeling subjects. Besides, these hard worked, unsung machines are perfect to practice some good weathering.
| REFERENCES |
- “Monogram’s Guide to USAAC Colours and Markings”, Don Archer
- “US Export colors and Primers”, Dana Bell
- “P-39 Airacobra Aces of WW2”, Mellinger and Stanaway, Osprey Publications
- “Second World War Special”, Fine Scale Modeller Magazine.
- “P-39 In Detail and Scale”, Bert Kinzey.
February 2007
If you would like your product reviewed fairly and quickly by a site that has nearly 350,000 visitors a month, please contact me or see other details in the Note to Contributors.