ProModeler 1/48 P-47N Thunderbolt
| KIT #: | 5929 |
| PRICE: | $20.00 SRP when new |
| DECALS: | Two options |
| REVIEWER: | Steve Towle |
| NOTES: |
| HISTORY |
The P-47 N was the final
production model of the “Jug” to go to war for the U.S. during the Second World
War.
It was developed from the experience gained from the P-47M, which was
used in Europe for chasing down V-1 Buzz Bombs and for shooting down Me-262’s.
The M model “Jug” was considered to be the hot rod of the family.
The N model was
designed specifically for the Pacific theater. It's design features included new
larger wings with more wing area and the addition of 93-gallon fuel tanks and
had mountings for five rockets on each wing for the late model P-47N-R-RE. Also
the N had longer ailerons and square tips for rapid rolls. A redesigned beefed
up landing gear was added and made wider and moved further away from the
fuselage to handle the all up weights that could reach up to 20,700 Lbs. Which
in turn required more power from a up rated engine change to the R-2800-57(C)
mated to a CH-5 super charger found in the M model. Also, the Dash 57 (C) engine
added more power with the aide of water injection for War Emergency boost when
speed was needed. So the N combined the speed qualities found in the P-47M
engine and combined them with a redesigned wing for adding range for flying
across the Pacific and escorting B-29s to the Japan.
The N model served exclusively in the second half of 1945 in the Pacific theater. Flying from Le Shima , Iwo Jima and on Okinawa. All Ns were dressed in natural metal and of course painted with those naughty pin-ups or cartoon characters. It helped make pilots like Captain John E. Vogt a ace in one day with five kills on the 28th of May,1945 and 1st Lt. Oscar Perdomo of the 507th fighter group became the last " Ace in a Day "on the last day of the war.
| THE KIT |
I bought this kit in 2005 at my local hobby store, it
was a shelf sitter stacked with four other kits on the bottom shelf at ankle
height covered with a light coating of dust. Unloved, forlorn and frozen in time
with the original sticker of price of 19 dollars and 50 cents with tax it came
to a little over 20 dollars. I liberated the kit from purgatory and brought it
home for a "Out of Box" build.
With a copyright date of 1997 perhaps this boxing was
the only release and if your looking for a P-47N model in 1/48 the ProModeler
kit or the Academy's release are the only two games in town. Unless you can
source a Medallion Models 1/48 scale conversion set for converting the Monogram
P-47D into a P-47N with resin wings and white metal Curtiss Electric type 386
prop and landing gear which was released back in '93.
 The kit
box is rather flimsy but functional with a painting of Capt. Jolene Vogt's "Drink'n
Sister" a
P-47N-2-RE on the top painted with Black anti glare panels.
The side panels have two photos of built up kits for
Vogt's "Drink'n Sister" completed with Blue trim and natural metal and
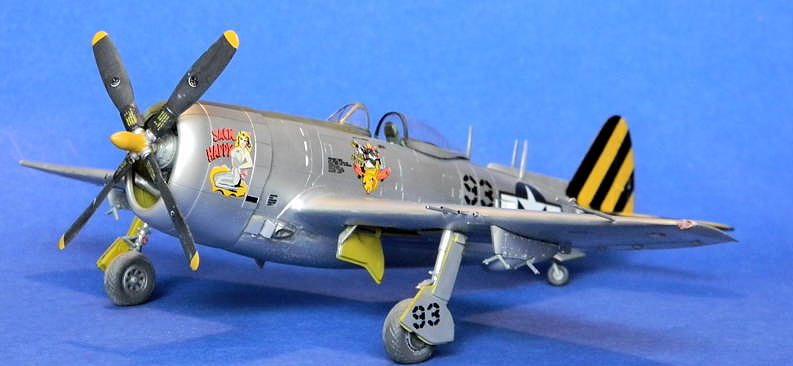
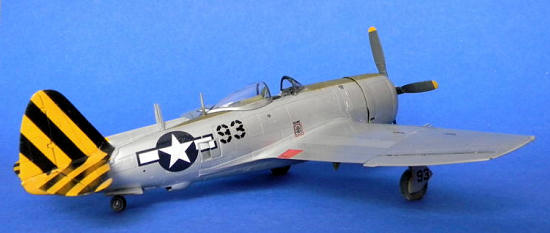
Lieutenant Robert W. Redfield's "Sack Happy" completed with the yellow and
striped tail over natural metal.
The kit
box is rather flimsy but functional with a painting of Capt. Jolene Vogt's "Drink'n
Sister" a
P-47N-2-RE on the top painted with Black anti glare panels.
The side panels have two photos of built up kits for
Vogt's "Drink'n Sister" completed with Blue trim and natural metal and
Lieutenant Robert W. Redfield's "Sack Happy" completed with the yellow and
striped tail over natural metal.
Opening the box
one sees a bagged kit with grey plastic parts with inscribed panel lines and a
comprehensive 20 page instruction booklet with a history photo's, parts break
down, and color call outs with options for building either a early model
P-47-1-RE bomb or auxiliary tanks carrying Jug or the later P-47N-2-RE which
carried ten missiles. Not bad for 1997. The kit in the bag looks promising
enough.
The decals are for two models a P-47N-2-RE again "Drink'N Sister”, of the 19th FS, 318Th FG equipped with bombs and missiles and markings for a P-47N-1-RE "Sack Happy", 44-88320 73rd, 318th FG,based at Le Shima. They're not too bad, being somewhat thick and out of register on the props markings but I used them after being in the box for 13 years. The nose art for "Sack Happy" or "Drink"N Sister" are not up to today's standards for graphics’ in decals. They are mostly done in primary colors.
| CONSTRUCTION |
This kit does a lot to echo some of Monograms
earlier releases of the P-47 so I took out their earlier P-47D release and
compared the two kits fuselages. Basically, the kit can be divided into two
assemblies comprising the fuselage and the wings. With the newer release
matching many of the panel lines of the old with in-graved ones and dividing the
fuselage into two vertical half's with two slot and tab mounted horizontal fins
on one end and a single piece cowling with flaps on the other end. Surprisingly,
the newer kit doesn't include the latch panel covers for the cowling but
replaces the relief engine of the earlier model with a full engine showing two
sets of cylinder banks and a crankcase with two magnetos that are appropriate
for the N model. After the little comparison of kits, I removed the after
mention parts from the P-47N kit's spruces and sanded them with a sanding stick,
dry fitted as needed and glued them with tube glue and left them to dry over
night.
Ending up with a fuselage that was glued together with the horizontal
fins, left and right waste gates and intercooler, supercharger and engine at one
end. I left the cowling and tail wheel off for later because, I find it too easy
to break off the tail wheel and scratch the paint and ruin the finish and
therefore, saved them for the final assembly.
The cockpit
like the Monogram of old is built up into a tub arrangement only with more parts
that have side panels and a seat attached to a base with a control panel and
petals. This little sub assembly has no aligning pins for mounting to the
fuselage and it doesn't have to be trapped between the fuselage half’s. The
modeler simply puts the cockpit into the opening on top using the
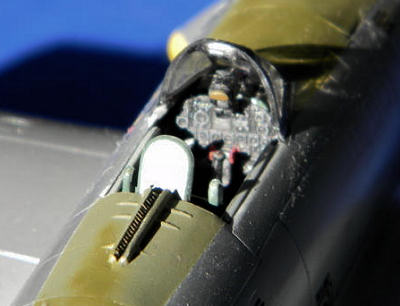 armored plate
behind the cockpit seat as guide for gluing. . This allows the modeler to add
the cockpit later because, of the wing opening in lower fuselage being so big.
I'd recommend that the cockpit be glued with a medium setting cyanoacrylate
glue. I held it into place with my fingers and tacked a bead on one end and then
ran a bead along the length of cockpit tub followed with strips of Evergreen
plastic and more glue to beef things up. This whole arrangement seemed odd but
it works. Also, the antenna mast directly behind the cockpit was added with a
tab arrangement that is rather awkward and like all Monogram kits is made with a
little play built into it. I mounted it and still had to sand the base flush to
fuselage.
armored plate
behind the cockpit seat as guide for gluing. . This allows the modeler to add
the cockpit later because, of the wing opening in lower fuselage being so big.
I'd recommend that the cockpit be glued with a medium setting cyanoacrylate
glue. I held it into place with my fingers and tacked a bead on one end and then
ran a bead along the length of cockpit tub followed with strips of Evergreen
plastic and more glue to beef things up. This whole arrangement seemed odd but
it works. Also, the antenna mast directly behind the cockpit was added with a
tab arrangement that is rather awkward and like all Monogram kits is made with a
little play built into it. I mounted it and still had to sand the base flush to
fuselage.
The
bottom wing...the people who designed this kit are not familiar with the needs
and construction habits of modelers and they designed a wing that is awkward to
assemble and makes things easy to break.
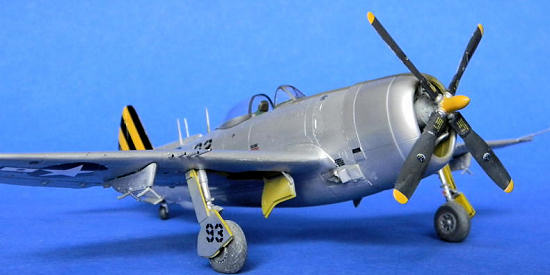
The kit's bottom wing (part #75) requires that you add
the landing gear during construction because the gear is molded to wing spar
used to box in the gear bays. This creates a strong gear but leaves the landing
gear exposed to being broken by the modeler during handling. Also, the bottom
wing's surface
looked as if it had been pulled out early from the molds
and had some uneven and distorted surfaces around the mounting holes for the
rockets, bomb racks and in the wing tips.
To complicate things, the two wing tops pieces when
glued to the lower bottom piece have the lower flaps mold into them which makes
a good thin trailing edge however, one must take care when gluing them to avoid
a step in a seam that appears on lower side of the flap.
On the plus side, the kit wings
have some decent detail in the wheel wells which are
deep and do a good job of boxing them in while, showing some detail for the
stringers, ribs and spars, actuating arms for the inner doors and the main
landing gear. This is an improvement from the older Monogram P-47 kits that used
slot and tabs to mount the wings, which left a seam in the wheel well. However,
this approach leaves the inner gear doors and a set of actuating arms, as well
the landing gear to again being exposed to being damage from handling. Another,
concern is that this arrangements makes the right main gear strut a little off,
it's not true because, of the wing dihedral and can be corrected with a little
pressure/bending from the fingers after the wing has been glued to the fuselage.
I might add that one of my gifts and talents played
right into this concern of dropping things and I dropped the kit from three feet
above the ground, proving that the landing gear is strong.
Another feature
designed into the wings are the gun mounts or plastic inserts that hold the gun
barrels in place and they do a good job of aligning them parallel to the ground
when glued in which is feature of the P-47. However, they're cannon fodder for
people who break things. So machine gun barrels parts 44 and 43 were cut off and
glued separately towards the end of construction.
The tires seem odd at first, they're weighted and have a flat bulge and almost looked like they were over inflated when viewing in the gray colored plastic. I did buy a resin set of wheels that were based on the Academy's version of the P-47N kit and painted them up thinking that they were better but, this is a case of being prejudiced by another kits interpretation of the facts and after looking at the references concluded that they weren't accurate. The original tires were used and painted and saved for final assembly.
The outer landing
gear doors were left off too and required some filling because; of the inner
door push pin marks. They're molded in one piece and are rather simple and plain
and when you look at the older Monogram D kit they're missing the round
 inspection plate of the bottom half.
A final note for
assembling the wings, when gluing the upper and lower pieces use some caution in
clamping or taping the wings towards the tips ...the plastic is thin and you can
depress and distort them. I was using medium setting cyanoacrylate glue and used
too much pressure on the right tip. Definitely a klutz moment and it created a
little putty party from that over sight.
Next up the wing
to fuselage joint. With hind site I'd glue two styrene tabs on the fuselage on
the leading and trailing edge sides to better align the wing to fuselage joint.
Followed by lots of dry fitting. This is a typical Monogram/Promodeler build in
that the wing to fuselage joints always seem to have a little play built into
the kit and you have find that sweet spot or middle ground that keeps things in
alignment while possibly leaving some cracks or space between things. Again
ProModeler's conventionally unconventional design for the bottom wing is awkward
although the design can be seen in Mustang and Spitfire kits having a one piece
lower wing ...when used on a P-47 kit creates a horse shoe hump between the
wings which is too flexible. The hump being the lower fuselage and when you do
find that sweet spot that keeps the wings and fuselage in alignment you will
have several gaps between the upper wing and the wing fillets or fairings
joints. I filled them with strips of sheet styrene and by laying down two strips
of Tamiya tape running along the outer edges of the gap and then applied liberal
amounts of gap filling super glue between the tape strips.
Now that all of the major parts were together the chore of smoothing out all of the glue joints was met with sand paper and sanding sticks. This model was going to be painted in a natural metal finish so lots of sanding, wet sanding, polishing and some filing (where the wings leading edge meets the fuselage) became, a ritual of doing over and over again until a acceptable finish could be made. A lot of these seams were shot with white paint to better see the imperfections too.
| COLORS & MARKINGS |
The majority of this kit was painted using model
railroad paints. I like to use the Floquil range because, the pigments are fine,
shoot well in an airbrush and are rather durable to the missgivings of this
modeler's hands. Reefer White makes a great primer and is a good under laying
paint for brightening those Yellow, Orange and Red colors. Engine Black is good
for a black shiny finishes and Grimy Black makes a great wash for those engine
cylinders. Weathered Black is a flat gray black which is great for wheels and
props. With Old Silver being the stand by for painting all of the natural metal
surfaces mixed with either white or black
 to get some contrast and different
shades of silver for different panels of sheet metal.
to get some contrast and different
shades of silver for different panels of sheet metal.
The cockpit was
painted using Model Master Paints and Euro Dark Green was used to capture the
green used by Republic. All of the Zinc Chromate came out of one of those little
Testors bottles and was used for the wheel wells, fire wall and the inside of
the engine cowling.
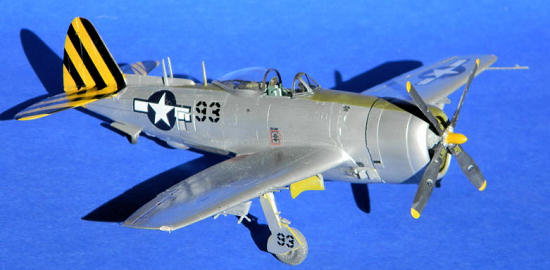
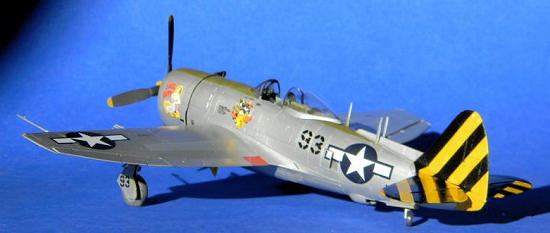
The actual exterior painting focused on doing "Sack
Happy" because, of the cool factor and having the Yellow and Black tail and I
didn't want to mount any rockets... besides, the lower wing made things more
complex with its imperfections... so I began with the tail which was taped off
and primed with white and
shot with Union Pacific Yellow. Followed by some masking
using the kit supplied tail decals as templates to get the blacks strips. Engine
Black was used for that. I didn't trust the 13yr old decals and want a paint
finish that could hold up to someone handling the kit by the tail. I then used
Model Master Olive Drab for the anti -glare panels. Following up with some Old
Silver for the over all finish.
Finally, I painted the red warning patches on the wing
flaps in ATSF Red because, of durability.
The whole thing
was "Futured" using a fine red sable brush along with the canopy parts being
dipped, dried, masked and painted for later assembly.
The kit decals
were used (with the exception of the black tail stripes) after 13yrs of sitting
in a box, they worked. I set them in a bowl of luke warm water and found that it
took them a minimum of 5-8 minutes to separate from the backing paper other wise
they would begin to tear. I then took a brush, dabbed on a little pool of Future
and then carefully would slide them into place. Dab a rag onto of the decal to
remove the air and press things out to conform to the kit. Some decals were hit
with a little Micro Set. Let dry and then sealed with another brushing of
Future.
| FINAL CONSTRUCTION |
| CONCLUSIONS |
If you can find this kit, you’ll get your moneys
worth provided you approach this kit with some patience and modeling skill. I
wouldn't recommend it to somebody new to the hobby or to someone not familiar
with the rituals of painting natural metal finishes
(NMF) for the first time.
| REFERENCES |
American Warplanes
of World War II. Combat Aircraft of the United States Army Air Force
US Navy,US Maine Corps 1941-1945. Edited by David
Donald. Published by Barnes and Noble,Inc. ISBN: 0-7607-2274-9
Fighters of the United States Air force. From World
War I Pursuits to the F-117. By Robert F.Dorr & David Donald. Published by
Military Press. ISBN 0-517-66994-3
Military Aircraft
Preview. The Modeler's Guide to New Products. Volume 1. Number 5. April/May
1993. Published by Three Geese Publishing.
February 2011If you would like your product reviewed fairly and quickly, please contact me or see other details in the Note to Contributors.