Airfix 1/72 OS2U Kingfisher
| KIT #: | 02021 |
| PRICE: | A few dollars at swap meets6.98 |
| DECALS: | options vary by boxing |
| REVIEWER: | Brian Baker |
| NOTES: |
First issued in the 70’s,
reissued in the 80’s and “90’s. |
| HISTORY |
The
Vought XOS2U-1 was a fleet reconnaissance monoplane designed to operate from
catapults from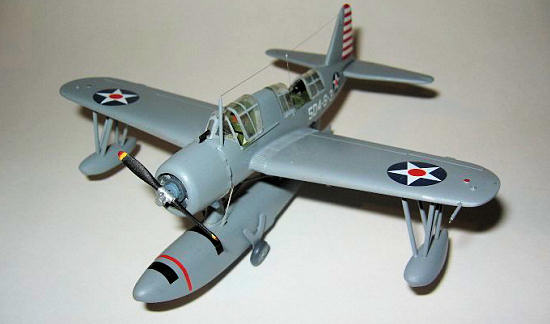 gear.
Variants included the OS2U-1, OS2U-2, and OS2U-3, which differed only in
minor details. A few experimental models
were also produced. An additional
300 OS2N-1’s, identical to the OS2U-3, were manufactured by the Naval
Aircraft Factory in Philadeplhia.
Export models went to the Royal Navy during the war, and also to the Royal
Australian Air Force, who took over an order from the Dutch.
These were delivered in Dutch markings,
and were subsequently repainted in RAAF colors.
I’d like to see a color scheme of these planes in NEIAF markings.
Additional OS2U’s were given to
gear.
Variants included the OS2U-1, OS2U-2, and OS2U-3, which differed only in
minor details. A few experimental models
were also produced. An additional
300 OS2N-1’s, identical to the OS2U-3, were manufactured by the Naval
Aircraft Factory in Philadeplhia.
Export models went to the Royal Navy during the war, and also to the Royal
Australian Air Force, who took over an order from the Dutch.
These were delivered in Dutch markings,
and were subsequently repainted in RAAF colors.
I’d like to see a color scheme of these planes in NEIAF markings.
Additional OS2U’s were given to
The
Kingfishers were used by the Navy throughout the war for fleet spotting and
air-sea rescue work, recovering numerous downed aircrew.
A few were even operated from destroyers, but not for long. The most
famous action was the rescue of Capt. Eddie Rickenbacker after his plane went
down in the Pacific in October 1942.
One OS2U pilot,
spotting
gunfire during the
| THE KIT |
 This kit
has been around for a long time, and has been issued and reissued since the
1970’s by Airfix (had to be very early 70's as I can
recall building this in 1976 in the MPC box. Ed) and more
recently (2002) by Octopus.
The kits
I used were molded in silver
or
dark blue styrene, and the molds show some wear,
This kit
has been around for a long time, and has been issued and reissued since the
1970’s by Airfix (had to be very early 70's as I can
recall building this in 1976 in the MPC box. Ed) and more
recently (2002) by Octopus.
The kits
I used were molded in silver
or
dark blue styrene, and the molds show some wear,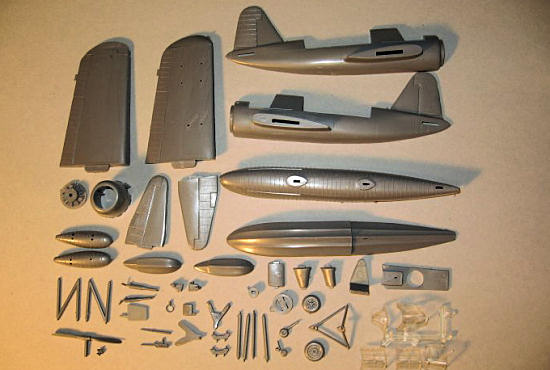 as there is a bit of flash to
be removed, although this is not a problem.
Detail consists of raised panel lines, which should be removed, and some
raised boiler plate rivets, but there is little detail inside the cockpit except
for the seat and a rear decking which contains a turret ring.
The canopy is probably the worst feature of this kit, as it doesn’t
really fit although it is quite transparent.
The windshield has no provision for a gunsight,
something nearly all OS2U’s had.
as there is a bit of flash to
be removed, although this is not a problem.
Detail consists of raised panel lines, which should be removed, and some
raised boiler plate rivets, but there is little detail inside the cockpit except
for the seat and a rear decking which contains a turret ring.
The canopy is probably the worst feature of this kit, as it doesn’t
really fit although it is quite transparent.
The windshield has no provision for a gunsight,
something nearly all OS2U’s had.
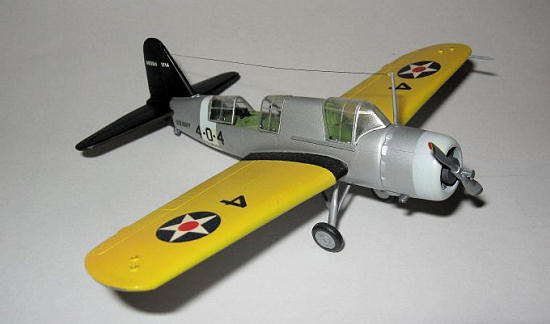
The wings appear to be correct in outline, although holes will need to be drilled where the wingtip floats and bomb racks should be installed. Control surfaces, which were fabric covered, are represented by fine raised lines, and this is effective. The engine crankcase protrudes too far ahead of the cowling, and should be trimmed back. The prop is rather crude, and the blades need reshaping, although the forward section is good, showing the prop balancing weights used for prop pitch control. The cowling is very basic, and the exhaust stacks slide into the rear part of the cowling, and these need trimming.
The
wheeled landing gear consists of three main struts assemblies, the wheels, and
the tailwheel.
The float assemblies
are rather simple, with the wingtip float struts being the correct shape.
One rather obvious problem is on the topside wing roots, where
 there is a
corrugated wingwalk provided on each side.
I left mine on, although a purist would probably fill them in. Small
details, such as the machine gun, radio mast, and pitot tube, are nicely done,
as are the beaching wheels for the floatplane version.
there is a
corrugated wingwalk provided on each side.
I left mine on, although a purist would probably fill them in. Small
details, such as the machine gun, radio mast, and pitot tube, are nicely done,
as are the beaching wheels for the floatplane version.
All in
all, although this is an old kit, it is certainly worth building, especially
since its only contemporary competitor
was the old Lindberg kit, which is quite rare and actually has less detail than
the Airfix kit. Pavla and Octopus have issued more recent kits, but I have not
seen these and can’t comment on them, although I have built other kits from
these manufacturers, and they are good, although quite expensive.
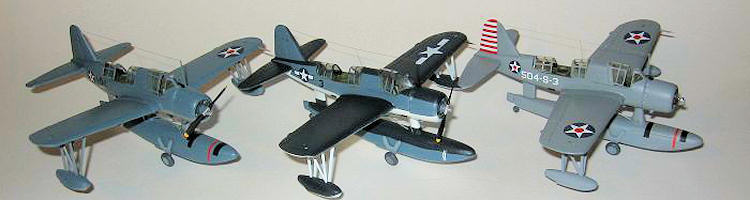
Since I liked the airplane,
and
had a number of kits on hand, I decided to build three, in addition to the two I
already had. All are illustrated in this article.
There are
a couple of things missing on the kit that should probably be added.
These planes had four retractable steps ahead and behind the wing, and
photos show them in both extended and retracted position.
I chose the retracted position. There is a small tube that protrudes from
the rear fuselage just behind the left wing root, and this can be made with
sprue.
In addition, a few OS2U’s
had an extra bracing strut on the wingtip floats, but most did not. Check photos
before you add this detail.
| CONSTRUCTION |
 I began
by trimming the flash and smoothing all of the main components.
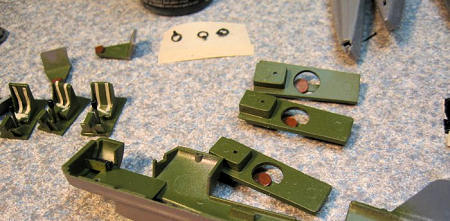
I scratch built the cockpits, using the seats but adding a floor,
control stick, some side panel detail, and an instrument panel.
In the rear cockpit, I added a gunner’s seat, but decided to use the kit
turret ring and gun mounting, even though they were not quite up to standard.
The interiors were painted in US Navy Interior green.
I drilled out the float strut holes and bomb rack holes and then
assembled the wings.
Fuselage
assembly was fairly easy, and not a lot of filler was required for the seams.
The wings attached quite well, with
the correct dihedral angle built in.
I began
by trimming the flash and smoothing all of the main components.
I scratch built the cockpits, using the seats but adding a floor,
control stick, some side panel detail, and an instrument panel.
In the rear cockpit, I added a gunner’s seat, but decided to use the kit
turret ring and gun mounting, even though they were not quite up to standard.
The interiors were painted in US Navy Interior green.
I drilled out the float strut holes and bomb rack holes and then
assembled the wings.
Fuselage
assembly was fairly easy, and not a lot of filler was required for the seams.
The wings attached quite well, with
the correct dihedral angle built in.
The tail
unit, the horizontals, also were easy to
attach and line up, so basic assembly went fairly quickly.
I decided to only attach the windshield, which fitted quite well,
although they could have included the hole for the gunsight, which was not
included in the kit. I then masked the windshield for painting.
The
engine was painted
before placing it inside the cowling, although the crankcase needed to be
trimmed back so
 that the prop was in the correct position.
The exhaust stacks need to be inserted
into the rear of the cowling, and these require some attention to get them
placed properly.
that the prop was in the correct position.
The exhaust stacks need to be inserted
into the rear of the cowling, and these require some attention to get them
placed properly.
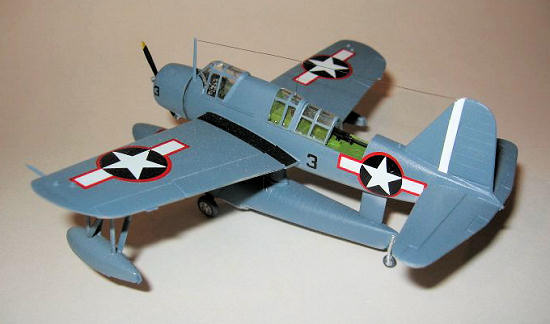
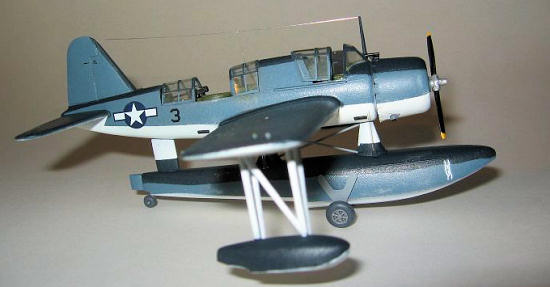
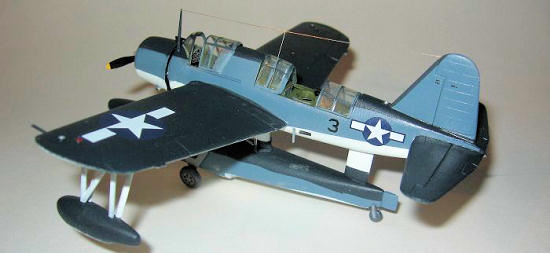
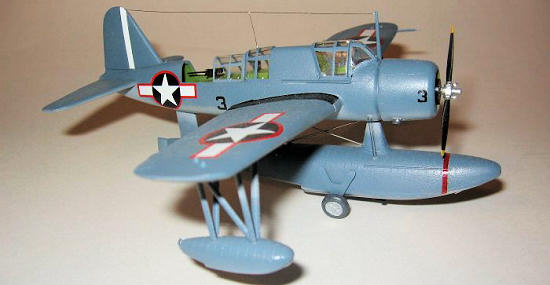
Since I was building the floatplane versions, I assembled the main and wing floats, and trimmed the flash off the strut fittings. There is a small hole in the float sides for attaching the beaching gear, and I enlarged this slightly to it would fit the gear strut. The wingtip floats required quite a bit of work, both sanding off the rivet detail and filling the seams to get them to line up smoothly, and afterwards, I attached the “N” struts, which are the vertical component of the units, leaving the other struts until after painting.
| COLORS & MARKINGS |
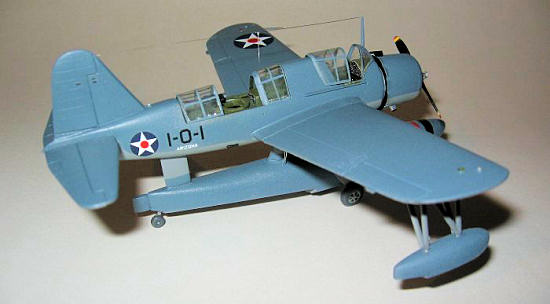 1695, from VO-1 aboard USS Arizona during Pearl
Harbor Day ( in intermediate blue over neutral grey) , and OS2U-3, bn 5733, from
USS Baltimore (CA-68) (in the late war tri-color scheme) required painting
before the main
and wingtip floats
were attached.
The cockpit areas
required masking, and some detailing of the engine was also needed.
The props all had black blades with silver hubs, but while the late war
OS2U-3 had yellow tips, the others required the three color red, yellow, and
blue tips more common to pre-war Navy aircraft.
1695, from VO-1 aboard USS Arizona during Pearl
Harbor Day ( in intermediate blue over neutral grey) , and OS2U-3, bn 5733, from
USS Baltimore (CA-68) (in the late war tri-color scheme) required painting
before the main
and wingtip floats
were attached.
The cockpit areas
required masking, and some detailing of the engine was also needed.
The props all had black blades with silver hubs, but while the late war
OS2U-3 had yellow tips, the others required the three color red, yellow, and
blue tips more common to pre-war Navy aircraft.
| FINAL CONSTRUCTION |
 There
were two things not included in the kit that I decided to add.
In between the main floats are a couple of thick bracing wires, and I
used thin rod for these.
In
addition, and also not included in the kit, were some bracing wires running from
the tops of the floats to the underside of the fuselage.
These are parallel flying wires, and require eight wires for each mode,
not including the small mounting stubs which need to be attached to the tops of
the floats.
I just whittled them
out of thin plastic strips, and, after painting them,
superglued them to the float tops.
After they were in position, I cut short pieces of wire and attached them
to the fuselage.
In addition, I
then attached the canopies using Tenax, and also the radio mast.
With the mast in position, I cut a piece of wire for the LF wire antenna,
and after it was in place, I glued on the connection wire to the left side of
the fuselage.
There
were two things not included in the kit that I decided to add.
In between the main floats are a couple of thick bracing wires, and I
used thin rod for these.
In
addition, and also not included in the kit, were some bracing wires running from
the tops of the floats to the underside of the fuselage.
These are parallel flying wires, and require eight wires for each mode,
not including the small mounting stubs which need to be attached to the tops of
the floats.
I just whittled them
out of thin plastic strips, and, after painting them,
superglued them to the float tops.
After they were in position, I cut short pieces of wire and attached them
to the fuselage.
In addition, I
then attached the canopies using Tenax, and also the radio mast.
With the mast in position, I cut a piece of wire for the LF wire antenna,
and after it was in place, I glued on the connection wire to the left side of
the fuselage.
| CONCLUSIONS |
| REFERENCES |
 There is
quite a bit of reference material available on the Kingfisher.
Probably the best source is the Squadron In- Action No. 119, although the
large Profile # 251 is also useful.
The type is included in a number of Squadron publications on US Navy Color
Schemes, and even William Green’s War Planes of the Second World War, Vol.
There is
quite a bit of reference material available on the Kingfisher.
Probably the best source is the Squadron In- Action No. 119, although the
large Profile # 251 is also useful.
The type is included in a number of Squadron publications on US Navy Color
Schemes, and even William Green’s War Planes of the Second World War, Vol.
Brian Baker
November 2011 If you would like your product reviewed fairly and fairly quickly, please contact the editor or see other details in the Note to
Contributors.