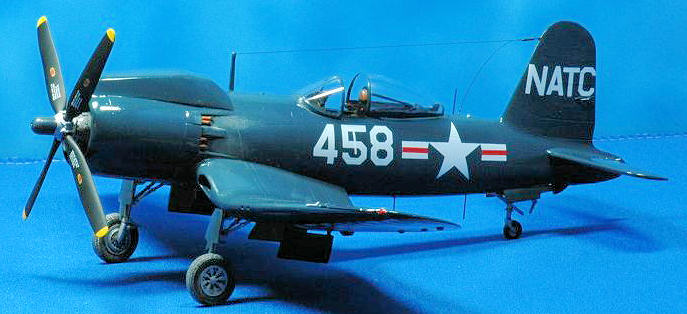
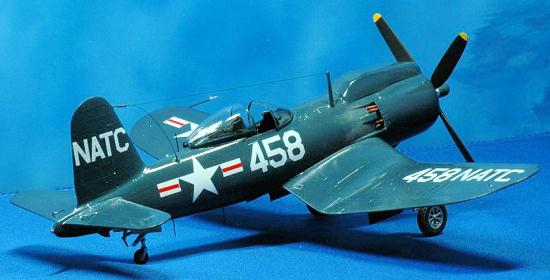
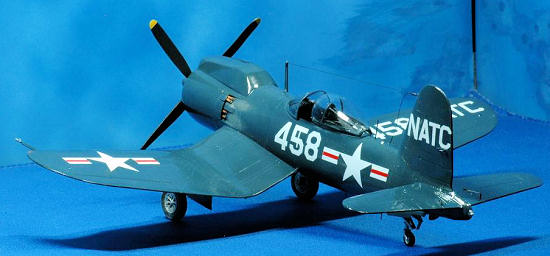
Special Hobby 1/48 F2G-1 Super Corsair
| KIT #: | 48049 |
| PRICE: | $42.00 MSRP |
| DECALS: | See review |
| REVIEWER: | Andy Garcia |
| NOTES: |
Obscureco Prop, True Details F4U-4 Resin
Cockpit |
| HISTORY |
Pratt & Whitney made a proposal
to the US Navy Bureau of Aeronautics in early 1943 that an R-4360 engine should
be installed in the F4U airframe. The U.S. Navy wanted 418 F2G Corsairs
developed and produced. The first production aircraft was BuNo 14691 to be
delivered in April 1945 to NAS Patuxent River, Maryland.
Seventeen Goodyear-built
aircraft would receive the XF2G or F2G designation representing seven
pre-production airframes for XF2G-1 aircraft, BuNos 13471, 13472, and 14691 to
14695. This was to be followed by ten production aircraft F2G-1 BuNos 88454 to
88458 and F2G-2 BuNos 88459 to 88463. The Goodyear Flight-test department
contributed nine other aircraft that were involved in supporting the F2G
project. These aircraft did not receive the XF2G nor F2G designation as each
plane was only given specific F2G modifications, none of which alone brought the
aircraft up to F2G specifications. That’s why you will find a photo, for
example, of a birdcage Corsair with the R-4360 engine! For example, BuNo 12992
appears in some texts as an XF2G but it is actually an FG-1A that had been
stricken from the US Navy inventory and was used by Goodyear as a shake and bake
airframe for static tests.
F2G-1D BuNo 88458 was the last
“dash 1” airframe in the small F2G-1 production batch. They were made by
Goodyear Aircraft Company (GAC) who was the eventual builder of all the final
production aircraft designated F2G-1D/2.
 The R4360
engine featured a lighter and simpler single-stage, variable speed supercharger.
This engine provided high power at low altitude without the complexity of a
two-stage intercooled engine like the existing R-2800 Corsairs. This resulted in
the change to a smaller wing air inlet.
The R4360
engine featured a lighter and simpler single-stage, variable speed supercharger.
This engine provided high power at low altitude without the complexity of a
two-stage intercooled engine like the existing R-2800 Corsairs. This resulted in
the change to a smaller wing air inlet.
During F2G development, a
variety of carburetor air intake configurations were tried. Thus, you may find
several variations of BuNo 88458 depending on when the photo was taken. This
version used a very large cowl air intake that goes by a variety of nicknames,
“camel back”, “dog house”, or the technical term “large extended intake” and was
used in the post WWII air races on F2G racers.
I found a large and excellent
photograph of F2G-1D BuNo 88458 in the F4U Corsair In Action, Squadron
Publication # 1145 on page 28. An additional color profile in Corsair – Thirty
Years of Filibustering 1940 –1970 by Bruno Pautigny – Histoire & Collections
Books on page 77 was another fine reference source.
The reason I wanted to model this version was to add the large induction cowl version to my ongoing F2G build. I really like Super Corsairs!
| THE KIT |
No specific kit information provided. Check the previews section. Ed
| CONSTRUCTION |
This model represents a standard
build of the Special Hobby F2G. I modified it by adding the True Details F4U-4
Corsair resin cockpit and used the parts to replace the very crude kit cockpit.
It is not a drop fit but applying some modeling skills gets you a much better
F2G like cockpit along with additional details like the cockpit coaming eyebrow
switch boxes and gun sight. The cost is just right and the details quite nice. I
used the SH headrest and rear bulkhead as well as the front SH instrument panel
plastic to establish the size parameters for the True Details resin F4U-4
cockpit. A rotary grinder bit on the Dremel was the best tool for this task.
The F2G-1 Corsair had major
modifications from earlier Vought Corsairs:
There was no carrier arrestor
landing hook. Photo references show its absence.
P&W R-4360 Wasp Major engine
which also caused changes to the induction, exhaust, supercharger and deleted
the intercooler systems. Externally it gave the Corsair a much longer engine
cowling and with the extra large air intake a very unique profile.
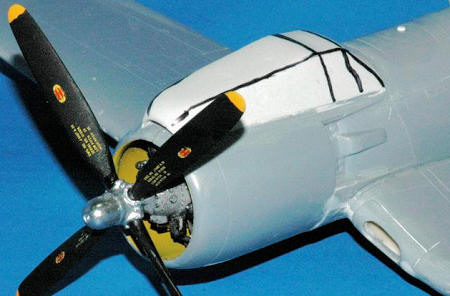
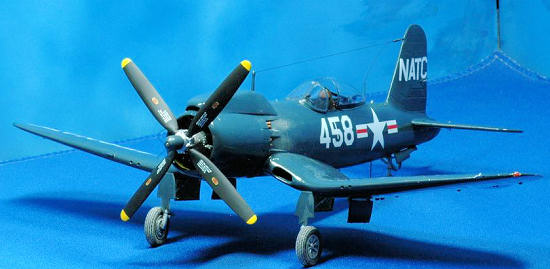
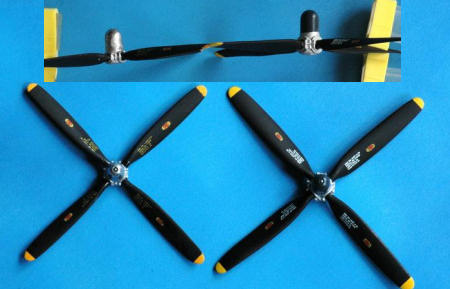 Larger prop
– it used a larger Hamilton Standard “Super Hydromatic” 14’ four blade
propeller. The kit prop is undersized and was replaced thanks to a great person
and modeler Boyd Waechter who having recently built the SH F2G kit acquired one
of the first resin replacement props from Obscureco for use in his beautiful F2G
build. The replacement prop is a beauty. The SH kit prop apparently is a rough
copy of existing F4U Corsair props.
The F2G prop was larger in all respects. The F2G was the
first single engine prop plane to have a reversible prop. This allowed
feathering and other adjustments familiar to bomber pilots but never seen in a
prop fighter plane before the F2G. The added feature required a larger prop hub
which Mike Meeks, the master pattern maker of the Obscureco F2G prop clearly put
into his resin masterpiece. On all counts, size and shape of the blades, prop
hub, etc Mike put together the finest replacement prop the F2G could take! The
photos of this compared to the kit prop speak for themselves.
Thank you Mike!!
Larger prop
– it used a larger Hamilton Standard “Super Hydromatic” 14’ four blade
propeller. The kit prop is undersized and was replaced thanks to a great person
and modeler Boyd Waechter who having recently built the SH F2G kit acquired one
of the first resin replacement props from Obscureco for use in his beautiful F2G
build. The replacement prop is a beauty. The SH kit prop apparently is a rough
copy of existing F4U Corsair props.
The F2G prop was larger in all respects. The F2G was the
first single engine prop plane to have a reversible prop. This allowed
feathering and other adjustments familiar to bomber pilots but never seen in a
prop fighter plane before the F2G. The added feature required a larger prop hub
which Mike Meeks, the master pattern maker of the Obscureco F2G prop clearly put
into his resin masterpiece. On all counts, size and shape of the blades, prop
hub, etc Mike put together the finest replacement prop the F2G could take! The
photos of this compared to the kit prop speak for themselves.
Thank you Mike!!
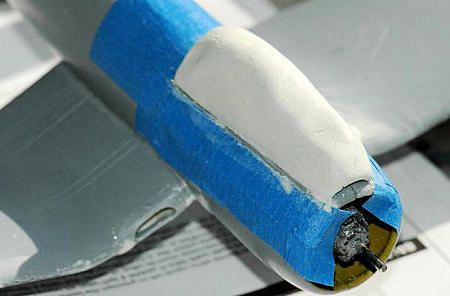
A very large and long 'raised
ram-air' induction intake was made from Aves Apoxie Sculpt to create the longer
and larger engine scoop. What made this conversion possible was the use of Aves
Apoxie for sculpting the carburetor scoop. I purchased Apoxie from the Aves web
site.
 New wing
tanks increasing fuel from 234 US gallons to 309 US Gallons.
New wing
tanks increasing fuel from 234 US gallons to 309 US Gallons.
Smaller wing root intakes only
for the oil cooler since there is no intercooler. It was redesigned for the
final F2G versions. SH has done this area quite well with rsin and etched
enhancements.
Siamese interconnected exhausts
used in later R-4360's.
The Special Hobby F2G Super
Corsair is a reasonable build and fills a big gap in Corsair genealogy. The big
problem at this time is a total absence of aftermarket decals for the naval
versions. I may take the suggestion of Boyd and use a Tamiya wing and landing
gear for my next F2G project since the SH kit is weak in this area. It lacks the
dropped flaps and has a poorly shaped landing gear leg cover. I added some parts
from the Eduard FE216 painted zoom etched metal parts and FE244 F4U-1 Corsair
placards to the cockpit. The use of additional bits from Eduard F4U Corsair
placards further enhanced the kit engine.
 I filled in
the extra machine gun port on the wing leading edge and also the 3rd wing gun
port and spent gun-casing chute underneath the wing since some photos show this
aircraft with a circular plate over the outboard oprning of the F4U-4 six-gun
configuration openings. From the photos it appears the standard F4U-1 wing was
used and the “extra” gun port sealed or covered over.
I filled in
the extra machine gun port on the wing leading edge and also the 3rd wing gun
port and spent gun-casing chute underneath the wing since some photos show this
aircraft with a circular plate over the outboard oprning of the F4U-4 six-gun
configuration openings. From the photos it appears the standard F4U-1 wing was
used and the “extra” gun port sealed or covered over.
The underside was modified in
the exhaust area to provide for the changed exhaust configuration. Thanks to
Rodney William's I had his excellent advice and references to modify this area
for the proper exhaust and engine flap configuration. There are three exhaust
flaps with six exhaust pipes separated by two fairings. The SH kit has a general
exhaust configuration underneath without the two fairings separating the pipes.
I used some of the kit engine resin pour plugs to shape a pair of fairings for
the underside exhaust area. I debated using some brass tubing for the exhaust
stacks cut at the 45 degree cut for the upper exhaust but used the kit resin
exhausts with
 painted
centers. Since I plan on doing this version again once aftermarket decals are
released and with the to be released Obscureco cowl I omitted some labor
intensive detailing like using metal tubing for the stacks in the next build.
painted
centers. Since I plan on doing this version again once aftermarket decals are
released and with the to be released Obscureco cowl I omitted some labor
intensive detailing like using metal tubing for the stacks in the next build.
The vertical stabilizer should
have the small F2G offset tab cut and repositioned since all F2G production
versions had a feature that when the landing gear was lowered or extended the
tab had an automatic spring extension.
The engine air intake was
created using Aves Apoxie. I used low tack masking tape to designate the
footprint of the air intake. This helped me establish the panel lines and
maintain the correct size of the intake during the free-hand shaping, cutting
and grinding operation.
I used all my reference photos
to correctly shape the scoop which is very different in appearance than the
final scoop used by most of the F2G’s. I understand Obscureco will be coming out
with this version of the F2G scoop since it is really needed for some of the F2G
racers. I will be buying a few of these scoops and using it along with the
superb F2G prop.
The long setting time, about
eight hours for Apoxie, allowed the rough form to be shaped without rushing. I
allowed it to harden for 24 hours. A Dremel motor tool set at a slow speed
 with a very
small routing bit was used to shape the intake once it hardened. Aves Apoxie
feathers into the plastic very well.
It is easy to sand and polish once dry. By using low
tack masking tape to outline the footprint of the scoop the panel lines were
easily established. I continually rough marked the panel and shape lines and
carefully shaped the intake scoop.
with a very
small routing bit was used to shape the intake once it hardened. Aves Apoxie
feathers into the plastic very well.
It is easy to sand and polish once dry. By using low
tack masking tape to outline the footprint of the scoop the panel lines were
easily established. I continually rough marked the panel and shape lines and
carefully shaped the intake scoop.
My main source for the scoop was
schematic sheet # 53, page 97, AJ Press text which appears a little undersized
to my eye compared to the other photographs and profiles for this intake cowl. I
hope someday someone finds a copy of the original blueprint with the exact
measurements or one of the original intake cowls used by the post war F2G
racers.
The kit canopy is a vacu-formed
type. It looks very nice once installed and its clarity was improved after a
future floor polish coating.
One of my biggest concerns with
the SH kit is the need to make your own connecting shaft between the resin
engine and the prop. In this and in previous builds I had formed one from a
metal rod taken from a paper holding clip (the ones that look like large
clamps). I did this as well to this build only to hear from Boyd Waechter and
see first hand the superior appearance of the Obscureco prop. After a lot of
internal debate I took out the diamond cutter and hacked of the glued on kit
prop. It was worth all the effort and thank you Boyd! I could not understand why
it was omitted, i.e. the lack of a connecting shaft between the resin engine and
the prop. The notation on the assembly instructions - “scratch build” - says it
all. I am a forgiving person thankful just to get a model released but this part
should be part of the prop or on the styrene fret or extended from the resin
engine. But, the solution using the Obscureco prop solves this problem too since
the resin prop also has the connecting rod!
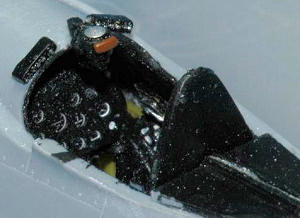 The etched
parts were fine except for PP15, the canopy mirrors. The mirrors are only the
frames and lack the “glass mirror” portion. I thought of workarounds like gluing
on a sheet of aluminum metalized helium balloon plastic and took the easy way
out using another full mirror from a spare Eduard detail set.
The etched
parts were fine except for PP15, the canopy mirrors. The mirrors are only the
frames and lack the “glass mirror” portion. I thought of workarounds like gluing
on a sheet of aluminum metalized helium balloon plastic and took the easy way
out using another full mirror from a spare Eduard detail set.
You may want to scribe in the round gas tank panel lines in front of the windscreen on top of the cowl. The kit has the square panel but within this panel there should be a round panel with the gas tank cap. It is an easy job with a circular metal panel template. I also placed a gas cap on the spot for the cap using a Waldron punch and very thin plastic sheet to add this detail. A good reference is the schematic drawing on page 95 “Sheet 50” of the AJ Press Monograph # 19 F4U Corsair.
The wingtip lights can be
improved by cutting out the solid plastic wing tip light notches and replacing
them with a small rod or pin head light and using clear epoxy or your favorite
alternative to replicate the clear lens cover and colored lights combination
used in Corsair wing tips. Most modelers just paint the wingtip lights red and
green as though they are solid colors when it appears they are actually colored
lights inside clear covers.
The military versions of the F2G
used at least two tail antenna configurations. The main difference is some have
the wire attached to the front tip of the vertical stabilizer (mainly F2G-1
versions) and some are connected to an extension protruding from the top
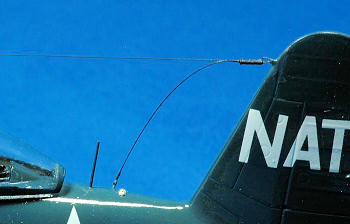 edge of the
rudder (F2G-2). I wrapped some very fine copper wire around a very small drill
bit to form the spring attachment point for the tail wire connection.
edge of the
rudder (F2G-2). I wrapped some very fine copper wire around a very small drill
bit to form the spring attachment point for the tail wire connection.
I added the rear view mirror to the
canopy.
Formation and position lights were painted Testors chrome silver
followed by a small dab of white paint on the tail light at the end of the rear
fuselage tail cone, along with the fuselage spine light followed by painting the
wing tip lights and the three underwing lights. The fuselage spine light was
from the Eduard 00 022 position lights etched set. There are also two topside
wing lights with
blue covers (see Bert
Kinsey’s Detail & Scale F4U reference book pg.
42 color photo and pg. 28 wing schematic which calls this out). I added small
drops of clear epoxy to simulate all the clear light covers and to the Eduard
fuselage spine light.
Add the stall prevention wedge
on the starboard (right side) wing just past the covered over outside (unused)
gunport. Add a small silver or white tail light at the end of the rear fuselage
tail cone and one just after the top fuselage whip antenna.
Add two whip antennas to the
rear underside of the fuselage and detail the inside of the landing gear bay –
it is sparse OOB.
The landing gear covers may have
a mis-shaped component. Quickboost 48-112 Corsair Undercarriage Covers may be
your best solution for a fix. I just cut and reshaped the covers on this build.
I used the Ultracast resin replacement wheels to get the accurate diamond treads
siec the SH kit has a smooth surface. I used some MiG pastels on the wheels to
enhance the tread appearance.
F2G production line photos show under wing rocket launcher stubs and six machine gun ports. The extra gun port was later covered with a round disk. I did not add the rocket launcher stub but it would have improved this models accuracy.
| COLORS & MARKINGS |
The F2G Corsair had standard USN
prop tip color (yellow) and featured a dark sea blue painted front prop hub with
a flat black props. I used Aeromaster enamel paints, # 9057 Gloss Sea Blue FS
15042 overall. I usually use Gunze acrylics or Testor's enamels but I still have
some Aeromaster in the paint sta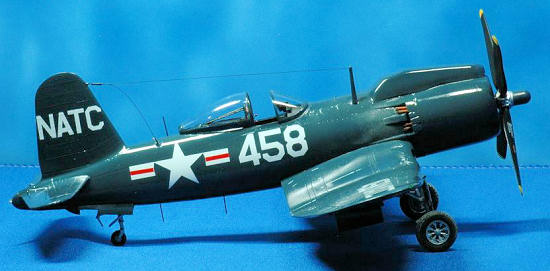 sh.
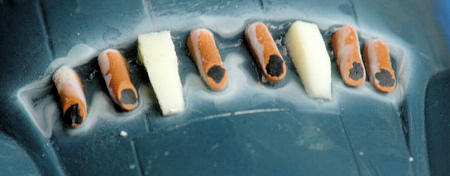
For the engine I used Testor's enamels.
sh.
For the engine I used Testor's enamels.
Decal markings came from a variety
of Superscale white letters and numbers sheets. It is hard to believe after two
years there are still no F2G decal sheets. I would be very happy to provide some
information to any legitimate after market decal provider regarding what should
go on the decal sheet. I have received dozens of emails after articles on my F2G
builds appear asking for remnants of my long gone War Eagle sheets. The F2G has
very simple markings but the small stencils are painful to find and cobble
together. There are some very unique markings such as a CASU-1 F2G that just
requires a decal maker to put out to create another sell out sheet like the now
OOP and collectors only Victory Productions Corsair decal sheet.
The Stars and Bars were from Superscale 48-899 USN Insignia white/red bars. This aircraft initially wore the all white USN star and bars and after the close of WWII red bars were added to all glossy sea blue U.S. Navy aircraft.
| CONCLUSIONS |
It was a very enjoyable project
that I have been intending to do for many years. I have a few more F2G related
builds in the works representing other versions and thanks to a fellow Corsair
fanatic I have details to build another F2G (FG-1A conversion) BuNo 13374 (Thank
you Jim Sullivan!) .
That’s it! It was another fun build
and a definite conversation piece at modeling events. The Accurate Miniatures
release of the SH kit has some new U.S. Navy decals for other military F2G’s so
the future is looking better and makes it worth getting the AM relaese. Perhaps
Yellow Wings decals will be coming out with an F2G decal sheet? Let Wayne Tevlin
at Yellow Wings Decals know if you are interested in his releasing an F2G decal
sheet.
| REFERENCES |
 F4U Corsair
Warbird History by Veronico & Campbell
- photos on the rear cover, and page 115 for
“Race 57” with the enlarged extended scoop.
F4U Corsair
Warbird History by Veronico & Campbell
- photos on the rear cover, and page 115 for
“Race 57” with the enlarged extended scoop.
R-4360 Pratt & Whitney’s Major
Miracle by Graham White
Specialty Press
2006
Pages 314 to 323.
F4U Corsair – AJ Press Aircraft
Monograph 19 by Adam Jarski
2005
Page 97, schematic drawing Sheet
53.
Modelling the F4U Corsair by Brett
Green , Osprey Modelling # 24, 2005
Corsair – Thirty Years of
Filibustering 1940 –1970 by Bruno Pautigny – Histoire & Collections Books 2003
color profile page 77.
F4U Corsair In Action, Squadron
Signal Publications # 1145 1994, page 28.
September 2008
Copyright ModelingMadness.com. All rights reserved. No reproduction in part or in whole without express permission.
If you would like your product reviewed fairly and fairly quickly, please contact the editor or see other details in the Note to Contributors.