Tamiya 1/48 F4U-1 'bubbletop' conversion
| KIT: | Tamiya 1/48 F4U-1 'bubbletop' conversion |
| KIT #: | 61061 |
| PRICE: | $21.00 (not retail) |
| DECALS: | Three options |
| REVIEWER: | Andy Garcia |
| NOTES: | Eduard Etched, War Eagle Vac and Quickboost parts used. |
| HISTORY |
 In an
attempt to improve the visibility of Corsair pilots in the next generation
Corsair (the F2G) Goodyear and Vought used some existing hardware, namly
canopies formthe P-47 and Hawker Typhoon to evaluation bubbletop canopies.
In an
attempt to improve the visibility of Corsair pilots in the next generation
Corsair (the F2G) Goodyear and Vought used some existing hardware, namly
canopies formthe P-47 and Hawker Typhoon to evaluation bubbletop canopies.
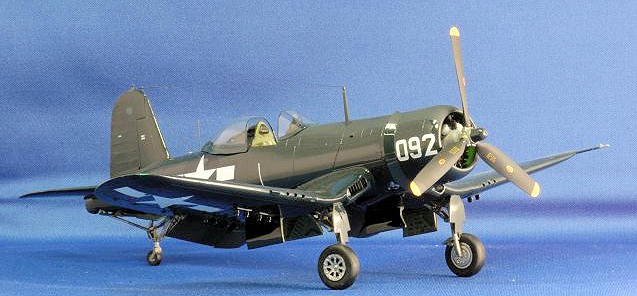
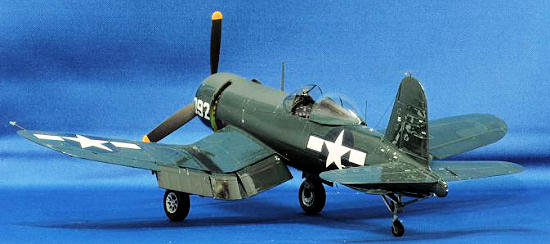
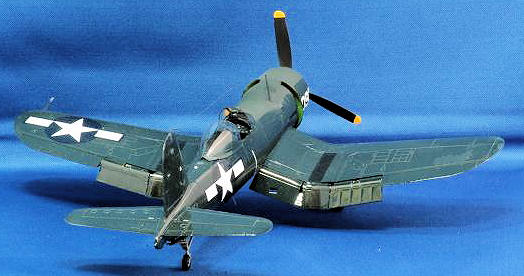
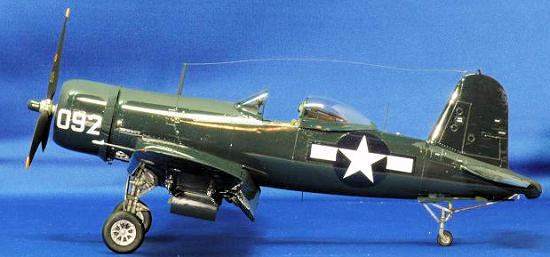
This model represents the Goodyear FG-1A bubbletop canopy test aircraft BuNo 14092 configuration. Although the aircraft was modified for testing needed for the F2G-1 Super Corsair program, there were no other F2G modifications done to this aircraft. There were two such aircraft BuNo 14091 and 14092. It is a simple conversion to the Tamiya kit # 61061 F4U-1D Corsair.
| THE KIT |
Check the previews section for reviews of the Tamiya F4U-1D kit.
| CONSTRUCTION |
The Tamiya F4U-1D Corsair is a well documented
enjoyable build. Most of the construction is a straightforward “Tamiya build” –
cut, file, sand and glue. The cockpit is very nice OOB and by adding the Eduard
FE216 painted zoom etched metal parts and FE244 F4U-1 Corsair placards the
cockpit was greatly improved.
 I deviated
from the Eduard instructions by cutting a small piece of sprue and placed it
behind the throttle console, Eduard part # 26. I drilled three holes for the
three throttle levers in the plastic sprue. I inserted three segments of steel
guitar wire, glued and painted them in short order. I attached the thin, flat
throttle levers to the guitar wire. I really like the final look of this
addition and the final look of the cockpit using the pre-painted zoom etched
metal. The cockpit maintains its 3-D form and has lots of pleasing colorful
scale detail that exceeds what I can do with a brush or using other techniques.
The Eduard F4U Corsair placards further enhanced the cockpit and engine.
I deviated
from the Eduard instructions by cutting a small piece of sprue and placed it
behind the throttle console, Eduard part # 26. I drilled three holes for the
three throttle levers in the plastic sprue. I inserted three segments of steel
guitar wire, glued and painted them in short order. I attached the thin, flat
throttle levers to the guitar wire. I really like the final look of this
addition and the final look of the cockpit using the pre-painted zoom etched
metal. The cockpit maintains its 3-D form and has lots of pleasing colorful
scale detail that exceeds what I can do with a brush or using other techniques.
The Eduard F4U Corsair placards further enhanced the cockpit and engine.
There is no need to fill in the extra machine gun port
on the wing leading edge and also the 3rd wing gun port spent gun
casing chute underneath the wing since this test aircraft maintained the F4U-1D
six gun configuration. 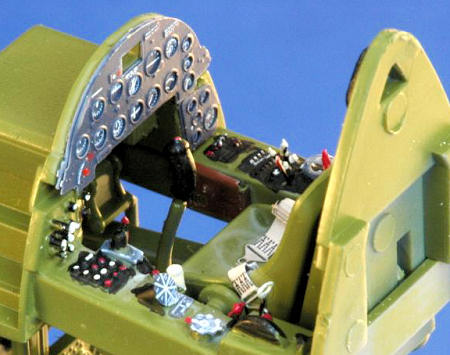
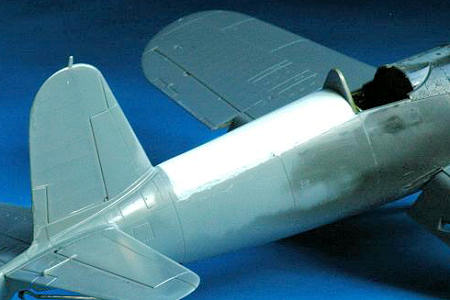
Now, the larger part of the conversion gets underway. I
cut the area behind the cockpit along a horizontal panel line. There is a simple
War Eagle F2G vac-form insert that is grafted onto the Tamiya Corsair fuselage
spine. Although it was intended for the Arii/Otaki kit it was a perfect fit for
the Tamiya kit. I added several thick styrene strips for reinforcement at the
join line between the vac part and kit plastic to securely attach the new spine
using Tenax glue. I cut along a natural panel line that both Tamiya and War
Eagle had making the final merge easier.
By careful cutting and measuring the two halves joined
well without any mis-fit. I used Tamiya putty to fill in the gaps and tried to
place styrene strips under any gaps to allow the putty to work better and this
resulted in a minor need to fill-in small areas. I held off on the Gunze Mr.
Surfacer until final pre-painting preparation.
I followed the rest of the standard Tamiya kit
instructions to complete the build. If you have built one of Tamiya’s Corsair’s
you know it is a very smooth process helped along by parts engineered to fit
only one way.
This keeps an overconfident modeler in line and guarantees a fine final
result.
The War Eagle vac-form spine fit the Tamiya kit perfectly.
Although designed for the Otaki/Arii kits it was a drop fit.
I used the Tamiya front fuselage antenna mast as per the
normal F4U-1D construction step. I added the metal wire whip antenna behind the
canopy. No other F2G whip antennas went under the fuselage – this version did
not use them.
I added a gunsight and two cockpit coaming switch
panels using the
Quickboost QB48016 Mk. VIII
resin gunsights and Tamiya coaming panels with Eduard placards.
I purchased the Quickboost R-2800 engine but set it aside
since it required a wiring ignition harness, spark plug wiring and pushrods. I
have purchased several of the QB engines but fail to use them due to this series
of “missing” parts. My backup plan was to detail the Tamiya engine per Brett’s
Green’s Corsair model building book and it looked great so I will save the resin
engine for another detailed F4U-1D build since it required just a little too
much effort given my objective was to get the bubbletop modification done.
The vac-form canopy and white metal canopy bracing arms
came from the War Eagle conversion kit. It looks very nice once installed due to
the thin scale effect and clarity after a future wax coating. A Future floor wax
acrylic coating on a vac-form canopy is truly amazing. The crystal clear clarity
Future adds brings the canopy to life.
Tamiya does such a superb job of finely moulding the wing
lights in a very thin edge that trying to improve this area as I did on my
previous F2G build is fraught with the possibility of a lot of work with little
visual impact. So, for this build the wing lights section I went with a Testor’s
chrome silver base coat and tinted Tamiya clear gloss overcoat approach to
simulate the wing-tip lights.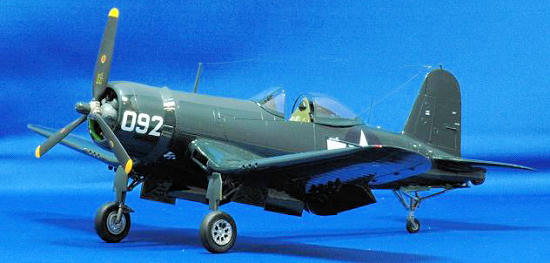
The Tamiya kit three-blade prop was used. This was a fast
and simple conversion. This kit did not require as many finishing touches as my
Special Hobby F2G kit. It was Tamiya simplicity and completeness at its best.
Other construction steps
I added a Quickboost gunsight (a Mk. VIII version) but the
Tamiya kit version would do just fine. A small dab of silver or white on the
tail light at the end of the rear fuselage tail cone, followed by painting the
wing lights and the three underwing lights were quick and easy to complete
steps.
F2G production line photos show under wing rocket
launcher stubs and six machine gun ports. These were retained in the FG-1A.
The FG-1A bubbletop requires two additional whip
antennas and one white running light on the top fuselage spine. They are well
disclosed in the AJ Press F4U Corsair, Aircraft Monograph # 19
book in the schematic section found on Sheet 48 , page 92. The spine
light comes from Eduard # 00 022 Position Lights etched set. This etched set is
now OOP so get one while you can – it is a terrific enhancement for many kits
once you see how much it adds to the kit.
That’s it! All in all it was a fun build and another completion of the missing links in Corsair genealogy.
| COLORS AND MARKINGS |
 I used
Aeromaster enamel paints, # 9057 Gloss Sea Blue FS 15042 overall. I usually use
Gunze acrylics or Testors enamels but I still have some Aeromaster in the paint
stash. For
the engine I used Testors enamels. Testors dullcoat was used to create the
anti-glare panel on the nose of the aircraft.
I used
Aeromaster enamel paints, # 9057 Gloss Sea Blue FS 15042 overall. I usually use
Gunze acrylics or Testors enamels but I still have some Aeromaster in the paint
stash. For
the engine I used Testors enamels. Testors dullcoat was used to create the
anti-glare panel on the nose of the aircraft.
Decal markings came from the excellent 1/48 scale War
Eagle F2G vac-form conversion set. It has a variety of F2G versions. The Stars
and stencils were from the Tamiya kit decal sheet using Future floor wax as a
setting solution.
| REFERENCES |
I found one photograph of
“White 092”
in the Squadron Signal In Action , # 1029, page 36 which was the first
release of the Squadron books Corsair In Action. This photo does not appear in
the second Corsair In Action ( # 1145).
The other superb
reference was the FG-1A schematic diagram in the AJ Press book.
F4U Corsair
- Warbird History
Veronico , J. &. D. Campbell (Motorbooks)
1994
Corsair – Thirty Years of Filibustering 1940 –1970 by
Bruno Pautigny – Histoire & Collections Books 2003
Modelling the F4U Corsair by Brett Green , Osprey
Modelling # 24, 2005
 R-4360
Pratt & Whitney’s Major Miracle by Graham White
Specialty Press
2006
R-4360
Pratt & Whitney’s Major Miracle by Graham White
Specialty Press
2006
F4U Corsair – AJ Press Aircraft Monograph 19 by Adam
Jarski
2005
Chance Vought F4U Corsair Volume 2, #26 (3026) by Andre
R. Zbiegniewski
2006 Kagero Books
Warbird Tech Series Vought F4U Corsair Volume 4 by Barrett Tillman Specialty Press 1996
June 2008
If you would like your product reviewed fairly and quickly, please contact me or see other details in the Note to Contributors.