Tamiya 1/48 F4U-1 WM Conversion
| KIT: | Tamiya 1/48 F4U-1 WM Conversion |
| KIT #: | 61046 |
| PRICE: | $21.00 |
| DECALS: | See review |
| REVIEWER: | Andy Garcia |
| NOTES: | Bunch of aftermarket stuff |
| HISTORY |
Pratt & Whitney made a proposal to
the US Navy Bureau of Aeronautics in early 1943 that an R-4360 engine should be
installed in the F4U airframe. The US Navy Bureau of Aeronautics, 'BuAer'
instructed Vought on March 24, 1943 to take an airframe destined for delivery to
NAS Jacksonville, Florida and to deliver it to Pratt & Whitney in Hartford,
Connecticut for their use as a proof of concept aircraft. Pratt and Whitney was
loaned an F4U-1 Birdcage Corsair, BuNo 02460
for the installation of a new engine, the
twenty-eight cylinder Wasp Major , TSB1-G experimental 3,000 horsepower engine.
The goal was to establish if the airframe and 3325
pound engine were compatible. Table 7-2 in the Graham White R-4360 engine book
showed the weight increase from the R-2800 Corsair to the R-4360 Corsair to be
1,248 pounds, the engine itself adding 866 pounds.
On July 17, 1943 BuNo 02460 flying
with its R-2800-8 engine was delivered to East Hartford, Connecticut. A simple
conversion followed with the external cowl dimensions maintained and a cowl
lengthened by 12 inches accommodated the new powerplant. The TSB1-G engine was a
semi-production version. The fourth
engine, '#4' was used for installation in the BuNo
02460 Corsair. There were four TSB1-G
'XR-4360' engines produced under specification
number 7031. The Hamilton Standard 14 foot propeller was delivered on August 26,
1943.
 BuNo 02460
was an early airframe since production F4U-1 Corsairs started with BuNo. 02152.
What is notable about these aircraft in the F2G development genealogy is they
were Vought manufactured and made for use by Pratt & Whitney and not made by
Goodyear aircraft Company (GAC) who was the eventual builder of the final
production aircraft designated F2G-1/2.
BuNo 02460
was an early airframe since production F4U-1 Corsairs started with BuNo. 02152.
What is notable about these aircraft in the F2G development genealogy is they
were Vought manufactured and made for use by Pratt & Whitney and not made by
Goodyear aircraft Company (GAC) who was the eventual builder of the final
production aircraft designated F2G-1/2.
Ground runs were initiated on September 6, 1943 and the
first flight occurred on September 12, 1943. The TSB1-G engine featured a
lighter and simpler single-stage, variable speed supercharger. This engine
provided high power at low altitude without the complexity of a two-stage
intercooled engine like the existing R-2800 Corsairs. This resulted in the
change to a smaller wing air inlet.
During its development, a variety of carburetor air intake
configurations were tried. Thus, you may find several variations of the 'WM'
depending on when the photo was taken. As Graham White noted in his book
'Several styles of induction scoops were tried on the F4U WM including a
so-called flush scoop and a raised scoop'.
I found an excellent photograph of one of the 'WM'
aircraft on Pratt & Whitney Corporations website. It is for sale and I purchased
an 11' X 14' sized copy which helped with establishing many details for this
modeling effort. It also added a new paint scheme to my future project list
since it appears to be a late war star and bar marked aircraft with a white nose
tip and horizontal white stripe on the vertical stabilizer! One reference shows
F4U-1 WM BuNo 02460 with a smaller air intake and a prominent horizontal panel
join line and BuNo 02460 in Test Phase 2 with five cowl latches on both sides of
the cowling similar to some of the final F2G versions.
| THE KIT |
| CONSTRUCTION |
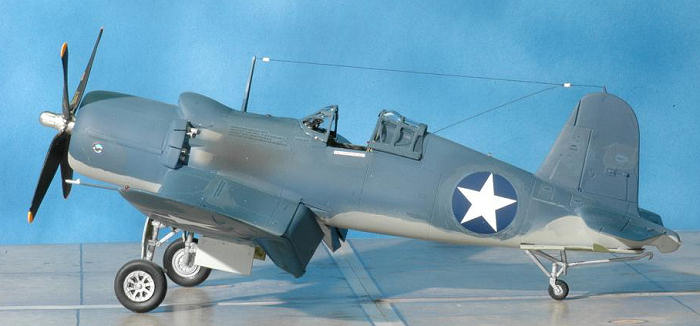
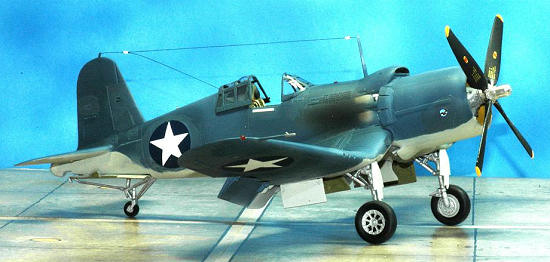
This model represents a conversion to
the Tamiya kit # 61046 F4U-1 Birdcage
Corsair. I
modified it to represent the first prototype of the
R-4360 engined Corsair designated F4U-1 WM (for Wasp Major). This aircraft was
the first proof of concept aircraft to determine what would happen if a new
engine, almost double the size of the largest existing WWII radial fighter
engines was installed in an existing airframe - that of the F4U-1 Corsair.
 The F4U-1
WM Corsair had major modifications from earlier Vought Corsairs:
The F4U-1
WM Corsair had major modifications from earlier Vought Corsairs:
P&W XR-4360 Wasp Major engine which also caused changes to
the induction, exhaust, supercharger and deleted the intercooler systems.
Externally it gave the Corsair a much longer engine cowling.
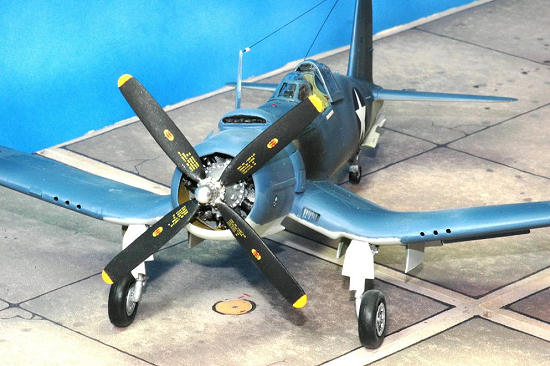
Larger prop – it used a larger Hamilton Standard “Super
Hydromatic” 14’ four blade propeller.
New 'raised ram-air' induction intake and 12 inch
extension to the F4U-1 cowling to accommodate the longer engine.
New wing tanks increasing fuel from 234 US gallons to 309
US Gallons.
Smaller square shaped wing root intakes only for the oil
cooler since there is no intercooler. It was redesigned for the final F2G
versions.
Extended upper exhaust tips cut at 90 degree angle and
connected by a metal bracket without the siamese interconnected exhausts of
later R-4360's.
The late, test phase 2 version had two pitot tubes to provide extra instrumentation logs, thus there are two pitot tubes - one per wing. This was not found on the aircraft during the first two phases of WM testing. See the photo reference on the P &W website.
A six-inch in diameter Pratt & Whitney Company logo was
placed on each side of the front cowl, in the center of the first panel section
on what appears to be a circular engine inspection access plate.
Depending on the date of the photo they sometimes carried
arrestor landing hooks and sometimes had them removed. Photo references show it
attached.
What made this conversion possible was the use of the War
Eagle vac-form fuselage parts and Aves Apoxy for sculpting the carburetor scoop.
I purchased Apoxy from the Aves web site.
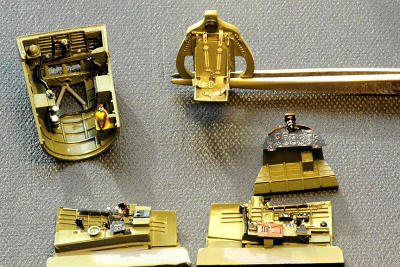 The Tamiya
F4U-1 Corsair is a well documented enjoyable build. Most of the construction is
a straightforward “Tamiya build” – cut, file, sand and glue. The cockpit is very
nice OOB and by adding the Eduard FE216 painted zoom etched metal parts and
FE244 F4U-1 Corsair placards the cockpit can be greatly improved. I had an Aires
Resin F4U-1 Birdcage cockpit in the stash and decided to use it on this version.
It is outstanding in detail but requires careful
cutting and dry fitting to ensure it will fit. I also added many Eduard color
zoom parts to the Aires resin. The use of additional bits from Eduard F4U
Corsair placards further enhanced the Aires cockpit and engine.
The Tamiya
F4U-1 Corsair is a well documented enjoyable build. Most of the construction is
a straightforward “Tamiya build” – cut, file, sand and glue. The cockpit is very
nice OOB and by adding the Eduard FE216 painted zoom etched metal parts and
FE244 F4U-1 Corsair placards the cockpit can be greatly improved. I had an Aires
Resin F4U-1 Birdcage cockpit in the stash and decided to use it on this version.
It is outstanding in detail but requires careful
cutting and dry fitting to ensure it will fit. I also added many Eduard color
zoom parts to the Aires resin. The use of additional bits from Eduard F4U
Corsair placards further enhanced the Aires cockpit and engine.
There is no need to fill in the
extra machine gun port on the wing leading edge and also the 3rd wing
gun port and spent gun-casing chute underneath the wing since this prototype
maintained the F4U-1 six-gun configuration.
 Now, the
larger part of the conversion gets underway. I cut the nose from the War Eagle
F2G vac-form and grafted it onto the Tamiya Corsair fuselage. I added several
thick styrene strips for reinforcement to securely attach the long cowl. I cut
along a natural panel line that both Tamiya and War Eagle had making the final
merge easier.
Now, the
larger part of the conversion gets underway. I cut the nose from the War Eagle
F2G vac-form and grafted it onto the Tamiya Corsair fuselage. I added several
thick styrene strips for reinforcement to securely attach the long cowl. I cut
along a natural panel line that both Tamiya and War Eagle had making the final
merge easier.
By careful cutting and measuring the two halves joined
well without any mis-fit. I used Aves Apoxy as my putty to fill in the gaps and
placed styrene strips under any gaps to allow the putty to work better and
fill-in small areas. You can use small amounts of water to wipe away excess
putty when it is first applied and avoid a lot of tedious sanding and damage to
panel lines. I held off on the Gunze Mr. Surfacer until final pre-painting
preparation.
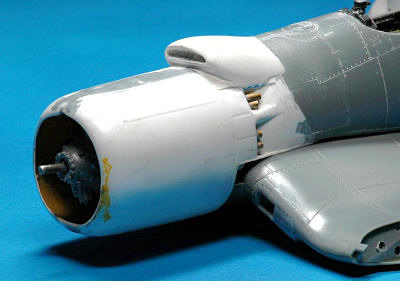
Once the two fuselage halves were
completed but not yet joined together, I turned to the challenge of finding an
R-4360 replacement engine. I used Engines & Things # 48093, R4360 engine as the
replacement for the Tamiya R-2800 engine.
I used some plumbers putty as a mounting ring at the
rear of the engine and before the putty hardened positioned the engine nose to
both center it and provide the clearance required from the cowl. After it
hardened, which took all of ten minutes this step was completed. I then joined
the two fuselage halves using Tenax glue. Basically the engine does not fit OOB.
You will need to grind down the engine heads to permit a fit. Once inserted and
closed up you won't notice the engine re-sizing.
The underside was modified in the exhaust area to provide
for the changed exhaust configuration. Thanks to Rodney William's I had his
excellent advice and references to modify this area for the proper exhaust and
engine flap configuration. There are three exhaust flaps with six exhaust pipes
separated by two fairings. The Tamiya kit cowl ring, Part # A-14 was cut and
modified to provide the underside and topside exhaust flaps. The 'WM' flap
segment size is different than the F4U-1 so you need to fill in and
 rescribe
the flap segment size. I used some brass tubing for the exhaust stacks cut at
the 90 degree angle. Later F2G versions used a 45 degree cut for the upper
exhaust.
rescribe
the flap segment size. I used some brass tubing for the exhaust stacks cut at
the 90 degree angle. Later F2G versions used a 45 degree cut for the upper
exhaust.
I followed the rest of the standard
Tamiya kit instructions to complete the build. If you have built one of Tamiya’s
Corsair’s you know it is a very smooth process helped along by parts engineered
to fit only one way.
This keeps an overconfident modeler in line and
guarantees a fine final result.
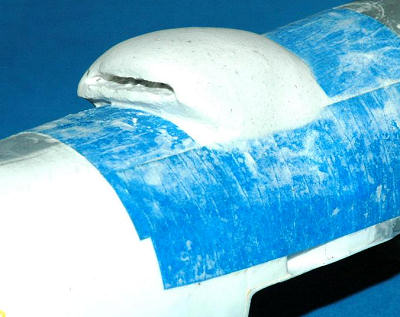
The engine air intake was created using Aves Apoxy. I used
low tack masking tape to designate the footprint of the air intake. This helped
me establish the panel lines and maintain the correct size of the intake during
the free-hand shaping, cutting and grinding operation.
I used the amazing Pratt & Whitney photograph found on
page 323 of the R-4360 Pratt & Whitney’s Major Miracle by Graham White textbook,
to correctly shape the scoop which is very different in appearance than the
final scoop used by the F2G. It was
 the
perfect photograph and the only photograph I could find from the correct angle
needed to produce the correctly shaped and positioned scoop.
the
perfect photograph and the only photograph I could find from the correct angle
needed to produce the correctly shaped and positioned scoop.
The long setting time, about eight
hours for Apoxy, allowed the rough form to be shaped without rushing. I allowed
it to harden for 24 hours. A Dremel motor tool set at a slow speed with a very
small routing bit was used to shape the intake once it hardened. Aves Apoxy
feathers into the plastic very well.
It is easy to sand and polish once dry. By using low
tack masking tape to outline the footprint of the scoop the panel lines were
easily established.
I used the Tamiya front fuselage
antenna mast as per the normal F4U-1 construction step. My main source for
details after photo references was the
schematic sheet # 43, page 87, AJ Press text which
has two versions of the 'WM' Corsair featured showing the subtle differences.
The canopy came from the Tamiya kit. It looks very nice
once installed and clarity was improved after a future floor polish coating.
The War Eagle kit provided a resin four-blade 14” super hydramatic prop. It has a very nice shape and after twelve years in storage was not warped. A connecting shaft between the resin engine and the prop was formed from a metal rod taken from a paper holding clip (the ones that look like large clamps).
| FINAL CONSTRUCTION |
I added
the Aires rear view mirror to the Tamiya canopy. The canopy used by the WM was
the birdcage with a rear-view mirror 'hump' version.
Formation and
position lights - Testors chrome silver followed by a small dab of white paint
on the tail light at the end of the rear fuselage tail cone, along with the
fuselage spine light followed by painting the wing tip lights
and the three underwing lights. I added small drops of clear epoxy to simulate
clear lig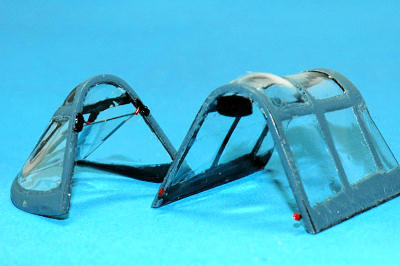 ht
covers. This is one of the many nice techniques I picked up from Brett Greens
Osprey series Corsair Modeling book. By using xylene or lacquer thinner with
Testors chrome silver the hardening and drying time are significantly improved.
ht
covers. This is one of the many nice techniques I picked up from Brett Greens
Osprey series Corsair Modeling book. By using xylene or lacquer thinner with
Testors chrome silver the hardening and drying time are significantly improved.
I enhanced the
Aires gunsight by attaching a bright metal foil disc obtained by punching a
disc, using a Waldron punch set, from a Cadbury's chocolate candy wrapper. I
initially applied a clear epoxy drop to give it a glass dome look but had to
remove the epoxy drop due to the tight clearance of the Aires gunsight and the
kit canopy with the Aires armor glass windscreen insert.
The
WM appeared in at least three different color schemes - early rollout, test
phase one and late war test phase two.
The early rollout WM Corsair had no prop tip color and
featured a bare-metal front prop surface with a flat black rear color on the
prop. National markings were the white star in blue circle markings and the blue
gray upper, light gray under surface paint scheme. The cowl had a P&W logo
identifier on both sides. Thanks to a trade with Dave Wells, I obtained the P&W
decal cut from an OOP Liveries
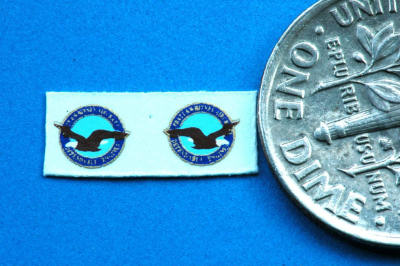 Unlimited
AGAX-001 decal sheet. The air intake was the initial rollout large raised scoop
version.
Unlimited
AGAX-001 decal sheet. The air intake was the initial rollout large raised scoop
version.
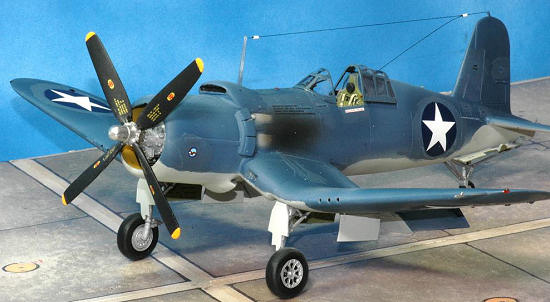
Test phase one saw the change to a star and bar national
marking scheme and the blue gray upper, light gray under surface paint scheme.
The propeller blades were now painted matt or flat black with yellow tips. The
arrestor hook was retained. A slightly smaller raised scoop was installed.
Test phase two used the star and bar national markings and the blue gray upper, light gray under surface paint scheme. It carried a distinctive white nose tip and horizontal white stripe on the vertical tail surface. This version can be found on the Pratt & Whitney Company web site as a 'for sale' photo. The arrestor hook was removed. Several air intake configurations were used during tests including a flush mount and small raised scoop.
| COLORS & MARKINGS |
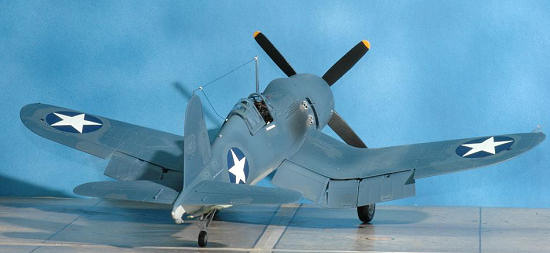
This model is painted in the test
phase one scheme which was the standard paint scheme for all early Corsair's -
the F4U-1 used the two-tone camouflage scheme in effect from 10-13-1941 until
2-1-1943.
Non-specular Blue Gray (ANA 603) similar to FS 35189 on
upper surfaces and on the under wing surface that folded upward.
Non-specular Light
 Gray
(ANA 602) similar to FS 36440 on lower surfaces - fuselage and that portion of
the wing which did not fold.
Gray
(ANA 602) similar to FS 36440 on lower surfaces - fuselage and that portion of
the wing which did not fold.
National markings of white star in blue circle in six
positions. Black is used for stencils (US NAVY, F4U-1 and BuNo 2460.
I used a mixture of Gunze H042 Blue
Gray with H015 Bright Blue for the upper surface and Gunze H315 Lt. Gull Gray
for undersurfaces.
For the engine I used Testors enamels. Testors gloss
with some dullcoat was used to create the final finish. I added some weathering
around the markings and some surface areas.
Decal national markings came from a Superscale decal sheet
and stencils were from a mix of Superscale and Tamiya kit decals. A combination
of Tamiya kit (61046) decal # 13 and # 24 gave the correct black BuNo stencil
detail.
There was another F4U-1 WM Birdcage Corsair, BuNo. 02312 which was the R&D static test and development airframe used to test fit and evaluate airframe modifications installed in BuNo 02360 for flight tests.
| CONCLUSIONS |
It was a very enjoyable project that I have been intending
to do for many years. I have a few more F2G related builds in final stages
representing other versions.
That’s it! All in all it was a fun build and a definite conversation piece at modeling events. The new Accurate Miniatures release of the SH kit has some new U.S. Navy decals for other military F2G’s so the future is looking better. Perhaps Yellow Wings decals will be coming out with an F2G decal sheet. Let Wayne Tevlin at Yellow Wings Decals know if you are interested in his releasing an F2G decal sheet. He can be contacted at http://yellow-wingsdecals.com/decals/contact_us.php?osCsid=2241168189145c56ffbed7089aa4c80a
| REFERENCES |
 R-4360
Pratt & Whitney’s Major Miracle by Graham White
Specialty Press
2006
R-4360
Pratt & Whitney’s Major Miracle by Graham White
Specialty Press
2006
Pages 314 to 323.
F4U Corsair – AJ Press Aircraft
Monograph 19 by Adam Jarski
2005
Pages 29, and schematic drawings Sheet 43, page 87 for
both of the WM aircraft.
Modelling the F4U Corsair by Brett Green , Osprey
Modelling # 24, 2005
Corsair – Thirty Years of Filibustering 1940 –1970 by
Bruno Pautigny – Histoire & Collections Books 2003
F4U Corsair In Action, Squadron Signal Publications # 1145
1994, page 11 in Phase 1 test color scheme.
PWA Report Inst. 146, November 15, 1944 by A.S. Horwath
and R.N. Wallace 'Installation and Test of an R-4360 Engine in the F4U-1 (WM)
Airplane.
United Technologies Pratt & Whitney Company website
Bureau of Naval Aeronautics F2G-1+2 Bu No Genealogy
If you would like your product reviewed fairly and quickly, please contact me or see other details in the Note to Contributors.