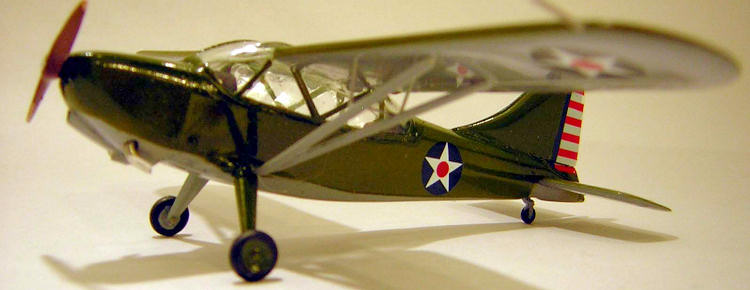
AZ Models 1/72 Stinson OY-2 Sentinel
| KIT #: | AZ7274/5 |
| PRICE: | $20.00 or so |
| DECALS: | Two options |
| REVIEWER: | Joel Hamm |
| NOTES: | Short run |
| HISTORY |
Model
airplaning lost its appeal about 3 years ago when all building time and energies
were diverted into the decree of a
stately pleasure dome where Alf the sacred river ran.
Actually, it was the 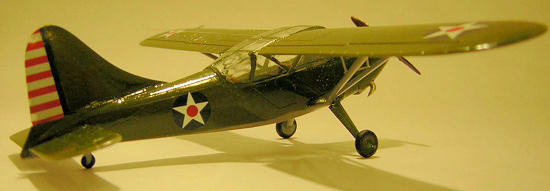 ne
by the Billy Bob Budweiser Home Improvement Co. (“Hey, Vern, pass me up anther
roll of that ‘lectrical tape. That
ought to stop them wires from sparking…”)
ne
by the Billy Bob Budweiser Home Improvement Co. (“Hey, Vern, pass me up anther
roll of that ‘lectrical tape. That
ought to stop them wires from sparking…”)
So after a day of stringing new cable
through a cramped oven-like attic; and pipes under a crawl space inhabited by
spiders and varmints rivaling anything you Australian fellows cultivate in your
Outback, there wasn’t much capacity left for sticking together little bits of
plastic; not that there was any place to do so anyway.
Back at the Mother Ship, this kit lay
dormant in the Secret Model Airplane Building Room, but during return visits it
inspired no passion. Checking in on
this website, and following the trickle of new releases still provided some
diversion; but with so much else needing to be done, building models seemed like
a silly way to spend one’s time. Eventually, however, the global accumulation of
greenhouse gasses conspired to cause a bit of winter cold enough to call a halt
to all house-building; and with little other occupation besides snacking and
sampling the Dewars bottle, I
forced myself to finish the project.
Oh – I’m
sorry. You wanted a history of the airplane.
Well, there’s little of that to speak of.
The Sentinel started life as the civilian Voyager and was one of those
off-the-shelf planes scarfed up by the military at the start of WWII.
It is generally regarded as the
 most
widely used “L-Bird” and served in just about every theater in just about every
capacity; as a liaison transport, artillery spotter, ambulance, and general
hack, sometimes flying off ships by dangling from a launching cable.
The Smithsonian’s Udvar Hazy annex displays an L-5 equipped with this
gear. It went on to soldier in
most
widely used “L-Bird” and served in just about every theater in just about every
capacity; as a liaison transport, artillery spotter, ambulance, and general
hack, sometimes flying off ships by dangling from a launching cable.
The Smithsonian’s Udvar Hazy annex displays an L-5 equipped with this
gear. It went on to soldier in
After
being replaced by the L-19 / O-1 Bird Dog the Stinson
made its way back into civilian hands.
There’s a passel of them still flown by individuals or squadrons such as
the Commemorative Air Force (“Confederate” before that word somehow became
politically faux-pas) as a cheap warbird, though we all know that nothing which
flies is cheap
| THE KIT |
A while
back I built the
Beechnut
Sentinel, but it was a crude affair demanding extensive surgery,
particularly vacuforming a new canopy. Sword, which I believe to be a division
of MPM or Pavla (as far as I know, Sword is an entity unto itself. Ed),
issued a kit advertised as buildable into
the low or high backed version, but it was said also to be a disappointment,
again in the transparency department. With a growing stash (what stash doesn’t?)
I dilly-dallied, till by the time
the decision was made “Sure -
why not?” the short run had sold out. When A Z Models released this kit I
changed my tune to “Buy it while you can; figure out what to do with it later”.
 Last-Into
the stash seems to have a funny way of muscling its way up to the First-Out
slot. It appeared to be a simple, straightforward kit that would take a week or
so. Whooda thunked it would take 3
½ years. “Typical East European
Short Run” should adequately describe the molding quality. Flash and sink holes
appear to be a thing of the past,
but mold seam lines, slight mismatches, troublesome sprue gates, and overly
thick airfoils will remain with us until the Czechs and Russians catch up with
the Japanese. This being a tube and
fabric airplane, there was little surface detail to worry about, but the door
and cowl panel lines were acceptably scribed, and the wing tanks were adequately
embossed. Inter-rib
scalloping may be overdone, but in
this scale the name of the game is representation rather than precise
reproduction so too much is preferable to not enough. There are no
pins, tabs, or slots, but locations are scribed on the wing undersides
for attaching the struts.
Last-Into
the stash seems to have a funny way of muscling its way up to the First-Out
slot. It appeared to be a simple, straightforward kit that would take a week or
so. Whooda thunked it would take 3
½ years. “Typical East European
Short Run” should adequately describe the molding quality. Flash and sink holes
appear to be a thing of the past,
but mold seam lines, slight mismatches, troublesome sprue gates, and overly
thick airfoils will remain with us until the Czechs and Russians catch up with
the Japanese. This being a tube and
fabric airplane, there was little surface detail to worry about, but the door
and cowl panel lines were acceptably scribed, and the wing tanks were adequately
embossed. Inter-rib
scalloping may be overdone, but in
this scale the name of the game is representation rather than precise
reproduction so too much is preferable to not enough. There are no
pins, tabs, or slots, but locations are scribed on the wing undersides
for attaching the struts.
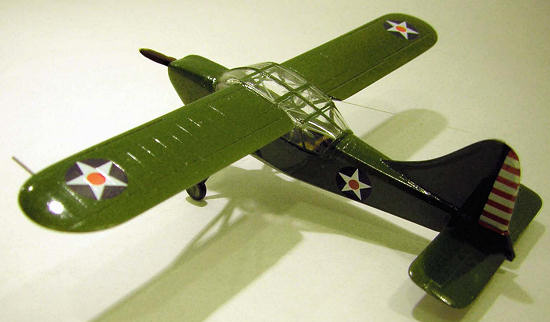
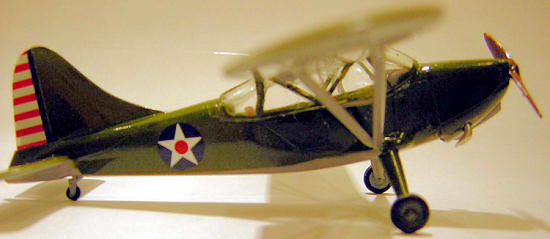
The
overall shape looked OK with 2 noticeable errors.
The nose cowl lacks the distinctive “flared nostrils” look of the engine
air inlets; and the vertical fin is not molded with the fuselage so its
base doesn’t flare smoothly into the turtleback.
Both problems, if you call
them that, can be fixed with fillers and files, but I didn’t.
The AZ
kit includes all parts necessary to construct either variant; almost all parts,
that is. The only thing missing is
decals for the A plane. The parts
diagram on the instructions shows 2 decal sheets but only
1 is included. Speaking of
instructions, these are rather poor.
Not that the average
plasticator under the influence of
glue fumes couldn’t figure out where things go, but the diagrams are unclear
about which parts go with which plane. There are 2 canopies, 2 fuselages, and 2
sets of gear legs. One drawing
shows the pitot tube affixed to the left wing, another to the right, and a third
skirts the issue by sticking one to each wing panel.
Left is right, right is wrong; is that perfectly clear?
| CONSTRUCTION |
Since I
already had an observer variant, I decided to build the high back version, to be
dressed in the classy dark gloss blue of the Marine Corps plane; but not the
eye-piercing royal cobalt blue shown on the box art and painting guide. Before
sticking on the nose bowl I drilled out the inlets and glued in a pair of
cylinders cut from a radial engine.
I also opened up the air exhaust slot under the cowl.
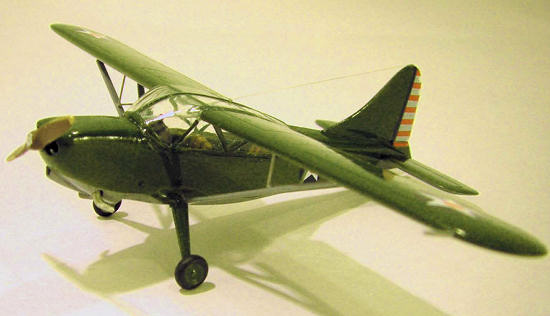
The Sentinel’s interior is a jungle-jim of
tubes and struts.
Surprisingly, these are provided on
the sprues, but cleaning them up is a chore.
Attaching them to the cockpit tub, as shown on the instructions, requires
that the greenhouse be attached in two halves – not the best way to get a good
fit. A better way is to join the
transparency halves, then insert the bracing
 birdcage
with canopy-safe glue. Gluing together clear parts without causing blemishes is
dicey. My preferred method is
with very sparing application of tube glue.
The bond is strong, there’s not enough solvent to cause fogging and
there’s no worry of liquid cement drips or crazy glue crazing.
birdcage
with canopy-safe glue. Gluing together clear parts without causing blemishes is
dicey. My preferred method is
with very sparing application of tube glue.
The bond is strong, there’s not enough solvent to cause fogging and
there’s no worry of liquid cement drips or crazy glue crazing.
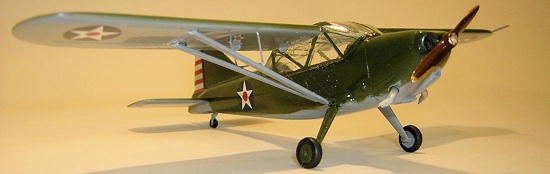
The fit
of the canopy to the fuselage is poor.
Because of the glass thickness the windshield base must be carefully
sculpted, and a mating trough must be carved where it meets the instrument
cowling ; but the windshield still
does not extend down far enough at its center so a gap is left in the most
obvious area. Trying to sand down
and lower the canopy causes a noticeably improper
profile and step where the
rear of the canopy meets the fuselage.
The gap should be left and closed with
some sort of clear filler.
That booger-up then has to be disguised by painting the windshield frame
higher than it should be; and the cure for that ensuing fix-it is to simply not
look at it too closely.
By the
time I had figured all this out the canopy and fuselage had been carved into a
complete mess, It was becoming evident
that plastic modeling is a silly way to spend one’s time,
and the project was headed for under-foot euthanasia. BUT WAIT!
This kit offers a second chance with a whole ‘nuther fuselage and canopy.
However, there’s only one vertical stabilizer and nose bowl, which had already
been glued on. Cutting away and
transplanting the fin was easy, but
removing the front piece would ruin it.
Much easier to simply cut away and replace the entire engine section;
which is what I did.
Being now forewarned of all the foibles, I was more careful on the second
go-around. Besides, the A variant
fuselage and canopy fit together slightly better than the B, though the nasty
windshield gap still remained. Rather than re-use the interior bracing parts, I
made new ones out of stretched sprue, which looked and fit better.
With the fuselage, canopy, and tail section back together it was time to
be off to the paint shop; but first the transparency had to be masked using DIY
Baremetal foil. That’s household
Renlolds Wrap, smoothed and thinned down by
burnishing with a soft cloth and coated with Superscale metal foil
adhesive. That’s the point at which
the model was left languishing in
the Secret Model Airplane Building Room while I went off to do real work.
| COLORS & MARKINGS |
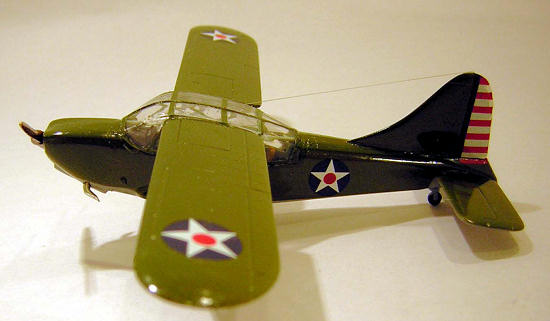
We resume our story 3 ½ years later. Since the project had of necessity
reverted back to a build of the observer variant, the only color option was
olive drab over neutral gray. I like my models shiny, which seems to annoy some
folks but that adds to the enjoyment of the hobby.
OD isn’t available in gloss but its easily concocted from Testors little
square bottles of green and orange (any of you old timers out there remember
when those bottles sold for ten cents – and that was half a week’s allowance?)
OD came in an infinite range of
hues depending on who made it, mixed it, schpritzed it, and how long it sat in
the sun. It also changes dramatically under different lighting conditions. I
mixed this shade to match a color chip in back of one of those Monogram color
and marking books and it seems to agree with on-line photos.
 Absence did not make the heart grow fonder for this build, but it did
make the foil adhesive grow fonder for its plastic substrate. Removing the mask
left lots of gloppy stuff on the formerly pristine window panes.
Surgical swabbing with Microbrushes dipped in pine oil eventually cleaned
the mess but the Future overcoat had to be re-done.
Hint #1: Masking media is
more easily and cleanly removed by first GENTLY warming with a hair dryer. Hint
#2: Don’t GENTLY warm too much.
I’m sure you can all figure out how I reached the latter conclusion.
Absence did not make the heart grow fonder for this build, but it did
make the foil adhesive grow fonder for its plastic substrate. Removing the mask
left lots of gloppy stuff on the formerly pristine window panes.
Surgical swabbing with Microbrushes dipped in pine oil eventually cleaned
the mess but the Future overcoat had to be re-done.
Hint #1: Masking media is
more easily and cleanly removed by first GENTLY warming with a hair dryer. Hint
#2: Don’t GENTLY warm too much.
I’m sure you can all figure out how I reached the latter conclusion.
Since no decals were included for the A variant, markings had to come
from the spares box. I needed a
simple scheme; no fancy-schmancy invasion stripes, no nose art, no fuselage or
tail codes. Lo and behold, right on
the first page of the op-cited Box Seat book was a shot of an L-5 wearing only
pre-war insignia (ball-in-star-in-ball).
I had tucked away several sheets of those roundels in various sizes.
The “Old Glory” rudder stripes might pose a challenge; but lo again and
behold again, right on the top of the spares box were not one but two sets that
with a tad of trimming and a dollop of fill-in with red and white paint fit
perfectly. Things were going too smoothly. The styrene gremlins had to be
cooking up something.
| FINAL CONSTRUCTION |
After making everything even shinier with another few coats of Future, it
was into the final stretch by attaching the wing panels.
Clear epoxy seemed the safest choice.
I had a tube of Gorilla Glue 5-Minute stuff that was part of a
consolation collection of glues that the company had sent in reply to a
complaint about one of their other adhesives: “Strongest Wood Glue On Earth”
that turned out to be plain old Elmer’s white stuff.
I should have known better than to trust to a suspect product a project
as precious as a model airplane.
The fuselage and wings were lined up in a jig cut from a Styrofoam block. The
proper proportions of Parts A and B were stirred for the prescribed period. The
room temperature was warmed to the optimum level. A thin bead was applied to
each of the wing roots and the excess epoxy was left in a test glob to indicate
when it was safe to resume construction.
 Five minutes later it hadn’t even thought of thickening.
I checked the label. Yup,
right there in big bold neon letters it screamed: “SETS IN 5 MINUTES!”. But
the fine print said “Leave undisturbed for 90 minutes.” An hour and a
half later the test glob was just starting to form a skin.
By morning it was the consistency of Jello. Warm Jello. When I returned
in the evening it was still soft and tacky. Gorillas must be the most patient
model builders on the planet, but their glue was making me go ape and I decided
to stop monkeying around.
Five minutes later it hadn’t even thought of thickening.
I checked the label. Yup,
right there in big bold neon letters it screamed: “SETS IN 5 MINUTES!”. But
the fine print said “Leave undisturbed for 90 minutes.” An hour and a
half later the test glob was just starting to form a skin.
By morning it was the consistency of Jello. Warm Jello. When I returned
in the evening it was still soft and tacky. Gorillas must be the most patient
model builders on the planet, but their glue was making me go ape and I decided
to stop monkeying around.
I pulled the wings off (didn’t take much pulling), scraped the glop off
the mating surfaces and went back to my old standard tube glue. By the next
morning the join was firm enough to continue, but despite the use of a jig, some
of the dihedral had sagged out. The kit supplied wing struts are a bit difficult
to clean up so I made new ones from Evergreen rods that were scraped and sanded
down into an airfoil shape. Plastruct used to make such extrusions in several
sizes but the LHS had never even heard of that company.
The kit supplied fixed pitch prop could also use a bit of scraping and
sanding to make it more convincing but by the time I reached that part I just
wanted to get the damned thing off the bench and onto a shelf so I could go back
to doing some real construction. All the other fiddly bits got stuck on and an
antenna wire of monofilament thread brought the proceedings to a close.
| CONCLUSIONS |
CONCLUSION #2: Playing with plastic
really is a silly way for a grown man to spend his time, but I will have to
wrangle a Secret Model Airplane Building Room into the new
house.
If you would like your product reviewed fairly and fairly quickly, please contact the editor or see other details in the Note to Contributors.