Pavla 1/72 TBY-1 Sea Wolf
| KIT #: | 72038 |
| PRICE: | AUD $38.00 |
| DECALS: | Three options |
| REVIEWER: | Peter Hobbins |
| NOTES: | Short run multimedia kit with additional resin set |
| HISTORY |
The failure of the Vought TBU/Consolidated
TBY to enter large-scale service illustrates both the successes and failures of
the US wartime mass production system. Design work on the TBU – a fast, 3-seat
torpedo bomber – began in 1940, with a prototype flying in late 1941 (just four
months after the Grumman TBM Avenger prototype). The Vought aircraft was 30 mph
faster than the 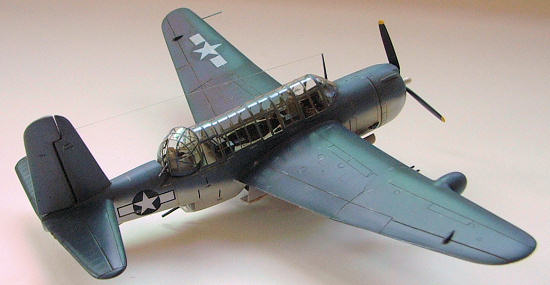 Avenger, mainly on account of the extra horsepower from its
R2800 engine, but thereafter things just never quite ‘happened’ for the type.
Despite the US Navy giving the project a green light to the order of 1100
machines, Vought was already in panic stations trying to pump out F4U Corsairs
and so the program was switched to Consolidated (thus being renamed TBY).
Avenger, mainly on account of the extra horsepower from its
R2800 engine, but thereafter things just never quite ‘happened’ for the type.
Despite the US Navy giving the project a green light to the order of 1100
machines, Vought was already in panic stations trying to pump out F4U Corsairs
and so the program was switched to Consolidated (thus being renamed TBY).
There were some teething troubles during development, and by the time the engineering work had been transferred to the new manufacturer, a massive new factory built and a workforce trained, the urgency had passed. The TBM had been in service since 1942 and was doing very nicely in the role, thank you very much. The TBY was still produced in small numbers (180) and did serve with the USN, but never operationally. By most accounts it was a fine and capable machine – the USN just found it had what it wanted in the TBM and Grumman pumped them out by the thousands when they were needed most. The TBY (nobody seems to have called it the ‘Sea Wolf’) did not survive long after the war and now only a few small pieces remain to commemorate what could otherwise have been a major combat type.
| THE KIT |
The TBY has previously
existed as a nice vacform kit from Wings, but a few years back Pavla brought out
this limited-run injection molded kit. This includes 71 injected and 23 resin
pieces, plus a clear vacform canopy sheet. The plastic is typical Pavla –
darkish 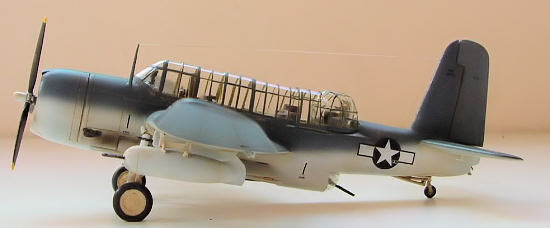 gray with slightly too fine panel lines (some fade away or are
indistinct) and underdone control surface scribing. The resin is nice and
consists of many small details such as undercarriage wells, wheels, engine face,
propeller hub, machine guns and actuator arms. The vacform canopy is extremely
thick – almost as solid as an injection-molded part – and the transparency
suffers a bit for it. It’s also so thick that you would have a very difficult
time opening up all of the sliding hoods, and even if you did they probably
wouldn’t sit correctly on top of each other. I’m normally a big fan of vac
canopies so this was something of a disappointment. (For this model I also
bought the Pavla interior set which includes a full cockpit and bomb-bay tub,
turret details and another canopy – unfortunately identical to the one from the
kit.) The 16-page A5 instruction booklet is very well illustrated and includes
useful alignment and detail sketches – always a strength of Pavla kits. The
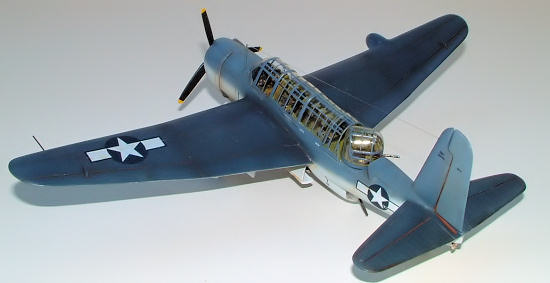
decals allow for three options – one in the three-tone scheme and two in
midnight blue – including relevant stencils.
gray with slightly too fine panel lines (some fade away or are
indistinct) and underdone control surface scribing. The resin is nice and
consists of many small details such as undercarriage wells, wheels, engine face,
propeller hub, machine guns and actuator arms. The vacform canopy is extremely
thick – almost as solid as an injection-molded part – and the transparency
suffers a bit for it. It’s also so thick that you would have a very difficult
time opening up all of the sliding hoods, and even if you did they probably
wouldn’t sit correctly on top of each other. I’m normally a big fan of vac
canopies so this was something of a disappointment. (For this model I also
bought the Pavla interior set which includes a full cockpit and bomb-bay tub,
turret details and another canopy – unfortunately identical to the one from the
kit.) The 16-page A5 instruction booklet is very well illustrated and includes
useful alignment and detail sketches – always a strength of Pavla kits. The
decals allow for three options – one in the three-tone scheme and two in
midnight blue – including relevant stencils.
| CONSTRUCTION |
Like most Pavla kits, I’d
rate this model at about medium difficulty for a limited-run, single-engine
type. Some parts go together easily enough – such as the tailplanes and cockpit
area – but others were more problematic. The wheel wells are nicely cast in
resin, and are actually molded with a section of the forward underside of the
wing. In order to sit flush against the fuselage, the pouring lugs require
considerable sanding, to the point that the internal wall is almost paper thin.
One of mine actually tore 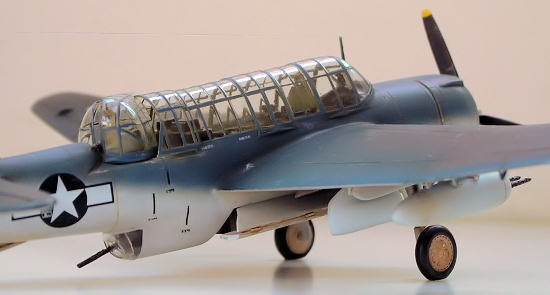 because I’d cut it too fine. The resin section then
has to be faired into the inner front of the wing and sanded flat, in order to
ensure a flush butt joint with the fuselage. This is very hard to achieve even
under normal circumstances, so in the end a fair bit of filler went into the
wing-to-fuselage join.
because I’d cut it too fine. The resin section then
has to be faired into the inner front of the wing and sanded flat, in order to
ensure a flush butt joint with the fuselage. This is very hard to achieve even
under normal circumstances, so in the end a fair bit of filler went into the
wing-to-fuselage join.
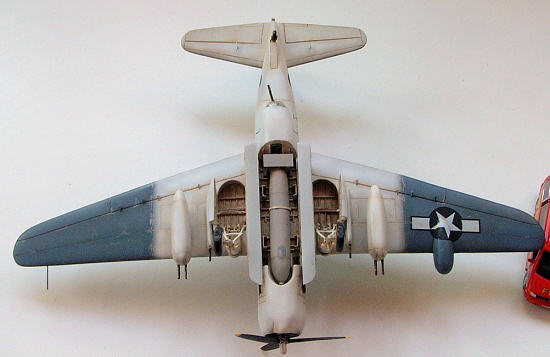
The cockpit out of the box is OK but benefits enormously from the extra resin set if you can get hold of it. It comes with almost all of the internal ‘boxes’, plus a very nicely detailed bomb-bay – someone at Pavla loves the TBY! Despite the thickness of the canopy, much cockpit detail can be seen under that long greenhouse so careful painting of the interior is for once rewarded! Curiously, while the cockpit and bomb-bay was easy to fit in, the forward bulkhead (which includes a cutout for the nose of the torpedo) was a very poor fit and took considerable sanding to correct. The bomb-bay doors come separate and are probably best posed open; I added a few small ‘hinges’ of stretched sprue along the fold lines.
The engine and undercarriage are also tricky. The bulkhead for the former is not very clearly located, so a process of trial and error is required to ensure that the front of the crankcase sits just proud of the lip of the cowling. This is made harder because the cowl ring is a separate piece – although it benefits from being cast in resin. Note that the instructions suggest attaching the cowl ring upside down – the front cover of the Ginter book on the TBY clearly shows the correct orientation. Pavla’s diagrams go a long way toward explaining the very complex undercart, but the modeler still has to scratchbuild several pieces and make it all sit symmetrically. Along with the integral gun pods, the underside of the wings gets very busy if you also add the bomb shackles (which I did) and the HVAR launchers (which I didn’t). Interestingly, the kit comes with the Douglas-designed twin .50 gun pods, but no other stores – if you want bombs, rockets or a torpedo, you’ll have to look elsewhere. I took a torpedo from ACE’s AM-1 Mauler kit, but had to remove a segment to make it fit the TBY’s bay.
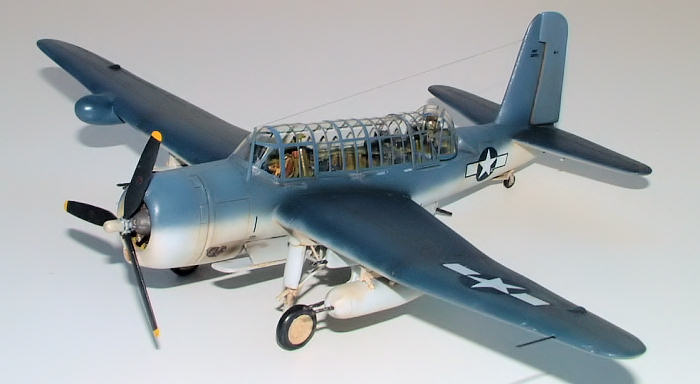
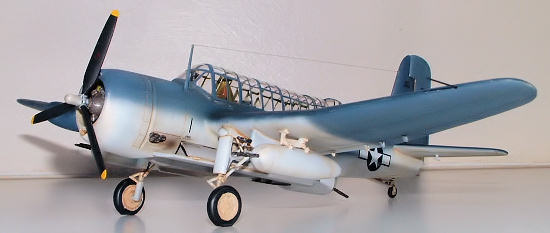 Now, back to that canopy!
Aside from being thick and hard to cut, it’s also too big! It is too long (if
you install it at the given length the turret won’t fit), too wide (it overhangs
the fuselage sides) and too high (it sits noticeably higher in profile than in
photos of the real thing). Now I’ve molded new canopies before, but if you think
I was going to attempt making a new canopy for this fully-glazed,
multiple-framed greenhouse, then you’re wrong! I bit the bullet and cut off the
final segment of the canopy. Then, after a wash with Future to prevent fogging,
I attached one side to the fuselage decking with white glue and then reinforced
it liberally with super glue. Once this was firm I taped the other side down
like mad and glued it in place. Then I glued the forward section, and masked the
whole thing (this sounds harder than it was – most of the panes are in two
standard sizes so I just cut out rectangles of Tamiya tape against a template
and the job went pretty fast). After masking, I then filled and sanded the
fuselage sides until the canopy was pretty well faired in. Only once that was
all done, the model painted and the turret installed did I come back and add the
final canopy segment – fitted so that it just allows the turret to fair in.
Phew!
Now, back to that canopy!
Aside from being thick and hard to cut, it’s also too big! It is too long (if
you install it at the given length the turret won’t fit), too wide (it overhangs
the fuselage sides) and too high (it sits noticeably higher in profile than in
photos of the real thing). Now I’ve molded new canopies before, but if you think
I was going to attempt making a new canopy for this fully-glazed,
multiple-framed greenhouse, then you’re wrong! I bit the bullet and cut off the
final segment of the canopy. Then, after a wash with Future to prevent fogging,
I attached one side to the fuselage decking with white glue and then reinforced
it liberally with super glue. Once this was firm I taped the other side down
like mad and glued it in place. Then I glued the forward section, and masked the
whole thing (this sounds harder than it was – most of the panes are in two
standard sizes so I just cut out rectangles of Tamiya tape against a template
and the job went pretty fast). After masking, I then filled and sanded the
fuselage sides until the canopy was pretty well faired in. Only once that was
all done, the model painted and the turret installed did I come back and add the
final canopy segment – fitted so that it just allows the turret to fair in.
Phew!
There are various small tubes, actuators and undercarriage parts that had to be added in the final stages before painting, including attaching the three propeller blades to the resin hub. These small pieces are designed to make masking the TBY a real chore if you don’t want to snap them off every few minutes!
| COLORS & MARKINGS |
The kit allows you to build
either the first TBY-2 in a tri-color scheme, a later TBY-2 from VT-154/155 in
overall blue, or the final TBY-2 at the ATTDTU, also in midnight blue. I find
overall blue a bit boring so the first machine it was. In trying to replicate
the very loose feathering of demarcation lines that are so well illustrated in
the Ginter book, I used minimal masking and sprayed freehand
 where possible.
This inevitably leads to some overspray, especially around the wing roots and
leading edges, so a few coats were required. I used Gunze acrylics for most of
the basic scheme, then Tamiya smoke to post-shade around panel lines and wing
roots. Getting paint in between the various gun pods and undercarriage doors was
also a challenge! Being a development aircraft the paintwork wasn’t too faded or
battered, but I couldn’t help adding some variation to the upper wing panels and
dirtying up the undercarriage bays (which are now a bit overdone). Photos of
this specific aircraft clearly show the rudder in a different shade of blue from
the rest of the fin, so I used a lightened tint for this part.
where possible.
This inevitably leads to some overspray, especially around the wing roots and
leading edges, so a few coats were required. I used Gunze acrylics for most of
the basic scheme, then Tamiya smoke to post-shade around panel lines and wing
roots. Getting paint in between the various gun pods and undercarriage doors was
also a challenge! Being a development aircraft the paintwork wasn’t too faded or
battered, but I couldn’t help adding some variation to the upper wing panels and
dirtying up the undercarriage bays (which are now a bit overdone). Photos of
this specific aircraft clearly show the rudder in a different shade of blue from
the rest of the fin, so I used a lightened tint for this part.
After a few coats of Future it was – as the wife says – ‘stickers time’. The kit decals were very nice and sit flat; only a few of the hand-hold lines caused me any grief by curling. They snuggled down even better with some Gunze Mr Mark Softer. After another coat of Future I ran a wash of raw umber oil paint over the panel lines (this helpfully shows up pale on very dark upper surface colors), then hit it with Testors Dullcote. After a few scratches with a silver pencil, the prop and final canopy section were attached and yee-haa, the TBY was done.
| CONCLUSIONS |
 Because of its ungainly and
unusual shape in an otherwise common paint scheme, the TBY draws glances from
modelers who aren’t quite sure what it is. I think a few were convinced it was a
‘what-if’ machine! I’ve always liked the look of the TBY and long wanted to make
one. In the end the effort was somewhat more than I’d anticipated, but having
built Pavla kits before I wasn’t completely surprised. Of all the elements, I
think the canopy was the major failing – a smaller and thinner clear vac canopy
would be of enormous benefit to this kit. If you’ve got a few limited-run kits
under your belt, then the end result comes out fine but it will certainly give
you some challenges along the way.
Because of its ungainly and
unusual shape in an otherwise common paint scheme, the TBY draws glances from
modelers who aren’t quite sure what it is. I think a few were convinced it was a
‘what-if’ machine! I’ve always liked the look of the TBY and long wanted to make
one. In the end the effort was somewhat more than I’d anticipated, but having
built Pavla kits before I wasn’t completely surprised. Of all the elements, I
think the canopy was the major failing – a smaller and thinner clear vac canopy
would be of enormous benefit to this kit. If you’ve got a few limited-run kits
under your belt, then the end result comes out fine but it will certainly give
you some challenges along the way.
| REFERENCES |
Steve Ginter with Bill Chana and Phil Prophett. XTBU-1 & TBY-2 Sea Wolf. Simi Valley: Steve Ginter, 1996.
July 2006
Copyright ModelingMadness.com. All rights reserved. No reproduction in any form without express permission from the editor.
If you would like your product reviewed fairly and fairly quickly, please contact the editor or see other details in the Note to Contributors.